The Cinematography of “Alder”

Back in February 2019 I spent a long day in Black Park, a forest behind Pinewood Studio, shooting a short film called Alder for director Vanda Ladeira. A little late perhaps, but here are my reflections on the cinematography and general experience of making this experimental fairytale.

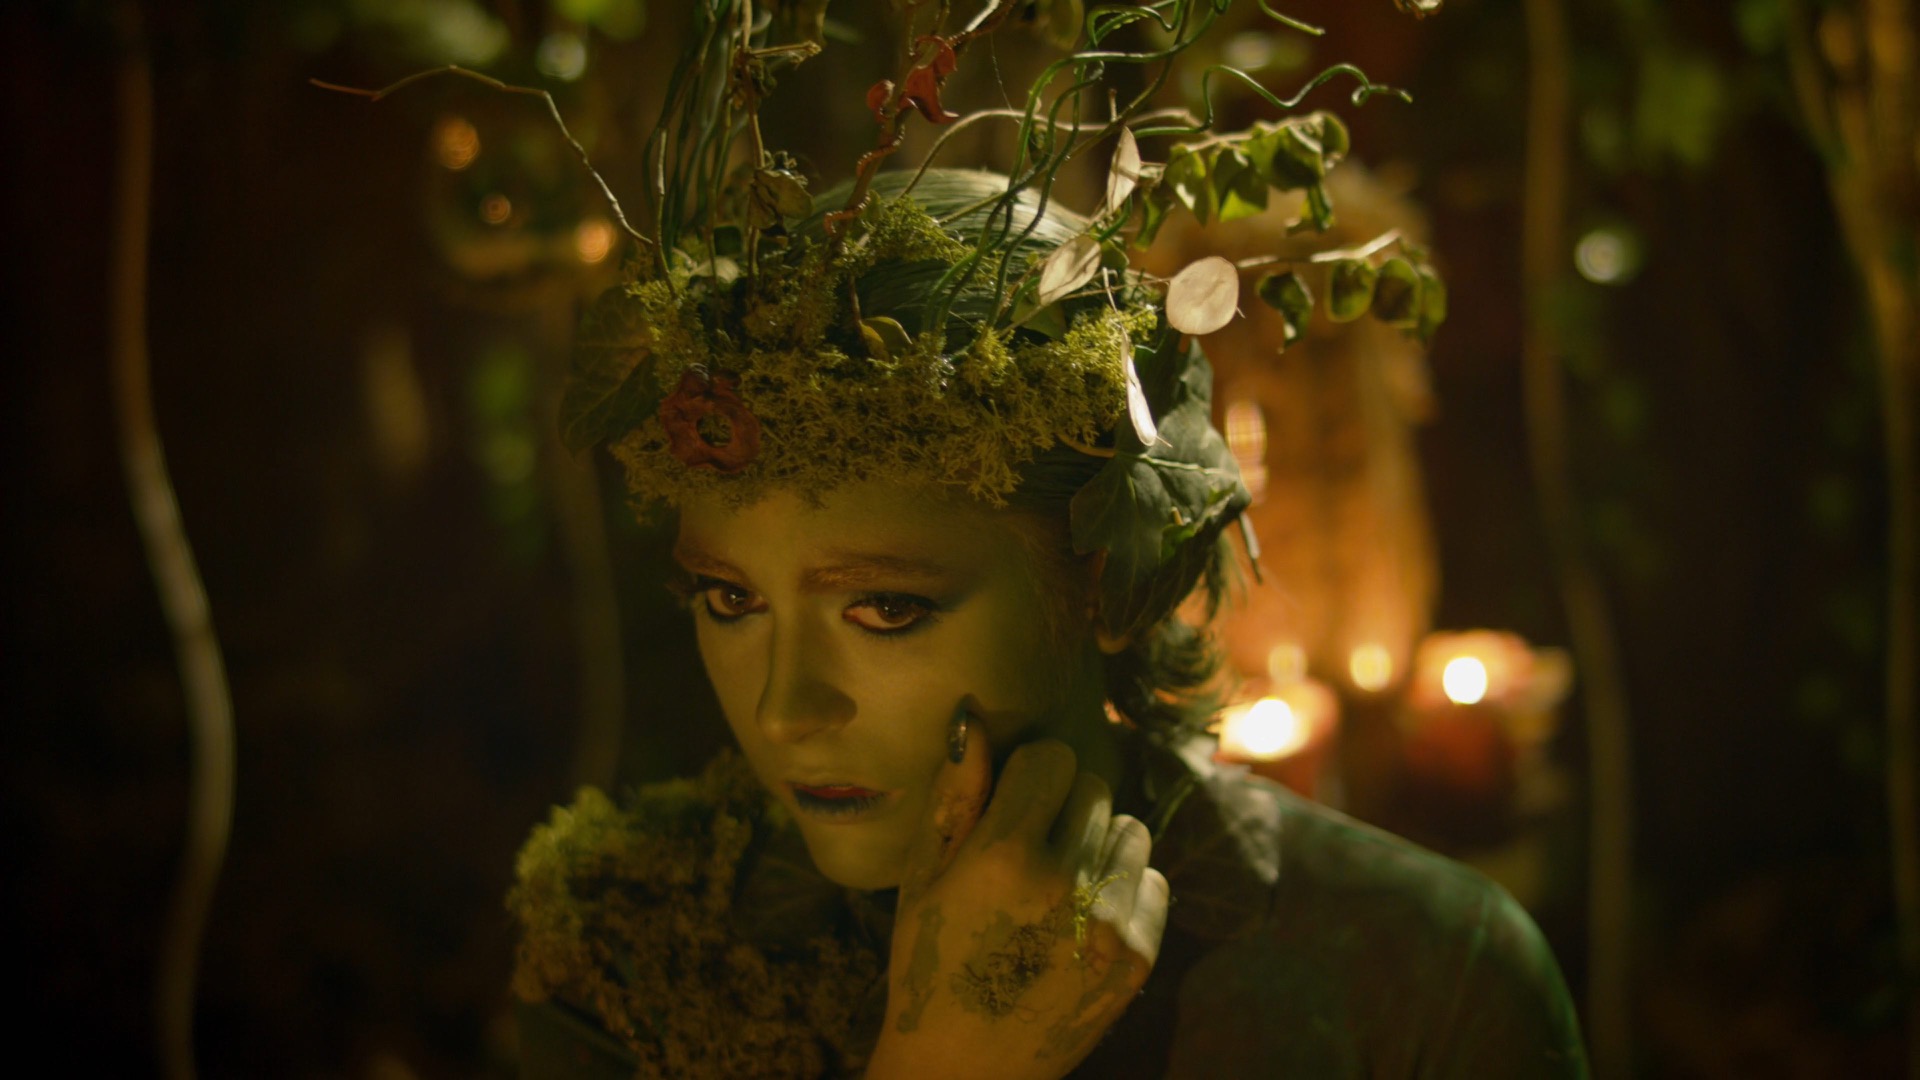
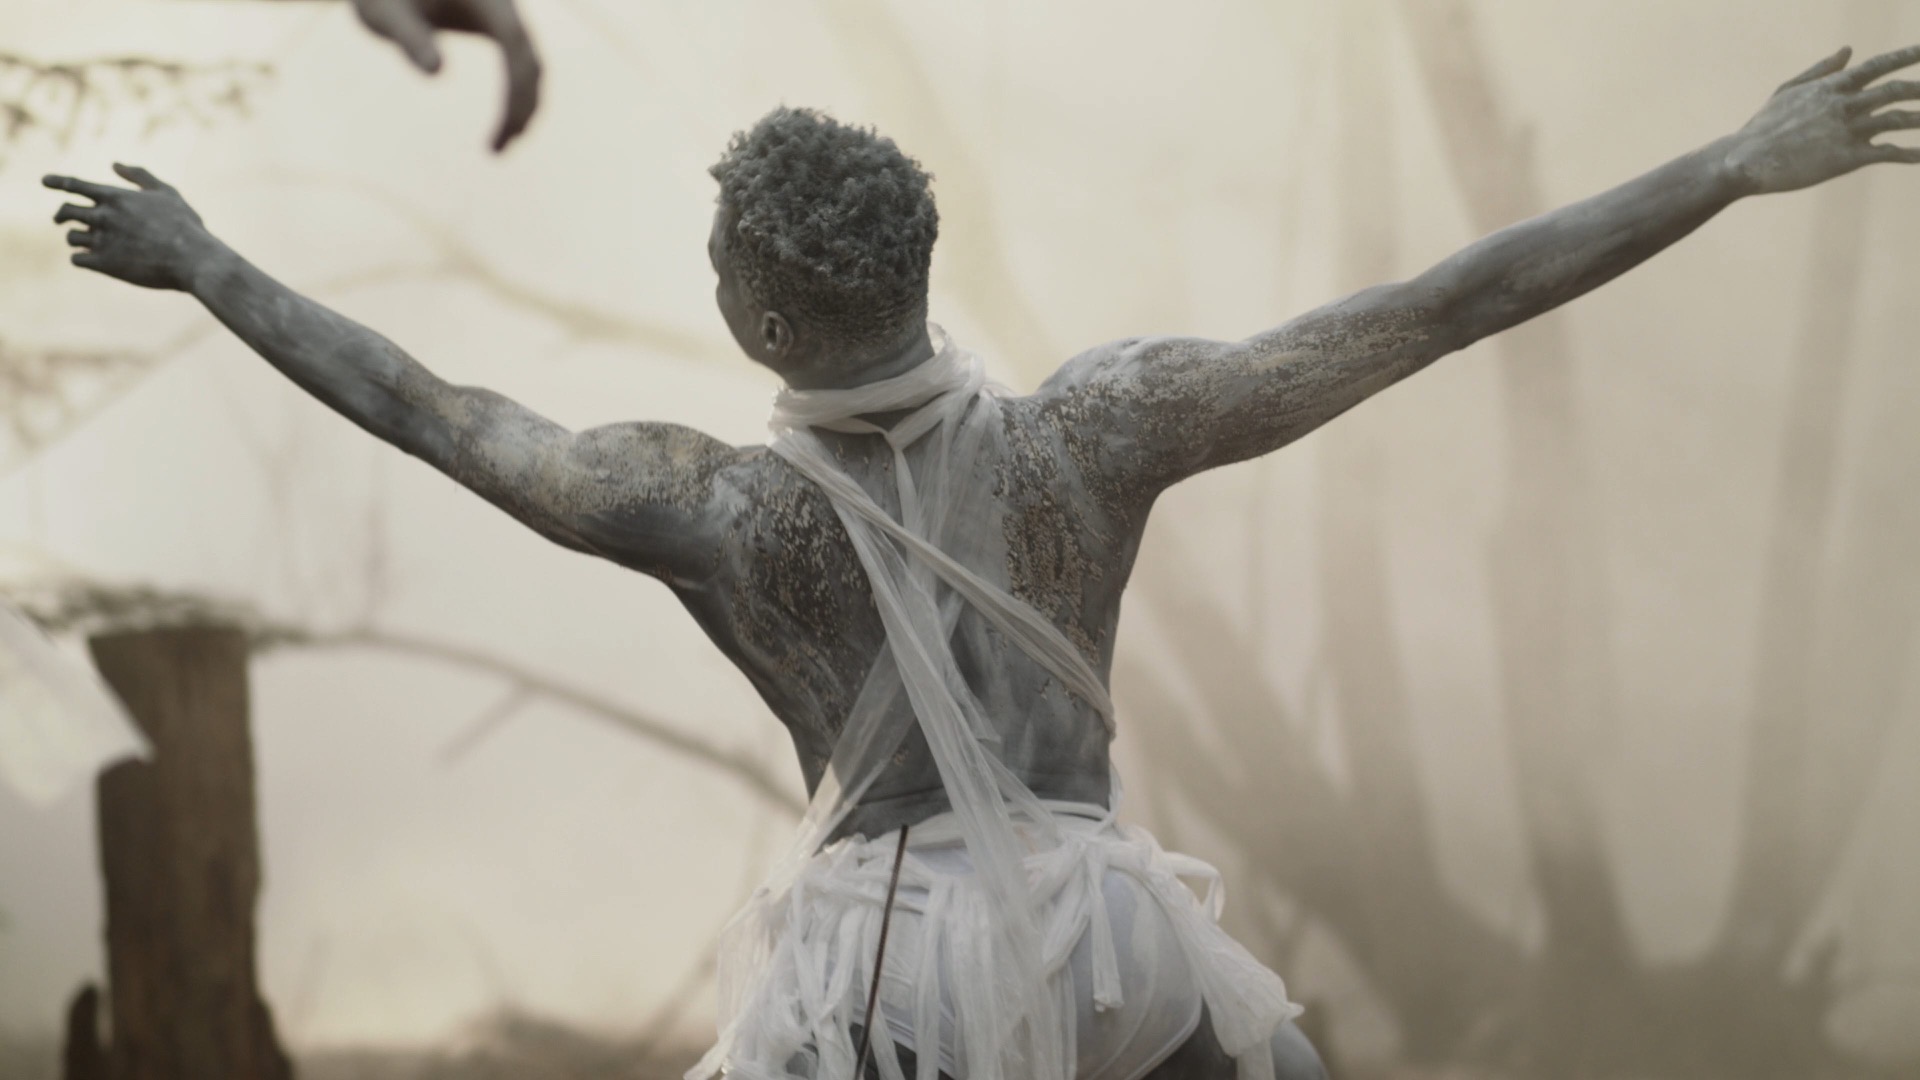
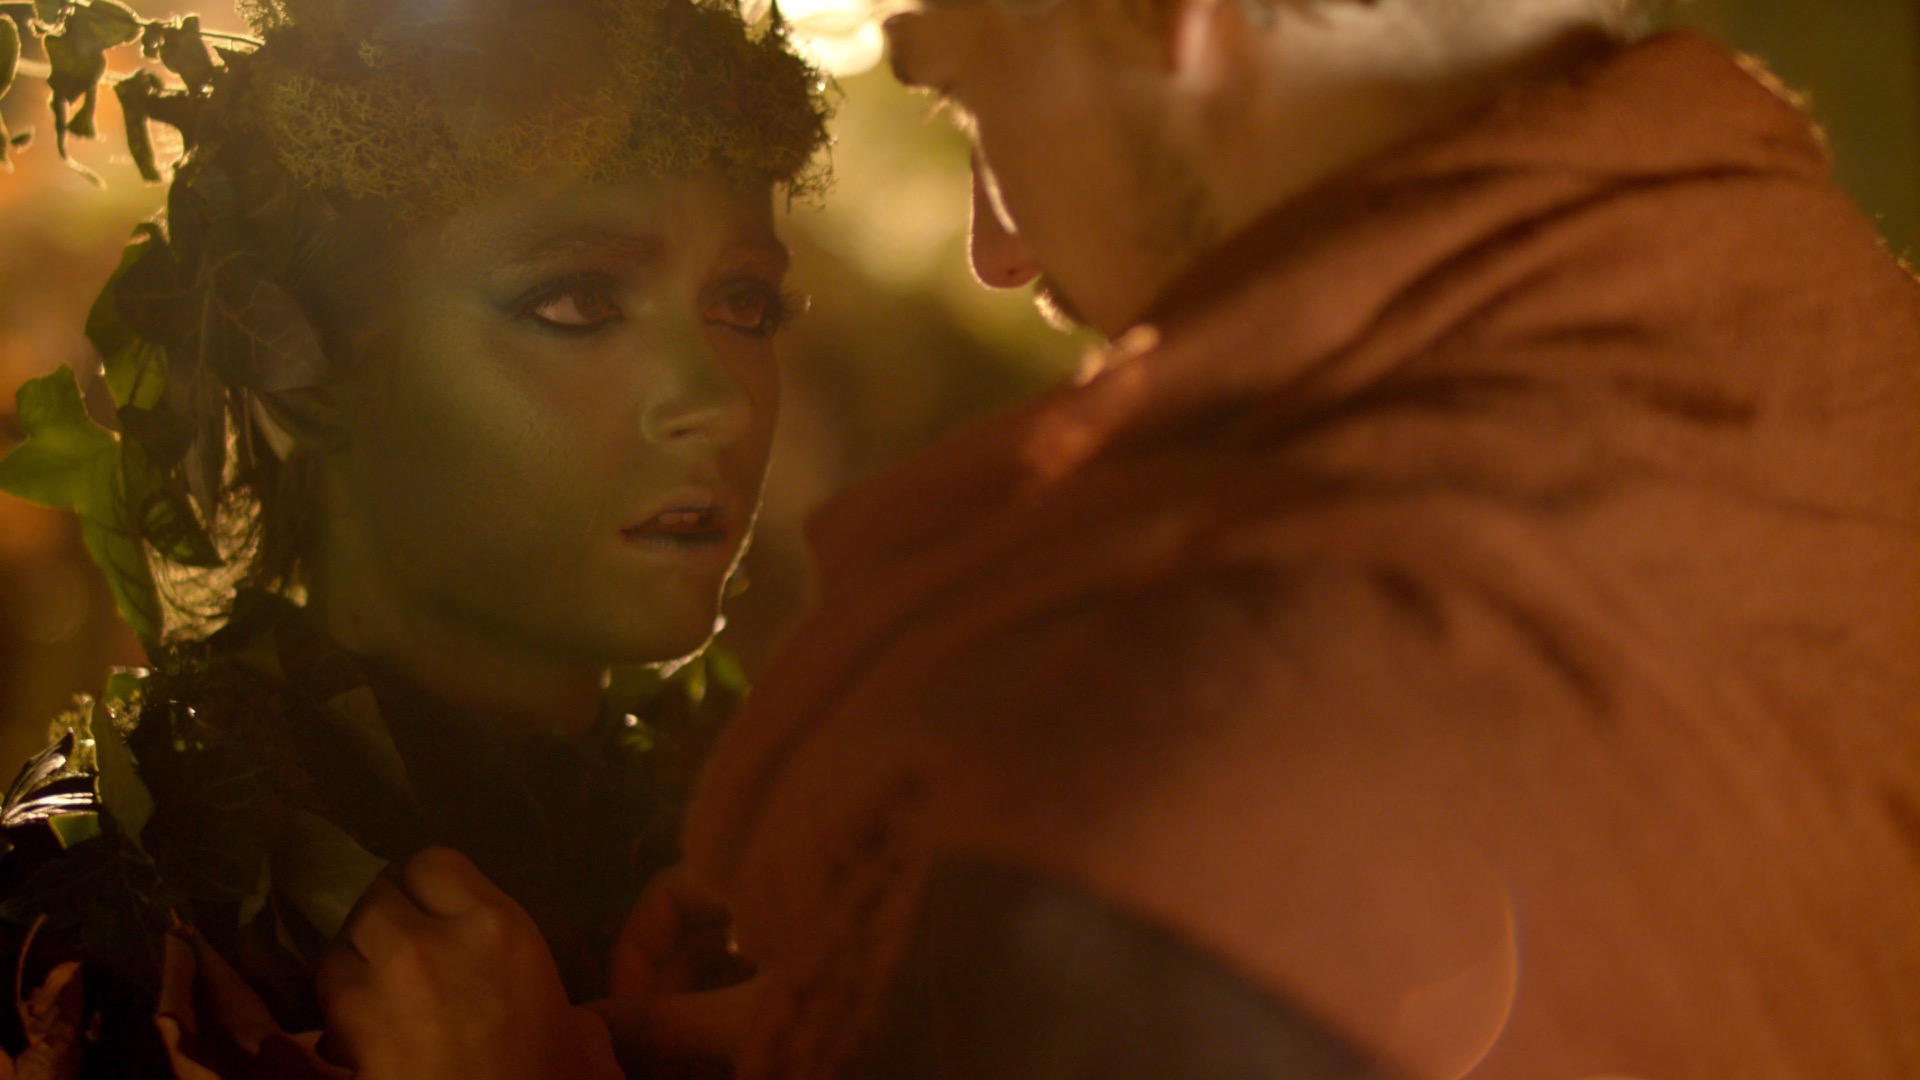
The film is about a forager (Odne Stenseth) who does not realise he is being watched by the very spirit of the forest, the titular Alder (Libby Welsh). As he cuts a sprig of holly, or steps on a mushroom, he is unknowingly causing her pain. Meanwhile a group of ghosts – Alder’s former victims? – cavort in the woodland, and strips of film made with ground-up human bone reach out from the trees to ensnare the forager.

Vanda contacted me after seeing my work on Ren: The Girl with the Mark. She was keen for Alder’s lair to have the same feel as Karn’s house in that series. We had a number of meetings to discuss the tone, visuals and the logistics of the shoot, which initially was going to take place over two days but was eventually compressed to one.

In October 2018 we conducted a recce in a forest that we ultimately weren’t able to use. I remember at the time that I was considering shooting the project on celluloid, tying in with the plot point about Alder making film from her victims’ bones. I dropped the idea after taking light readings on that recce – when it was very overcast – and realising just how dark it could be under the tree canopy.

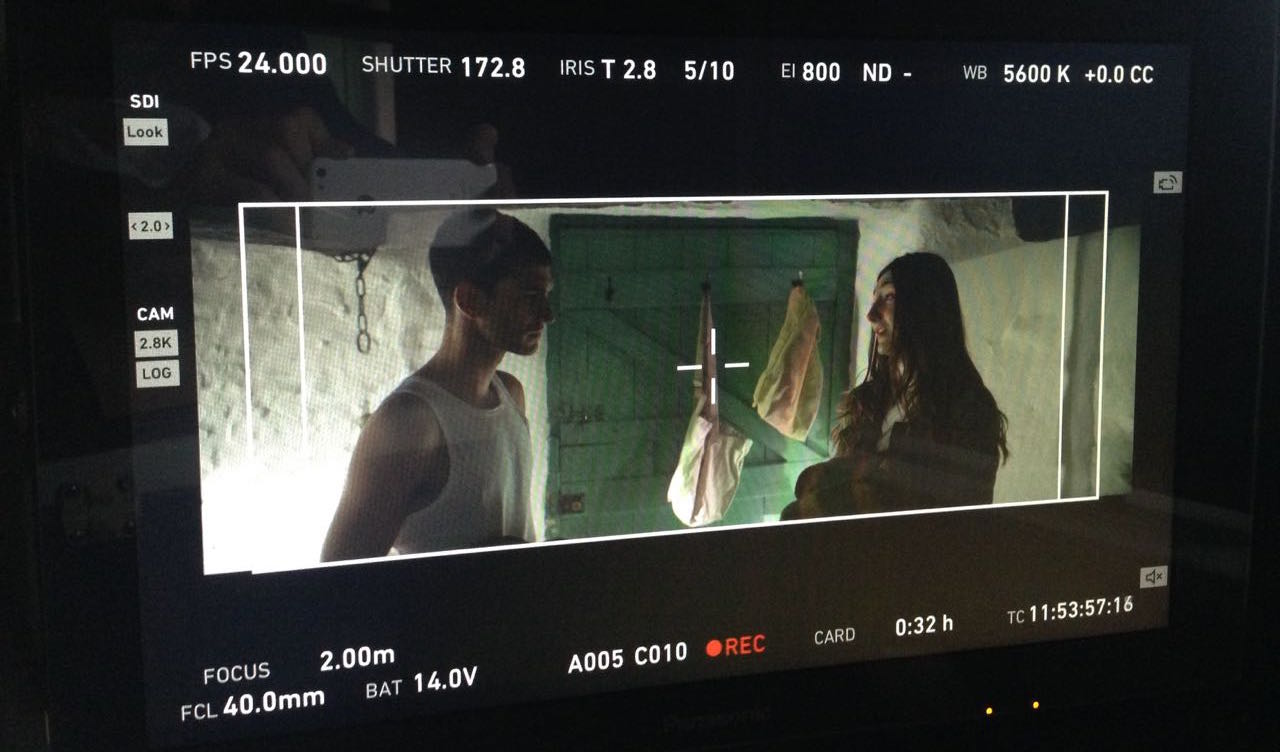
We ultimately shot on a Blackmagic Ursa Mini and Xeen primes, provided along with the lighting kit by gaffer Jeremy Dawson. The Blackmagic sensors seem to do very well with earthy tones, as I noticed on the village set of Ren, and the Ursa rendered the browns of the bracken, the soil and the forager’s costume nicely. Jeremy also provided us with a jib which enabled us to underscore the forager’s action with some definite moves: an introductory crane down; a dramatic pull up as he drives his knife into a tree; and a frantic boom down with him as he searches for his lost compass. In Alder’s lair we kept the camera drifting from side to side or up and down to bring energy to her more static scenes.

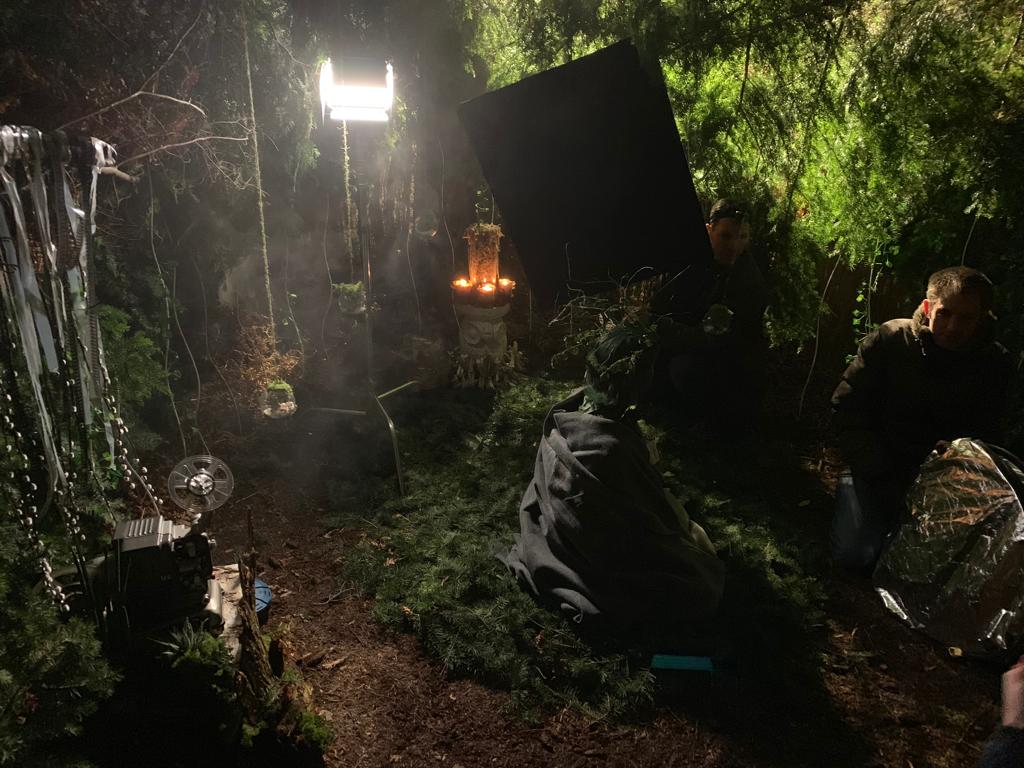
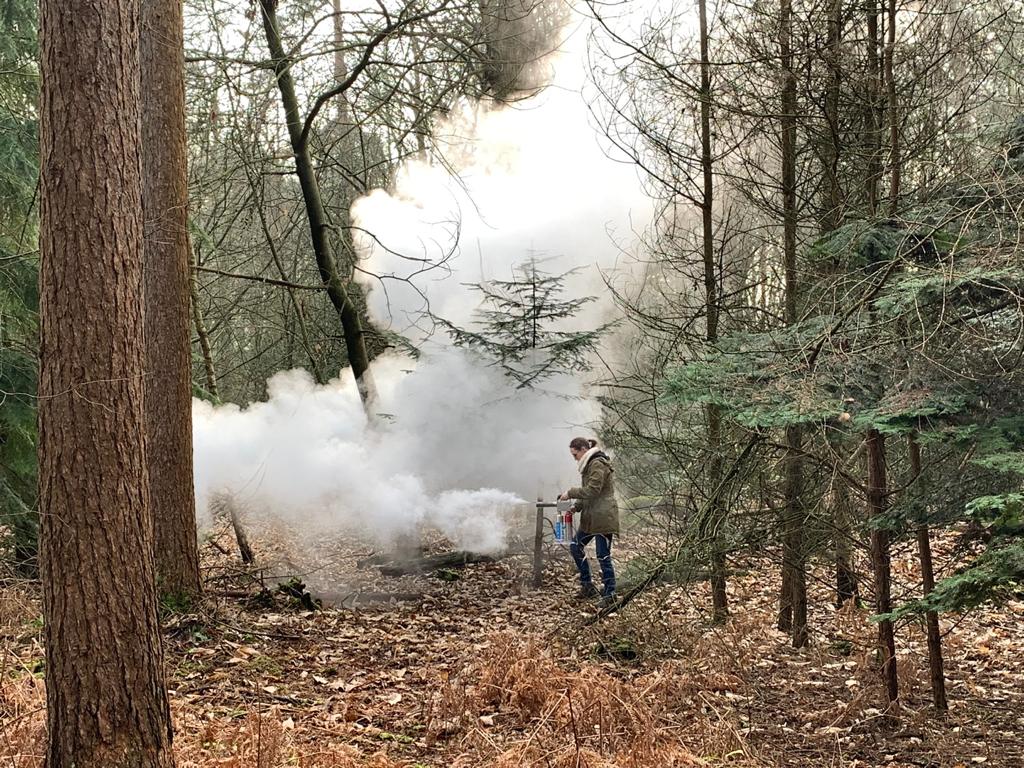
Lighting for the forager’s scenes was all natural, with just a little bounce or negative fill from time to time to keep some shape to the image. An Artem smoke gun, operated by Claire Finn, was used on almost every shot to give the forest some life and mystery, and also to keep the backgrounds from getting too busy; the grey wall of smoke serves to fade the background slightly, keeping the eye focused on the foreground action.

As there was no dialogue, I was free to change the frame rate expressively. Examples include: over-cranking close-ups of the forager’s feet and hands in contact with nature, emphasing the sensuality of his unwitting connection to Alder; over-cranking the dance of the ghosts to make their movements even more beautiful and supernatural; and under-cranking the forager slightly to enhance his panic when he finds himself lost and surrounded.

Alder’s lair was a set built by Denisa Dumitrescu in the forest. I took broadly the same approach to lighting it as I had for the reference scene from Ren, making some holes in the branch-covered roof and shining a blinder (a bank of four LED spotlights) through it to produce dappled shafts of sunlight. On the floor around Alder were a number of candles; we beefed up the light from these by skipping an 800W tungsten lamp off a bounce board on the floor.

The biggest challenge was the meeting between the two main characters, a scene scripted for daylight which we were forced to shoot after dark due to running behind schedule. It was the longest and most important scene in the film and suddenly the cinematography had to be completely improvised. We did not have anywhere near the lighting package that a woodland night exterior normally calls for – just 800W tungsten lamps, a few LED fixtures, and a generator only powerful enough to run one of each.

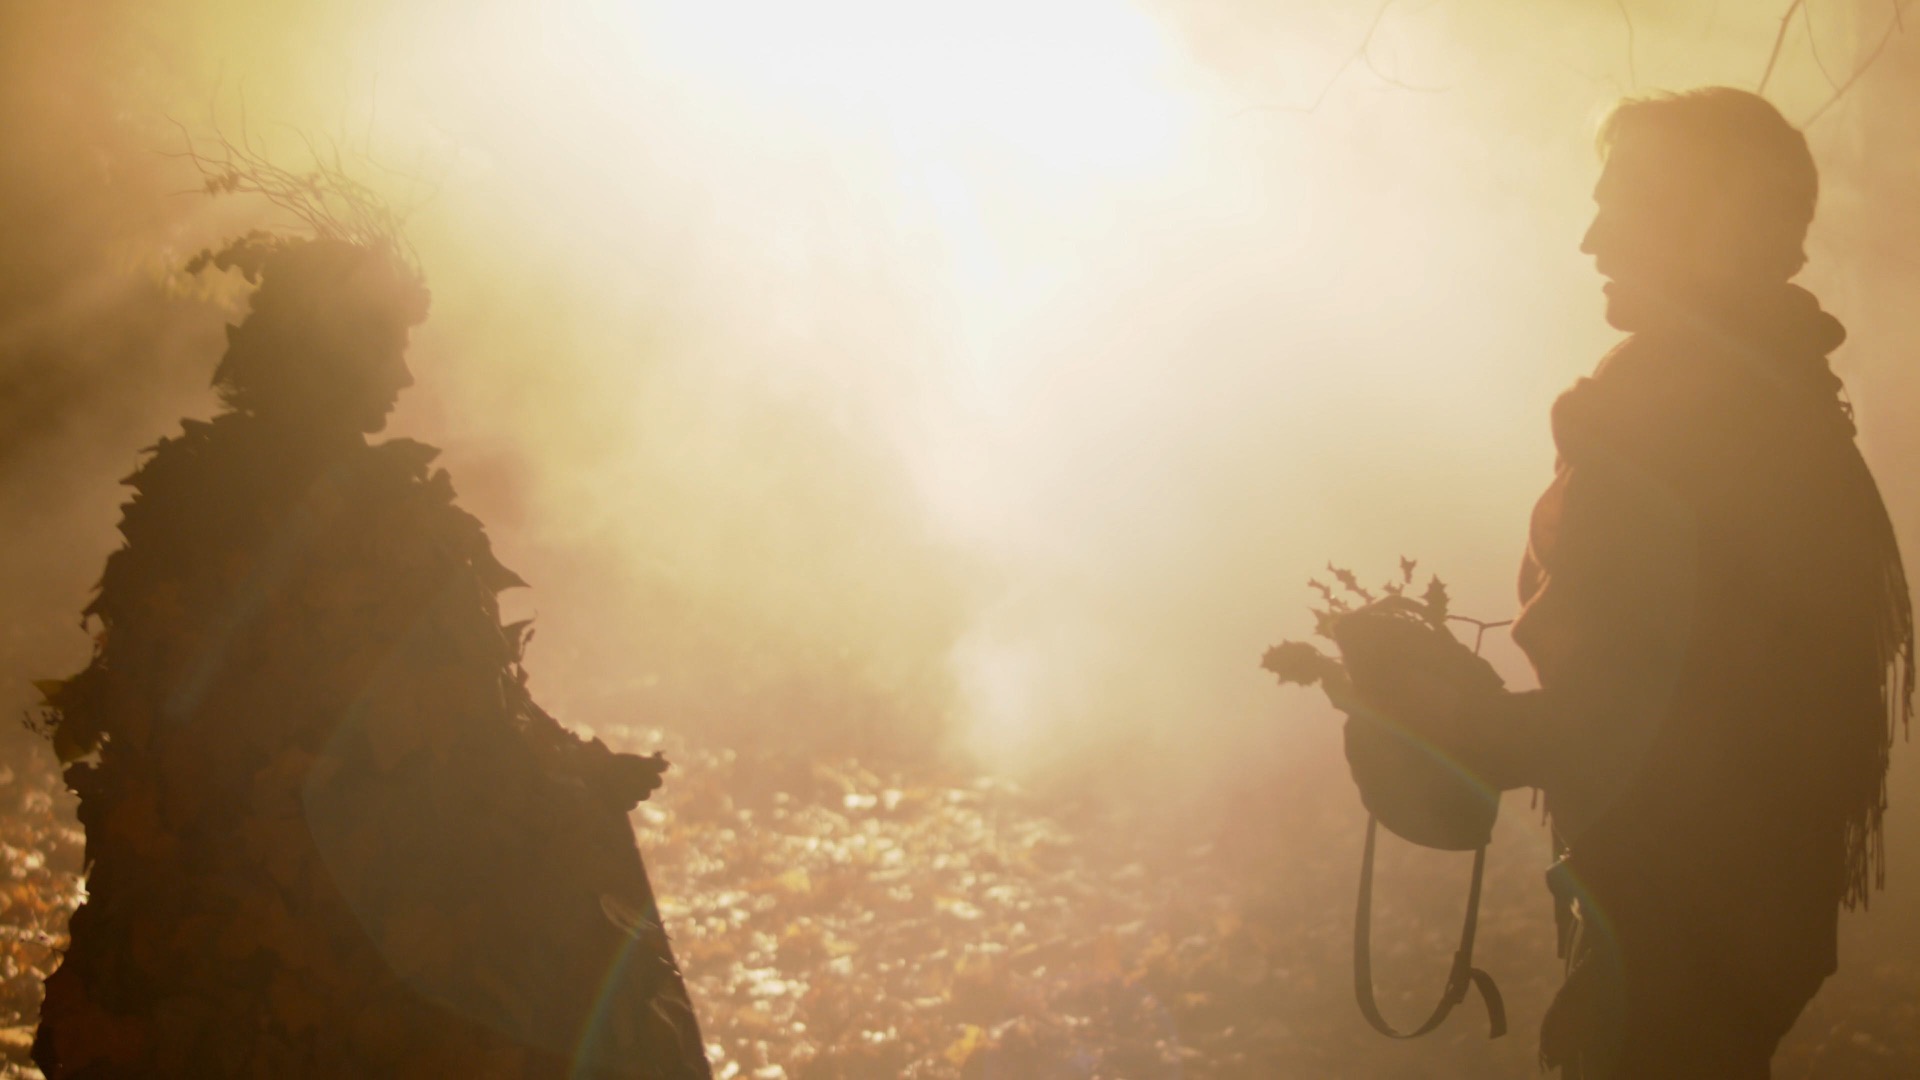
What I ended up doing was putting an 800 in the background, ostensibly as a setting sun, and bouncing a blinder off poly-board as fill. We shot the whole scene through in a single handheld shot, once with smoke and once without, then picked up a few close-ups.I tried to hide the lack of light in the background by allowing the 800 to flare the lens and render the smoke almost impenetrable at times. Vanda and her editor, Tom Chandler, leant into the strange, stylised look and bravely intercut the smoky and smokeless takes. The result is much more magical and expressive than what we would have shot if we had still had daylight.

You can watch the finished film here. It won me Best Cinematographer at the New York Cinematography Awards (August 2019) and Film Craft Award: Cinematography at Play Short International Film Awards (2019).

The Cinematography of “Alder”

24fps or 25fps, which is best?

The monitor overlays here show how “Annabel Lee” was shot at 24fps with a shutter angle of 172.8 to prevent flickering of non-incandescent light sources, a typical recipe for UK filmmakers today.

An article of mine from 2014 weighing the merits of shooting at 24 vs. 25 frames per second has recently been getting a lot of hits. I’m surprised that there’s still so much uncertainty around this issue, because for me it’s pretty clear-cut these days.

When I started out making films at the turn of the millennium, 25fps (or its interlaced variant, 50i) was the only option for video. The tapes ran at that speed and that was that. Cathode ray tube TVs were similarly inflexible, as was PAL DVD when it emerged.

Film could be shot at 24fps, and generally was for theatrical movies, since most cinema projectors only run at that speed, but film for television was shot at 25fps.

Three big technological shifts occurred in the late noughties: the delivery of video over the internet, flat-screen TVs and tapeless cameras. All of these support multiple frame rates, so gradually we found that we had a choice. At the start of a shoot, as a DP I would have to ask which frame rate to set.

The frame rate and resolution menu from my old Canon 600D, the first time I owned a camera that could shoot 24fps.

Americans and others in NTSC regions are in a different situation. Their TV standard of 30fps has a discernibly different look to the international movie standard of 24fps, so the choice of frame rate is as much creative as it is technical. I don’t think anyone can tell the difference between 24 and 25fps, even on a subconscious level, so in Europe it seems we must decide on a purely technical basis.

But in fact, the decision is as much about what people are used to as anything else. I shot a feature film pilot once on 35mm at 25fps and it really freaked out the lab simply because they weren’t used to it.

I shot the 35mm pilot for “The Dark Side of the Earth” (2008) at 25fps because tapes still played a part in postproduction at that time. Today I would not hesitate to shoot at 24.

And what people seem to be most used to and comfortable with in the UK today is 24fps. It offers the most compatibility with digital cinemas and Blu-ray without needing frame rate conversion. (Some cinemas can play 25fps DCPs, and Blu-rays support 25fps in a 50i wrapper which might not play in a lot of US machines, but 24 is always a safer bet for these formats.)

Historically, flickering of non-incandescent light sources and any TV screens in shot was a problem when shooting 24fps in the UK. These days it’s very easy to set your shutter to 172.8° (if your camera measures it as an angle) or 1/50th (if your camera measures it as an interval). This ensures that every frame – even though there are 24 of them per second – captures 1/50th of a second, in sync with the 50Hz mains supply.


The Times when 25fps is best

There are some situations in which 25fps is still the best or only option though, most notably when you’re shooting something intended primarily for broadcast on a traditional TV channel in the UK or Europe. The same goes if your primary distribution is on PAL DVD, which I know is still the case for certain types of corporate and educational videos.

Once I was puzzled by a director’s monitor not working on a short film shoot, and discovered that it didn’t support 24fps signals, so I had to choose 25 as my frame rate for that film. So it might be worth checking your monitors if you haven’t shot 24fps with them before.

“Finding Hope” was shot at 25fps simply because the director’s monitor wouldn’t accept 24fps signals.

Finally, if your film contains a lot of archive material or stock footage at 25fps, it makes sense to match that frame rate.

Whichever frame rate you ultimately choose, always discuss it with your postproduction team ahead of time to make sure that you’re all on the same page.

24fps or 25fps, which is best?

Exposure Part 3: Shutter

In the first two parts of this series we saw how exposure can be controlled using the lens aperture – with side effects including changes to the depth of field – and neutral density (ND) filters. Today we will look at another means of exposure control: shutter angle.


The Physical Shutters of Film Cameras

As with aperture, an understanding of what’s going on under the hood is useful, and that begins with celluloid. Let’s imagine we’re shooting on film at 24fps, the most common frame rate. The film can’t move continuously through the gate (the opening behind the lens where the focused light strikes the film) or we would end up recording just a long vertical streak of light. The film must remain stationary long enough to expose an image, before being moved on by a distance of four perforations (the standard height of a 35mm film frame) so that the next frame can be exposed. Crucially, light must not hit the film while it is being moved, or vertical streaking will occur.

Joram van Hartingsveldt, CC BY-SA 3.0

This is where the shutter comes in. The shutter is a portion of a disc that spins in front of the gate. The standard shutter angle is 180°, meaning that the shutter is a semi-circle. We always describe shutter angles by the portion of the disc which is missing, so a 270° shutter (admitting 1.5x the light of a 180° shutter) is a quarter of a circle, and a 90° shutter (admitting half the light of a 180° shutter) is three-quarters.

The shutter spins continuously at the same speed as the frame rate – so at 24fps the shutter makes 24 revolutions per second. So with a 180° shutter, each 24th of a second is divided into two halves, i.e. 48ths of a second:

  • During one 48th of a second, the missing part of the shutter is over the gate, allowing the light to pass through and the stationary film to be exposed.
  • During the other 48th of a second, the shutter blocks the gate to prevent light hitting the film as it is advanced. The shutter has a mirrored surface so that light from the lens is reflected up the viewfinder, allowing the camera operator to see what they’re shooting.


Intervals vs. Angles

If you come from a stills or ENG background, you may be more used to talking about shutter intervals rather than angles. The two things are related as follows:

Frame rate x (360 ÷ shutter angle) = shutter interval denominator

For example, 24 x (360 ÷ 180) = 48 so a film running at 24fps, shot with a 180° shutter, shows us only a 48th of a second’s worth of light on each frame. This has been the standard frame rate and shutter angle in cinema since the introduction of sound in the late 1920s. The amount of motion blur captured in a 48th of a second is the amount that we as an audience have been trained to expect from motion pictures all our lives.

A greater (larger shutter angle, longer shutter interval) or lesser (smaller shutter angle, shorter shutter interval) amount of motion blur looks unusual to us and thus can be used to creative effect. Saving Private Ryan features one of the best-known examples of a small shutter angle in its D-day landing sequence, where the lack of motion blur creates a crisp, hyper-real effect that draws you into the horror of the battle. The effect has been endlessly copied since then, to the point that it now feels almost mandatory to shoot action scenes with a small shutter angle.

Large shutter angles are less common, but the extra motion blur can imply a drugged, fatigued or dream-like state.

In today’s digital environment, only the Arri Alexa Studio has a physical shutter. In other cameras, the sensor’s photo-sites are allowed to charge with light over a certain period of time – still referred to as the shutter interval, even though no actual shutter is involved. The same principles apply and the same 180° angle of the virtual shutter is standard. The camera will allow you to select a shutter angle/interval from a number of options, and on some models like the Canon C300 there is a menu setting to switch between displaying the shutter setting as an angle or an interval.


When to Change the Shutter Angle

Sometimes it is necessary to change the shutter angle to avoid flickering. Some luminous devices, such as TV screens and monitors, or HMI lighting not set to flicker-free mode, will appear to strobe, pulse or roll on camera. This is due to them turning on and off multiple times per second, in sync with the alternating current of the mains power supply, but not necessarily in sync with the shutter. For example, if you shoot a domestic fluorescent lamp in the UK, where the mains AC cycles at 50Hz, your 1/48th (180° at 24fps) shutter will be out of sync and the lamp will appear to throb or flicker on camera. The solution is to set the shutter to 172.8° (1/50th), which is indeed what most DPs do when shooting features in the UK. Round multiples of the AC frequency like 1/100th will also work.

You may notice that I have barely mentioned exposure so far in this article. This is because, unlike stills photographers, DPs rarely use the shutter as a means of adjusting exposure. An exception is that we may increase the shutter angle when the daylight is fading, to grab an extra shot. By doubling the shutter angle from 172.8° to 345.6° we double the light admitted, i.e. we gain one stop. As long as there isn’t any fast movement, the extra motion blur is likely to go unnoticed by the audience.

One of the hallmarks of amateur cinematography is that sunny scenes have no motion blur, due to the operator (or the camera’s auto mode) decreasing the shutter interval to avoid over-exposure. It is preferable to use ND filters to cut light on bright days, as covered in part two of this series.

For the best results, the 180° (or thereabouts) shutter angle should be retained when shooting slow motion as well. If your camera displays intervals rather than angles, ideally your interval denominator should be double the frame rate. So if you want to shoot at 50fps, set the shutter interval to 1/100th. For 100fps, set the shutter to 1/200th, and so on.

If you do need to change the shutter angle for creative or technical reasons, you will usually want to compensate with the aperture. If you halve the time the shutter is open for, you must double the area of the aperture to maintain the same exposure, and vice versa. For example, if your iris was set to T4 and you change the shutter from 180° to 90° you will need to stop up to T2.8. (Refer back to my article on aperture if you need to refresh your memory about T-stops.)

In the final part of this series we’ll get to grips with ISO.

Learn more about exposure in my online course, Cinematic Lighting. Until this Thursday (19/11/20) you can get it for the special price of £15.99 by using the voucher code INSTA90.

Exposure Part 3: Shutter

What Does “Cinematic” Mean?

Earlier this year I undertook a personal photography project called Stasis. I deliberately set out to do something different to my cinematography work, shooting in portrait, taking the paintings of Dutch seventeenth century masters as my inspiration, and eschewing traditional lighting fixtures in favour of practical sources. I was therefore a little disappointed when I began showing the images to people and they described them as “cinematic”.

An image from “Stasis”

This experience made me wonder just what people mean by that word, “cinematic”. It’s a term I’ve heard – and used myself – many times during my career. We all seem to have some vague idea of what it means, but few of us are able to define it. 

Dictionaries are not much help either, with the Oxford English Dictionary defining it simply as “relating to the cinema” or “having qualities characteristic of films”. But what exactly are those qualities?

Shallow depth of field is certainly a quality that has been widely described as cinematic. Until the late noughties, shallow focus was the preserve of “proper” movies. The size of a 35mm frame (or of the digital cinema sensors which were then emerging) meant that backgrounds could be thrown way out of focus while the subject remained crisp and sharp. The formats which lower-budget productions had thereto been shot on – 2/3” CCDs and Super-16 film – could not achieve such an effect. 

Then the DSLR revolution happened, putting sensors as big as – or bigger than – those of Hollywood movies into the hands of anyone with a few hundred pounds to spare. Suddenly everyone could get that “cinematic” depth of field. 

My first time utilising the shallow depth of field of a DSLR, on a never-completed feature back in 2011.

Before long, of course, ultra-shallow depth of field became more indicative of a low-budget production trying desperately to look bigger than of something truly cinematic. Gradually young cinematographers started to realise that their idols chose depth of field for storytelling reasons, rather than simply using it because they could. Douglas Slocombe, OBE, BSC, ASC, cinematographer of the original Indiana Jones trilogy, was renowned for his deep depth of field, typically shooting at around T5.6, while Janusz Kaminski, ASC, when shooting Kingdom of the Crystal Skull, stopped down as far as T11.

There was also a time when progressive scan – the recording of discrete frames rather than alternately odd and even horizontal lines to make an interlaced image – was considered cinematic. Now it is standard in most types of production, although deviations from the norm of 24 or 25 frames per second, such as the high frame rate of The Hobbit, still make audiences think of reality TV or news, rejecting it as “uncinematic”.

Other distinctions in shooting style between TV/low-budget film and big-budget film have slipped away too. The grip equipment that enables “cinematic” camera movement – cranes, Steadicams and other stabilisers – is accessible now in some form to most productions. Meanwhile the multi-camera shooting which was once the preserve of TV, looked down upon by filmmakers, has spread into movie production.

A direct comparison may help us drill to the core of what is “cinematic”. Star Trek: Generations, the seventh instalment in the sci-fi film franchise, went into production in spring 1994, immediately after the final TV season of Star Trek: The Next Generation wrapped. The movie shot on the same sets, with the same cast and even the same acquisition format (35mm film) as the TV series. It was directed by David Carson, who had helmed several episodes of the TV series, and whose CV contained no features at that point.

Yet despite all these constants, Star Trek: Generations is more cinematic than the TV series which spawned it. The difference lies with the cinematographer, John A. Alonzo, ASC, one of the few major crew members who had not worked on the TV show, and whose experience was predominantly in features. I suspect he was hired specifically to ensure that Generations looked like a movie, not like TV.

The main thing that stands out to me when comparing the film and the series is the level of contrast in the images. The movie is clearly darker and moodier than the TV show. In fact I can remember my schoolfriend Chris remarking on this at the time – something along the lines of, “Now it’s a movie, they’re in space but they can only afford one 40W bulb to light the ship.” 

The bridge of the Enterprise D as seen on TV (top) and in the “Generations” movie (bottom).

It was a distinction borne of technical limitations. Cathode ray tube TVs could only handle a dynamic range of a few stops, requiring lighting with low contrast ratios, while a projected 35mm print could reproduce much more subtlety. 

Today, film and TV is shot on the same equipment, and both are viewed on a range of devices which are all good at dealing with contrast (at least compared with CRTs). The result is that, with contrast as with depth of field, camera movement and progressive scan, the distinction between the cinematic and the uncinematic has reduced. 

The cinematography of “Better Call Saul” owes much to film noir.

In fact, I’d argue that it’s flipped around. To my eye, many of today’s TV series – and admittedly I’m thinking of high-end ones like The Crown, Better Call Saul or The Man in the High Castle, not Eastenders – look more cinematic than modern movies. 

As my friend Chris had realised, the flat, high-key look of Star Trek: The Next Generation was actually far more realistic than that of its cinema counterpart. And now movies seem to have moved towards realism in the lighting, which is less showy and not so much moody for the sake of being moody, while TV has become more daring and stylised.

A typically moody and contrasty shot from “The Crown”

The Crown, for examples, blasts a 50KW Soft Sun through the window in almost every scene, bathing the monarchy in divine light to match its supposed divine right, while Better Call Saul paints huge swathes of rich, impenetrable black across the screen to represent the rotten soul of its antihero. 

Film lighting today seems to strive for naturalism in the most part. Top DPs like recent Oscar-winner Roger Deakins, CBE, ASC, BSC,  talk about relying heavily on practicals and using fewer movie fixtures, and fellow nominee Rachel Morrison, ASC, despite using a lot of movie fixtures, goes to great lengths to make the result look unlit. Could it be that film DPs feel they can be more subtle in the controlled darkness of a cinema, while TV DPs choose extremes to make their vision clear no matter what device it’s viewed on or how much ambient light contaminates it?

“Mudbound”, shot by Rachel Morrison, ASC

Whatever the reason, contrast does seem to be the key to a cinematic look. Even though that look may no longer be exclusive to movies released in cinemas, the perception of high contrast being linked to production value persists. The high contrast of the practically-lit scenes in my Stasis project is – as best I can tell – what makes people describe it as cinematic.

What does all of this mean for a filmmaker? Simply pumping up the contrast in the grade is not the answer. Contrast should be built into the lighting, and used to reveal and enhance form and depth. The importance of good production design, or at least good locations, should not be overlooked; shooting in a friend’s white-walled flat will kill your contrast and your cinematic look stone dead. 

A shot of mine from “Forever Alone”, a short film where I was struggling to get a cinematic look out of the white-walled location.

Above all, remember that story – and telling that story in the most visually appropriate way – is the essence of cinema. In the end, that is what makes a film truly cinematic.

SaveSave

What Does “Cinematic” Mean?