“The Little Mermaid”: Pools of Light

Although The Little Mermaid takes place mostly on dry land, there were some key scenes involving tanks and pools. These include the moment which introduces the audience to the mermaid herself, played by Poppy Drayton. Here are some extracts from my diary covering the challenges of creating a magical, fairytale look while filming in and around water.


Day 10

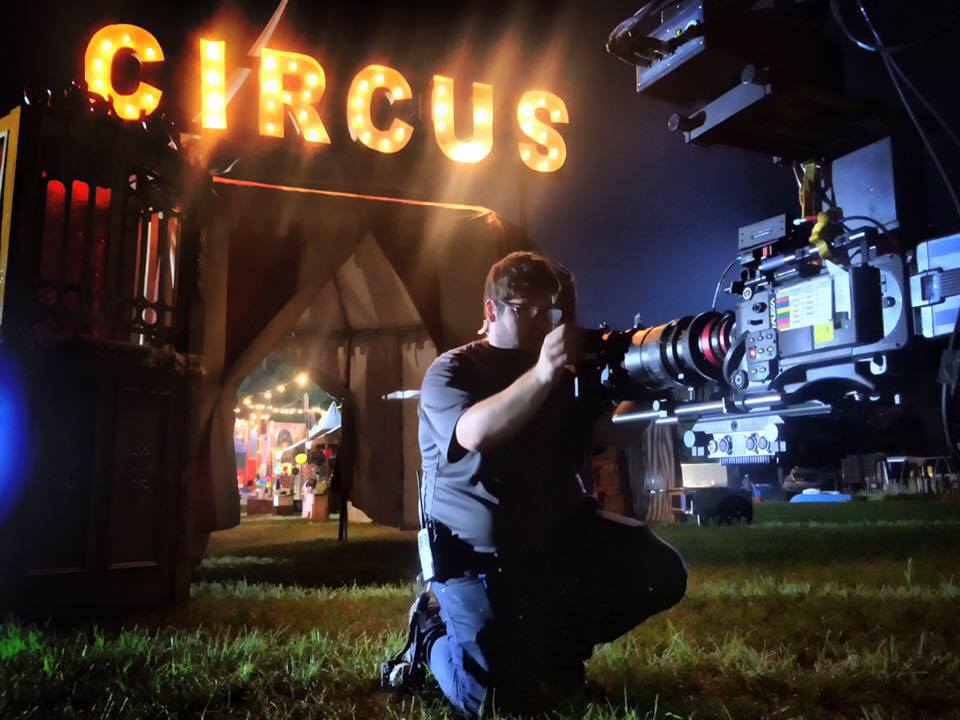
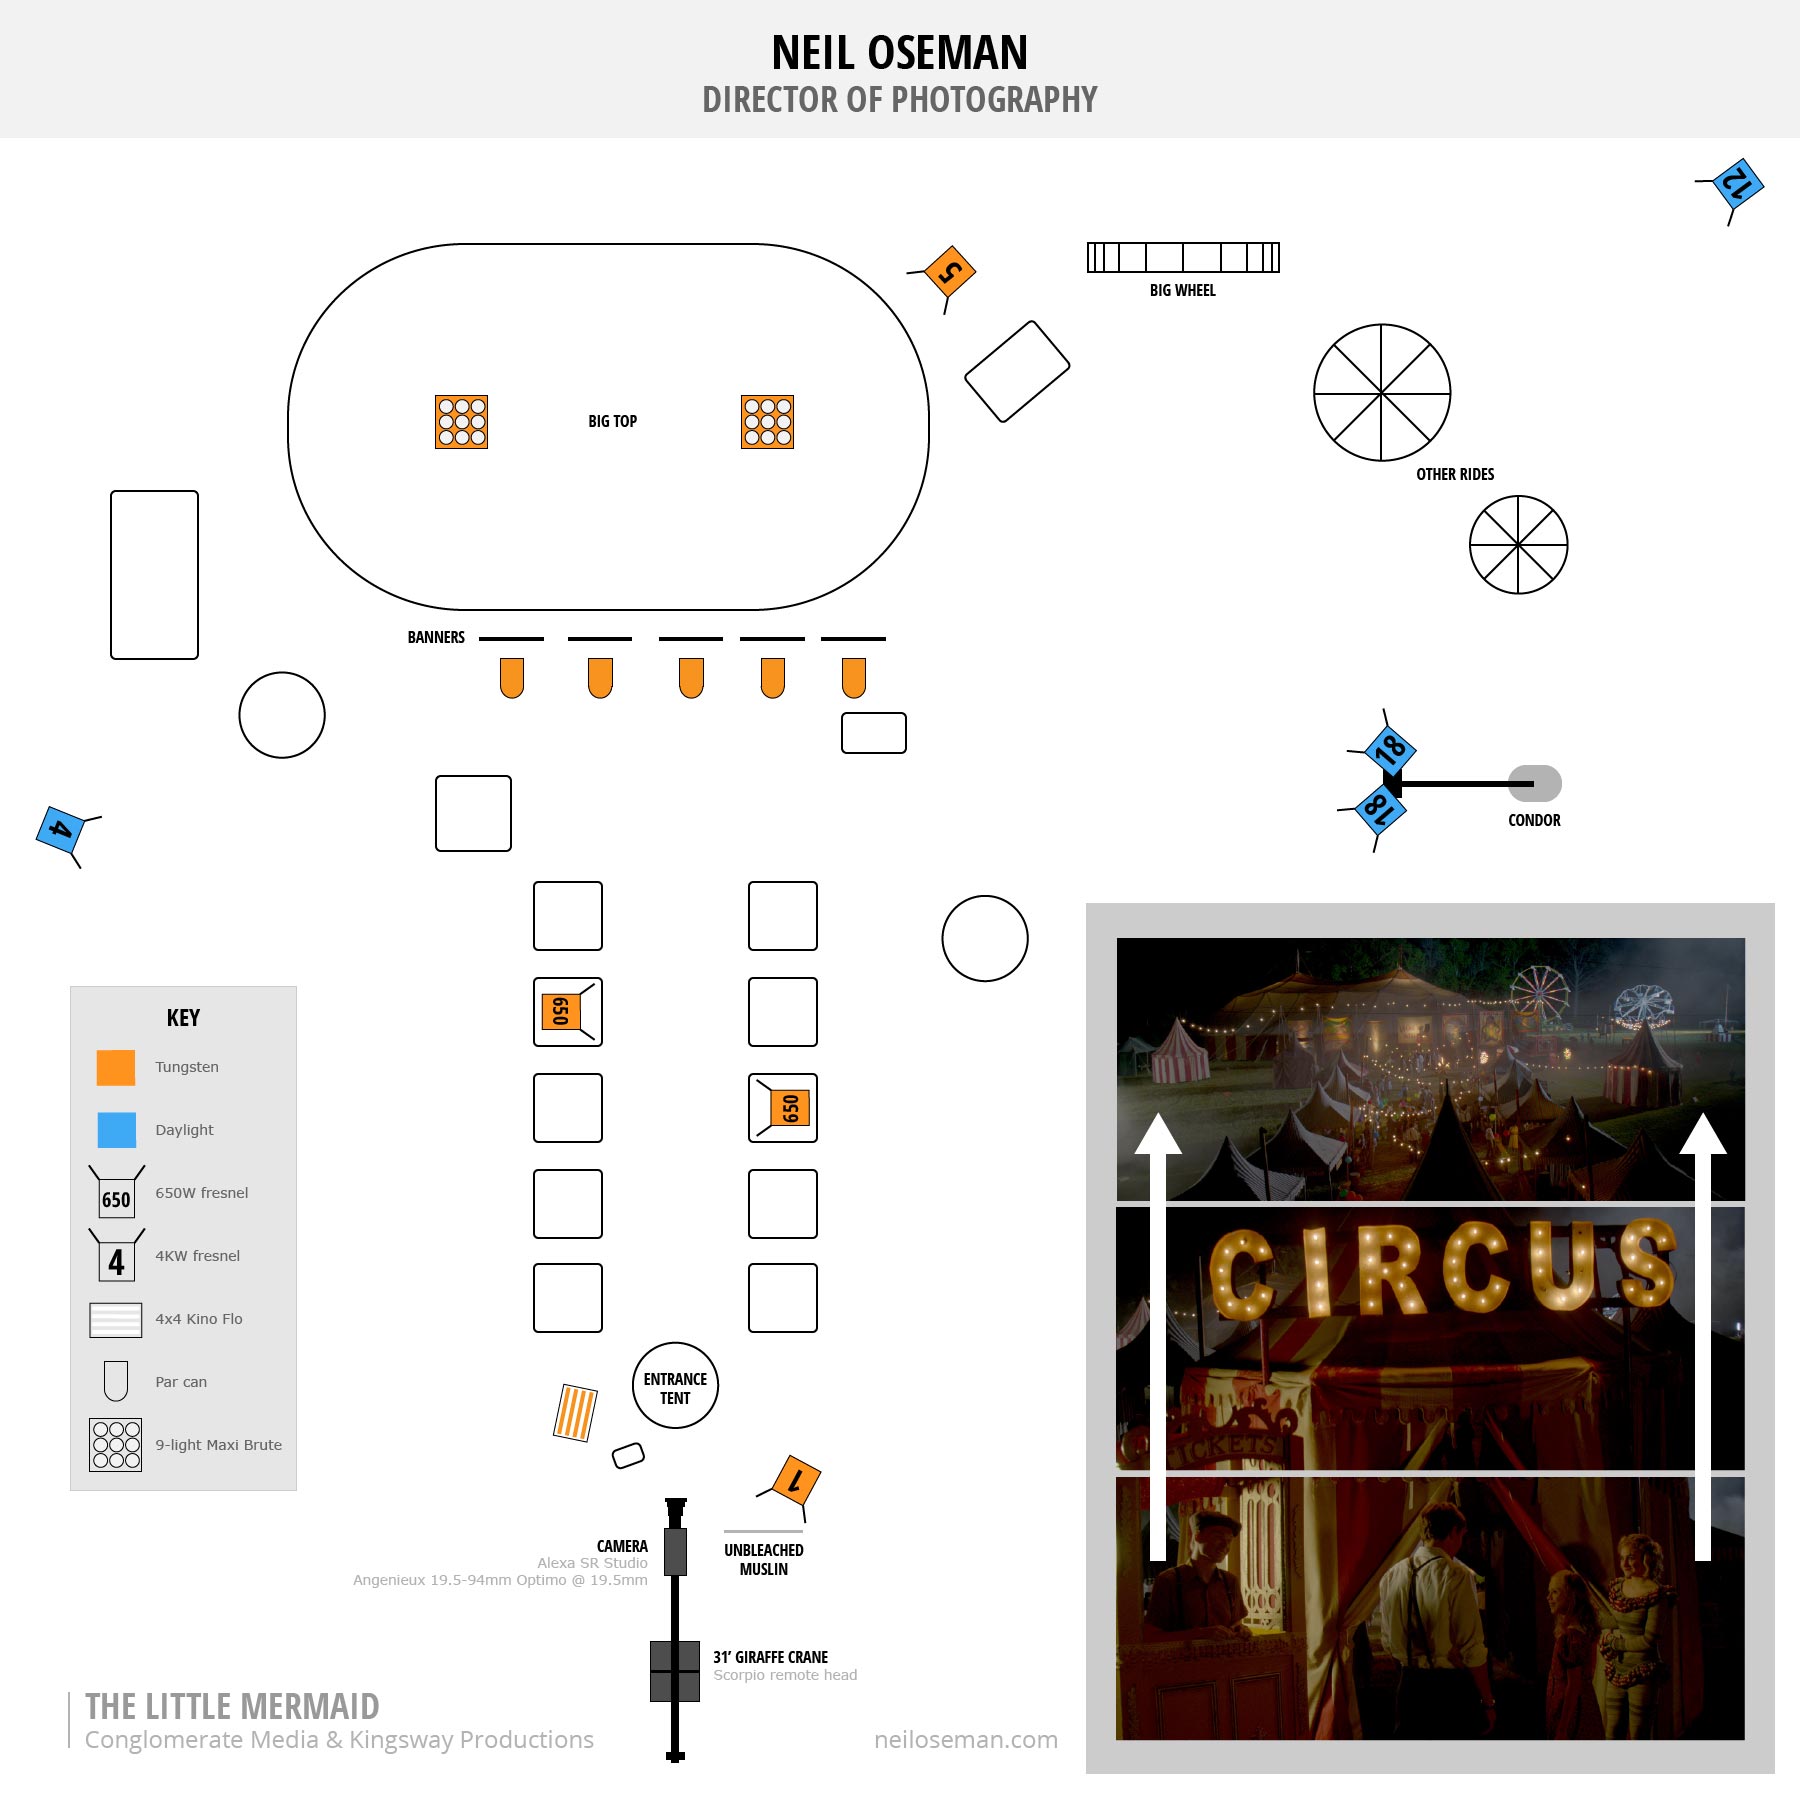
Today we’re inside the big top all day – actually all NIGHT. We can’t shoot during the day because too much daylight bleeds through the canvas of the tent.

We are setting up when a storm hits. The tent starts to blow about in a slightly alarming fashion, rain lashes down outside (and inside, because the tent isn’t very waterproof) and lightning flashes. We are ordered out of the tent, and I run into a waiting mini-van with Joe from art and some of the camera crew. We sit watching the rain and telling stories for half an hour before we can press on.

Setting up with a stand-in next to the mermaid tank (centre, behind the monitors). In the top right you can see the 575W HMI backlight for the tank, and below that, grip Sawyer Oubre stands ready to fake watery rippling light with a par can and a blue gel frame.

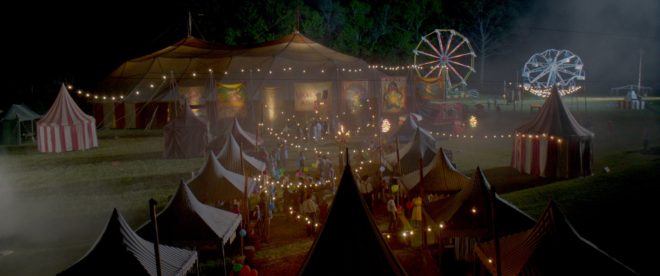
Around the wall of the tent the art department have hung canvas posters; at the suggestion of gaffer Mike Horton, we uplight these with par cans and par 38s. The design of these fixtures hasn’t changed since the 30s, so we can get away with seeing them in shot. The art dept have sourced four period spotlights which we use as background interest (they’re not powerful enough to really illuminate anything), as well as string-lights.

Ambience comes from a Maxi Brute, with just a couple of bubbles on, firing into the tent roof. After seeing a video test of various diffusers during preproduction, I asked for Moroccan Frost to be added to our consumables list, and we use it for the first time on this Maxi Brute. It gives a lovely muted orangey-pink look to the scene.

Steadicam operator Chris Lymberis. Photo: Kane Pearson

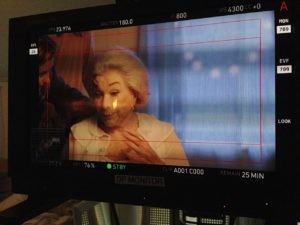
We’re shooting our mermaid for the very first time, in a tank in the circus ring. The initial plan is to fire a Source Four straight down into the water to create genuine watery rippling light, while bouncing a par can off a wobbling frame of blue gel to beef up the effect. In the end the Source Four isn’t really cutting it, so instead we rig a 575W HMI, gelled with Steel Blue, to a menace arm and fire it into the tank as toppy backlight. This Steel Blue gelled daylight source, blued up slightly further by the water itself, contrasts beautifully with the Moroccan Frost tungsten ambience which the Maxi Brutes are giving us.

In her mermaid tail and costume, Poppy Drayton looks stunning in the tank. We shoot steadicam angles and some slo-mo to get the most out of the set-up.


Day 15

The rocky pool set with two of the side-lighting Kino Flos and the 1.2K HMI backlight (centre) in place

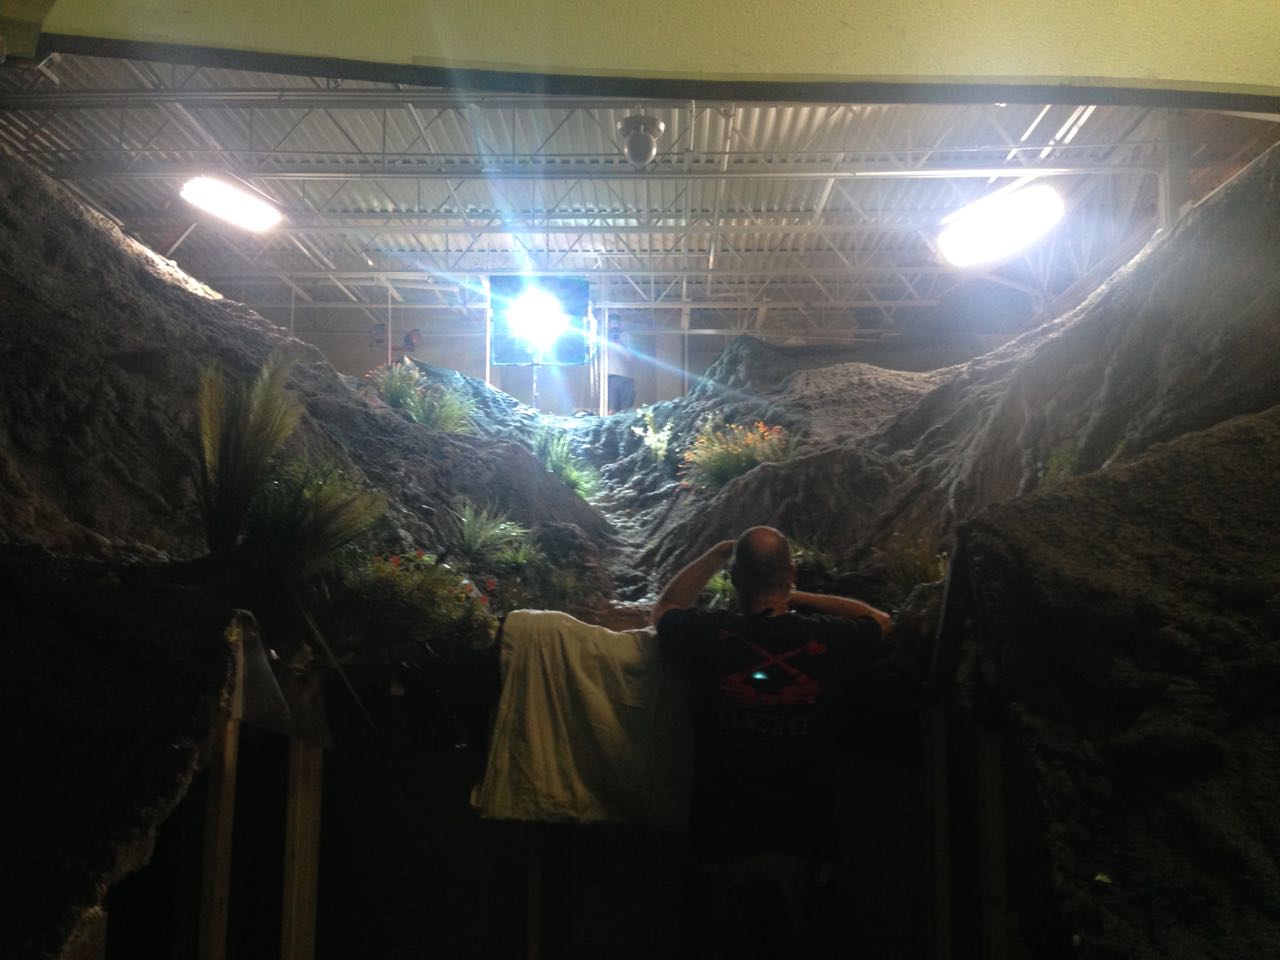
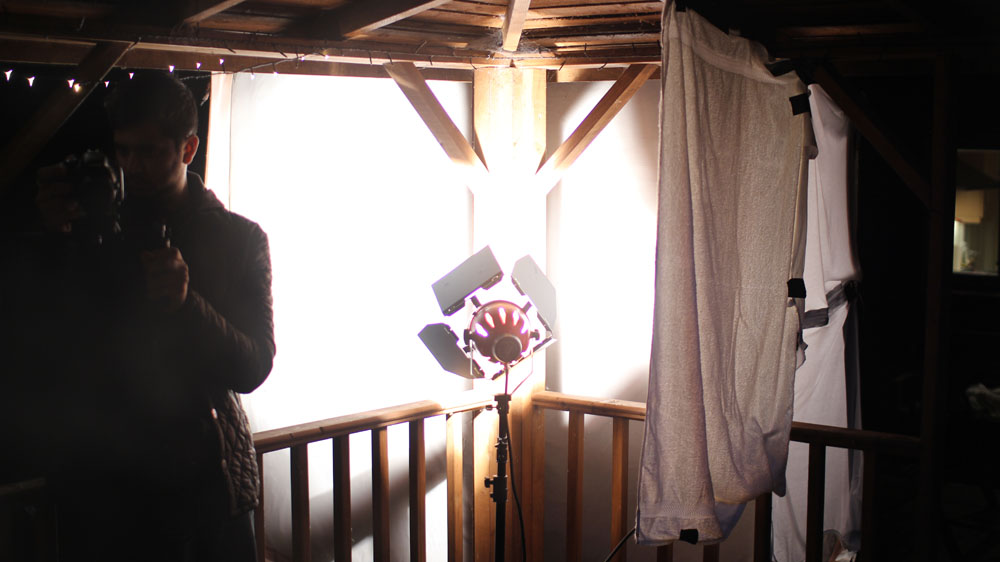
Back on stage, and we’re shooting the rocky pool. This set was built before I even arrived in Savannah, so I’ve been waiting a long time to shoot it. It’s built almost right up to the ceiling of the studio (a former supermarket) so it’s challenging to light. The grips build four menace arms and poke two 4×4 Kinos and two 575W HMIs over the sides to cross-light the set and bring out all the texture in it. Where the set ends they put up a 20×20′ greenscreen, which we light with two Kino Flo Image 80s fitted with special chroma green tubes.

After a wide (which didn’t make the final cut), the next set-up is a 2-shot of our leads in the pool itself. We consider arming the camera out over the pool using a jib, but ultimately decide that it’s better for me to join the cast in the pool, with the camera on my shoulder in a splash bag. 2nd AC Kane Pearson joins the pool party as well, and ends up hand-bashing a monitor for me since the splash bag’s designed for a Panaflex film camera and the viewfinder doesn’t line up. I’m reminded of my frustrating splash bag experience on See Saw back in 2007, but this time at least within a few minutes I’ve found a comfortable and effective way to operate the camera, under-slinging it and allowing it to partially float so I don’t have to support the whole weight.

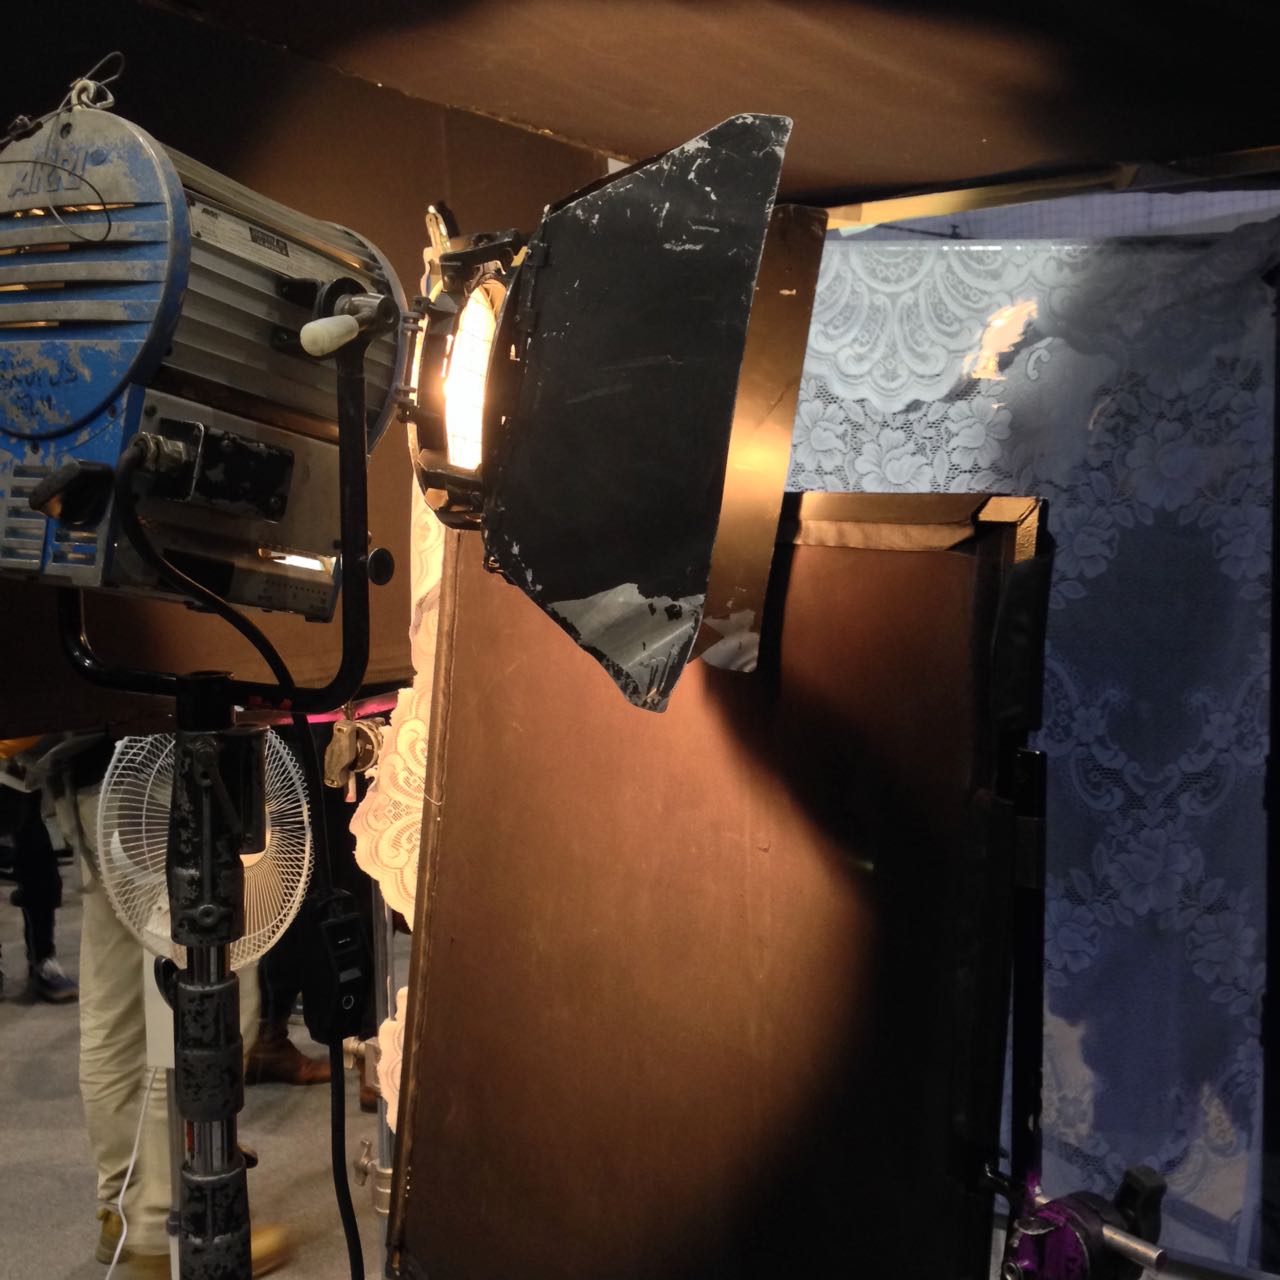
For this shot we’ve added our par-can-bounced-off-a-wobbling-blue-gel gag for watery light ripples, and combined with the real light ripples and the reflections of a 1.2K HMI backlight, the image looks beautiful.


Day 19

After lunch we shoot the singles for the rocky pool scene. The pool itself has been removed, and the actors sit on stools in a paddling pool, with the set behind them. The paddling pool serves two functions: it catches the water that make-up pours over the actors to make them look wet, and it reflects rippling light onto their faces. This light originates from a par can. At first it flattens out the look, then we figure out that we need to lay black fabric on the bottom of the pool. This stops the par can’s light bouncing directly, while retaining the rippling highlights off the water’s surface. (Check out my article on shooting water for more tips like this.)

The low-tech solution for the pool pick-ups

In the final edit this was all intercut with some beautiful footage by underwater DP Jordan Klein, shot both at a local diving pool in Savannah and at Weeki Wachee Springs State Park in Florida. The main unit shot another scene in the actual ocean, but I’ll cover that later in this series. In the meantime, next week I’ll reveal some of the tricks and techniques used in shooting The Little Mermaid‘s many sequences in moving vehicles.

“The Little Mermaid”: Pools of Light

“The Little Mermaid”: Circus Cinematography

‘B’ cam 2nd AC Matt Dixon preps the camera on the crane’s Scorpio remote head. Photo: Tim Gill

The biggest set on The Little Mermaid was the circus, an area the size of a football pitch which was transformed into a period spectacle. The big top and many other pieces were driven across the country from LA, and during our first week of principal photography the art department were hard at work setting it all up and dressing it.

Today’s post is about how I lit the night exterior scenes on this huge set. To that end I’m going to focus on the two biggest shots in the sequence: a tracking shot outside the big top, and the crane-up which first reveals the circus to the audience. Below, as well as my diary entries from the shoot, you’ll find a little behind-the-scenes video I grabbed on my phone for the tracking shot, and a lighting plan for the crane shot.


Day 7

The two 18K HMI fresnels rigged on the condor

A couple of daylight pick-ups today, then we start setting up for a big night scene. The camera will dolly with Cam and Elle from the exit of the big top, past candy floss and ‘healing water’ stalls where bits of dialogue will happen, and finally reveal a ferris wheel in the distance. We block while the sun’s still up, and paint in the light as night sets in. We are trying to light most of it in a way that will also work for our big crane shot reveal of the circus later in the week, because repositioning large HMIs – especially the two 18Ks we’re flying on a condor (cherry-picker) – is very time-consuming. Inevitably it doesn’t quite work out that way, and one of the 18Ks has to die for now at least.

The ferris wheel is backlit by a 12K, with a little front-light from a 5K tungsten fresnel. Cross-light on the talent comes from the working 18K and a 6K on the opposite side of frame. Nine-light Maxi Brutes illuminate the tent from inside, some of that light spilling out onto the talent, while par cans uplight a row of banners outside. A 1K baby provides edge-light to the talent in their final position. A 300W fresnel inside the healing water wagon spills out, and a bare 40W globe inside the umbrella of the candy floss stall gives us a little glow there.

The final lamp to go up is another 300W fresnel, because the directors are concerned that the ’sold out’ sign on the healing water wagon isn’t clear enough. We end up firing it in from the front because there’s no time for anything else, but as always with front-light, I deeply regret it. Ideally we would have armed it out from the roof of the wagon to rake down the side of it.

Once the supporting artists are choreographed, the shot looks great.

A post shared by Neil Oseman (@neiloseman) on


Day 9

A Nine-light Maxi Brute inside the big top

We start with a big crane shot revealing the whole circus at night. For this shot we have the following lamps burning: 2 x 18Ks (on a condor), 1 x 12K, 1 x 4K – all those are providing moonlight or starlight, with varying degrees of blue gel on them; 2 x Nine-light Maxi Brutes making the big top glow from inside; a 5K spilling some orange glow on the background; 2 or 3 smaller tungsten units spilling out light from inside the smaller tents; and lighting the foreground, a 4×4 Kino and a 1K baby bounced off unbleached muslin. There are also numerous practicals on, including the lights on the ferris wheel, the illuminated ‘circus’ sign, several par can up-lighters, and about 7KW of fairy lights. Totalling over 80KW, it is easily the biggest lighting set-up of my career. Although the grip and electrical crew is relatively small given the scale of the set-up, they handle it with aplomb.

We have rebuilt our Giraffe crane to its maximum 31ft configuration, so we can swoop up over the entrance tent, past the ’circus’ sign, and reveal the twinkling string-lights of the midway leading to the big top, and the rides beyond.

Here’s a retrospective lighting plan for this crane shot (not to scale); click to enlarge it. Note that additional tents were added in postproduction, as you can see in the trailer.

Ideally we would have had two condors, with an 18K on each, and put one of them way back behind the trees, to maintain a consistent direction of moonlight, but budget and the practicalities of the location made this impossible.

The ‘A’ camera on the dolly, with the two 18Ks on the condor in the background

One thing that was a little different to my original plan was the hard 4K edging the roofs of the midway tents on the lefthand side. This was meant to be a pair of 6Ks firing through a diffusion frame, to get a much softer, less “sourcey” look than the hard “moonlight” from the 18Ks. But unfortunately both our 6Ks were malfunctioning.

Another change was the lighting of the midway itself. We had a tungsten helium balloon on the truck, which I had planned to float above the midway to provide warm ambience. As it turned out, the practical string lights, although only 40W each, were so numerous that they provided ample illumination in the centre of the frame.

Later on in production, I was chatting to one of the ADs about this scene and he expressed surprise at how well I had handled it, given that it was so much bigger than any lighting set-up I’d previously done. Honestly it never fazed me. Lighting is entirely scaleable; the principles are identical, whether your set is a small bathroom or a football pitch. I’d done so much night exterior in my career, I’d just never had the big toys I wanted before. I’ll let you in on a secret though: the only reason I knew to ask for 18Ks and a condor was from reading American Cinematographer!

In my next post I’ll discuss shooting some of Poppy Drayton’s key scenes as the eponymous mermaid, including her introduction inside the big top. Don’t forget that The Little Mermaid is currently showing in movie theatres across the US and on Amazon in the UK.

“The Little Mermaid”: Circus Cinematography

“The Little Mermaid”: Shooting Shirley

The Little Mermaid, an independent live-action take on the Hans Christian Andersen fairytale, is now showing in cinemas across the USA. To mark the release, over the next few weeks I’ll be posting a series of articles about my cinematography of the film, using extracts from the diary I kept during production.

In this first instalment I’ll focus on the “pre-shoot”, two days of capturing the present-day scenes, undertaken a few weeks before principal photography began. For these scenes, we were all very excited to be working with bona fide Hollywood royalty in the form of Shirley MacLaine. Since debuting in the 1955 Hitchcock comedy The Trouble with Harry (and winning a Golden Globe), Shirley’s career has taken in six Oscar nominations as well as a win for Terms of Endearment, plus an AFI Life Achievement Award, two Baftas, an Emmy and several more Golden Globes.

No pressure then….


Saturday

Shirley is installed at a five-star hotel in downtown Savannah for hair, make-up and wardrobe tests. Taking it easy at the studio, I get a call from the UPM telling me that Shirley wants to meet me. Nervously I transfer my lighting reference images (including screen grabs I gathered last week from her previous movies) to my iPad and await my car.

When I get to the hotel I bump into her and the rest of the crew in the hall. Plunging straight in, I shake her hand and introduce myself as “Neil Oseman, the DP”. Evidently not hearing that last bit, and presuming I’m a PA or possibly a fan, she looks me up and down and asks me who I am. I repeat that I am the director of photography. “You’re so young!” she exclaims, laughing at her mistake.

“Well, I’ve been doing this for fifteen years,” I reply, all too aware of how short my career is compared with hers.

“Which pictures? Tell me,” she says.

Again acutely aware that my credits list isn’t going to sound very impressive to her, I mention Heretiks, and Ren: The Girl with the Mark and mutter something about doing lots of features.

To my great relief she doesn’t press the point, instead asking what I think of the wig and make-up she’s wearing. I ask her to step into the daylight, and assure her that it looks good, but that I’d like to warm up her skin tone a little with the lighting, an idea she responds well to.

Satisfied, Shirley moves on to other things, and I hang out in a meeting room at the hotel drawing storyboards, until it’s time for a production meeting.


SUNDAY

The present-day scenes were shot on Arri Alexas using Zeiss Super Speed Mark I primes and an Angenieux Optimo zoom, diffused with Tiffen Soft FX filters.

I arrive on location before even the early crew call of 8am, with my gaffer Mike Horton. His and key grip Jason Batey’s teams have rigged a dark box around the beach house’s deck/balcony so we can shoot day-for-night interiors.

At 10am Shirley arrives, blocks the scene, then goes off to hair and makeup. We’re starting with close-ups of her, so the grip and electric teams come in and build a book light. (This is a V-shaped arrangement of bounce and diffusion material, resembling an open book, which greatly softens the light fired into it.) When we start to turn over and Shirley watches playback, I’m gratified to find she is very happy with how she looks on camera. We shoot out all her close-ups, then bring in the little girls playing opposite her and block the wide shots.

In the lefthand foreground here is the 2K source for the book light. In the top right you can see the diffusion frame it’s firing through, and you can just make out the poly or rag we attached to the wall to bounce the light back onto Shirley (in the white nightgown). The net in the upper centre is cutting some light off the background. The camera can just be seen on the right of the photo.

As time begins to crunch, I fall back on cross-backlighting as a quick no-brainer solution to get the wide shot looking good. It’s so important to have these lighting templates up your sleeve when the pressure’s on. (Later on in this blog series I’ll discuss the use of cross-backlighting in several other scenes in the movie.)

For a little while it looks like we might not make the day, but I suggest a way to maximise the beautiful beach view at twilight and get the story beats covered in one two-camera set-up. The shot feels like something out of a classic old movie. Shirley MacLaine walking off into the sunset! Everyone loves how it looks, including Shirley. The praise of an actor as experienced as her is high praise indeed, and it makes my day!


Monday

At the monitors with producer Rob Molloy. Photo: Brooks Patrick Allen

We start lighting for our “sunset” scene, which involves firing a pink-gelled 6K through the window and netting the background to get some highlight detail into it. Rather than a book light, this time I use a diffused 4×4 Kino Flo as Shirley’s key. I take a risk and place it further off to the side to get a bit more shape into the light.

Shirley enters, takes one glance at the lighting and remarks, “So, you like this cross-light, huh?”

Busted!

We compromise by adding a little fill from a reflector which Shirley positions herself before each take. Her awareness of how she’s being photographed is astounding. She knows more about lighting than some DPs I’ve met!

Looking at the scenes now, I realise that a large white horizontal reflector in front of Shirley would have been perfect to simulate bounce off the bed, which we moved out when we were shooting the close-ups. Hindsight is 20/20, but I’m still pleased with how it turned out.

Next week I’ll break down the huge lighting set-up required for the night exterior circus scenes.

“The Little Mermaid”: Shooting Shirley

6 Tips for Making DIY Lighting Look Pro

Good lighting can boost the production values of a film tremendously, making the difference between an amateur and a professional-looking piece. For filmmakers early in their careers, however, the equipment typically used to achieve these results can be prohibitively expensive. Far from the Hollywood productions attended by trucks full of lights, a micro-budget film may be unable to rent even a single HMI. Do not despair though, as there are ways to light scenes well without breaking the bank. Here are my top six tips for lighting on the cheap.


1. Make the most of natural light

Checking my compass at the stone circle
Guesstimating the sun path on location

The hardest shots to light without the proper equipment are wide shots. Where a fully-budgeted production would rig Maxi Brutes on cherry-pickers, or pound HMIs through windows, a filmmaker of limited means simply won’t have access to the raw power of such fixtures. Instead, plan your day carefully to capture the wide shots at the time when natural light gives you the most assistance. For a day interior, this means shooting when the sun is on the correct side of the building.

See also: “Sun Paths”


2. Keep L.E.D.s to the background

£2 LED camping light

There are a plethora of LED fixtures on the market, designed for all kinds of applications, some of them very reasonably priced. It might be tempting to purchase some of these to provide your primary illumination, but I advise against it. Cheap LED units (and fluorescents) have a terrible Colour Rendering Index (CRI), making for unnatural and unappealing skintones. Such units are therefore best restricted to backgrounds, accent lighting and “specials”. For example, I purchased a little LED camping light from a charity shop for about £2, and I often use it to create the blue glow from computer screens or hang it from the ceiling to produce a hint of hair-light.

See also my article on LEDs from my “Know Your Lights” series.


3. Key with tungsten or halogen

Worklight
Halogen floodlight

By far the best solution for a high output, high CRI, low cost key is a halogen floodlight; 500W models are available for as little as £5. Their chief disadvantage is the lack of barn doors, making the light hard to control, though if you can stretch to a roll of black wrap you can fashion a kind of snoot. Alternatively, consider investing in a secondhand tungsten movie fixture. With many people switching to LEDs, there are plenty of old tungsten units out there. Try to get a reputable brand like Arri or Ianiro, as some of the unbranded units available on Ebay are poorly wired and can be unsafe.

See also: “DIY Interview Lighting for the ‘Ren’ EPK”


4. Control the light

Lace curtains used to break up light in a Camerimage workshop last year

Flooding a halogen light onto a scene is never going to look good, but then the same is often true of dedicated movie fixtures. Instead it’s more how you modify the light that creates the nuanced, professional look. Improvise flags from pieces of cardboard to stop the light spilling into unwanted places – but be VERY careful how close you put them to a tungsten or halogen source, as these get extremely hot. For example, when shooting indoors, flag light off the background wall (especially if it’s white or cream) to help your subject stand out.

See also “Lighting Micro-sets” for an example of this.


5. Soften the light

Almost all cinematographers today prefer the subtlety of soft light to the harshness of hard light. You can achieve this by bouncing your fixture off a wall or ceiling, or a sheet of polystyrene or card. Or you could hang a white bedsheet or a shower curtain in front of the light as diffusion, but again be sure to leave a safe distance between them. Professional collapsible reflectors are available very cheaply online, and can be used in multiple ways to diffuse or reflect light.

Hot tub cover = bounce board
Hot tub cover = bounce board. Towel = flag

See also: “How to Soften Harsh Sunlight with Tinfoil and a Bedsheet”; and to read more about the pictured example: “Always Know Where Your Towel Is”


6. Make use of practicals

Black-wrapped ceiling light

Finally, don’t be afraid to use existing practical lighting in your scene. Turning on the main overhead light usually kills the mood, but sometimes it can be useful. You can generate more contrast and shape by covering up the top of the lampshade, thus preventing ceiling bounce, or conversely use the ceiling bounce to give some ambient top-light and cover the bottom of the lampshade to prevent a harsh hotspot underneath it. Table lamps and under-cupboard kitchen lights can add a lot of interest and production value to your backgrounds. If possible, swap out LED or fluorescent bulbs for conventional tungsten ones for a more attractive colour and to eliminate potential flickering on camera.

See also: “5 Tips for Working with Practicals”, and for an example of the above techniques, my blog from day two of the Forever Alone shoot.

6 Tips for Making DIY Lighting Look Pro