Composing a Wide Shot

I have wanted to write a blog post about composition for ages, but I’ve procrastinated. Framing is such an instinctive and subjective thing; could I ever articulate how to do it? I’m still not sure, but at last I’m taking a deep breath and giving it a go. To help me, I’m using frame grabs from Best Cinematography Oscar-winning films of the last ten years or so, taken from the brilliant and handy website Cinematographer’s Index. Check it out and donate a few bucks if you can.


the rule of thirds

The Rule of Thirds is well known to most filmmakers. It suggests that you imagine the frame divided vertically and horizontally into thirds, then place the subject on one of the intersections of these lines.

However, composing images using The Rule of Thirds is like riding a bike using stabilisers. It’s something that you use before you’ve developed your own eye for composition.

Here are just a few examples of cinematography which completely ignore the rule, yet won Oscars. Guillermo Navarro puts his subject bang in the centre, in this scene from Pan’s Labyrinth

While Dion Beebe goes for an extreme off-set in Memoirs of a Geisha

In this scene from Life of Pi, Claudio Miranda places the two least important elements in the frame – the lifeboat and the sun – roughly on the thirds, but puts Pi himself right in the centre, and the distant ship off to the right…


ENclosing one SIDE

So, if we’re not using The Rule of Thirds, where do we start? I like to start with the edges of the frame, rather than some arbitrary points within in. I look for something to give me a reason to put the edge of the frame in a particular place.

As I touched on in my previous post, about Turner, it’s aesthetically pleasing to create a frame within a frame, but unless you’re shooting through a window you can’t always enclose the image on all four sides. Often the ground/horizon gives you a free framing along the bottom edge. So if you can frame just one more side, you’ve got an L-shaped frame (though the ‘L’ may be backwards) and you’re doing pretty well.

This is probably the most common compositional technique you’ll see in wide shots: a tree, wall or other vertical element enclosing the frame on one side. Pan’s Labyrinth again…

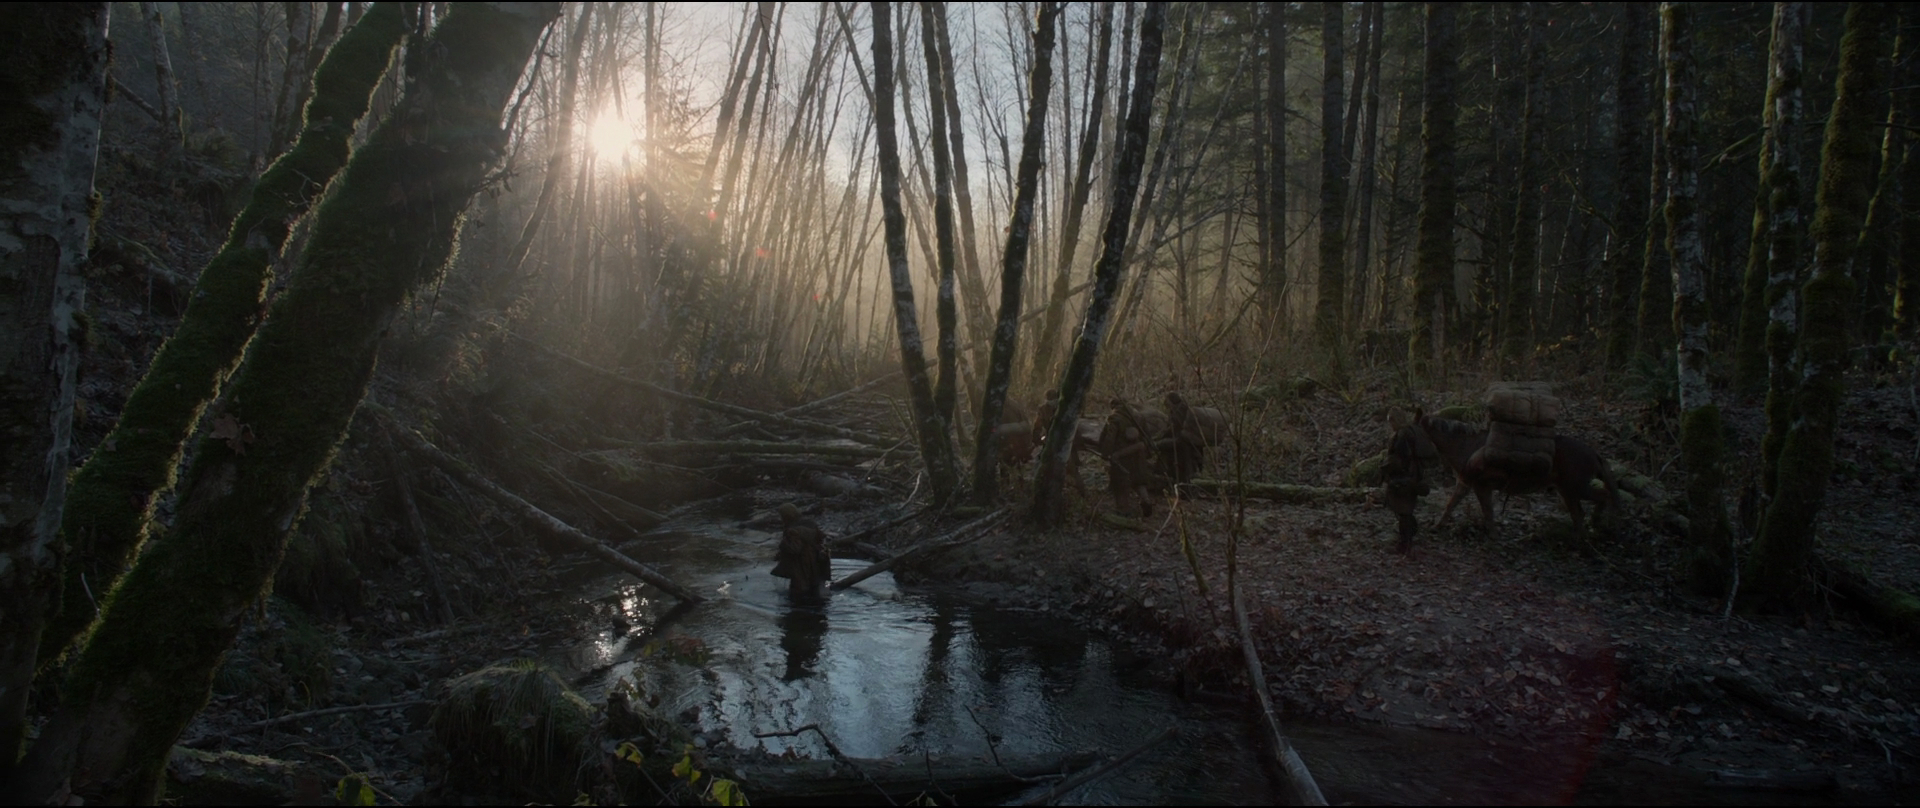
Here’s one from The Revenant (DP: Emmanuel Lubezki)…

It’s great when these enclosing elements are in the foreground, because they also serve to add depth to the image. But they can be in the background too, like the righthand skyscraper in this frame from Slumdog Millionaire (DP: Anthony Dod Mantle)…

Or in this one from Pan’s Labyrinth, where the mill wheel defines the height of the image as well as framing it on the left…

Sometimes, with flatter compositions, you can find an element on the same plane as the subject with which to frame the shot on one side, like the streetlamp on the left of this shot from Life of Pi. Note that the edge of the pond also provides strong framing along the bottom of the image…
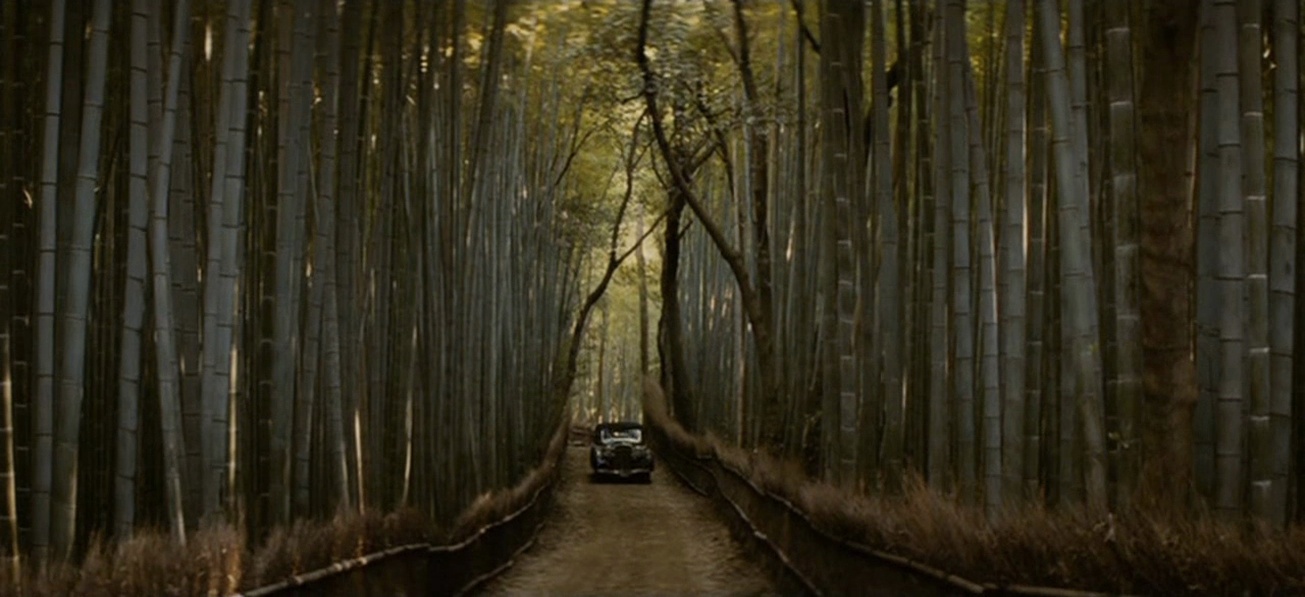
 

ENCLOSING TWO SIDES

Placing enclosing elements on both sides of the frame, as well as being even more aesthetically pleasing than enclosing a single side, can suggest a situation from which the characters cannot escape. Consider these frames from, respectively, Inception (DP: Wally Pfister) and Road to Perdition (DP: Conrad Hall)…


Other frames within frames

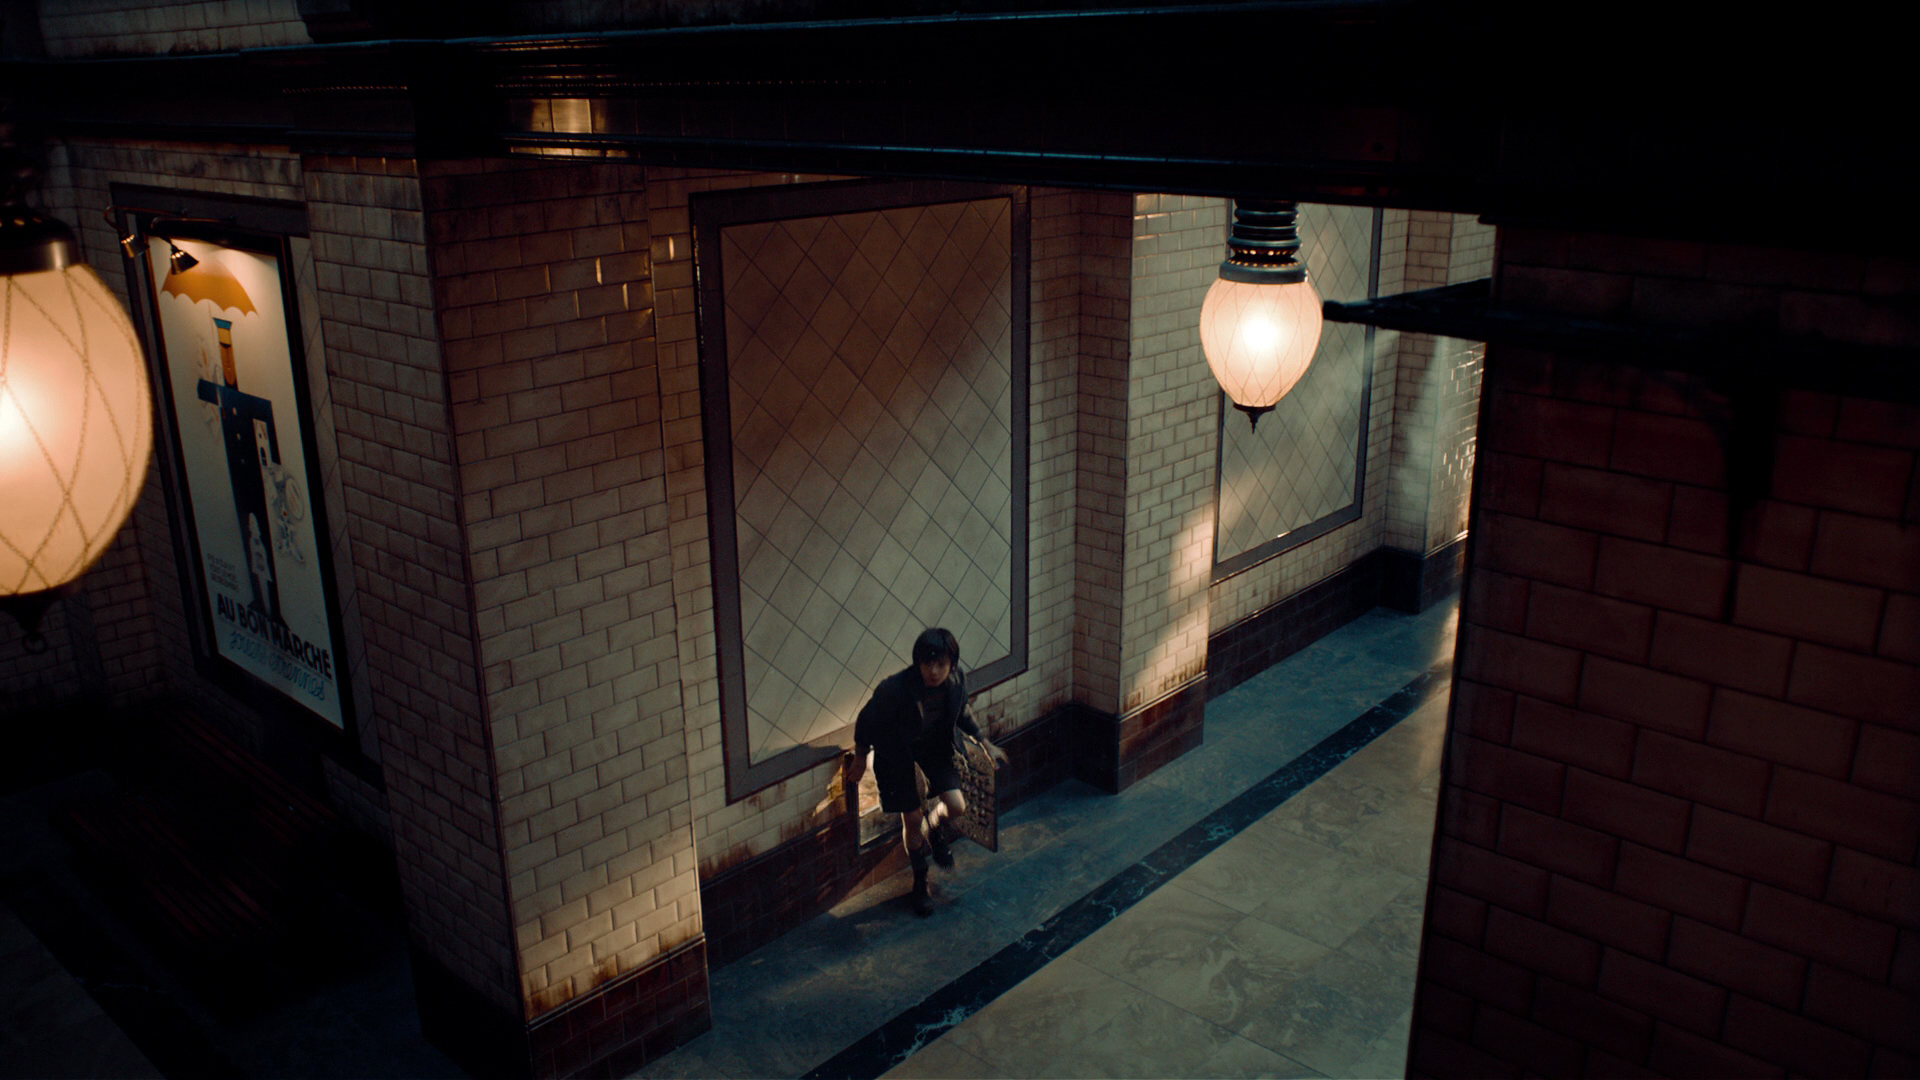
In this shot from Hugo (DP: Robert Richardson), the architecture frames the image along the top and righthand side, while leaving it open in the bottom left, the direction towards which the subject is moving…

This shot from Life of Pi contains an interesting choice. The obvious – and far more dominant place – to put the subject would have been leaning against the foreground pillar on the right. Instead, Miranda makes the audience search for him in the frame…

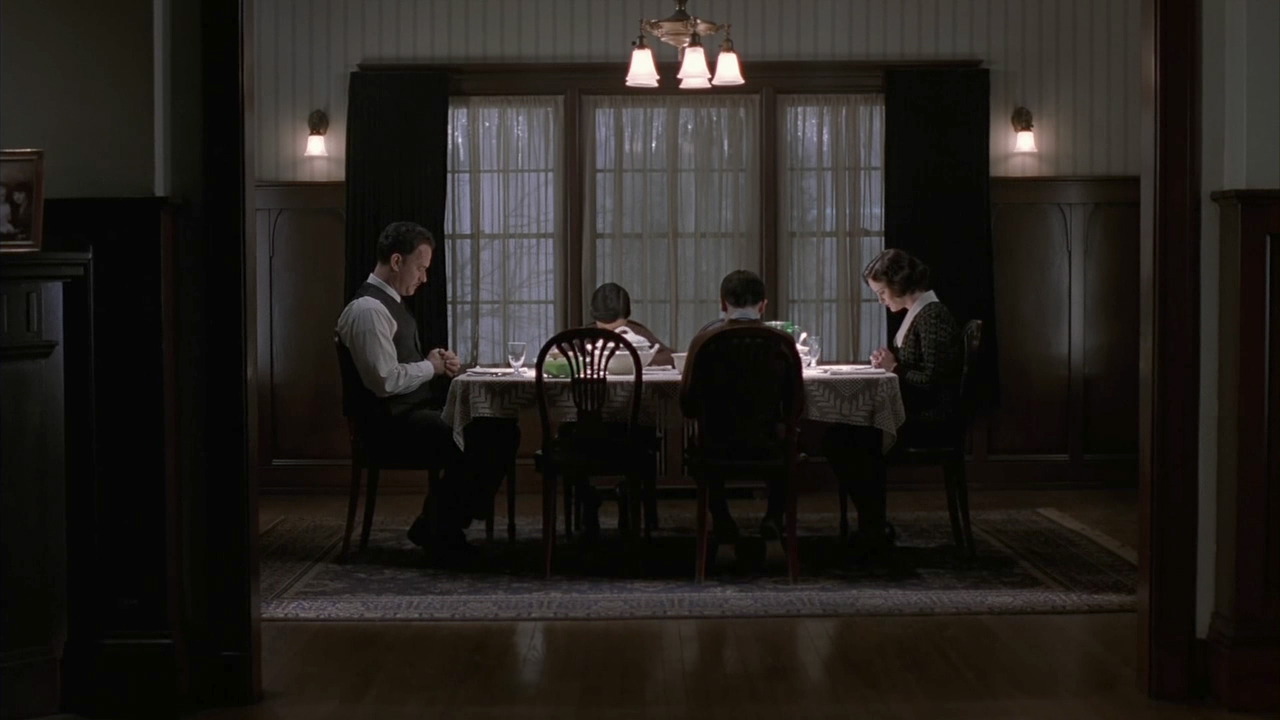
Here, in Road to Perdition, the foreground character, the desk, the phone and the doorway all cradle and enclose the subject…


Pinning a corner

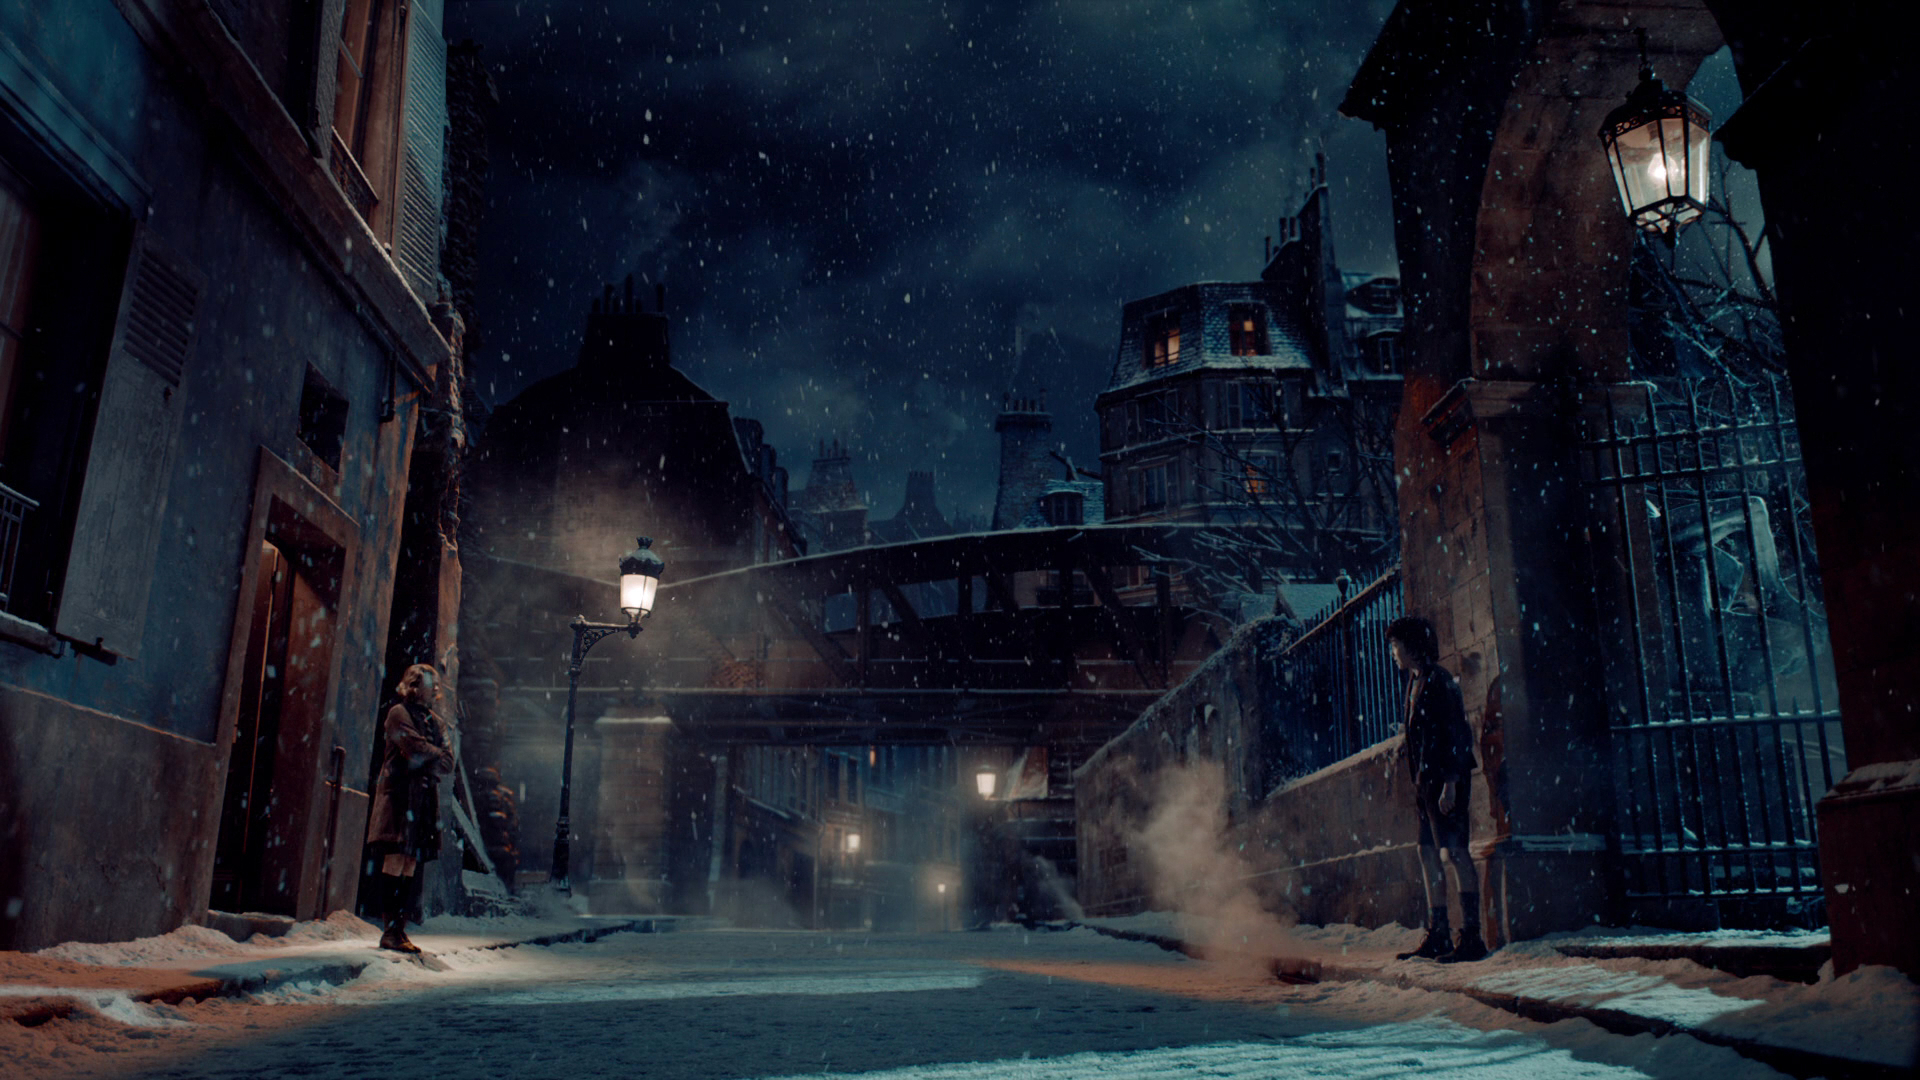
Sometimes it is impossible to enclose the image on any of its sides. In these cases I will at least try to pin a corner – to find an element that I can place just within a corner of the frame to anchor the composition. This frame from Hugo uses the lamp in the top right for this purpose…

Mantle uses the foreground tyre here in Slumdog Millionaire…

Navarro uses a chair in the bottom left of this Pan’s Labyrinth shot. Notice how the subject is placed on the imaginary line connecting the chair to the circular window in the background, which balances it out…

In this scene from Road to Perdition, Hall pins the top lefthand corner with the light fixture, then balances it beautifully with the shadows in the bottom right…

Indeed, the corner-pinning technique seems most effective when the diagonally opposite corner is opposite in other ways too – dark vs. light, close vs. far, warm vs. cold, etc.


Vanishing points

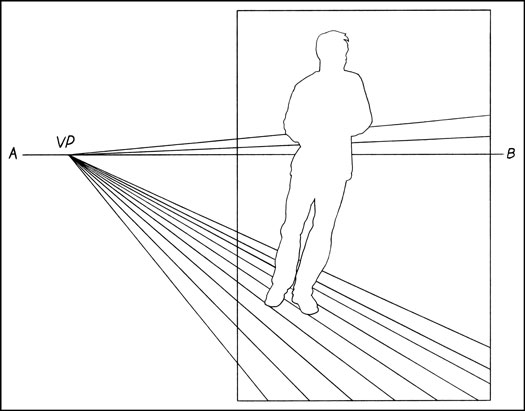
Vanishing points are a concept familiar to artists and technical drafters. You extend the image’s straight lines in perspective to the point where they vanish into the distance. Placing the subject of your image on a vanishing point will lead the viewer’s eyes right to them. Check out these examples from, respectively, Memoirs of a Geisha and Road to Perdition…

This shot from Slumdog Millionaire is a little more subtle, but follow the lines of the table and chair and you’ll end up right at the children…

And just to prove that rules are meant to be broken, here’s a Slumdog shot where the subjects are nowhere the vanishing point…
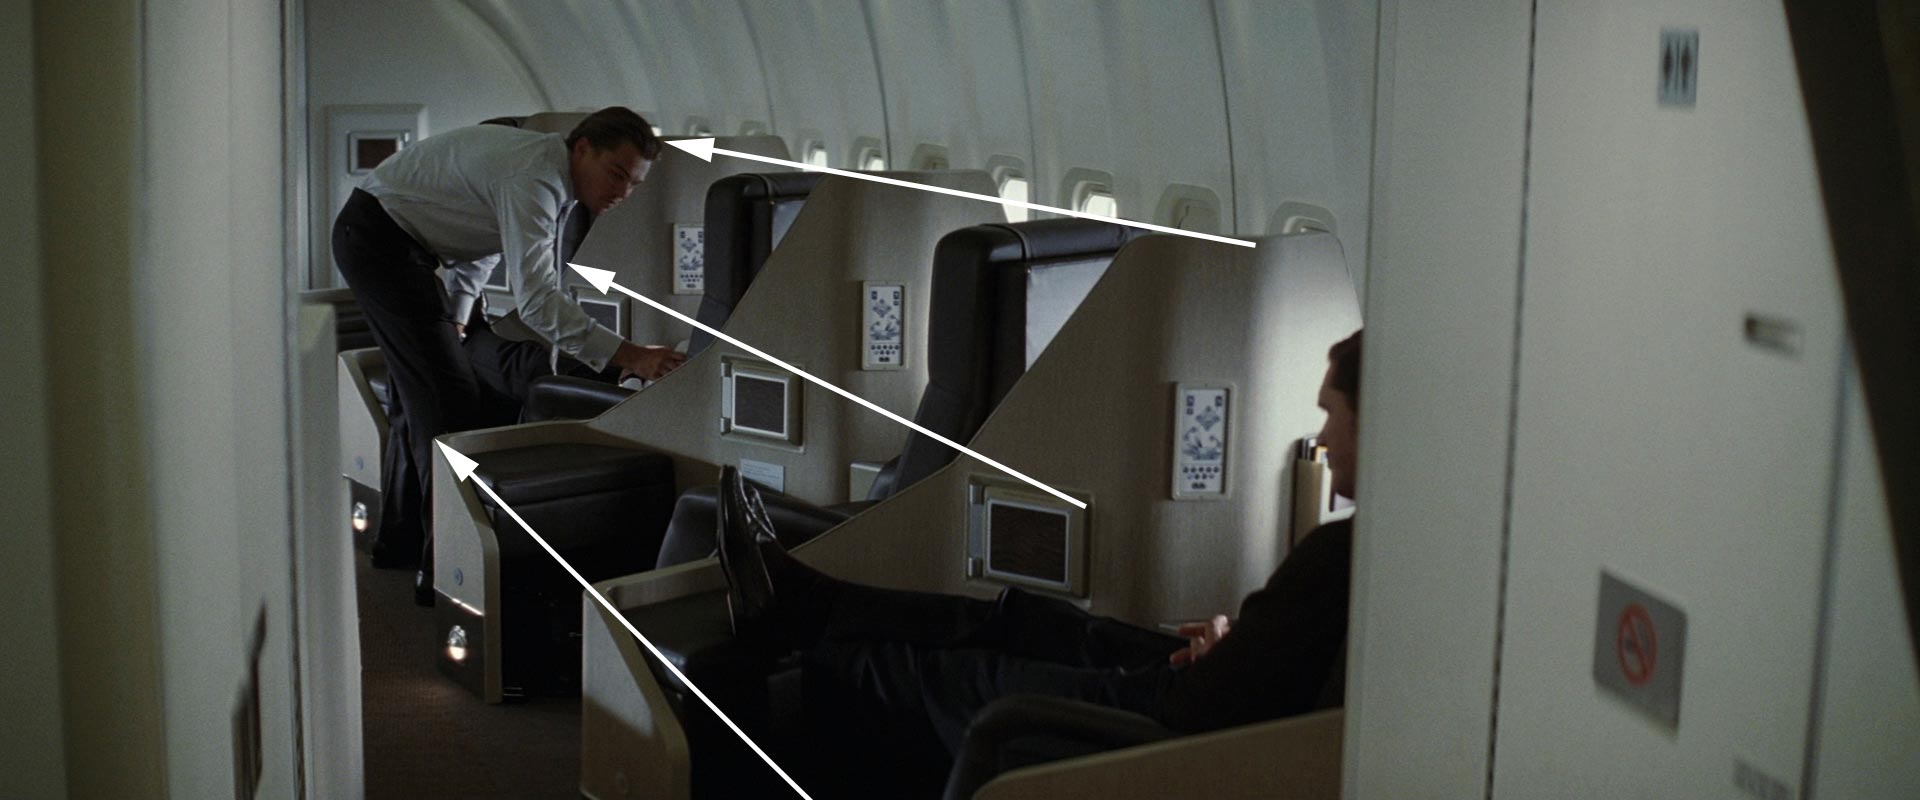
 

LEADING LINES

It’s not just vanishing points that provide satisfying spots to place your subject. Leading lines of any kind can draw the eye. In this shot from Inception, the vanishing point (the tip of the plane’s nose) would be somewhere in the extreme top-left corner of frame. Di Caprio isn’t on that vanishing point, but the rows of seats still lead our eyes to him…

In this shot from Sicario, Roger Deakins places both subjects over the corners of the house, where the buildings’ lines lead us to…

In The Revenant, this frame places the subjects at the point of the V formed by the sloping mounds…


Symmetry

I’ve touched on the concept of balance throughout this post, and I’ll probably need to write a whole other post to really get into it, but for now, here are some beautiful examples of the simplest way of giving a composition balance: symmetry…


So those are a few basic ways of approaching the composition of a wide shot. More composition posts to come, but meanwhile, you might like to check out my existing post on 2.39:1 composition.

Composing a Wide Shot

“Above the Clouds”: February 2017 Pick-ups

Last weekend saw many of the crew of Above the Clouds reunite to shoot the remaining scenes of this comedy road movie. Principal photography was captured on an Alexa Mini during summer 2016 on location in Kent, on the Isle of Skye, and at Longcross Studio in Buckinghamshire, with additional location shooting on a Blackmagic Micro Cinema Camera in October.

The outstanding scenes were to be photographed on stage, at Halliford Studio in Shepperton, this time on an Arri Amira. The Amira uses the same sensor as the Alexas, allowing us to match the look from principal photography in the most cost-effective way. With the addition of a Premium license, the camera is capable of the same ProRes 4444 recording codec as the Alexas too. As per last summer, our glass was a set of Arri/Zeiss Ultra Primes, with a half Soft FX filter to take the digital edge off.

Director Leon Chambers designed and built the set himself, sending me photos of a scale model well in advance. He was also specific about certain lighting cues and states that were required across the two sets and six scenes we would be recording to complete the movie. Based on this information, I concocted a lighting plan, which I communicated to Halliford’s in-house gaffer Micky Reeves by Photoshopping stock images of lamps onto Leon’s set model photos.

Last Saturday was devoted to pre-lighting the sets, mainly the kitchen, while construction work continued on the second set.


Day 24 / Sunday

We begin with a morning scene. A 5K fresnel serves as a low sun, streaking across the back wall of the set (see my post about lighting through windows). Even with this direct light four stops over, the natural bounce off the set isn’t enough to bring actor Philip Jackson – with his back to the window – up to key. Micky rigs a Dedo firing into a soft silver bounce just out of frame to solve the problem.

Also coming through the window are two 4×4 kinos, rigged on goalposts above the window. Their daylight tubes reflect off the blinds, serendipitously creating the illusion of a blue sky “outdoors”, where in fact there is only a wall and a white backdrop.

Philip exits into the hallway and disappears from view, supposedly to go out through the front door. No door exists. Instead there is a flag which spark Amir Moulfi rotates in front of a 2K, creating a momentary oblong of light in which Philip’s shadow appears.

The next scene follows on from an exterior captured last October at dusk, when the natural light was soft, flat and cool in colour, cheated even cooler with the white balance. This failing daylight is to be the only source of illumination now in the kitchen set, until Philip enters and turns on the lights. This is the main reason that the daylight 4×4 kinos outside the window were rigged. A third kino from the direction of the front door is added, plus a small LED reporter light to pick an important prop out of the shadows.

Lead actress Naomi Morris enters, silhouetted against the windows. Then Philip enters and hits the lights. Simultaneously, Amir flips a breaker on a lunchbox, activating a hanging practical fixture above the breakfast bar and the 5K which that practical motivates.

Generally I don’t like toplight. It throws the eyes – those windows to the soul… or windows to the performance – into shadow. But with the hanging practical in shot, whatever I was going to use to beef it up had to be somewhat toppy or it wouldn’t make sense. I considered space-lights and Jem balls, but in consultation with Micky I ultimately picked a 5K with a chimera, coming in at a 45 degree back/toplight angle. As you can see from the photos, this looks almost comically large. But large and close means soft, which is what I want. It had to be soft enough to wrap both actors when they faced each other across the bar.


But why such a large lamp? Why not use a 2K, like Micky suggested yesterday? Bitter experience has always taught me to go with a bigger unit than you think you need, particularly if you’re softening it, and particularly if it’s going to take a while to rig. (The 5K was hung from another goalposts set-up.) We ended up dimming the 5K to 50% and scrimming it down a stop and a half. But having too much light like that is easy to deal with. If we had put up a 2K and it wasn’t bright enough, we would have to have taken the whole thing down and re-rigged with a 5K. And even if the 2K had seemed sufficient to begin with, blocking can often take actors into unexpected, dark corners of the set. Being able to turn up a dimmer a couple of notches to handle that kind of situation is very useful.

Besides the 5K, there are a few other sources playing: some 300W hairlights, a pup bouncing off the side of a cupboard to bring up the area around the cooker, a China ball in the hallway, and Leon’s Rosco LitePads serving as practical under-cabinet down-lighters.


Day 25 / Monday

I probably shouldn’t say what today’s set is, because it’s a little bit of a spoiler. There are some lighting similarities to the kitchen: again we have a character flicking a light switch, bringing on two hanging overhead practicals and a 2K with a chimera to beef them up.

A practical lamp on a desk was supposed to be turned on during the scene as well, but we all forget until it’s too late. It would have bounced off the desk and given Philip a little eye-light, and at first I regret losing this. But soon I realise that it is more appropriate for the scene not to have that level of refinement, for the lighting to be a little raw. The toppy, “broken key” angle of the chimera’s light works well for this tone too.

We wrap just before noon, releasing Naomi to high-tail it to Oxford to appear on stage in a musical this evening. Eventually there will be second-unit-style GVs and establishing shots to do, but there will only be three or four of us for that. For the cast and most of the crew, today brings Above the Clouds to an end, eight months after the camera first rolled.

See all my Above the Clouds posts here, or visit the official website.

“Above the Clouds”: February 2017 Pick-ups

Aspect Ratio

Aspect ratio is a large and potentially confusing subject, but the good news is that there are only a few things you need to know to get by 99% of the time. Today I’ll go over those things, and show you where to look if you want to cover that last 1%.

Put simply, aspect ratio is the ratio of an image’s width to its height. For example, a 1.85:1 image is 1.85 times as wide as it is high.

Caption: the three main aspect ratios, plus 4:3 for reference. 4:3 is, more or less, the ratio most movies were shot in until the 1950s and all TV was shot in until the late 1990s.

The diagram above shows four aspect ratios. 4:3 is, more or less, the ratio most movies were shot in until the 1950s and all TV was shot in until the late 1990s, but today it’s virtually obsolete. So let’s look at the other three…

  • 16:9 – This is the standard ratio for TV, DVD (sort of), Blu-ray, YouTube and other video sharing and VOD platforms. It is sometimes written as 1.77:1 or 1.78:1. Almost all digital cameras shoot natively in this ratio. In the TV industry, this ratio was often called widescreen to distinguish it from 4:3.
  • 1.85:1 – One of two standard ratios for digital cinema projection. It is very similar to 16:9, but slightly wider. In practice, 1.85:1 movies may be shot and framed for 16:9, and delivered in 16:9 for TV, DVD and so on, but cropped very slightly at the top and bottom to achieve the 1.85:1 ratio for cinema projection.
  • 2.39:1 – A.k.a. Cinemascope (“Scope” for short) or widescreen (in the film industry), this is the other standard ratio for cinema projection. It is achieved either by cropping a 16:9 frame or by using anamorphic lenses to squeeze the image horizontally. Note that many cameras offer 2.35:1 framing guides rather than 2.39:1, but the difference is negligible, and these two designations are used pretty much interchangeably, as well as 2.40:1. On TV, VOD and so on, 2.39:1 movies are generally letterboxed to fit the ratio onto the 16:9 screen.
A 2.39:1 image letterboxed to 16:9, from The Gong Fu Connection (dir. Ted Duran)
A 2.39:1 image letterboxed to 16:9, from an action-comedy feature I shot called The Gong Fu Connection (dir. Ted Duran)


This graph by Stephen Follows shows how 2.39:1 movies have become more common in recent years, with around 70% of the 100 top grossing Hollywood films produced in this ratio.
This graph by Stephen Follows shows how Scope movies have become more common in the last two decades, with around 70% of the 100 top grossing Hollywood films produced in the 2.35:1 / 2.39:1  ratio. I suspect that a survey of lower grossing films would show a higher proportion of 1.85:1 material.

There is a temptation to choose 2.39:1 because it looks more “cinematic“, but it’s important to think carefully before selecting your aspect ratio. Here are some reasons to consider:

Some advantages of 2.39:1

  • Better for landscapes
  • More composition options with group shots and over-the-shoulder shots in terms of horizontal placement and separation of the two characters
  • Better for wide sets, or sets lacking height

(See also my article on 2:39:1 composition.)

Ren: The Girl with the Mark (2.35:1)
The 2.39:1 aspect ratio helps me to frame out the unfinished roofs of the buildings behind the title character in Ren: The Girl with the Mark (dir. Kate Madison).

Some advantages of 1.85:1 or 16:9

  • Shows more body language in singles
  • Better for shots containing characters of very different heights – e.g. two-shot of an adult and a child
  • Better for tall or narrow sets, and car interiors
The 16:9 aspect ratio allows me to show the nice, oak beam ceiling and the raised stage in this shot from The First Musketeer (dir. Harriet Sams).

Although your project will almost certainly be delivered in one of the three ratios listed above, it is of course possible to frame and mask your footage to any aspect ratio you can imagine. This should always be cleared with the producer though, because sales agents may reject films not presented in a standard ratio.

Some recent films using non-standard ratios are:

  • The Hateful Eight – 2.76:1 – Tarantino’s latest was lensed in Ultra Panavision 70, an obsolete, super-wide 70mm celluloid format. But unless you were lucky enough to catch one of the much-publicised roadshow screenings, or you own the Blu-ray, you probably saw it cropped to 2.39:1.
  • Jurassic World – 2:1 – The filmmakers felt that 1.85:1 was too TV, but 2.39:1 lacked enough height for the dinosaurs, so they used a halfway house. In practice, the movie was delivered to cinemas in 1.85:1 with letterboxing at the top and bottom to achieve the 2:1 ratio. I have a whole post about 2:1 here.
  • Ida – 4:3 – Set in a convent, this film symbolises its nuns’ and novices’ thoughts of God and heaven above by using this tall aspect ratio and framing with lots of head room. I have a whole post about 4:3 here.
aspect_ratios
The Grand Budapest Hotel

A surprising number of films use multiple aspect ratios, which we often don’t even notice on a conscious level. Here are just a few examples:

  • The Grand Budapest Hotel – Wes Anderson differentiated the three time periods featured in the story by giving each a different aspect ratio: 1.375:1 (“Academy” ratio, similar to 4:3) for the 1930s, 2.35:1 for the 1960s and 1.85:1 for the more contemporary bookends.
  • The Dark Knight – Parts of this film, such as the opening bank robbery and aerial city footage, were shot in Imax at 1.44:1, while the rest is in 2.35:1.
  • Scott Pilgrim vs. the World – To recall the comic book format of this film’s source material, the aspect ratio changes on a shot-by-shot basis during the fight scenes.

The aspect ratio of a film is agreed by the director, the DP and sometimes the producer, in preproduction. However, it is very easy for a director, producer, editor or colourist to alter the aspect ratio in postproduction. This is far from ideal, and since it changes the composition of every image in the movie, the DP should always be consulted and should ideally work with the post team to ensure that he or she retains authorship of the frame. After all, his or her name is on the film as director of photography.

Regrettably, this doesn’t always happen. I did a short last year which I agreed with the director and producer we would shoot in 4:3, but to my dismay when I saw the finished film it had been reformatted to 2.39:1, a drastically different ratio. To minimise the chances of this happening to you, make sure in preproduction that your director and producer fully understand the consequences of the selected ratio, and make your best effort to attend the grading so you can at least see if any re-framing has occurred before it’s too late.

If you want to know more about aspect ratio, here are a couple of videos you might find useful. The first is a guide I made a few years ago to shooting on celluloid, and it covers (at timecode 2:00) the aspect ratios native to the various gauges of film.

The second is a comprehensive history of aspect ratios in film and TV from Filmmaker IQ.

Aspect Ratio

Lensing Ren – episode 1

Here is the first in a series of cinematography videos I’m publishing to compliment the five episodes of Ren: The Girl with the Mark as they are released over the coming weeks. These videos will tell you the how, what and why of photographing the show. This week I discuss the camera equipment used, differentiating characters photographically, and lighting Karn’s magical woodland house.

Here is the lighting plan for Karn’s house:

Karns-house-1080p

And here is a video blog from the set of Karn’s house:

You may be interested to read my article on Masculine and Feminine Lighting, which gives some more detail on the techniques used to light Ren and Karn in the riverside scene.

See also: 5 Tips for Perfect Shafts of Light and Lighting Techniques #6: Cross-light.

Check back next Saturday for another instalment of Lensing Ren, and meanwhile watch the next episode of Ren itself from Tuesday at 8pm GMT at rentheseries.com

Lensing Ren – episode 1

Classic Single Developing Shot in Back to the Future: Part II

“What the hell’s going on, Doc? Where are we? When are we?”

“We’re descending towards Hill Valley, California, on Wednesday, October 21st, 2015.”

“2015? You mean we’re in the future?”

Yep, we’re all in the future now.

The Back to the Future trilogy are the films that made me want to be a filmmaker, and 30 years has not dulled their appeal one bit. In a moment I’ll give a single example of the brilliance with which Robert Zemeckis directed the trilogy, but first a reminder…

If you’re in the Cambridge area, you can see Back to the Future along with my short film Stop/Eject at the Arts Picturehouse next Monday, Oct 26th, 9pm. You need to book in advance here.

If you can’t make it, I’m pleased to announce that Stop/Eject will be released free on YouTube on November 1st.

Stop-Eject release poster RGBAnyway, back to Back to the Future. Robert Zemeckis is a major proponent of the Single Developing Shot – master shots that use blocking and camera movement to form multiple framings within a single take. Halfway through BTTF: Part II comes a brilliant example of this technique. Doc has found Marty at his father’s graveside, the pair having returned from 2015 to a nightmarish alternate 1985. In an exposition-heavy scene, Doc explains how history has been altered and what they must do to put it right.

It could have been very dull if covered from a lot of separate angles (and not acted by geniuses). Instead Zemeckis combines many of the necessary angles into a single fluid take, cutting only when absolutely necessary to inserts, reverses and a wide. Here are the main framings the shot moves through.

It starts on a CU of the newspaper…

Screen Shot 2015-10-19 at 21.30.42

…then pulls out to a 2-shot…Screen Shot 2015-10-19 at 21.31.22

…which becomes a deep 2 as Doc walks away…Screen Shot 2015-10-19 at 21.31.47

…before pushing in to Doc at the blackboard…Screen Shot 2015-10-19 at 21.32.07

…and panning with him to the DeLorean…Screen Shot 2015-10-19 at 21.32.25

…then pulls back out to include Marty again…Screen Shot 2015-10-19 at 21.32.41

…rests briefly on another 2-shot…Screen Shot 2015-10-19 at 21.32.46

…then becomes a deep 2 once more as Doc moves away…Screen Shot 2015-10-19 at 21.32.55

…then a flat 2 again…Screen Shot 2015-10-19 at 21.33.16

…then a deep 2 again…Screen Shot 2015-10-19 at 21.33.33

…then pushes in to a tighter 2 as Marty realises it’s all his fault…Screen Shot 2015-10-19 at 21.33.40

…then it becomes an over-the-shoulder as Marty turns to Doc at the DeLorean…Screen Shot 2015-10-19 at 21.33.49

…then a 50/50 as they face each other…Screen Shot 2015-10-19 at 21.33.59

…then it tracks back to the blackboard…Screen Shot 2015-10-19 at 21.34.03

…and tracks in further to emphasise the reveal of the second newspaper…Screen Shot 2015-10-19 at 21.34.16

…then dollies back with Marty as he takes it into the foreground…Screen Shot 2015-10-19 at 21.34.26

…then dollies into a tight 2 to end.Screen Shot 2015-10-19 at 21.34.41I wonder how many takes they did of this, and how many different takes are used in the edit. Just after the reveal of the second paper there’s a cut to Einstein the dog, and when we come back to the developing shot the framing is slightly different, suggesting the dog shot is there to allow a splicing of takes more than anything else. All the other cuts in the scene are strongly motivated though, and seem to be there for narrative reasons rather than take-hopping.

Given the shortness of the lens – not more than a 35mm, I reckon – it’s likely that Michael J. Fox had to deliberately move out of the camera’s way at certain points, and the table seen in the opening frame may have been slid out by grips early on in the take to facilitate camera movement. I’d love to see some behind-the-scenes footage from this day on set, but none seems to exist.

So there you have it, one small example of the inventiveness which makes these films so enduring. Now stop reading this and get back to your trilogy marathon!

Classic Single Developing Shot in Back to the Future: Part II

20 Facts About the Cinematography of Mad Max: Fury Road

cars

The Australian Cinematographers’ Society has released a video of a two hour talk by Fury Road DP John Seale, ACS, ASC. It’s a fascinating watch, with lots of interesting info and some dry Aussie wit; more than once Seale talks about “taking to the drink” when things got tricky!

Watch the video here. (Embedding is disabled.)

John Seale, ACS, ASC

Here are the most interesting points I took from it, with a few extra details added from American Cinematographer’s article on Fury Road:

  1. The team spent years developing a new 3D camera based on a sensor built for the US military. Director George Miller wanted something rugged enough to survive dusty desert work and small enough to fit into the truck cabs. Camera tests revealed it had only five stops of dynamic range, nowhere near enough to capture detail both outside and inside the cabs in the same frame.
  2. The film was ultimately shot on Arri Alexas (four Ms and six Pluses) and converted to 3D in post. Absolutely no consideration to the 3D format was given during shooting.
  3. When early footage failed to please DIT Marc Jason Maier and his meters, Seale agreed to downrate the Alexa from its published 800 ASA to 400 ASA. The subsequent footage was deemed technically correct by Maier and made Seale much more comfortable that he was recording what he thought he was recording in terms of exposure.
  4. Dailies were rendered with two different LUTs: the standard Rec 709 and a custom one designed to emulate a one-light celluloid work-print. This was for the benefit of Seale, for whom Fury Road was his first digital movie.
  5. Canon 5D Mark IIs with the Technicolor CineStyle profile were used as crash cams. Sky replacement had to be executed on many of the 5D shots to remove banding, presumably caused by the small colour space.
  6. Olympus and Nikon DSLRs were used a little as well.
  7. For close-ups of Max escaping the Citadel early in the film, a Blackmagic Cinema Camera with a Tokina 11-16mm zoom (a combination I used frequently on The First Musketeer!) was rigged on a Movi.
  8. The film was lensed predominantly on zooms, with a few Super Speed primes kept on standby for when the daylight was running out.
  9. Custom-built 15mm and 16mm primes were used inside the cab of the War Rig. The lenses’ hyperfocal distance had been adjusted so that everything from 0′ to 9′ (i.e. everything inside the cab) would be in focus.
  10. Lighting and camera rigs hung from the roofs of the vehicles had to be stripped back because of the shadows they cast. Instead, platforms were rigged on the sides of the trucks, and a track-and-pulley system was built into the War Rig’s cab’s ceiling from which cameras could be suspended.bts
  11. Scenes in the cab were shot at T5.6, with strips of LEDs mounted on the ceiling and on the pillars between the front and rear doors to bring up the actors inside.
  12. Day-for-night scenes were overexposed by two stops so that characters in the shadows could be lifted in the grade, if necessary, without noise.
  13. The film was storyboarded early on, but a script was only written when the studio demanded it!
  14. Miller wanted to shoot everything single-camera, including action, but Seale began sneaking in with extra cameras and soon convinced his director of the efficacy of this method.
  15. Much of the film was shot as Poor Man’s Process, or “Sim Trav” as Seale calls it.
  16. In post, Miller chose shots with camera shake that he liked and had that shake digitally applied to other shots.
  17. Miller decreed that the subject of the shot should always be framed centrally. This allowed him to edit faster, because time wouldn’t be lost on each cut as the viewer searched the width of the anamorphic frame for the subject.
  18. Extensive use was made of two Edge Arms. An evolutionary step up from Russian Arms, these are cameras mounted on robotic arms which are in turn mounted on pick-up trucks.
  19. Other vehicle rigs included custom-built buggies with Alexa Pluses mounted front and rear, and a “Ledge” mount which was a 30′ truss tower built on the back of a truck, allowing high angles without the need for drones or helicopters.
  20. Leaf blowers were used, via flexible pipes, to keep sand off the lenses in moving shots.

It’s interesting to hear how laid-back Seale is. He gave his focus puller a great degree of leeway in choosing the lens package, and let his DIT, gaffer and operator handle the technical side of recording and exposing the image. This level of trust in his team must give him tremendous capacity to focus (pardon the pun) on the creative side of his job without worrying about the details.

I’ll leave you with the EPK B-roll from Fury Road…

20 Facts About the Cinematography of Mad Max: Fury Road

2015 Cinematography Showreel

I thought it was about time my showreel got an update, so here it is:

Please get in touch if you need a DP. I’ll consider most projects as long as they’re creative and not entirely unpaid.

These are the films, series and promos featured on the reel. If you want to find out more about any of these productions, you can find links in the showreel’s YouTube description.

* Note: I only worked on the trailer, not the film itself.

The music is “Up is a Down” from the OST of Pirates of the Caribbean at World’s End.

2015 Cinematography Showreel

Mini-DV Memories

Goodbye, Mini-DV
Goodbye, Mini-DV

I’m moving soon, to a much smaller place, and lots of my stuff has to go. Amongst the things going into bin bags at the moment is a large number of Mini-DV tapes. Funny to think how ubiquitous they were in the micro-budget movie world just a few years ago, and now they’re a thing of the past.

How could a mere 720 x 576 pixels ever have looked good? (I frequently deinterlaced my DV footage and cropped it to 16:9, which must have reduced the vertical resolution to about 200 lines!) Cathode ray tubes certainly helped. CRT screens have a lovely softness, which I still prefer to LCDs, and that softness blurred the limited number of pixels into one organic image. Bright colours were particularly softened, a fact which Mini-DV compression exploited by devoting little data to chrominance, resulting in blocky saturated colours that looked terrible on your computer, but which blurred magically back into acceptability on your CRT TV.

An example of very blocky saturated colours in Soul Searcher

I don’t know how many stops of dynamic range a typical DV camera had, but it wasn’t many. Shooting in daylight was a nightmare; you could never find an aperture setting where you weren’t losing loads of detail in blown-out whites and/or crushed blacks. I embraced the contrast, lighting everything like film noir, which the format handled pretty well. In this 2005 featurette I outline the lighting techniques I learnt for Mini-DV. While incredibly crude by today’s standards, the underlying principles are still sound.

Shooting Soul Searcher on my XL1

The video bitrate of DV was just 25mbps. By comparison, my Blackmagic Production Camera shoots at 880mbps – that’s 35 times more detail per frame. Despite this, there were a few big theatrical films shot on DV, Lars von Trier’s The Idiots being first. Perhaps the best known is 28 Days Later, shot on a Canon XL1, a camera I owned for several years.

I loved that camera! And in some ways it was better than today’s ultra-HD cinema cameras. It was so light and comfy to put on your shoulder. You didn’t need a rig – it actually had a bloody hand grip next to the lens! And get this – it had a viewfinder! That came with it, no extra charge! There was no DITing, no dual system sound to sync. How easy it all was!

A nice bit of noir lighting from Soul Searcher

After shooting my feature film Soul Searcher and countless other projects I DPed, my XL1 met an ignoble end, its lenses Ebayed and its malfunctioning body Freecycled. I’d foolishly bought a Sony A1, an awful, awful HDV camera that I was stuck with until I joined the DSLR revolution in 2011.

minidvThat A1 will not survive my moving cull either. It’s languished in a drawer for the last few years, my sole remaining means of playing back old DV tapes. Now the tapes are going, so will the camera.

So goodbye, Mini-DV. I cut my teeth on you. Your accessibility allowed me to learn my craft, and your shonky dynamic range forced me to learn to control light. For that I will always be grateful.

Mini-DV Memories

Traction: A First Time for Everything

Me (far right) with the cast and crew of Traction in December 1999

Fifteen years ago I made my first professional film, Traction. Okay, it wasn’t professional in the strictest sense – I wasn’t paid – but I racked up a number of important firsts on the project and learnt a lot. Based on a true story, it’s about a teenaged boy undergoing traction for his juvenile arthritis.

Today you can go out and make a film on your smartphone and reach an instant audience via YouTube, which is great, but you need to collaborate with others if your work is ever going to reach its full potential. Here’s how Traction challenged and improved me.

  • First time having a production company to answer to. Traction was produced by The Rural Media Company as part of its youth media programme, in which I was a participant. It was a completely new experience for me to have to submit a draft script and take on board the feedback of the company’s senior staff. I was probably resistant at first, but their advice was good. You’re not compromising your artistic vision by asking for and acting on feedback from others, you’re making it stronger. And when you work with a budget, you will always have to answer to the people supplying that budget, so get used to arguing your case and sometimes losing.
  • First time directing anyone other than my friends. I had to learn to be clearer and more communicative to get the best out of the other young people who were acting as my crew. They were all into the project far more than my corralled schoolfriends had ever been into my amateur films, which was great and really energising for me as a director.
  • First time directing anyone with acting experience. How to work with actors is something I’m still learning to this day, but the process started right there in 1999 when I ran my very first audition at Hereford College of Art and then directed Rowan Middleton for the two days of the shoot. It’s been said many times by many people, but don’t just cast your mates in your films. Unless your mates are really good actors and right for the parts. Obviously.
  • First time having to stick to a schedule. Although the only costs of Traction’s production were travel and catering expenses, and the youth worker’s fee, I still had a responsibility to ensure that Rural Media did not have to pay for more than the agreed two days’ worth of those costs. This forced me to be prepared, disciplined and ready to compromise when time ran short. Staying on schedule is always a challenge for a director, and the sooner you can start to learn this skill, the better.
  • First time shooting on digital video. Traction was a great opportunity for me to learn a new medium, having worked exclusively on the analogue Video-8 format up to that point. Most filmmakers own a camera, but have you considered hiring or borrowing a better model for your next project? Push yourself, learn to use a new bit of kit and raise your production values at the same time.
  • First time using lighting. Many new filmmakers are scared of lighting, and I probably was too before Traction. Don’t be afraid to experiment; it’s one of the best ways to learn.
  • First time having to use only copyright-cleared music. If you’re only posting your films on YouTube, you can get away with using copyrighted tracks and the system will just put an iTunes link under your video. But dipping into the vast catalogue of pre-existing music can make you lazy. Why not advertise for a composer – there are so many out there desperate to get a start in film scoring – and get some original music for your piece?
  • First time being limited to a final running time. Traction was made for a competition which had a strict five minute time limit. Nothing sharpens your editing skills more than a hard running time limit, and for that reason I’d recommend that every filmmaker try entering a competition at some point in their career.

If you’re a new filmmaker trying to raise your game, ask yourself if you’ve pushed in every direction you can to improve your work, or are you stuck in your comfort zone?

traction6
Left to right: sound recordist John Galloway, me, and actors Rowan Middleton and Rosie Laws
Traction: A First Time for Everything

The Steadicam, the Blackmagic and the Troublesome Converters

I spent last week in rural Sussex DPing Ted Duran’s 30 minute action-comedy, The Gong Fu Connection. It was a great shoot with a real community atmosphere, excellent food and beautiful weather. I’ve just been looking through the rushes and I’m blown away by the amazing images that my Blackmagic Production Camera has produced. They are very filmic with an incredible amount of detail, even though we only shot in 1080P.

Colin operates the Canon C300 on his Steadicam Pilot
Colin Smith operates the Canon C300 on his Steadicam Pilot

Not everything went to plan though. The aim was to capture the fights using fluid Steadicam photography, and since I hadn’t used a Blackmagic with Colin’s Steadicam Pilot before, he and I met up the weekend before to test the set-up.

The chief difficulty was that the rig’s built-in monitor accepts only a composite video input, while the Blackmagic outputs only an SDI signal. I searched online for a portable SDI to composite converter, but no such thing seemed to exist. I already had an SDI to HDMI converter, so the obvious solution was to buy an HDMI to composite converter. But the more links a chain has, the more opportunity for weakness.

I made the purchase and Colin sorted out power adapters so that both converters could run off the same battery as the Steadicam monitor. We tested it at my flat and it worked perfectly.

Flash-forward a week and we’re on set preparing the Steadicam for The Gong Fu Connection’s first martial arts sequence. All we’re getting on the Steadicam’s monitor are colour bars, which are output by the HDMI to composite converter when it’s receiving no input signal. The other converter, the SDI to HDMI one, has packed up.

Without a working monitor on the bottom of the rig, Colin can’t watch his step and frame the shot at the same time. The Steadicam is essentially useless.

There is a Canon C300 on set, being used for behind-the-scenes shooting. Although Ted and I are both keen to shoot the main film exclusively on the Blackmagic, to avoid severely disrupting the schedule we decide to shoot the day’s Steadicam material on the C300. (The C300 has SDI, HDMI and composite outputs. Blackmagic Design take note.)

DO NOT BUY THIS CONVERTER.

At lunchtime I get on the wifi and see if I can order a replacement SDI to HDMI converter. The only one that can be delivered the next day (a Sunday) is the same model as the one that packed up. Having little choice, I order it. Amazingly it is indeed delivered on the Sunday. Nice one, Amazon.

Unfortunately it doesn’t work. I was at least hoping for the paltry month of service I got from the previous one. But no, this one is dead on arrival.

By a process of elimination we check that the converter is indeed the piece at fault. We swap cables and cameras and the results are the same.

We continue to shoot the Steadicam material on the C300.

But I have one last desperate idea to get the Blackmagic working on the rig.

The CCTV camera set up to film the Blackmagic's screen
The CCTV camera, set up to film the Blackmagic’s screen

On Monday morning I send our driver, Lucky, to the nearest Maplin. I’ve given him instructions to buy a small CCTV camera. When he gets back with it I have Colin attach it to the rig behind the Blackmagic, filming the Blackmagic’s screen. The CCTV camera outputs a composite signal directly to the Steadicam’s monitor.

Incredibly, this works. But it does mean enclosing the Blackmagic and the CCTV camera in black wrap to eliminate reflections on the former’s screen. Which means we can’t get to the iris controls, and we’re relying on the distances marked on the lens barrel to focus. And to make matters worse, the Steadicam Pilot can’t take the weight of a V-lock battery, so the Blackmagic must run off its short-lived internal battery. Between takes we have to plug it into a handheld V-lock to top up the charge.

After capturing two or three successful set-ups with this ludicrous rig, we decide it’s slowing us down too much. I finally abandon all hope of using the Blackmagic on the Steadicam.

For those interested in how the C300 and Blackmagic stack up against each other, the Canon has a sharper, more video look compared with the Blackmagic’s filmic images. The Canon also has more compression artefacts due to its lower bitrate. But they seem to cut together alright once graded.

The lack of an HDMI output on the Blackmagic has been the one thing that’s really caused me problems since buying the camera. I’d be tempted to go for a Kinefinity mod if it wasn’t so expensive…

Of course, the camera is still incredible value for money. Personally I think the only competitors in terms of image quality are the Reds. (The Alexa and film are in a whole other league.) But it is strange that Blackmagic Design claim to have built the camera for people working in the low budget world, but apparently didn’t consider that such people rarely have access to SDI monitors.

Stay tuned for more on The Gong Fu Connection shoot. There is still time to contribute to the project’s crowdfunding campaign over at Indiegogo.

The Steadicam, the Blackmagic and the Troublesome Converters