24 Things I Learnt from CineFest

img_1220Last week I was fortunate enough to attend the Bristol International Festival of Cinematography: five days of masterclasses and panel discussions with a range of DPs from Oscar-winners like Chris Menges, ASC, BSC and Billy Williams, BSC, OBE to emerging cinematographers like Rina Yang. It was fascinating to watch the likes of Williams lighting the purpose-built set and explaining his decisions as he went. I learnt a huge amount, so I decided to share some of the opinions and nuggets of wisdom I collected.

  • Everyone agrees that the role of the DP is being diminished. Films are more collaborative than they used to be, often with lots of input from the VFX team right from the start.

Getting Work

  • You have to create your own luck. (Rina Yang)
  • Going to LA parties and schmoozing helps. (Roberto Schaefer, AIC, ASC)
  • Each clip on your showreel should make the viewer feel something. (Matt Gray, BSC)

Prep

  • Director Philippa Lowthorpe and Gray, her DP, spent weeks of prep getting on the same page when they worked together – chatting, exchanging photos, films, and so on.
  • Spend as much time as you can with the director in the early stages of prep, because as you get closer to the shoot they will be too busy with other stuff. (Schaefer)
  • Start with ten ideas about how you want to approach the cinematography of the film. If you hang onto five of them throughout the shoot you’re doing well. (Gray)
  • Hire a gaffer who knows more than you do. (Schaefer)

Equipment

  • On Gandhi, co-cinematographer Billy Williams, BSC, OBE was granted only half of the lighting kit he asked for. That was a $22 million movie which won eight Oscars!
  • Schaefer usually carries a 24’x30′ mirror in his kit, in case he needs to get an angle from somewhere where the camera won’t fit.
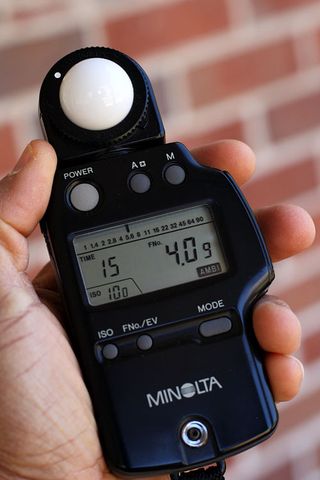
  • Schaefer doesn’t used OLED monitors to light from, because the blacks are richer than they will ever be seen by an audience on any other device, including in a cinema. He won’t judge the lighting by the EVF either, only a monitor calibrated by the DIT.
  • Focus drop-off is faster on digital than on film. Hence the current popularity of Cooke lenses, which soften the drop-off.
  • Nic Knowland, BSC uses a DSLR as a viewfinder to pick his shots. He also likes to record takes on his Convergent monitor so he can review them quickly for lighting issues.

On Set

  • You have to give the actors freedom, which may mean compromising the cinematography. (Nigel Waters, BSC)
  • Gray would never ask an actor to the find the light. The light needs to find them! As soon as actors are freed from marks, they can truly inhabit the space. [Note: in my experience, some actors absolutely insist on marks. Different strokes for different folks.]
  • On digital, everyone wants to shoot the rehearsal. (Schaefer)
  • Digital encourages more takes, but more takes use up time, drains actors’ energy and creates more work for the editor. Doing fewer takes encourages people to bring their A game to take one. (Williams)
  • Director Philippa Lowthorpe prefers a DP who operates because there is no filter between the ideas you’ve discussed in prep and the operation of the camera.

Lighting

  • Sometimes when you start lighting a set, you don’t where you’re going with it. You build a look, stroke by stroke, and see where it takes you. (Knowland)
  • Williams advocates maintaining the same stop throughout a scene, because your eye gets used to judging that exposure.
  • Knowland relies more on false colours on his monitor than on his light meter.
  • Schaefer often foregoes his traditional light and colour meters for an iPad app called Cine Meter III.
  • Knowland will go to 359º on the shutter if he’s struggling for light.
  • It’s worth checking the grade on a cheap monitor or TV. That’s how most people will watch it. (Schaefer)
24 Things I Learnt from CineFest

4 Reasons to Use a Light Meter

lightmeterIn the celluloid era, light meters were essential to ensure proper exposure of the film negative. In today’s digital world, where you can immediately see your images on a monitor, it may seem like light meters are obsolete.

But these devices still have their place in modern cinematography. On a bigger production, when you may not be at the camera the whole time, they can be very useful. Interrupting your ACs (as they set up the sticks, swing the lens, put on the eyepiece extension, balance the fluid head, run cables to the monitors, etc.) in order to see if your image is correctly exposed on camera can be inefficient.

And having the reliable, hard number a light meter gives you can be more reassuring than judging false colours or histograms.

Here are four ways in which I used my brand new light meter on my last production, The Little Mermaid:

  1. To call ND filters. When shooting outdoors, I would take light readings in the sun and in the shade, and when then the sun was in, to understand the range of light levels I was dealing with. I could then pick an ND filter that would put me at a stop at where I would still have the room to adjust the iris a little either way if the light got brighter or darker. This was particularly important when we were shooting on water in a splash bag, when changing NDs or even just adjusting the iris was a longer process. (In my next post I’ll look deeper into stop maths and ND filters to demonstrate exactly how to select an ND filter based on a light reading.)
  2. To measure contrast ratios. The Alexa can handle up to seven stops of over-exposure and eight stops of under-exposure. Knowing this, I could use my meter to see if certain areas were going to blow out or crush, before the camera was even set up. I could also measure how many stops the key side of an actor’s face was above the fill side, and thus work out the key-to-fill ratio. At present this is still something I judge by eye on the monitor, but the more I get to know the numbers, the more I suspect I will start determining it in advance.
  3. To check green-screens are properly lit. The visual effects supervisor, Jafar, told me that green-screens should be exposed at key, or up to half a stop over key. So if I was shooting at T4, I would walk along the green-screen and take readings at various points to make sure the meter was generally giving me between f4 and f4½.
  4. To schedule a dusk shot. For a twilight scene on a beach, I needed to know in advance exactly what our window of opportunity was. Looking up the sunset time is all well and good, but it doesn’t help you figure out how long afterwards there will be enough ambient light left to shoot with. So while at location the day before, I went out onto the beach and took light readings every few minutes after sundown. These told me I had 20 minutes from sunset until the ambient light dropped below what the lenses could expose.

Do you use a light meter? And if so, how?

4 Reasons to Use a Light Meter

10 Things to Look for in a Schedule

scheduleThe director of photography is one of the crew members who has the greatest influence over the pace of a shoot. How long you take to light each set-up has a huge impact on how much gets done in a day. So it’s only natural that you are usually consulted on the shooting schedule during preproduction. More often than not, your pleas for more shooting days will be ignored because there simply isn’t the money. Nonetheless, it’s your duty to feedback on the schedule, and if you can be specific about your concerns then you may occasionally succeed in getting tweaks made. And if not, at least you can say, “I told you so.”

Here are some things I’m looking for when I assess a schedule.

  1. Length of shoot. Are there enough days? Is there a second unit to mop up up anything you drop, or do you have to cover everything on every day yourself?
  2. Turnarounds. Is there a full day of daylight exterior immediately after a night shoot, for example?
  3. Night scenes scheduled during daylight hours. Is the AD expecting you to black out windows, or is this a mistake? I hate blacking out windows; it robs the visuals of depth.
  4. Stunts, VFX, make-up gags etc. Has the AD factored in the extra set-up time that comes with these things? Again, if there’s a second unit for this stuff then it may not affect you.
  5. Nightmare shots. Has adequate time been allowed for any special, fancy shots that might take longer than usual to set up?
  6. Location moves. Are there any location moves during the day, even just between rooms in the same house? Has time been allowed for these moves? Has extra time been allowed for the first scene in each location, to allow it to be lit properly? This may be less of an issue if you have a pre-rig crew.
  7. Easing into it. Does the shoot start off a little easier to give the crew time to get into the swing of things?
  8. Movie star shots. Are there any big heroic or romantic moments late in the schedule? Towards the end of the shoot, everyone will be tired, and this will show on the actors’ faces. Try to have key close-ups brought forward in the schedule, or warn the AD that lighting and make-up will take longer than normal.
  9. Seasonal variations. On long shoots, there may be noticeable changes in season (trees in leaf/not in leaf, for examples) during production, and the available hours of daylight may change. Has this been taken into consideration?
  10. Cover sets. Has the AD got contingency plans if the weather is bad?

A good 1st AD should have thought of most if not all of these things, but it never hurts to check them out yourself.

Want to learn more about scheduling? Check out my posts on scheduling my feature film Soul Searcher and my short film Stop/Eject.

production-schedule

10 Things to Look for in a Schedule

10 Ways Low Budget Shoots Differ from Micro Budget Ones

My camera and lighting crew for last year's feature
My camera and lighting crew for last year’s feature

I’ve been working in the film business for 16 years now, but until very recently I hadn’t really worked on a ‘proper’ production, one that had a budget above five figures. Here are some differences I noticed stepping up from micro-budget to low budget…

  1. Formal crew structure. There is a proper separation between departments, even between camera and lighting (which is quite strange for the DP, in charge of both). Woe betide anyone who moves set dressing without asking the art department, or who plugs something in without checking with the sparks, or who stores equipment in a room without asking locations.
  2. Proper production and locations departments. The feature I worked on last year had two producers, a line producer, a production manager and a production co-ordinator, plus a locations department. I’m used to productions where one person does all those jobs, and often directs as well. Figuring out which person to approach about any given issue was fun! (Creative Skillset’s website is a good place to check if you’re not sure who does what.)
  3. Advance prep. With a large crew, time cannot be wasted waiting for things that could have been pre-rigged. Heads of department are expected to think ahead and splinter their crew if necessary to be ready for things coming later in the day or week. For a DP this most commonly means pre-rigging distro and/or lighting.
  4. Delegation. Aside from operating the camera, I did little hands-on work on the recent feature shoot. Lens changes, grip rigging and lighting set-ups are all handled by other people on the instructions of me, and of the gaffer and the 1st AC. Sometimes this means the DP can go and have a cup of tea, but often it provides important thinking and planning time – an opportunity to reccie the next set and design the lighting, or to review footage in the edit room, or reccie a possible location with other HoDs, or discuss the afternoon’s shots with the director. It’s impossible to do this sort of forward planning if you’re changing your own lenses and setting your own lamps up.
  5. Hard wrap times. On micro-budget shoots the wrap time is a theoretical concept, with no more relevance to reality than an episode of Sponge Bob Square Pants. On a bigger production, you wrap at wrap time, because if you don’t then the gaffer might pull the plug. Occasionally the crew will be asked if they are willing to go over by half an hour, say, in order to complete a scene. But everyone must agree, and that half hour must be deducted from the next day.
  6. Lunch break, not just lunch. In micro-budget land, getting lunch at all is not a given. But when you do get it, you’re often expected to eat as quickly as possible and get straight back to work. On a bigger production you get your hour lunch break come hell or high water. And there’s proper catering. With desserts!
  7. Reliance on the crew. If you’re working with a small camera and mains power, you can stay late with the director and steal a few extra shots, if necessary. But when everything’s run off a generator, which only the gaffer is qualified to operate, and your camera package is almost too heavy to lift onto your own shoulder, and you have no idea how half the bits and bobs connected to it work because your ACs always deal with it, you really can’t do anything on your own.
  8. Permissions and qualifications. For insurance reasons you must have qualified people overseeing the electrics and the rigging. You must also check with the locations department before using any space or equipment or filming in any area that was not discussed and signed off in preproduction.
  9. Paperwork. Most HoDs seem to have some kind of daily paperwork to do on a larger production.The DP happily escapes this (the ACs handle the camera reports), though they do have to complete a risk assessment before shooting commences.
  10. People management. Because of the size of the team under you, people management becomes a major part of an HoD’s job. I’ll go into more detail on this in a future post.
10 Ways Low Budget Shoots Differ from Micro Budget Ones

5 Things Directors Should Know About Cinematography

IMG_4793_2watermark-1000pxAny director worth their salt will be skilled in telling a story with the camera. But, quite understandably, they’re not familiar with the key concepts of cinematography – particularly the lighting side of cinematography – which a DP employs every day to create images that have impact, mood and production value. For the most part, directors don’t need to know these things – after all, that’s what the DP’s there for – but understanding a few of the basic concepts can help set up your film for visual excellence before the DP even gets involved.

1. We don’t light from the front.

It is logical to assume that light coming from behind the camera will give the best illumination to a scene. And on a purely cold, scientific level, it’s true. But on an aesthetic level, it couldn’t be more wrong. Quite apart from the practical issues of boom shadows and actors squinting in the sun, frontlight gives a flat, depthless image similar to a photo taken with flash.

Lighting from behind. Gotta love it.

Similarly, anyone who has taken photos with a camera in automatic mode will have been told – or quickly learnt – that shooting towards the sun, or when indoors, towards a window, is a bad idea, resulting in silhouettes and/or blown-out skies. So directors are often surprised when towards the sun (or a window) is EXACTLY the direction I want to shoot in, because it supplies beautiful backlight and allows me to fill in the shadow side – the side towards camera – as I see fit. No, it’s not going to be a silhouette (unless that’s what we’re going for) because I have a lamps and I have manual control of my iris.

2. Dark scenes do not require a camera with good low light sensitivity.

It depends what you mean by dark. A scene that is dark as a creative decision won’t actually be dark in reality because it will still be lit, perhaps highly lit, to create a moody, contrasty look. Therefore the camera’s sensitivity is not much of an issue.

A scene that is dark because you don’t have the budget to light it properly – yes, that’s going to need a sensitive camera if you’re going to see anything but noise.

3. You can’t fix everything in the grade.

It is truly amazing what can be done with today’s colour correction software, but there are two things it can’t do: it can’t save an image that was seriously underlit or underexposed, and it can’t change the angle or quality of light. Colour and intensity, yes. Angle and quality (soft/hard), no. And since these are the main things a DP determines, grading can never replace a good cinematographer. If it doesn’t look good on the monitor on the day, it will probably never look good.

4. We can’t light without seeing the blocking.

I can’t count the number of times I’ve turned up on set and asked to see the blocking, and been told no because the actors actors are in make-up, “but they’re going to stand kind of here.” In most circumstances, the first scene of the day should be blocked BEFORE the actors go to make-up. That way the DP can be lighting while the cast is getting made up, which is much more time efficient. Otherwise the DP tinkers about trying to light the space and looking at their watch, then when the talent comes out everyone is kept waiting while the DP changes all the lighting. Because inevitably the actors will want to do something different than what the director had in mind, or the director forgot to mention that one of the actors has to be seen coming through the door at the start, etc, etc. Blocking can also throw up problems with the scene which can be solved by various other departments while make-up is going on.

Great costume - check. Great location - check. (Photo from The First Musketeer by Jessica Ozlo)
Great costume – check. Great location – check. (Photo from The First Musketeer by Jessica Ozlo)

5. A good camera and a good DP are not substitutes for good design.

Light and lensing can only do so much. If what’s put in front of the camera doesn’t look good to start with, there’s very little I can do about it. Get an art director. Please, please, please, get an art director. They will do much more for the look of your film than I can. I don’t care if it’s a futuristic sci-fi movie or a gritty drama shot in a student flat, you need an experienced person with an artistic eye adding character to the sets and locations, developing a palette and composing everything beautifully for the camera.

5 Things Directors Should Know About Cinematography

9 Tips for Easier Sound Syncing

Colin Smith slates a shot on Stop/Eject
Colin Smith slates a shot on Stop/Eject. Photo: Paul Bednall

While syncing sound in an edit recently I came across a number of little mistakes that cost me time, so I decided to put together some on-set and off-set tips for smooth sound syncing.

On set: tips for the 2nd AC

  1. Get the slate and take number on the slate right. This means a dedicated 2nd AC (this American term seems to have supplanted the more traditional British clapper-loader), not just any old crew member grabbing the slate at the last minute.
  2. Get the date on the slate right. This can be very helpful for starting to match up sound and picture in a large project if other methods fail.
  3. Hold the slate so that your fingers are not covering any of the info on it.
  4. Make MOS (mute) shots very clear by holding the sticks with your fingers through them.
  5. Make sure the rest of the cast and crew appreciate the importance of being quiet while the slate and take number are read out. It’s a real pain for the editing department if the numbers can’t be heard over chit-chat and last-minute notes from the director.
  6. Speak clearly and differentiate any numbers that could be misheard, e.g. “slate one three” and “slate three zero” instead of the similar-sounding “slate thirteen” and “slate thirty”.
Rick Goldsmith slates a steadicam shot on Stop/Eject. Photo: Paul Bednall

For more on best slating practice, see my Slating 101 blog post.

Off set: tips for the DIT and assistant editor

  1. I recommend renaming both sound and video files to contain the slate and take number, but be sure to do this immediately after ingesting the material and on all copies of it. There is nothing worse than having copies of the same file with different names floating around.
  2. This should be obvious, but please, please, please sync your sound BEFORE starting to edit or I will hunt you down and kill you. No excuses.
  3. An esoteric one for any dinosaurs like me still using Final Cut 7: make sure you’ve set your project’s frame rate correctly (in Easy Setup) before importing your audio rushes. Otherwise FCP will assign them timecodes based on the wrong rate, leading to errors and sound falling out of sync if you ever need to relink your project’s media.

Follow these guidelines and dual system sound will be painless – well, as painless as it can ever be!

9 Tips for Easier Sound Syncing

5 Tips for Successful Pick-ups

Discussing the next set-up on the Ren pick-ups shoot with director Kate Madison. Photo: Michael Hudson

Recently I’ve been involved in pick-ups shoots for a couple of projects I lensed last year: action-comedy feature The Gong Fu Connection and fantasy series Ren. Both pick-up shoots were strange experiences, featuring some very familiar aspects of the original shoot – locations, sets, costumes – but noticeably lacking others – certain actors, crew members and so on. The Ren pick-ups in particular were like re-living principal photography in microcosm, with stressful crowd shoots followed by more relaxed, smaller scenes and finally night shots with flaming arrows again!

A CTB-gelled Arrilite 1000 stands in for the 2.5K we used for backlight during principal photography on Ren! Photo: Michael Hudson
A CTB-gelled Arrilite 1000 stands in for the 2.5K HMI used for backlight during principal photography on Ren! Photo: Michael Hudson

I’ve blogged previously about how a director/producer can prepare for pick-ups – by keeping certain key props and costumes, for example – but today I have a few thoughts from a DP’s perspective.

1. Keep a record of lighting plans. I have a pretty good memory for my lighting set-ups, but not everyone does, so keeping notes is a good idea. Your gaffer may even do this for you. I frequently use this blog as a means of recording lighting set-ups, and indeed tried to access it during the Ren pick-ups shoot but was foiled by dodgy wifi.

2. Keep camera logs. On a properly crewed shoot this will be the 2nd AC’s job. The logs should include at least the following info for each slate: lens, aperture, ASA, white balance and shutter angle. This can be useful in principal photography too, for example if you shoot the two parts of a shot-reverse at different ends of the day or different days all together, and need to make sure you use the same lens.

Production assistant Claire Finn tends the brazier which provides smoke in the absence of the Artem smoke gun we used during principal photography. Photo: Michael Hudson
Production assistant Claire Finn tends the brazier which provides smoke in the absence of the Artem smoke gun used during principal photography. Photo: Michael Hudson

3. Have the original scene handy when you shoot the pick-ups. Load the edit onto a laptop or tablet so that you can compare it on set to the new material you’re framing up.

4. Own a bit of lighting kit if you can. In the shed I have some battered old Arrilites and a few other bits and pieces of gear that has seen better days. On a proper shoot I would leave this at home and have the production hire much better kit. But for pick-ups, when there’s often no money left, this stuff can come in handy.

5. Keep gels. If you employ an unusual colour of gel during principal photography, try to keep a piece of it in case you need to revisit that lighting set-up in pick-ups. Production will have to pay for the gel once it’s been used anyway. On the Ren pick-ups shoot, after pulling all of my gels out of the plastic kitchen bin I keep them in, I was relieved to find that I still had two pieces of the Urban Sodium gel I used in the flaming arrows scene the first time around.

Urban Sodium gel provides the grungy orange light for the flaming arrows scene, just as it did last November. Photo: Hermes Contreras
5 Tips for Successful Pick-ups

Giving Yourself Somewhere to Go

On the recce for The Second Shepherd's Play. Photo: Douglas Morse
On the recce for The Second Shepherd’s Play. Photo: Douglas Morse

As a cinematographer, it can often be tempting to make your shots look as slick and beautiful as possible. But that’s not always right for the story. And sometimes it can leave you nowhere to go.

Currently I’m shooting The Second Shepherds’ Play, a medieval comedy adaptation, for director Douglas Morse. The story starts in the mud and drizzle of three shepherds’ daily drudge, and in a Python-esque twist ends up in the nativity. The titular trio develop from a base, selfish, almost animalistic state to something much more divine.

So, much as my instincts filming the opening scenes yesterday were to have a shallow depth of field and bounce boards everywhere to put a sparkle in the shepherds’ eyes, this wouldn’t have been right for this stage of the film. We had to have somewhere to go, so I shot at around f9 all day with unmodified natural, overcast light. As we get towards the end of the story – we’re shooting roughly in story order – I’ll start to use eyelight and more sculpted illumination and reduce the depth of field, as well as switching from handheld to sticks.

Grading episode one of Ren

Similarly, grading episode one of Ren the other day, it was important to keep things bright and cheerful, so that later episodes could be colder and darker by comparison when things go wrong for our heroes. And playing the long game, I lit Ren herself with soft, shadowless light for most of the first season, so that as she develops from innocence to more of an action heroine in later seasons, her lighting can get harder and moodier.

Like all heads of department on a production, DPs are storytellers, and it all comes down to doing what’s right for the story, and what’s right for that moment in the story.

Giving Yourself Somewhere to Go

Shooting in Rain

Il pleut dans la nuit. Ce n'est pas jolie.
The rain in France falls mostly on the crew of The First Musketeer.

Rain. How we’d love to go inside and have a cup of tea when the old British precipitation interrupts a shoot, but quite often the schedule demands that we carry on regardless. Here are a few tips for filming in the wet stuff.

Cover the Camera

If you don’t have a proper rain cover, a transparent recycling bag with a couple of holes cut in it will usually do the job, but have someone hold an umbrella over the camera at all times as added protection. If you have them, put on a matte box and top flag to keep rain off the lens.

Check the Lens

Condensation may well be an issue. Have an assistant with a ready supply of dry lens tissues (in a ziplock bag), because a cloth will quickly get too damp to be of any use.

In this photo by Miriam Davies from a location shoot on Ren, you can see a bagged LED panel on the left of frame.

Look After the Lighting

Transparent recycling bags are perfect for covering LED panels, which don’t get hot.

Tungsten lamps get so hot that they burn off any water before it can do any damage, so as long as they’re switched on you don’t need to worry about them getting wet, but you should wrap the switch in a plastic bag.

The same goes for HMIs, though you’ll need to put a bin bag over the ballast. Make sure the bag is loose at the top, so that the heat from the ballast can inflate it and then dissipate through the bag; if you wrap the bag on tightly, the ballast will overheat and cut out.

People can be understandably concerned about mixing water with electricity, but honestly, I’ve run tungsten and HMI lamps in the pouring rain for hours without covering them, and never had any problems. If you’re really worried, clip a sheet of gel over the lamphead to make a little hood.

16A cable
16A cable

Use Outdoor Cabling

Ideally you should use only 16A (and above) cabling with C-form sockets (the round blue ones); these are rainproof. If you have to use domestic 13A extensions, wrap all the connections in plastic bags.

Seeing the Rain

The key to making rain show up on camera is backlight. If you want it to look like a real downpour, get your biggest HMI at the back of shot and blast it towards camera. Or maybe you don’t want to see the rain, maybe it’s bad for continuity, in which case you should avoid backlight at all costs.

Ye olde person-talking-to-other-person's-back shot in Soul Searcher, obviating the need for a shot-reverse.
The rain in this shot from Soul Searcher is fake, but it’s backlight that makes it show up.

Need rain for your shoot but the sky is cloudless? Read my post on faking precipitation.

Got precipitation of a more wintry nature? Check out my tips for shooting in snow.

I’ll leave you with the latest Ren behind-the-scenes video, which is all about rain and shooting – or not shooting – in it. Subscribe to get the Mythica Entertainment channel to see all the latest Ren videos as they’re released.

Shooting in Rain

How to Black Out Windows

Blacking out a window
Blacking out a window on Beyond Recognition

Sometimes when shooting indoors, you need to make day look like night. And believe it or not, there’s an art to blacking out windows. Light is like water: it leaks in through the tiniest crack, and you need to appreciate that if you’re going to black out a window successfully. Here are my tips.

  1. Don’t do it. Shoot at night; it’s quicker and easier. It will also look much better because you can light the view outside for added depth in the background of frame.
  2. Ignored rule one? Well, at least do a split shoot so that you only shoot away from the windows during daylight, and shoot towards them after dark. If the windows aren’t actually in frame, your light seal doesn’t need to be 100%.
  3. Ignored rule two as well? Unquestionably the best way to black out a window is to gaffer tape black drapes or bin bags to the outside of the window frame. Don’t try to tape to the surrounding brickwork; it won’t hold. The gaffer tape needs to go in an unbroken line all the way around the edges, or light will leak in through the cracks.
  4. If you have large windows to black out, it may be tempting to rig drapes on stands. OK, fine, but you still need to gaffer tape all the edges. And make sure the stands are well sandbagged in case the wind gets up.
  5. Here’s an example where the lefthand side hasn’t been taped. As you can see, the daylight comes in and nicely cross-lights the drapes, showing up every wrinkle and utterly destroying the illusion of a dark sky. (Fortunately, in this instance the window wasn’t going to be in shot, and the amount of light leaking in wasn’t sufficient to contaminate the DP’s lighting design.)
    image
  6. When you’re outside doing the blacking-out, it is impossible to judge the quality of your work. You need to go inside and see what it looks like. You’ll probably get a nasty shock.
  7. Beware that some things that seem opaque from the outside – bin bags or fabric – actually let light through. Hold them up to the light to check this before you waste time gaffering them up. These drapes looked completely opaque from outside…
    image
  8. Sometimes the DP will want to put a lamp outside to simulate moonlight, and this will need to be tented around. This is extremely difficult and can waste a lot of time. The lamp will spill light onto the drapes, showing them up for what they are. Black wrap the lamphead as much as you can (without covering any vents) and don’t use a tarpaulin as black-out material because it will reflect the light.
  9. Finally, remember to put any stands holding up the drapes BEHIND the drapes, so they’re hidden from camera. (I’ve seen this mistake made, and made it myself, several times – see picture above!

UPDATE: Karl Poyzer has this great tip: “A much easier way to black out windows not in shot or behind a curtain is to spray them with water and roll tin foil over them, stays stuck there indefinitely, blocks out 100% of the light, is cheap and won’t fall down.” Thanks Karl!

How to Black Out Windows