Almost every film today has visual effects of some kind or another, be it compositing a phone screen for a couple of shots or adding a fleet of attacking spaceships and their laser blasts destroying distant CG buildings. Many smaller productions cannot afford to have a VFX supervisor on set, however, so a conscientious DP should be looking out for ways they can ensure the footage they capture is not going to cause complications or rack up extra costs down the line.
1. Interactive Light
VFX will often look a lot more convincing if they affect the lighting on the actors or set. This could be as simple as flashing a lamp for a gunshot that’s going to be added in post, or it could involve programming a dynamic lighting effect into a row of Astera tubes. Remember that it could be negative lighting; I once had to shoot day exterior scenes next to an alien spaceship that wasn’t really there, so I had the gaffer rig a wall of floppy flags to create its shadow.
Beware though: inaccurate interactive lighting – be it mistimed, the wrong colour or casting unrealistic shadows – is worse than none at all. I would always advise shooting a take without the interactive lighting, because even if you do it perfectly there is always the chance that the effect will be changed in post-production from what was agreed.
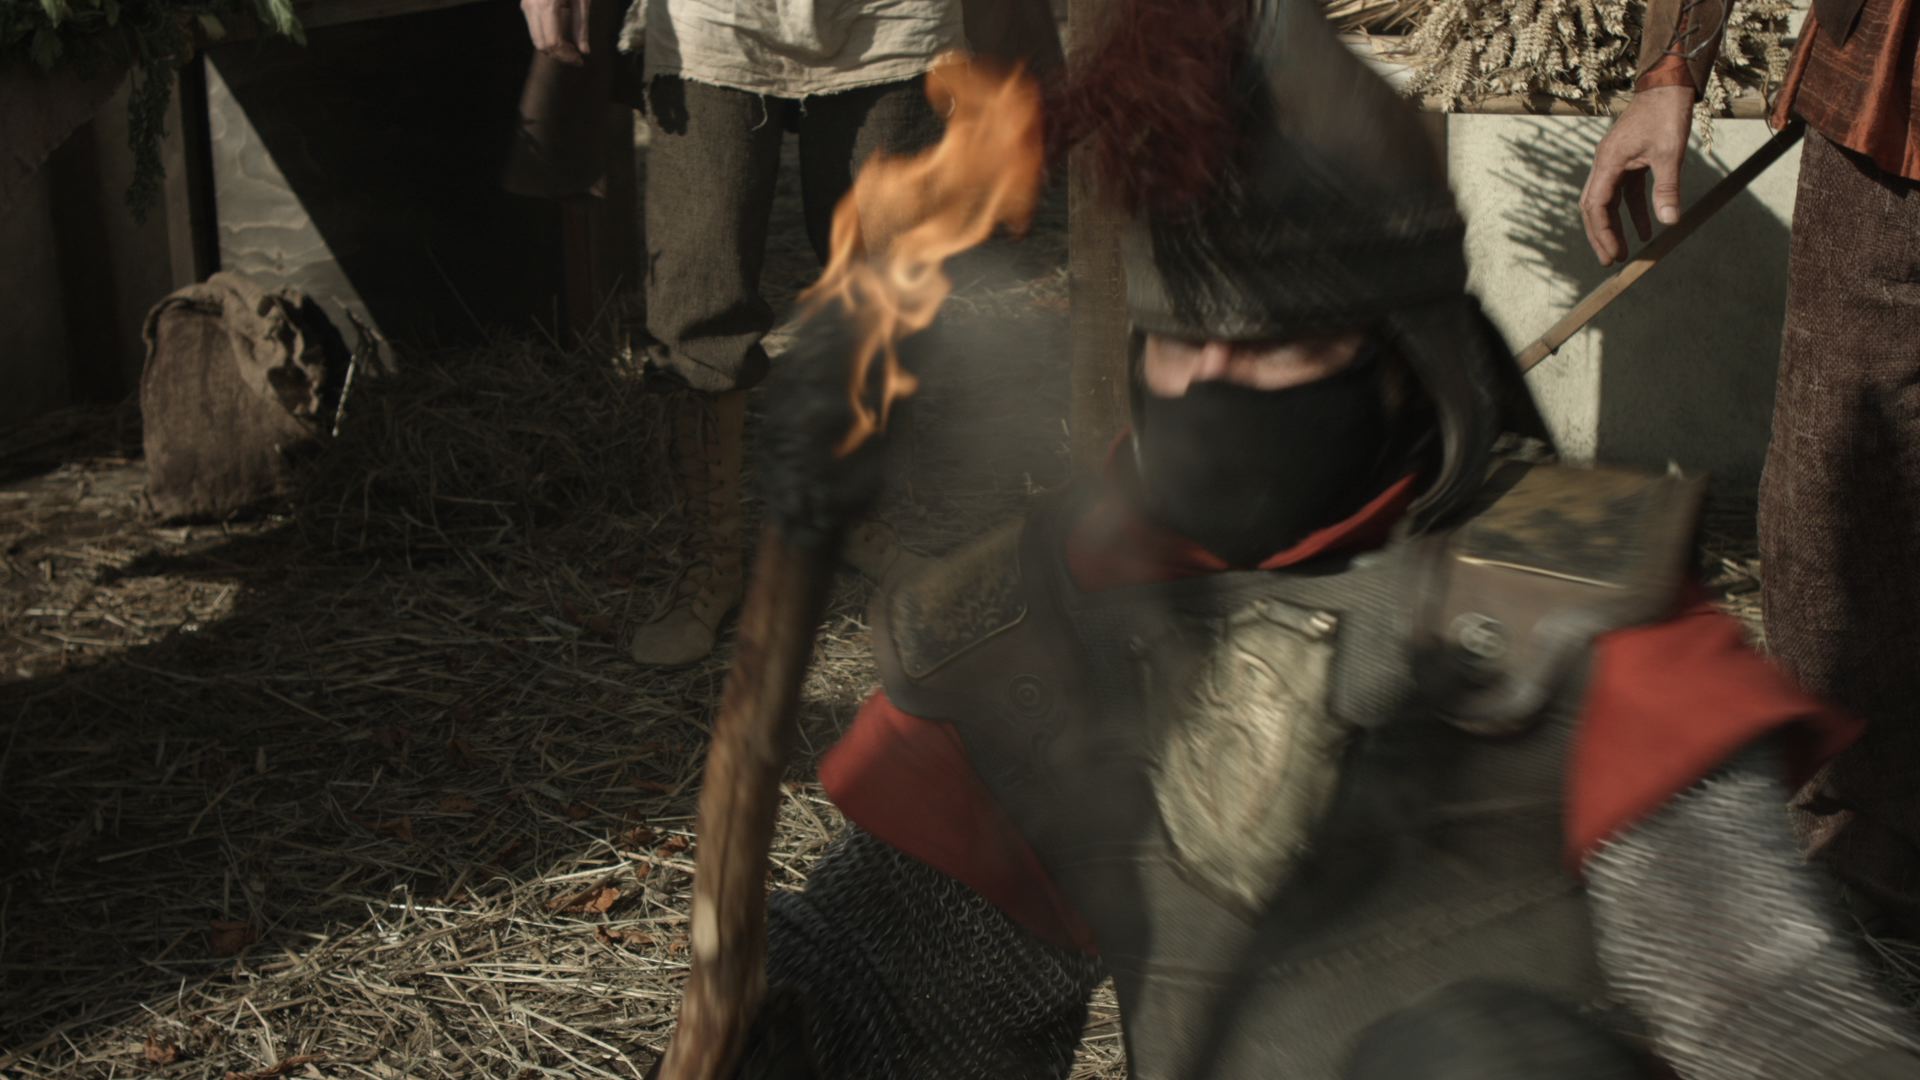
An unused take from “Ren: The Girl with the Mark” in which I used green interactive light to match the concept art of the VFX. The VFX colour was changed to gold in post and we were very glad we’d done a safety take without the light!
2. Tracking
If you are doing a moving shot to which something will be added in post, consider adding some tracking crosses into the scene. Tracking software is really good now, but it doesn’t hurt to help it along, especially if you’re dealing with a fairly featureless surface like a blank TV screen, and definitely with green screens. A simple X made of white camera tape will do the job. Be careful not to cover up any detail that will make the X hard to paint out.
3. Recording Mode
If you are not generally shooting at the highest quality your camera permits, consider switching up to it for VFX shots at least. This means going to RAW if you were in, say, ProRes, or increasing the bit depth, and reducing the compression ratio. The cleaner the image, the easier you make life for the VFX team, particularly when it comes to pulling keys and motion tracking.
If you’re able to increase the resolution so that there is extra image outside the frame that will help VFX with any stabilisation, artificial image shake or adjustments of the camera move they need to make once the CG elements are in.
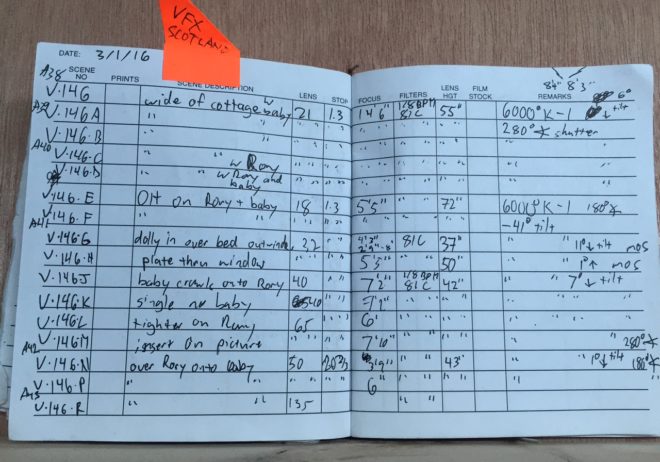
4. Camera Log
This camera log from “Rory’s Way” includes extra details because a baby had to be composited into some of the shots.
Accurate information about the lens and camera is important for the VFX department. Normally your 2nd AC will be recording focal length, T-stop, white balance, ISO, shutter angle and filtration, but for VFX shots a few extra things will be useful: lens height from the ground, tilt angle (use an inclinometer app) and at least a rough focal distance.
5. Green Screens
There are a whole host of things to look out for when you’re shooting on blue or green screens, but the main one is lighting. You should light the screen as evenly as possible, and to the same level as your key light. Once the camera position is set, a good tip is to bring in a couple of flags just out of the sides of frame to cut as much green spill as possible off the talent, so that the VFX team can pull a clean key.
Note the tracking crosses on the green screen in this log frame from “The Little Mermaid”.
Virtual production has been on everyone’s lips in the film industry for a couple of years now, but like all new technology it didn’t just appear overnight. Let’s trace the incremental steps that brought us to the likes of The Mandalorian and beyond.
The major component of virtual production – shooting actors against a large LED screen displaying distant or non-existent locations – has its roots in the front- and rear-projection common throughout much of the 20th century. This involved a film projector throwing pre-recorded footage onto a screen behind the talent. It was used for driving scenes in countless movies from North by Northwest to Terminator 2: Judgment Day, though by the time of the latter most filmmakers preferred blue screen.
Cary Grant films the crop duster scene from “North by Northwest”
The problem with blue and green screens is that they reflect those colours onto the talent. If the screen is blue and the inserted background is clear sky that might be acceptable, but in most cases it requires careful lighting and post-production processing to eliminate the blue or green spill.
Wanting to replace these troublesome reflections with authentic ones, DP Emmanuel Lubezki, ASC, AMC conceived an “LED Box” for 2013’s Gravity. This was a 20’ cube made of LED screens displaying CG interiors of the spacecraft or Earth slowly rotating beneath the characters. “We were projecting light onto the actors’ faces that could have darkness on one side, light on another, a hot spot in the middle and different colours,” Lubezki told American Cinematographer. “It was always complex.” Gravity’s screens were of a low resolution by today’s standards, certainly not good enough to pass as real backgrounds on camera, so the full-quality CGI had to be rotoscoped in afterwards, but the lighting on the cast was authentic.
Sandra Bullock in “Gravity’s” LED box
Around the same time Netflix’s House of Cards was doing something similar for its driving scenes, surrounding the vehicle with chromakey green but rigging LED screens just out of frame. The screens showed pre-filmed background plates of streets moving past, which created realistic reflections in the car’s bodywork and nuanced, dynamic light on the actors’ faces.
Also released in 2013 was the post-apocalyptic sci-fi Oblivion. Many scenes took place in the Sky Tower, a glass-walled outpost above the clouds. The set was surrounded by 500×42’ of white muslin onto which cloud and sky plates shot from atop a volcano were front-projected. Usually, projected images are not bright enough to reflect useful light onto the foreground, but by layering up 21 projectors DP Claudio Miranda, ASC was able to achieve a T1.3-2.0 split at ISO 800. Unlike those of Gravity’s low-rez LED Box, the backgrounds were also good enough to not need replacing in post.
The set of “Oblivion” surrounded by front-projected sky backgrounds
It would take another few years for LED screens to reach that point.
By 2016 the technology was well established as a means of creating complex light sources. Deepwater Horizon, based on the true story of the Gulf of Mexico oil rig disaster, made use of a 42×24’ video wall comprising 252 LED panels. “Fire caused by burning oil is very red and has deep blacks,” DP Enrique Chediak, ASC explained to American Cinematographer, noting that propane fires generated by practical effects crews are more yellow. The solution was to light the cast with footage of genuine oil fires displayed on the LED screen.
Korean zombie movie Train to Busan used LED walls both for lighting and in-camera backgrounds zipping past the titular vehicle. Murder on the Orient Express would do the same the following year.
The hyperspace VFX displayed on a huge LED screen for “Rogue One”
Meanwhile, on the set of Rogue One, vehicles were travelling a little bit faster; a huge curved screen of WinVision Air panels (with a 9mm pixel pitch, again blocky by today’s standards) displayed a hyperspace effect around spacecraft, providing both interactive lighting and in-camera VFX so long as the screen was well out of focus. The DP was Greig Fraser, ACS, ASC, whose journey into virtual production was about to coincide with that of actor/director/producer Jon Favreau.
Favreau had used LED screens for interactive lighting on The Jungle Book, then for 2018’s The Lion King he employed a virtual camera system driven by the gaming engine Unity. When work began on The Mandalorian another gaming engine, Unreal, allowed a major breakthrough: real-time rendered, photo-realistic CG backgrounds. “It’s the closest thing to playing God that a DP can ever do,” Fraser remarked to British Cinematographer last year. “You can move the sun wherever you want.”
Since then we’ve seen LED volumes used prominently in productions like The Midnight Sky, The Batman and now Star Trek: Strange New Worlds, with many more using them for the odd scene here and there. Who knows what the next breakthrough might be?
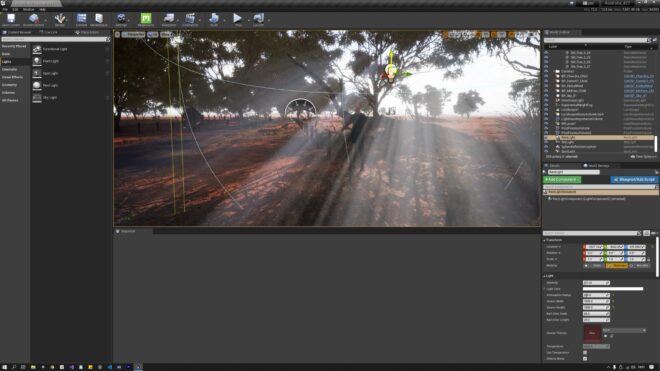
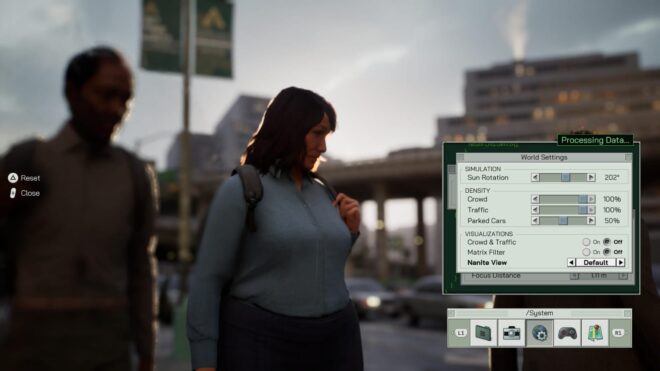
Yesterday I paid a visit to my friend Chris Bouchard, co-director of The Little Mermaid and director of the hugely popular Lord of the Rings fan film The Hunt for Gollum. Chris has been spending a lot of time working with Unreal, the gaming engine, to shape it into a filmmaking tool.
The use of Unreal Engine in LED volumes has been getting a lot of press lately. The Mandalorian famously uses this virtual production technology, filming actors against live-rendered CG backgrounds displayed on large LED walls. What Chris is working on is a little bit different. He’s taking footage shot against a conventional green screen and using Unreal to create background environments and camera movements in post-production. He’s also playing with Unreal’s MetaHumans, realistic virtual models of people. The faces of these MetaHumans can be puppeteered in real time by face-capturing an actor through a phone or webcam.
Chris showed me some of the environments and MetaHumans he has been working on, adapted from pre-built library models. While our friend Ash drove the facial expressions of the MetaHuman, I could use the mouse and keyboard to move around and find shots, changing the focal length and aperture at will. (Aperture and exposure were not connected in this virtual environment – changing the f-stop only altered the depth of field – but I’m told these are easy enough to link if desired.) I also had complete control of the lighting. This meant that I could re-position the sun with a click and drag, turn God rays on and off, add haze, adjust the level of ambient sky-light, and so on.
Of course, I tended to position the sun as backlight. Adding a virtual bounce board would have been too taxing for the computer, so instead I created a “Rect Light”, a soft rectangular light source of any width and height I desired. With one of these I could get a similar look to a 12×12′ Ultrabounce.
The system is pretty intuitive and it wasn’t hard at all to pick up the basics. There are, however, a lot of settings. To be a user-friendly tool, many of these settings would need to be stripped out and perhaps others like aperture and exposure should be linked together. Simple things like renaming a “Rect Light” to a soft light would help too.
The system raises an interesting creative question. Do you make the image look like real life, or like a movie, or as perfect as possible? We DPs might like to think our physically filmed images are realistic, but that’s not always the case; a cinematic night exterior bears little resemblance to genuinely being outdoors at night, for example. It is interesting that games designers, like the one below (who actually uses a couple of images from my blog as references around 3:58), are far more interested in replicating the artificial lighting of movies than going for something more naturalistic.
As physical cinematographers we are also restricted by the limitations of time, equipment and the laws of physics. Freed from these shackles, we could create “perfect” images, but is that really a good idea? The Hobbit‘s endless sunset and sunrise scenes show how tedious and unbelievable “perfection” can get.
There is no denying that the technology is incredibly impressive, and constantly improving. Ash had brought along his Playstation 5 and we watched The Matrix Awakens, a semi-interactive film using real-time rendering. Genuine footage of Keanu Reeves and Carrie-Anne Moss is intercut with MetaHumans and an incredibly detailed city which you can explore. If you dig into the menu you can also adjust some camera settings and take photos. I’ll leave you with a few that I captured as I roamed the streets of this cyber-metropolis.
Award-winning visual effects artist Douglas Trumbull died recently, leaving behind a body of memorable work including the slit-scan “Stargate” sequence from 2001: A Space Odyssey. But what is slit-scan and where else has it been used?
Slit-scan has its origins in still photography of the 1800s. A mask with a slit in it would be placed in front of the photographic plate, and the slit would be moved during the exposure. It was like a deliberate version of the rolling shutter effect of a digital sensor, where different lines of the image are offset slightly in time.
The technique could be used to capture a panorama onto a curved plate by having the lens (with a slit behind it) rotate in the centre of the curve. Later it was adapted into strip photography, a method used to capture photo-finishes at horse races. This time the slit would be stationary and the film would move behind it. The result would be an image in which the horizontal axis represented not a spatial dimension but a temporal one.
Such a collision of time and space was exactly what Stanley Kubrick required for the Stargate sequence in 2001: A Space Odyssey, when astronaut Dr David Bowman is treated to a mind-warping journey by the alien monolith.
Douglas Trumbull, then only 25, had already been working on the film for a couple of years, first producing graphics for the monitors in the spacecraft (all done with physical photography), then detailing and shooting miniatures like the moon bus, creating planets by projecting painted slides onto plexiglass hemispheres, and so on, eventually earning a “special photographic effects supervisor” credit.
“The story called for something that represented this transit into another dimension,” Trumbull said of the Stargate in a 2011 interview with ABC, “something that would be completely abstract, not something you could aim a camera at in the real world.
“I had been exposed to some things like time-lapse photography and what is called ‘streak photography’,” he continued, referring to long exposures which turn a point light source into a streak on film.
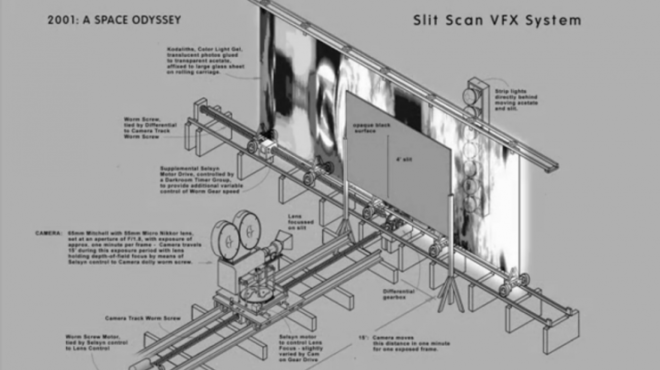
This germ of an idea developed into a large and elaborate machine that took five minutes to shoot a single frame.
The camera was mounted on a special tracking dolly driven by a worm gear to ensure slow, precise movement. While exposing a single frame it would creep towards a large black mask with a 4ft-high slit in it. Behind the slit was a piece of backlit artwork mounted on a carriage that could move perpendicularly to the camera. This artwork – an abstract painting or a photo blow-up of flowers or coral – slid slowly to the right or left as the camera tracked towards it. Remember, this was all just to capture one frame.
The resulting image showed a wall of patterned light stretching into the distance – a wall generated by that slit streaking across the frame.
For each new frame of film the process was repeated with the artwork starting in a slightly different position. Then the whole strip of film was exposed a second time with the camera adjusted so that the slit now produced a second wall on the other side of frame, creating a tunnel.
The Stargate sequence was unlike anything audiences had seen before, and one of the many people inspired by it was the BBC’s Bernard Lodge, who was responsible for creating Doctor Who’s title sequences at the time. For early versions he had used a ‘howl-around’ technique, pointing a camera at a monitor showing its own output, but when a new look was requested in 1973 he decided to employ slit-scan.
Lodge used circles, diamonds and even the silhouette of Jon Pertwee’s Doctor rather than a straight slit, creating tunnels of corresponding shapes. Instead of artwork he used stressed polythene bags shot through polarising filters to create abstract textures. The sequence was updated to incorporate Tom Baker when he took over the lead role the following year, and lasted until the end of the decade.
An adaptation of slit-scan was used in another sci-fi classic, Star Trek: The Next Generation, where it was used to show the Enterprise-D elongating as it goes to warp. This time a slit of light was projected onto the miniature ship, scanning across it as the camera pulled back and a single frame was exposed. “It appears to stretch, like a rubber band expanding and then catching back up to itself,” visual effects supervisor Robert Legato told American Cinematographer. “This process can only be used for a couple of shots, though; it’s very expensive.”
Thanks to CGI, such shots are now quick, cheap and easy, but the iconic images produced by the painstaking analogue techniques of artists like Douglas Trumbull will live on for many years to come.
How were visual effects achieved before the advent of computer generated imagery (CGI)? Most of us know that spaceships used to be miniatures, and monsters used to be puppets or people in suits, but what about the less tangible effects? How did you create something as exotic as an energy beam or a dimensional portal without the benefit of digital particle simulations? The answer was often a combination of chemistry, physics, artistry and ingenuity. Here are five examples.
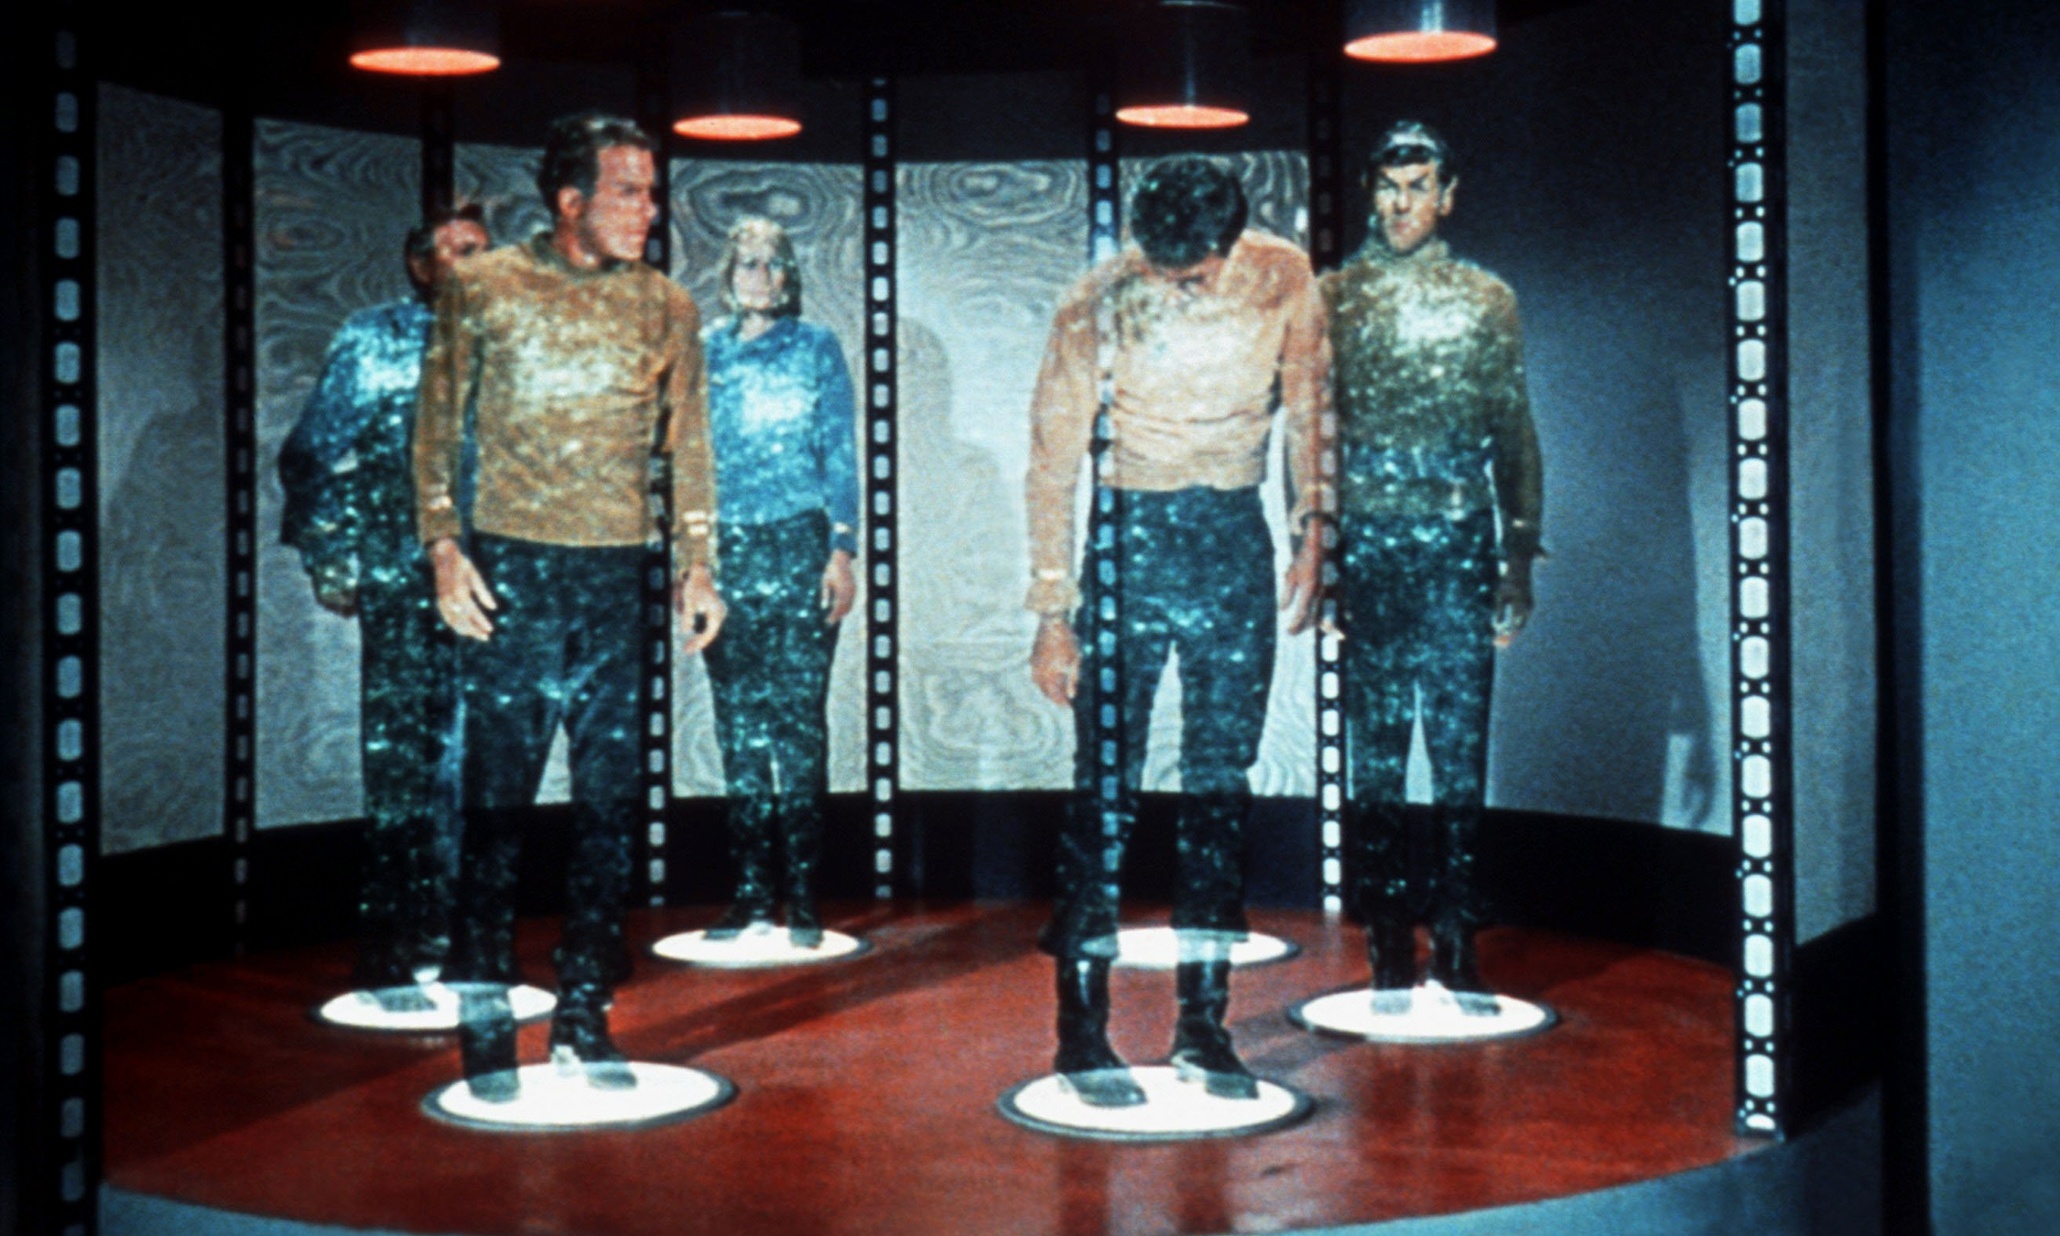
1. “Star Trek” transporters
The original series of Star Trek, premiered in 1966, had to get creative to achieve its futuristic effects with the budget and technology available. The Howard Anderson Company was tasked with realising the iconic transporter effect which enables Kirk’s intrepid crew to beam down to alien planets. Darrell Anderson created the characteristic sparkles of the dematerialisation by filming backlit aluminium powder being sprinkled in front of a black background in slow motion. Hand-drawn mattes were then used to ensure that the sparkling powder only appeared over the characters.
2. “Ghostbusters” proton packs
The much-loved 1984 comedy Ghostbusters features all kinds of traditional effects, including the never-to-be-crossed particle streams with which the heroes battle their spectral foes. The streams consist of five layers of traditional cell animation – the same technique used to create, say, a Disney classic like Sleeping Beauty – which were composited and enhanced on an optical printer. (An optical printer is essentially two or more film projectors connected to a camera so that multiple separate elements can be combined into a single shot.) Composited onto the tips of the Ghostbusters’ guns were small explosions and other pyrotechnic effects shot on a darkened stage.
3. “Lifeforce” energy beams
This cult 1985 sci-fi horror film, most notable for an early screen appearance by Patrick Stewart, features alien vampires which drain the titular lifeforce from their victims. To visualise this lifeforce, VFX supervisor John Dykstra settled on a process whereby a blue argon laser was aimed at a rotating tube made of highly reflective mylar. This threw flowing lines of light onto a screen where it would be captured by the camera for later compositing with the live-action plates. The tube could be deliberately distorted or dented to vary the effects, and to add more energy to certain shots multiple brief elements of a flashing xenon bulb were added to the mix.
4. “Big Trouble in Little China” portal
A mixture of chemical and optical effects were employed for certain shots in the 1986 action-comedy Big Trouble in Little China. Director John Carpenter wanted an effervescent effect like “an Alka-Seltzer tablet in water” to herald the appearance of a trio of warriors known as the Three Storms. After many tests, the VFX team determined that a combination of green paint, metallic powder and acetone, heated in a Pyrex jar on a hotplate, produced an interesting and suitable effect. The concoction was filmed with a fisheye lens, then that footage was projected onto a dome to make it look like a ball of energy, and re-photographed through layers of distorted glass to give it a rippling quality.
5. “Independence Day” cloud tank
By 1996, CGI was replacing many traditional effects, but the summer blockbuster Independence Day used a healthy mix of both. To generate the ominous clouds in which the invading spacecraft first appear, the crew built what they called the “Phenomenon Rig”. This was a semi-circle of halogen lights and metal piping which was photographed in a water tank. Paint was injected into the water through the pipes, giving the appearance of boiling clouds when lit up by the lamps within. This was digitally composited with a live-action background plate and a model shot of the emerging ship.
A miniature ship with a real camel, people and helicopters in “Close Encounters of the Third Kind”
“These are small,” Father Ted once tried to explain to Father Dougal, holding up toy cows, “but the ones out there are far away.” We may laugh at the gormless sitcom priest, but the chances are that we’ve all confounded size and distance, on screen at least.
The ship marooned in the desert in Close Encounters of the Third Kind, the cliff at the end of Tremors, the runways and planes visible through the windows of Die Hard 2’s control tower, the helicopter on the boat in The Wolf of Wall Street, even the beached whale in Mega Shark Versus Giant Octopus – all are small, not far away.
The most familiar forced perspective effect is the holiday snap of a friend or family member picking up the Eiffel Tower between thumb and forefinger, or trying to right the Leaning Tower of Pisa. By composing the image so that a close subject (the person) appears to be in physical contact with a distant subject (the landmark), the latter appears to be as close as the former, and therefore much smaller than it really is.
Building the forced perspective corridor for “Moon”
Architects have been playing tricks with perspective for centuries. Italy’s Palazzo Spada, for example, uses diminishing columns and a ramped floor to make a 26ft corridor look 100ft long. Many film sets – such as the basement of clones in Moon – have used the exact same technique to squeeze extra depth out of limited studio space or construction resources.
Even a set that is entirely miniature can benefit from forced perspective, with a larger scale being used in the foreground and a smaller one in the background, increasing the perceived depth. For example, The Terminator’s “Future War” scenes employ skulls of varying size, with background ruins on an even smaller scale.
“Princess Nicotine”
An early cinematic display of forced perspective was the 1908 short Princess Nicotine, in which a fairy who appears to be cavorting on a man’s tabletop is actually a reflection in a distant mirror. “The little fairy moves so realistically that she cannot be explained away by assuming that she is a doll,” remarked a Scientific American article of the time, “and yet it is impossible to understand how she can be a living being, because of her small stature.”
During the 1950s, B movies featuring fantastically shrunk or enlarged characters made full use of forced perspective, as did the Disney musical Darby O’Gill and the Little People. VFX supervisor Peter Ellenshaw, interviewed for a 1994 episode of Movie Magic, remembered the challenges of creating sufficient depth of field to sell the illusion: “You had to focus both on the background and the foreground [simultaneously]. It was very difficult. We had to use so much light on set that eventually we blew the circuit-breakers in the Burbank power station.”
One of many ingenious forced perspective shots in “The Gate”This behind-the-scenes angle reveals how the above shot was done.
Randall William Cook was inspired years later by Ellenshaw’s work when he was called upon to realise quarter-scale demonic minions for the 1987 horror movie The Gate. Faced with a tiny budget, Cook devised in-camera solutions with human characters on raised foreground platforms, and costumed minions on giant set-pieces further back, all carefully designed so that the join was undetectable. As the contemporary coverage in Cinefex magazine noted, “One of the advantages of a well-executed forced perspective shot is that the final product requires no optical work and can therefore be viewed along with the next day’s rushes.”
A subgroup of forced perspective effects is the hanging miniature – a small-scale model suspended in front of camera, typically as a set extension. The 1925 version of Ben Hur used this technique for wide shots of the iconic chariot race. The arena of the Circus Maximus was full size, but in front of and above it was hung a miniature spectators’ gallery containing 10,000 tiny puppets which could stand and wave as required.
Setting up a foreground miniature for the 1970 “Doctor Who” story “Inferno”
Doctor Who used foreground miniatures throughout its classic run, often more successfully than it used the yellow-fringed chromakey of the time. Earthly miniatures like radar dishes, missile launchers and big tops were captured on location, in camera, with real skies and landscapes behind them. The heroes convincingly disembark from an alien spaceship in the Tom Baker classic “Terror of the Zygons” by means of a foreground miniature and the actors jumping off the back of a van in the distance. A third-scale Tardis was employed in a similar way when the production wanted to save shipping costs on a 1984 location shoot on Lanzarote.
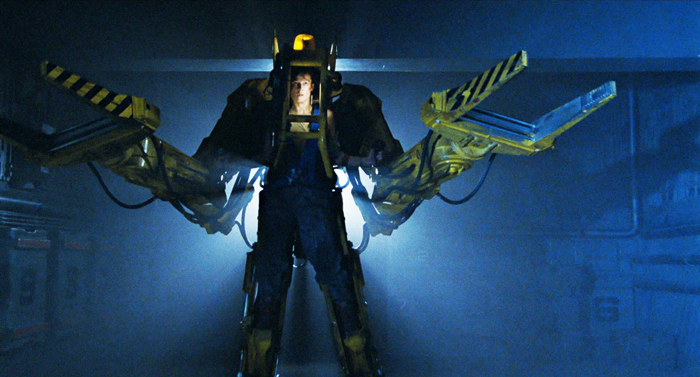
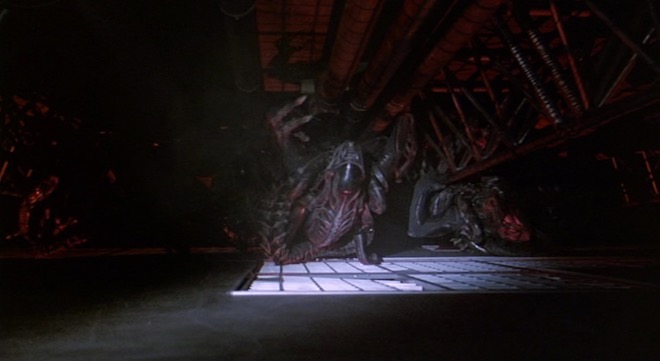
Even 60 years on from Ben Hur, Aliens employed the same technique to show the xenomorph-encrusted roof in the power plant nest scene. The shot – which fooled studio executives so utterly that they complained about extravagant spending on huge sets – required small lights to be moved across the miniature in sync with the actors’ head-torches.
The red line shows the division between hanging miniature and full-scale set in “Aliens”.
The Aliens shot also featured a tilt-down, something only possible with forced perspective if the camera pivots around its nodal point – the point within the lens where the light focuses. Any other type of camera movement gives the game away due to parallax, the optical phenomenon which makes closer objects move through a field of view more quickly than distant ones.
The 1993 remake of Attack of the 50ft Woman made use of a nodal pan to follow Daniel Baldwin to the edge of an outdoor swimming pool which a giant Daryl Hannah is using as a bath. A 1/8th-scale pool with Hannah in was mounted on a raised platform to perfectly align on camera with the real poolside beyond, where Baldwin stood.
The immediacy of forced perspective, allowing actors of different scales to riff off each other in real time, made it the perfect choice for the seasonal comedy Elf. The technique is not without its disadvantages, however. “The first day of trying, the production lost a whole day setting up one shot and never captured it,” recalls VFX supervisor Joe Bauer in the recent documentary Holiday Movies That Made Us.
This shot from “Elf” was accomplished with an extended tricycle allowing Papa Elf to sit much further behind young Buddy than he appears. Tiny puppet hands on Buddy’s shoulders complete the illusion.
Elf’s studio, New Line, was reportedly concerned that the forced perspective shots would never work, but given what a certain Peter Jackson was doing for that same studio at the same time, they probably shouldn’t have worried.
The Lord of the Rings employed a variety of techniques to sell the hobbits and dwarves as smaller than their human friends, but it was in the field of forced perspective that the trilogy was truly groundbreaking. One example was an extended cart built to accommodate Ian McKellen’s Gandalf and Elijah Wood’s supposedly-diminutive Frodo. “You could get Gandalf and Frodo sitting side by side apparently, although in fact Elijah Wood was sitting much further back from the camera than Gandalf,” explains producer Barrie Osborne in the trilogy’s extensive DVD extras.
Jackson insisted on the freedom to move his camera, so his team developed a computer-controlled system that would correct the tell-tale parallax. “You have the camera on a motion-controlled dolly, making it move in and out or side to side,” reveals VFX DP Brian Van’t Hul, “but you have another, smaller dolly [with one of the actors on] that’s electronically hooked to it and does the exact same motion but sort of in a counter movement.”
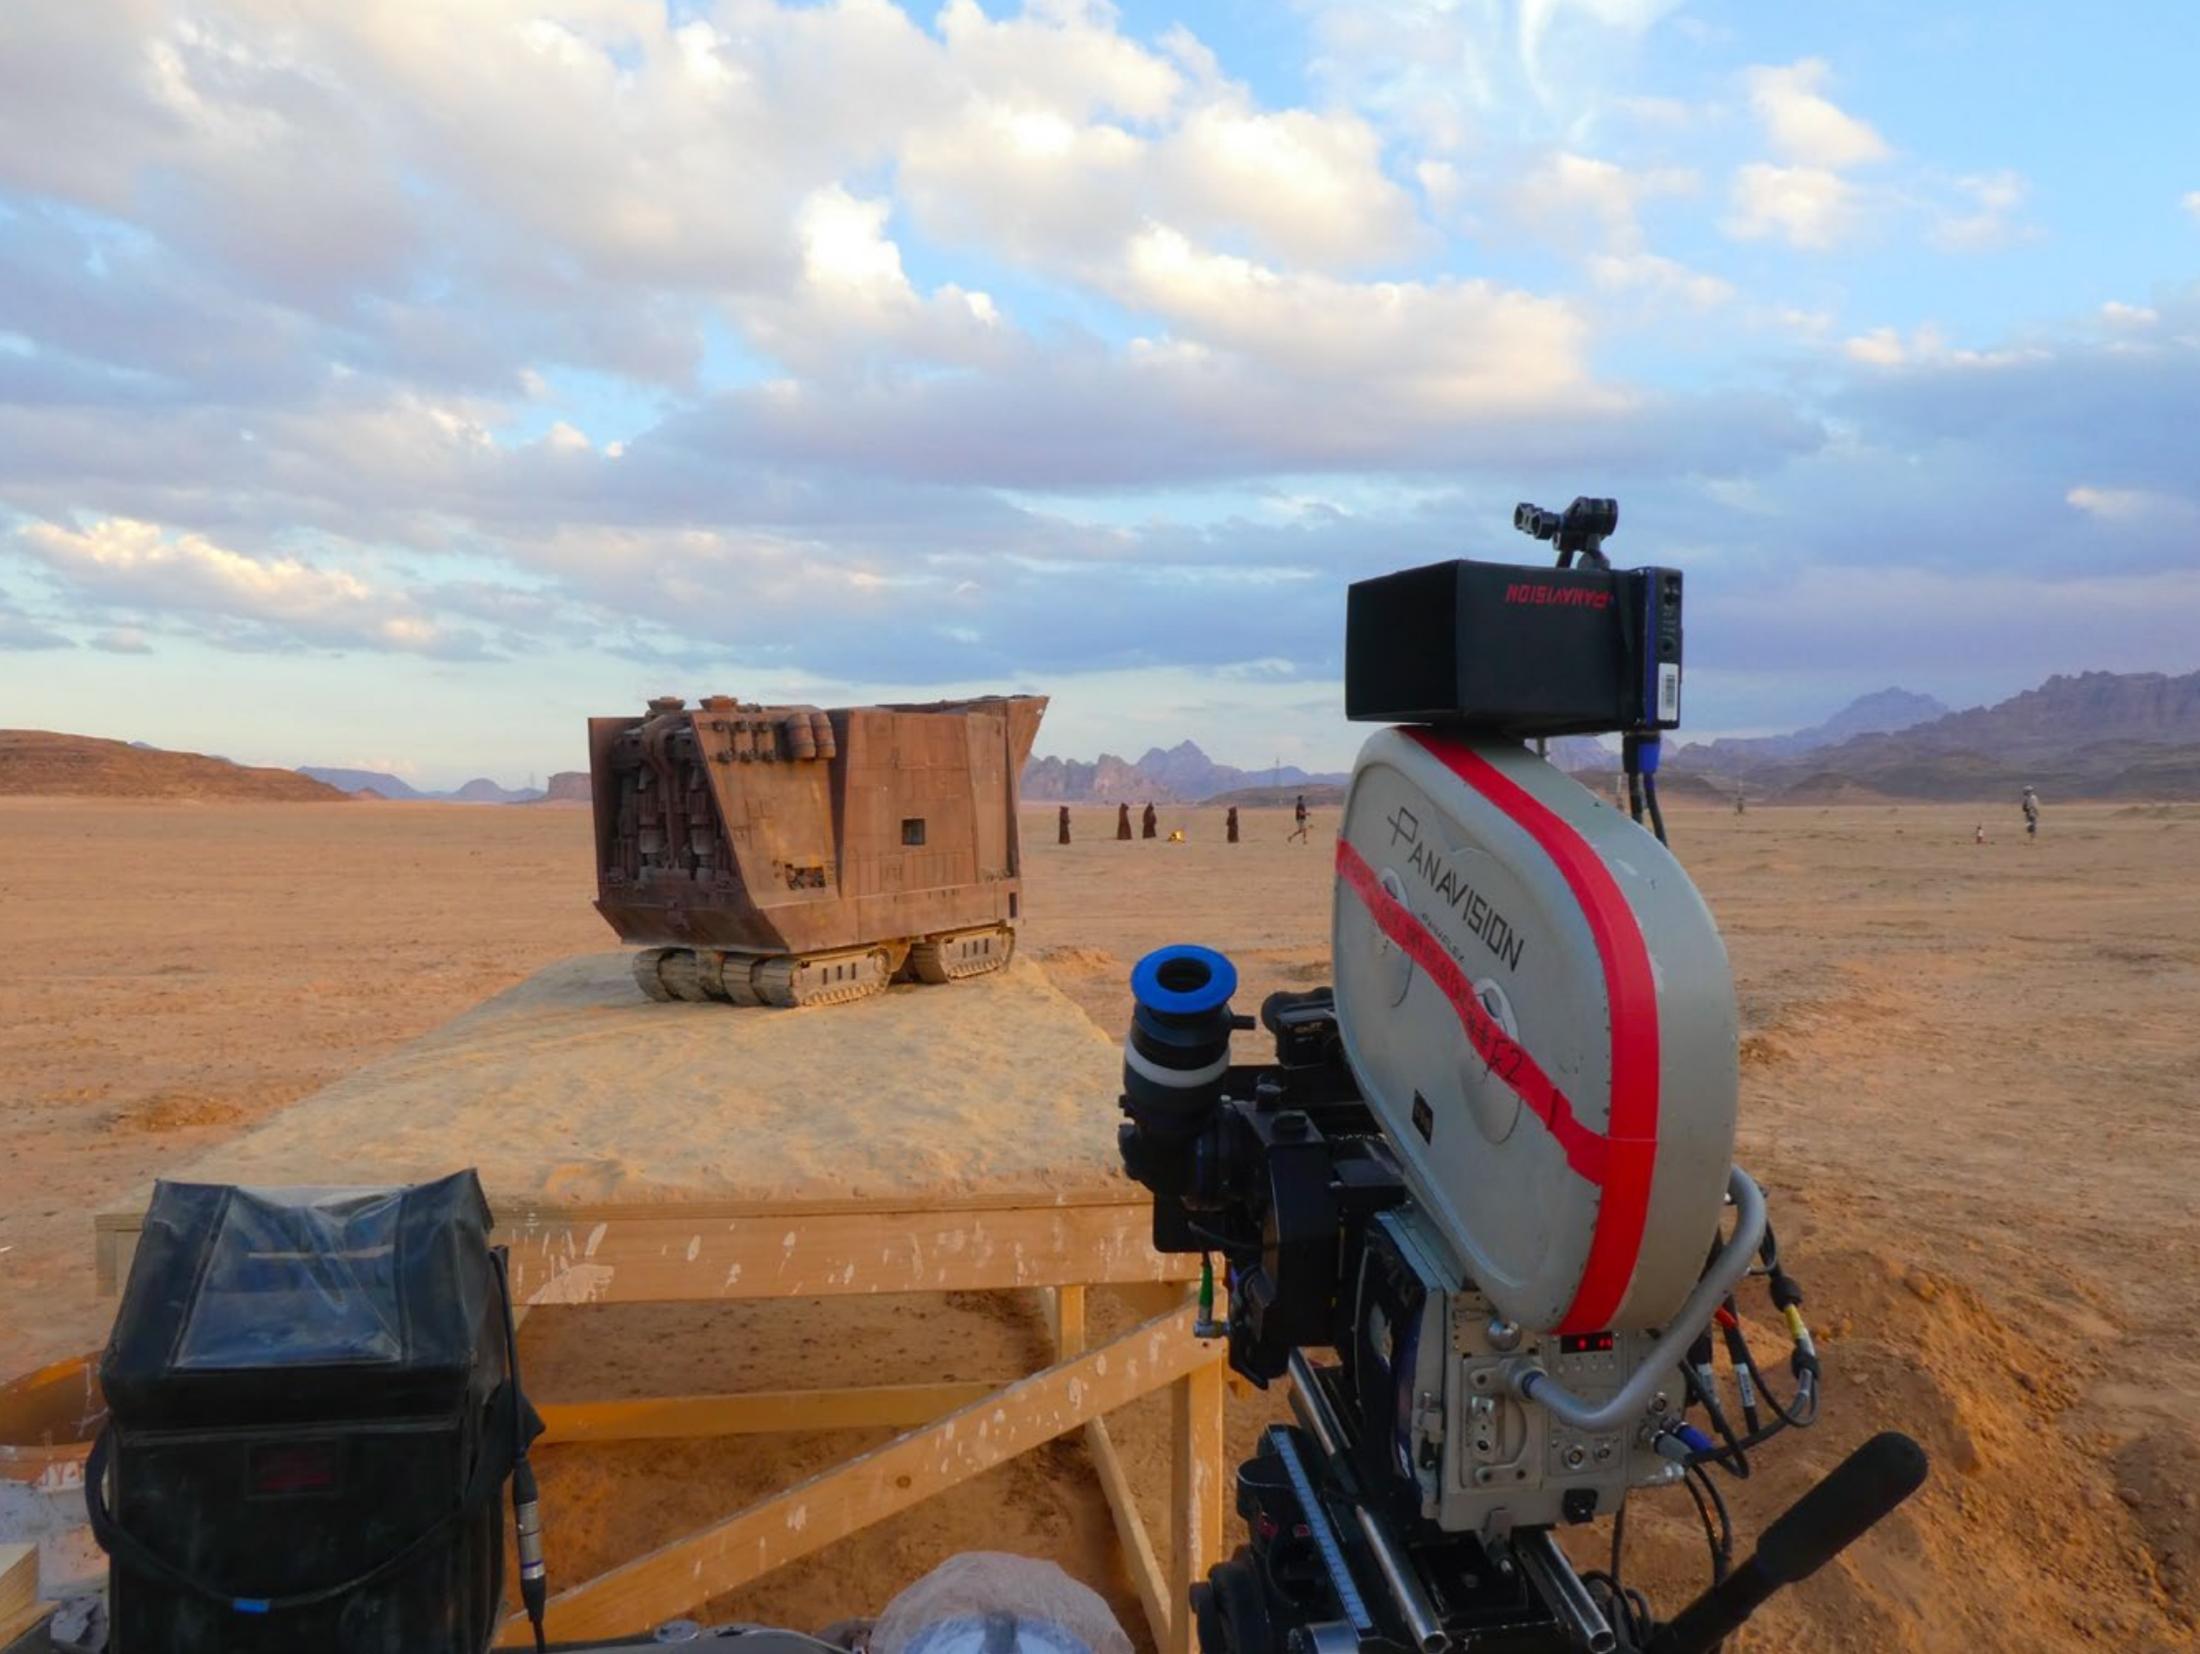
Forced perspective is still alive and kicking today. For Star Wars Episode IX: The Rise of Skywalker, production designer Kevin Jenkins built a 5ft sand-crawler for shooting in the Jordan Desert. “It was placed on a dressed table at height,” he explained on Twitter, “and the Jawa extras were shot at the same time a calculated distance back from the mini. A very fine powdery sand was dressed around for scale. We even made a roller to make mini track prints! Love miniatures :)”
Filming the Jawa sand-crawler for “Rise of the Skywalker”
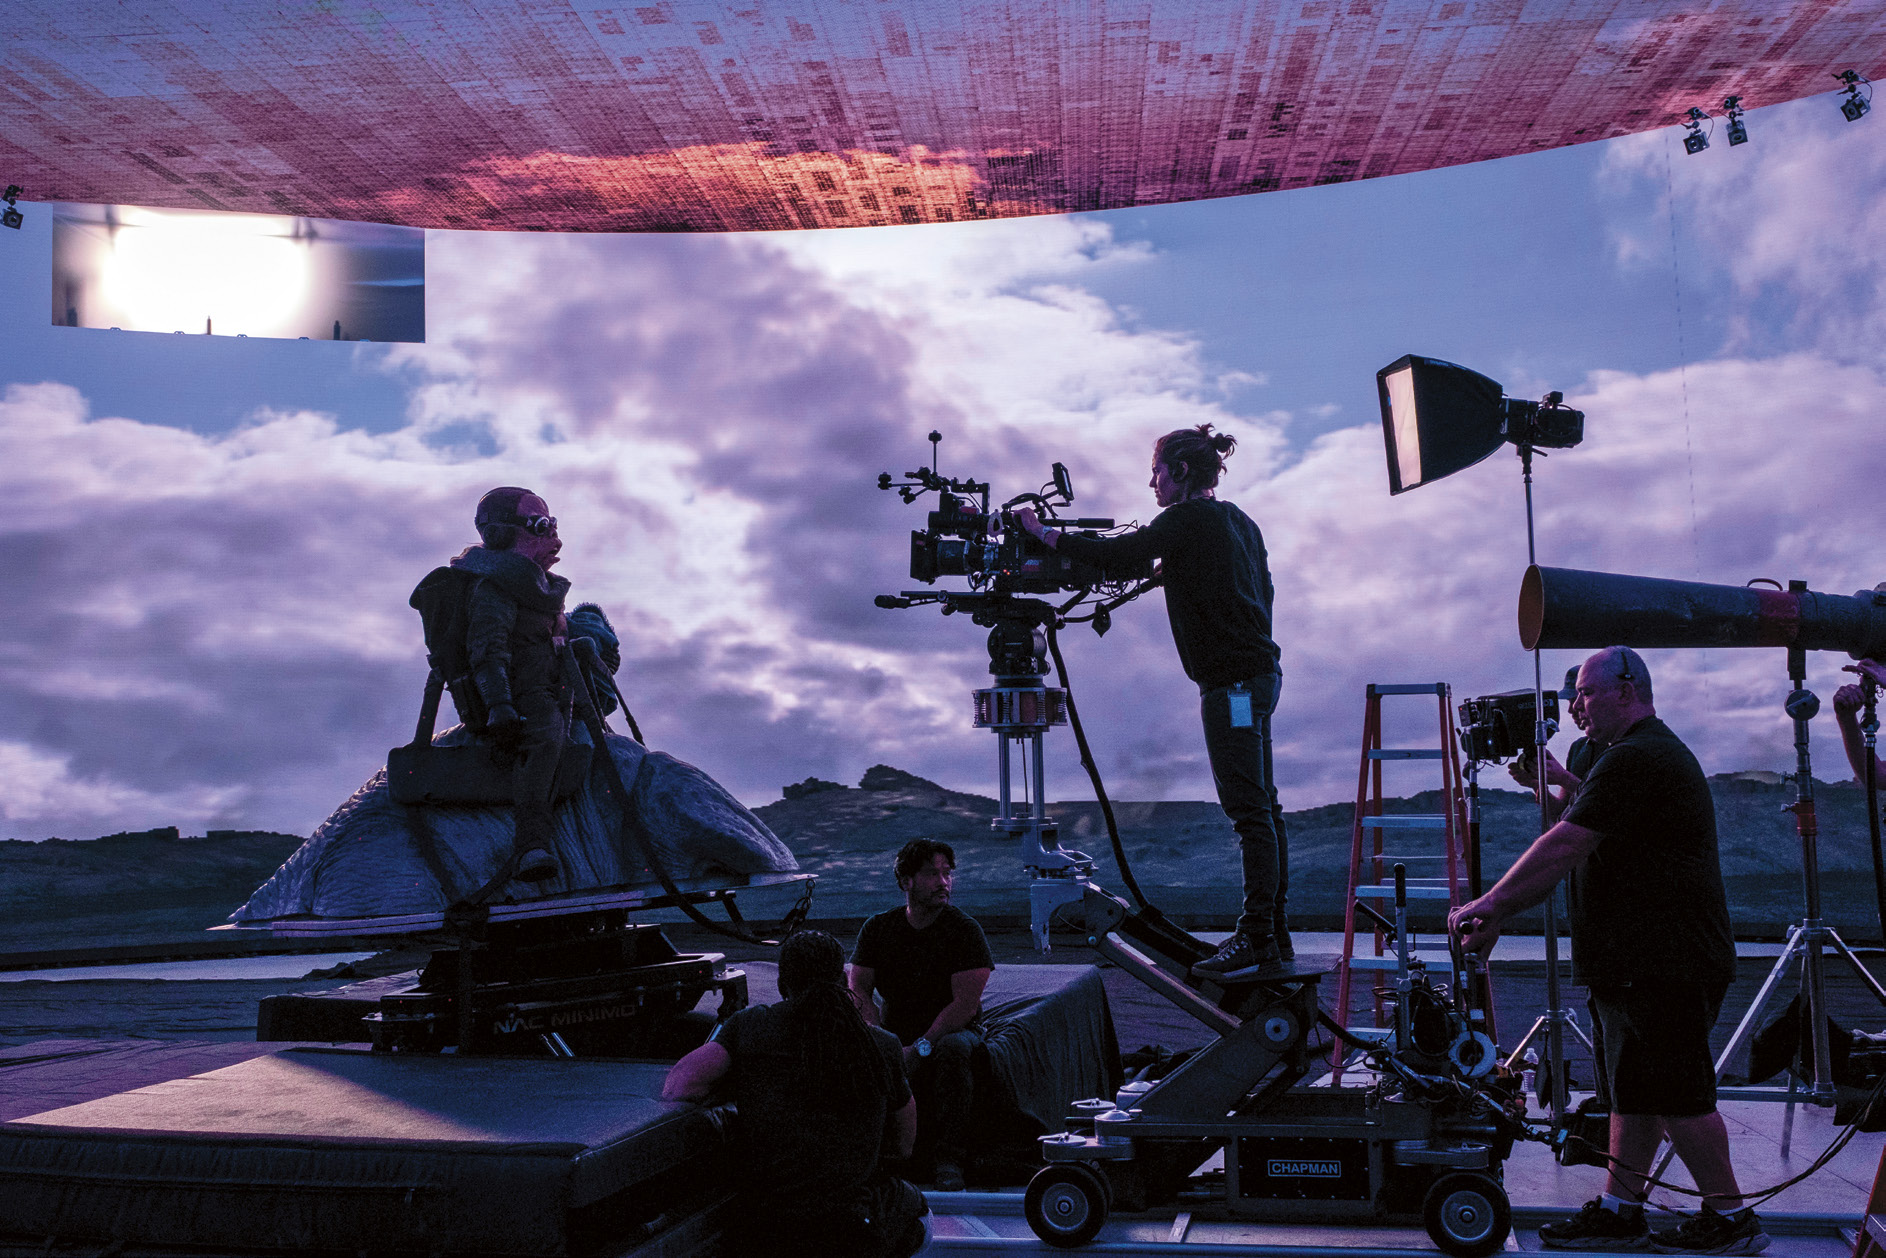
Last week, Greig Fraser, ASC, ACS and Baz Idoine were awarded the Emmy for Outstanding Cinematography for a Single-camera Series (Half-hour) for The Mandalorian. I haven’t yet seen this Star Wars TV series, but I’ve heard and read plenty about it, and to call it a revolution in filmmaking is not hyperbole.
Half of the series was not shot on location or on sets, but on something called a volume: a stage with walls and ceiling made of LED screens, 20ft tall, 75ft across and encompassing 270° of the space. I’ve written before about using large video screens to provide backgrounds in limited aways, outside of train windows for example, and using them as sources of interactive light, but the volume takes things to a whole new level.
In the past, the drawback of the technology has been one of perspective; it’s a flat, two-dimensional screen. Any camera movement revealed this immediately, because of the lack of parallax. So these screens tended to be kept to the deep background, with limited camera movement, or with plenty of real people and objects in the foreground to draw the eye. The footage shown on the screens was pre-filmed or pre-rendered, just video files being played back.
The Mandalorian‘s system, run by multiple computers simultaneously, is much cleverer. Rather than a video clip, everything is rendered in real time from a pre-built 3D environment known as a load, running on software developed for the gaming industry called Unreal Engine. Around the stage are a number of witness cameras which use infra-red to monitor the movements of the cinema camera in the same way that an actor is performance-captured for a film like Avatar. The data is fed into Unreal Engine, which generates the correct shifts in perspective and sends them to the video walls in real time. The result is that the flat screen appears, from the cinema camera’s point of view, to have all the depth and distance required for the scene.
The loads are created by CG arists working to the production designer’s instructions, and textured with photographs taken at real locations around the world. In at least one case, a miniature set was built by the art department and then digitised. The scene is lit with virtual lights by the DP – all this still during preproduction.
The volume’s 270° of screens, plus two supplementary, moveable screens in the 90° gap behind camera, are big enough and bright enough that they provide most or all of the illumination required to film under. The advantages are obvious. “We can create a perfect environment where you have two minutes to sunset frozen in time for an entire ten-hour day,” Idoine explains. “If we need to do a turnaround, we merely rotate the sky and background, and we’re ready to shoot!”
Traditional lighting fixtures are used minimally on the volume, usually for hard light, which the omni-directional pixels of an LED screen can never reproduce. If the DPs require soft sources beyond what is built into the load, the technicians can turn any off-camera part of the video screens into an area of whatever colour and brightness are required – a virtual white poly-board or black solid, for example.
A key reason for choosing the volume technology was the reflective nature of the eponymous Mandalorian’s armour. Had the series been shot on a green-screen, reflections in his shiny helmet would have been a nightmare for the compositing team. The volume is also much more actor- and filmmaker-friendly; it’s better for everyone when you can capture things in-camera, rather than trying to imagine what they will look like after postproduction. “It gives the control of cinematography back to the cinematographer,” Idoine remarks. VR headsets mean that he and the director can even do a virtual recce.
The Mandalorian shoots on the Arri Alexa LF (large format), giving a shallow depth of field which helps to avoid moiré problems with the video wall. To ensure accurate chromatic reproduction, the wall was calibrated to the Alexa LF’s colour filter array.
Although the whole system was expensive to set up, once up and running it’s easy to imagine how quickly and cheaply the filmmakers can shoot on any given “set”. The volume has limitations, of course. If the cast need to get within a few feet of a wall, for example, or walk through a door, then that set-piece has to be real. If a scene calls for a lot of direct sunlight, then the crew move outside to the studio backlot. But undoubtedly this technology will improve rapidly, so that it won’t be long before we see films and TV episodes shot entirely on volumes. Perhaps one day it could overtake traditional production methods?
In 1983, up-and-coming director James Cameron was hired to script a sequel to Ridley Scott’s 1979 hit Alien. He had to pause halfway through to shoot The Terminator, but the subsequent success of that movie, along with the eventually completed Aliens screenplay, so impressed the powers that be at Fox that they greenlit the film with the relatively inexperienced 31-year-old at the helm.
Although the sequel was awarded a budget of $18.5 million – $7.5 million more than Scott’s original – that was still tight given the much more expansive and ambitious nature of Cameron’s script. Consequently, the director and his team had to come up with some clever tricks to put their vision on celluloid.
1. Mirror Image
When contact is lost with the Hadley’s Hope colony on LV-426, Ripley (Sigourney Weaver) is hired as a sort of alien-consultant to a team of crack marines. The hypersleep capsules from which the team emerge on reaching the planet were expensive to build. Production designer Peter Lamont’s solution was to make just half of them, and place a mirror at the end of the set to double them up.
2. Small Screens
Wide shots of Hadley’s Hope were accomplished with fifth-scale miniatures by Robert and Dennis Skotak of 4-Ward Productions. Although impressive, sprawling across two Pinewood stages, the models didn’t always convince. To help, the crew often downgraded the images by showing them on TV monitors, complete with analogue glitching, or by shooting through practical smoke and rain.
3. Big Screens
The filmmakers opted for rear projection to show views out of cockpit windscreens and colony windows. This worked out cheaper than blue-screen composites, and allowed for dirt and condensation on the glass, which would have been impossible to key optically. Rear projection was also employed for the crash of the dropship – the marines’ getaway vehicle – permitting camera dynamics that again were not possible with compositing technology of the time.
4. Back to Front
A highlight of Aliens is the terrifying scene in which Ripley and her young charge Newt (Carrie Henn) are trapped in a room with two facehuggers, deliberately set loose by sinister Company man Carter Burke (Paul Reiser). These nightmarish spider-hands were primarily puppets trailing cables to their operators. To portray them leaping onto a chair and then towards camera, a floppy facehugger was placed in its final position and then tugged to the floor with a fishing wire. The film was reversed to create the illusion of a jump.
5. Upside Down
Like Scott before him, Cameron was careful to obfuscate the man-in-a-suit nature of the alien drones wherever possible. One technique he used was to film the creatures crawling on the floor, with the camera upside-down so that they appeared to be hanging from the ceiling. This is seen when Michael Biehn’s Hicks peeks through the false ceiling to find out how the motion-tracked aliens can be “inside the room”.
6. Flash Frames
All hell (represented by stark red emergency lighting) breaks loose when the aliens drop through the false ceiling. To punch up the visual impact of the movie’s futuristic weapons, strobelights were aimed at the trigger-happy marines. Taking this effect even further, editor Ray Lovejoy spliced individual frames of white leader film into the shots. As a result, the negative cutter remarked that Aliens‘ 12th reel had more cuts than any complete movie he’d ever worked on.
7. Cotton Cloud
With most of the marines slaughtered, Ripley heads to the atmospheric processing plant to rescue Newt from the alien nest. Aided by the android Bishop (Lance Henriksen) they escape just before the plant’s nuclear reactor explodes. The ensuing mushroom cloud is a miniature sculpture made of cotton wool and fibreglass, illuminated by an internal lightbulb!
8. Hole in the floor
Returning to the orbiting Sulaco, Ripley and friends are ambushed by the stowaway queen, who rips Bishop in half. A pre-split, spring-loaded dummy of Henriksen was constructed for that moment, and was followed by the simple trick of concealing the actor’s legs beneath a hole in the floor. As in the first movie, android blood was represented by milk. This gradually soured as the filming progressed, much to Henriksen’s chagrin as the script required him to be coated in the stuff and even to spit it out of his mouth.
9. Big Battle
The alien queen was constructed and operated by Stan Winston Studios as a full-scale puppet. Two puppeteers were concealed inside, while others moved the legs with rods or controlled the crane from which the body hung. The iconic power loader was similar, with a body builder concealed inside and a counter-weighted support rig. This being before the advent of digital wire removal, all the cables and rods had to be obfuscated with smoke and shifting shadows, though they can still be seen on frame grabs like this one. (The queen is one of my Ten Greatest Movie Puppets of All Time.)
10. Little Battle
For wide shots of the final fight, both the queen and the power loader were duplicated as quarter scale puppets. Controlled from beneath the miniature set via rods and cables, the puppets could perform big movements, like falling into the airlock, which would have been very difficult with the full-size props. (When the airlock door opens, the starfield beyond is a black sheet with Christmas lights on it!) The two scales cut seamlessly together and produce a thrilling finale to this classic film.
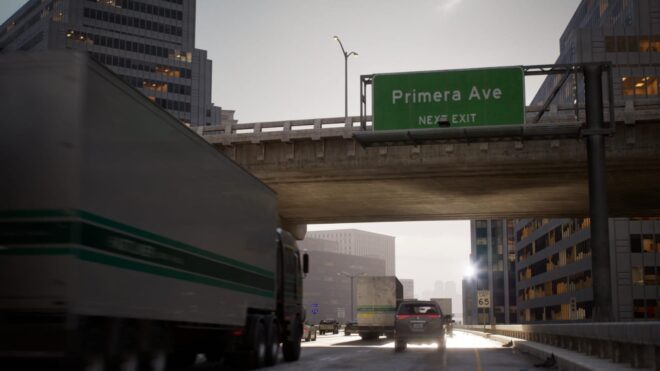
The publicity machine is ramping up for Kenneth Branagh’s Murder on the Orient Express remake, and it’s got me thinking about the challenges of a script set largely on a moving train. There are a number of ways of realising such scenes, and today I’m going to look at five movies that demonstrate different techniques. All of these methods are equally applicable to scenes in cars or any other moving vehicle.
1. For Real: “The Darjeeling limited”
https://www.youtube.com/watch?v=S92KktyxGY0
Wes Anderson’s 2007 film The Darjeeling Limited sees three brothers embarking on a spiritual railway journey across India. Many of the usual Anderson tropes are present and correct – linear tracking shots, comical headgear, Jason Schwartzman – but surprisingly the moving train wasn’t done with some kind of cutesy stop-motion. Production designer Mark Friedberg explains:
The big creative decision Wes made was that we were going to shoot this movie on a moving train. And all that does is complicate life. It makes it more expensive, it makes the logistics impossible. It made it incredibly difficult to figure out how many crew, what crew, what gear… but what it did do is it made it real.
Kenneth Branagh has stated that at least some of Murder on the Orient Express was shot on a real moving train too:
They painstakingly built a fully functioning period authentic locomotive and carriages from the Orient Express during the golden, glamorous age of travel. It was a train that moved… All of our actors were passengers on the train down the leafy lanes of Surrey, pretending to be the former Yugoslavia.
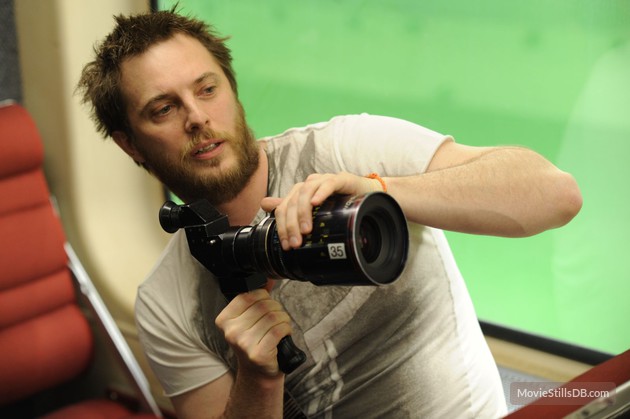
2. Poor Man’s Process: “The Double”
Director Richard Ayoade
Although best known as The IT Crowd‘s Moss and the new host of the Crystal Maze, Richard Ayoade is also an accomplished director. His last feature was a darkly beautiful adaptation of Dostoyevsky’s classic identity-crisis novella The Double.
Unlike the other movies on this list, The Double only has short sequences on a train, and that’s a key point. So named because it’s a cheap alternative to rear projection (a.k.a. process photography), Poor Man’s Process is a big cheat. In order to hide the lack of motion, you keep the view outside your vehicle’s windows blank and featureless – typically a night sky, but a black subway tunnel or a grey daytime sky can also work. Then you create the illusion of motion with dynamic lighting, a shaky camera, and grips rocking the carriage on its suspension. Used judiciously, this technique can be very convincing, but you would never get away with it for a whole movie.
Poor Man’s works particularly well in The Double, the black void outside the subway car playing into the oppressive and nightmarish tone of the whole film. In an interview with Pushing Pixels, production designer David Crank explains how the subway carriage set was built out of an old bus. He goes on to describe how the appearance of movement was created:
We put the forks of a forklift under the front of the bus, and shook it… For the effect of moving lights outside the train, it was a combination of some spinning lights on stands, as well as lights on small rolling platforms which tracked back and forth down the outside of the bus.
Part 2 of the Darjeeling Limited featurette above reveals that Poor Man’s Process was also used occasionally on that film, when the train was stuck in a siding due to heavy rail traffic. I used Poor Man’s myself for night-time train sequences in two no-budget features that I made in the early noughties – see the BTS clip below – and I’ve also written a couple of blog posts in the past about my use of the same technique on a promotional video and in a fantasy web series.
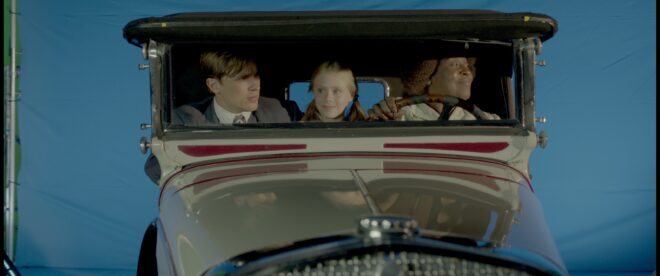
3. Green screen: “Source Code”
https://www.youtube.com/watch?v=ildCiVpLM8s
Duncan “Zowie Bowie” Jones followed up his low-budget masterpiece Moon with Hollywood sci-fi thriller Source Code, a sort of mash-up of Quantum Leap and Groundhog Day with a chilling twist. It takes place predominantly on a Chicago-bound commuter train, in reality a set surrounded by green screen. In the featurette above, Jones mentions that shooting on a real moving train was considered, but ultimately rejected in favour of the flexibility of working on stage:
Because we revisit an event multiple times, it was absolutely integral to making it work, and for the audience not to get bored, that we were able to vary the visuals. And in order to do that we had to be able to build platforms outside of the train and be able to really vary the camera angles.
In the DVD commentary, Jones also notes that the background plates were shot in post from a real train “loaded up with cameras”.
Director Duncan Jones on the set of “Source Code”
Cinematographer Don Burgess, ASC discusses lighting the fake train in a Panavision article:
It’s difficult to make it feel like natural light is coming in and still get the sense of movement on a train… We worked with computer programs where we actually move the light itself, and brighten and dim the lights so it feels as if you are travelling… The lights are never 100% constant.
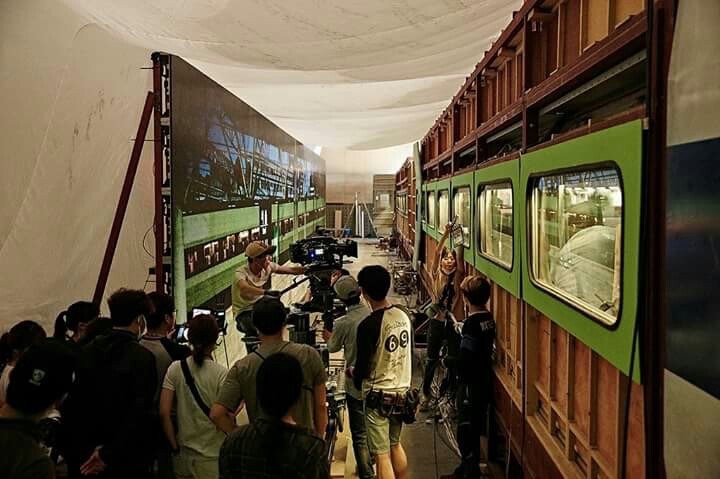
When I shot The Little Mermaid last year we did some train material against green screen. To make the lighting dynamic, the grips built “branch-a-loris” rigs: windmills of tree branches which they would spin in front of the lamps to create passing shadows.
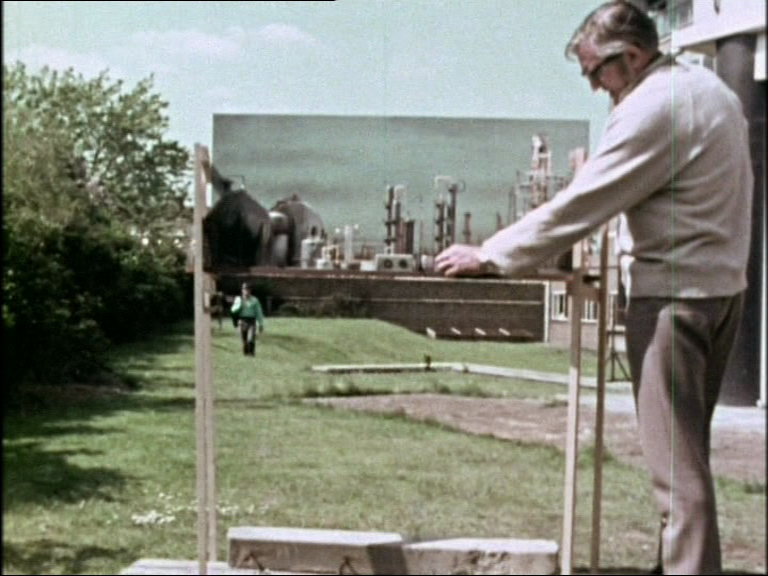
4. Rear projection: “Last Passenger”
Perhaps the most low-budget film on this list, Last Passenger is a 2013 independent thriller set aboard a runaway train. Director Omid Nooshin and DP Angus Hudson wanted a vintage look, choosing Cooke Xtal anamorphic lenses and a visual effects technique that had long since fallen out of favour: rear projection.
Before the advent of optical – and later digital – compositing, rear projection was commonly used to provide moving backgrounds for scenes in vehicles. The principle is simple: the pre-recorded backgrounds are projected onto a screen like this…
Rear projection in use on “River of no Return” (1954)
Hudson goes into further detail on the technique as used for the Last Passenger:
To capture [the backgrounds] within our limited means, we ended up shooting from a real train using six Canon 5D cameras, rigged in such a way that we got forward, sideways and rear-facing views out of the train at the same time. We captured a huge amount of footage, hours and hours of footage. That allowed us to essentially have 270 degrees of travelling shots, all of which were interlinked.
Because rear projection is an in-camera technique, Nooshin and Hudson were able to have dirt and water droplets on the windows without worrying about creating a compositing nightmare in postproduction. Hudson also notes that the cast loved being able to see the backgrounds and react to them in real time.
5. L.E.D. Panels: “Train to Busan”
https://www.youtube.com/watch?v=3nKVBSHvxi8
Enabling the actors to see the background plates was also a concern for Yeon Sang-ho, director of the hit Korean zombie movie Train to Busan. He felt that green screen would make it “difficult to portray the reality”, so he turned to the latest technology: LED screens. This must have made life easier not just for the cast, but for the cinematographer as well.
You see, when you travel by train in the daytime, most of the light inside the carriage comes from outside. Some of it is toplight from the big, flat sky, and some of it is hard light from the sun – both of these can be faked, as we’ve seen – but a lot of the light is reflected, bouncing off trees, houses, fields and all the other things that are zipping by. This is very difficult to simulate with traditional means, but with big, bright LED screens you get this interactive lighting for free. Because of this, and the lack of postproduction work required, this technique is becoming very popular for car and train scenes throughout the film and TV industry.
This brings us back to Murder on the Orient Express, for which 2,000 LED screens were reportedly employed. In a Digital Spy article, Branagh notes that this simulated motion had an unintended side effect:
It was curious that on the first day we used our gimballed train sets and our LED screens with footage that we’d gone to great trouble to shoot for the various environments – the lowlands and then the Alps, etc… people really did feel quite sick.
I’ll leave you with one final point of interest: some of the above films designed custom camera tracks into their train carriage sets. On Last Passenger, for example, the camera hung from a dolly which straddled the overhead luggage racks, while The Darjeeling Limited had an I-beam track designed into the centre of the ceiling. Non-train movies like Speed have used the same technique to capture dolly shots in the confines of a moving vehicle.
Accessing the compositing modes in Final Cut Pro 7
When it comes to shooting elements for VFX, green-screen gets all the press. But certain kinds of elements can be tricky to key well, and sometimes it’s not the right look. In the last few days Kate Madison and I have needed to shoot last-minute elements for some shots in Ren: The Girl with the Mark, and we turned to monochromatic backgrounds.
Why? How does it work? Well certainly you can key out black or white just like you’d key out green, but the most powerful way to use these backgrounds is not with keying at all, but by a bit of basic maths. And don’t worry, the computer does the maths for you.
If you’ve ever used Photoshop, you’ll have noticed some layer modes called Screen and Multiply. Final Cut Pro has the same modes (it also has Add, which to most intents and purposes is the same as Screen) and so do all the major editing and FX packages.
Screen adds the brightness of each pixel of the layer to the layer underneath. Since black has a brightness of zero, your black screen disappears, and the element in front of it is blended seamlessly into the background image, with its apparent solidity determined by its brightness.
Multiply, as the name suggests, multiplies the brightness of each pixel with the layer underneath. Since white has a brightness of one, and any number multiplied by one is that same number, your white screen vanishes. Whatever element is in front of your screen is blended into the background image, with darker parts of the element showing up more than lighter parts.
One of the elements Kate and I needed to shoot was a flame, to be comped onto a torch. We lit a torch and clamped it to a stand, shooting at night with the pitch black garden in the background. It was the work of moments to comp this element into the shot using Screen mode.
The flame element, shot at night in the garden to ensure a seamless black backgroundI adjusted the flame’s size and used Screen mode to composite it over the background.
Fire is the perfect partner for black-screen shooting, because it generates its own light and it’s not solid. Solid objects composited using Screen/Add or Multiply take on a ghostly appearance – perfect for, er, ghost effects – but not ideal in other situations; because of the way Screen mode works, anything that’s not peak white will be transparent to some degree.
We shot some fast-moving leaves and debris against black, but only the high level of motion blur allowed us to get away with it. In fact, if you know you’re going to have a lot of motion blur, black-screen might be the ideal method, because it will be tricky to get a clean key off a green-screen.
A smoke element shot against a black drape and backlit so that the smoke is visible but the drape is notShooting dirt in a vase of water against white
Other things that work well against black-screen are sparks, smoke and water/rain, again because they’re not solid. If you want to add rain or snow to a shot, black-screen is the way to go – check out my post about that here.
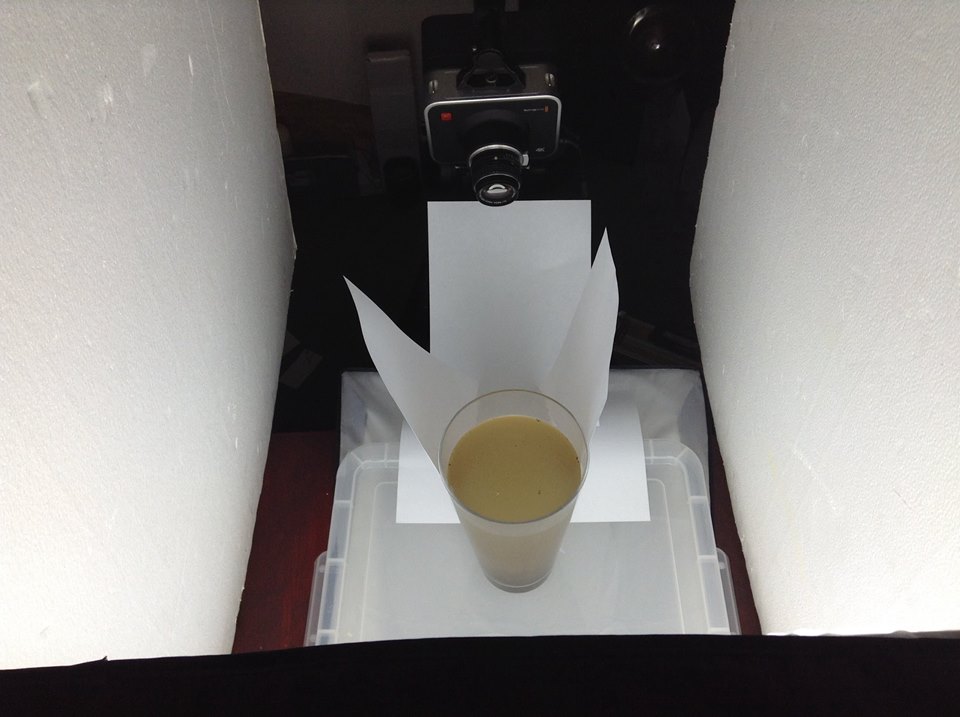
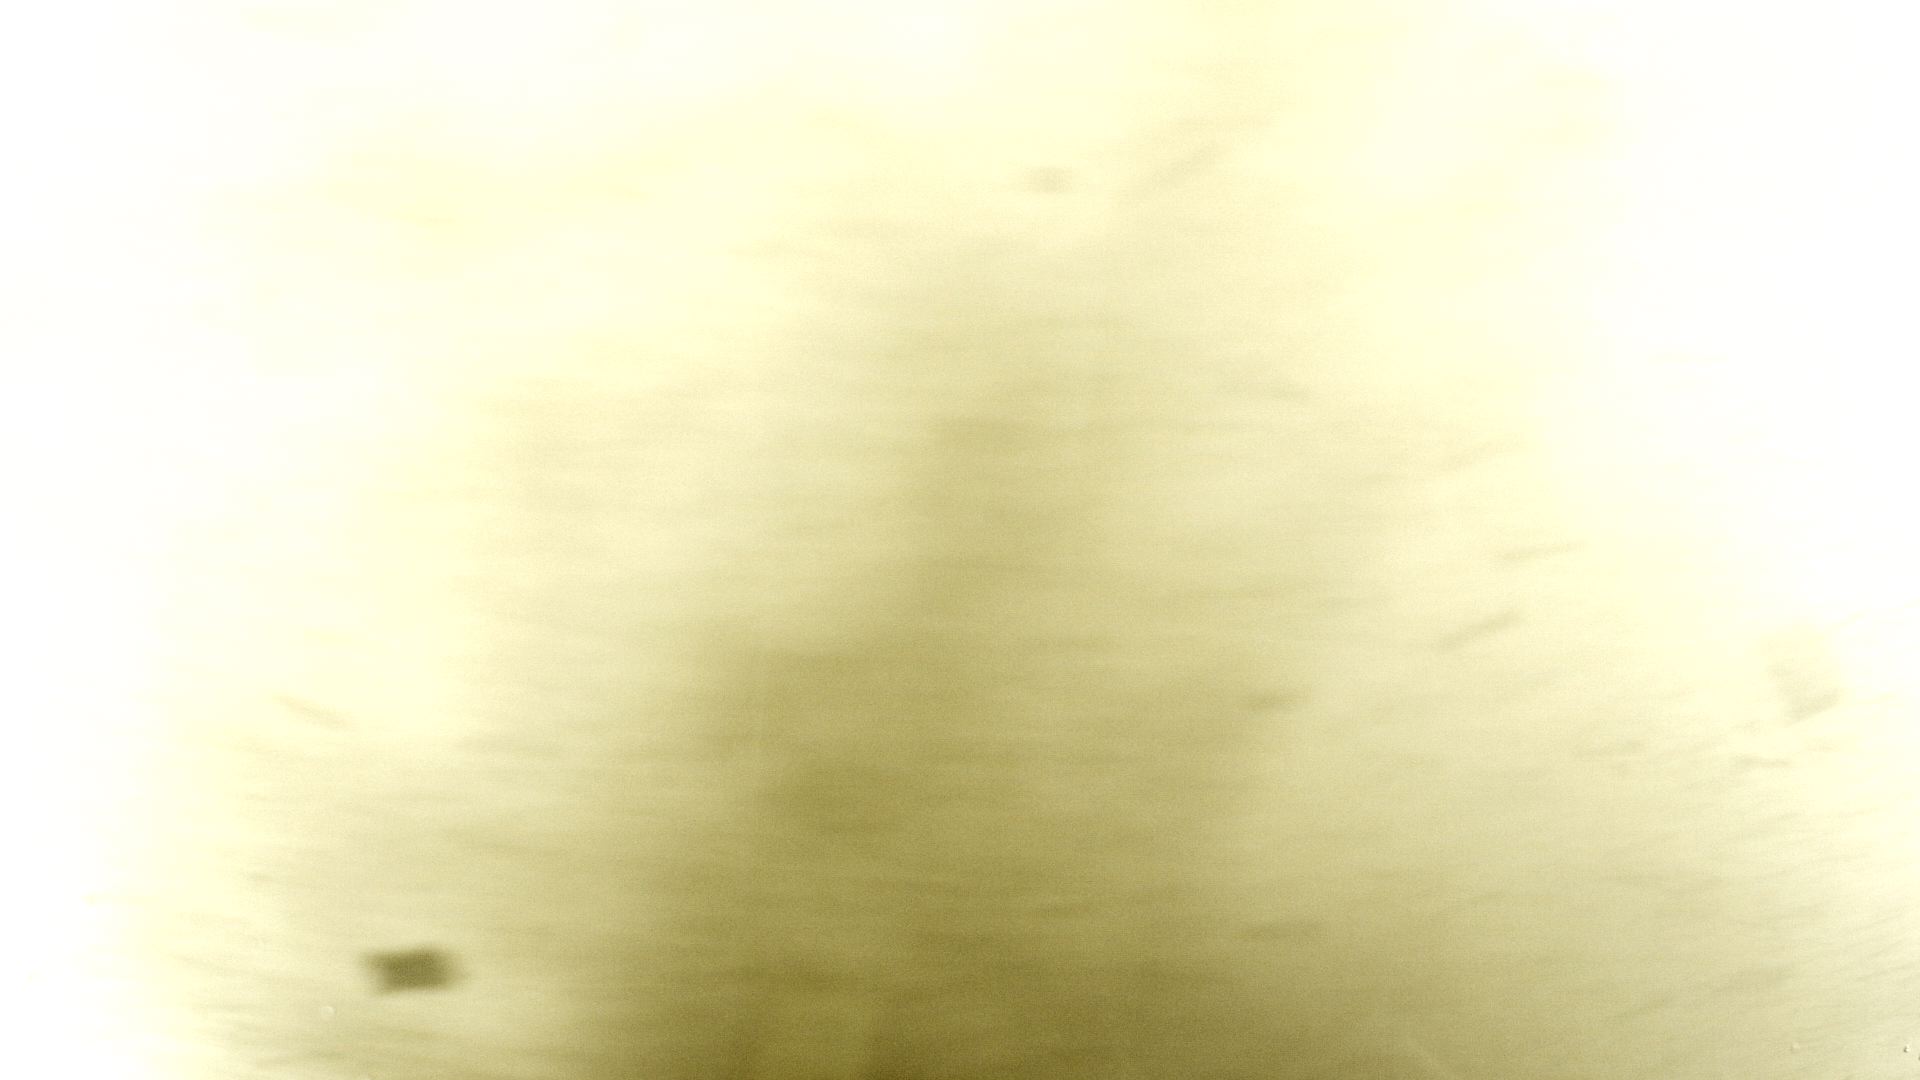
Yesterday Kate and I needed to shoot a whirlwind element. One of the VFX team suggested swirling sand in a vase of water. After a few experiments in the kitchen, we ended up using dirt from the garden. We used fluorescent softboxes for the background, ensuring we got a bright white background, and made weird arrangements of white paper to eliminate as many of the dark reflections in the vase as we could.
One of the tornado elements shot with the set-up pictured above. We let the dirt settle in the bottom of the water, then swirled the water with a spoon (which had to be kept out of frame).
A few weeks back we shot hosepipe water against black, inverted it and used Multiply to superimpose it as blowing dirt.
With a little thinking outside the box, you can shoot all kinds of elements against white or black to meet your VFX needs. I’ll leave you with this featurette I made in 2006, breaking down the various low-tech FX – many of them black-screen – that I employed on my feature film Soul Searcher.


 Award-winning visual effects artist Douglas Trumbull died recently, leaving behind a body of memorable work including the slit-scan “Stargate” sequence from 2001: A Space Odyssey. But what is slit-scan and where else has it been used?