The Normal Lens

Today I’m investigating the so-called normal (a.k.a. standard) lens, finding out exactly what it is, the history behind it, and how it’s relevant to contemporary cinematographers.


The Normal lens in still photography

A normal lens is one whose focal length is equal to the measurement across the diagonal of the recorded image. This gives an angle of view of about 53°, which is roughly equivalent to that of the human eye, at least the angle within which the eye can see detail. If a photo taken with a normal lens is printed and held up in front of the real scene, with the distance from the observer to the print being equal to the diagonal of the print, then objects in the photo will look exactly the same size as the real objects.
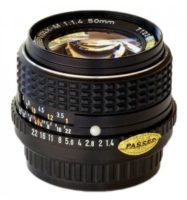
Asahi Pentax-M 50mm/f1.4 – a normal lens for 35mm stills

Lenses with a shorter focal length than the normal are known as wide-angle. Lenses with a greater focal length than the normal are considered to be long lenses. (Sometimes you will hear the term telephoto used interchangeably with long lens, but a telephoto lens is technically one which has a focal length greater than its physical length.)

A still 35mm negative is 43.3mm across the diagonal, but this got rounded up quite a bit — by Leica inventor Oskar Barnack — so that 50mm is widely considered to be the normal lens in the photography world. Indeed, some photographers rarely stray from the 50mm. For some this is simply because of its convenience; it is the easiest length of lens to manufacture, and therefore the cheapest and lightest. Because it’s neither too short nor too long, all types of compositions can be achieved with it. Other photographers are more dogmatic, considering a normal lens the only authentic way to capture an image, believing that any other length falsifies or distorts perspective.


The normal lens in cinematography

SMPTE (the Society of Motion Picture and Television Engineers), or indeed SMPE as it was back then, decided almost a century ago that a normal lens for motion pictures should be one with a focal length equal to twice the image diagonal. They reasoned that this would give a natural field of view to a cinema-goer sitting in the middle of the auditorium, halfway between screen and projector (the latter conventionally fitted with a lens twice the length of the camera’s normal lens).

A Super-35 digital cinema sensor – in common with 35mm motion picture film – has a diagonal of about 28mm. According to SMPE, this gives us a normal focal length of 56mm. Acclaimed twentieth century directors like Hitchcock, Robert Bresson and Yasujiro Ozu were proponents of roughly this focal length, 50mm to be more precise, believing it to have the most natural field of view.

Of course, the 1920s SMPE committee, living in a world where films were only screened in cinemas, could never have predicted the myriad devices on which movies are watched today. Right now I’m viewing my computer monitor from a distance about equal to the diagonal of the screen, but to hold my phone at the distance of its diagonal would make it uncomfortably close to my face. Large movie screens are still closer to most of the audience than their diagonal measurement, just as they were in the twenties, but smaller multiplex screens may be further away than their diagonals, and TV screens vary wildly in size and viewing distance.


The new normal

To land in the middle of the various viewing distances common today, I would argue that filmmakers should revert to the photography standard of a normal focal length equal to the diagonal, so 28mm for a Super-35 sensor.

Deleted scene from “Ren: The Girl with the Mark” shot on a vintage 28mm Pentax-M

According to Noam Kroll, “Spielberg, Scorsese, Orson Wells, Malick, and many other A-list directors have cited the 28mm lens as one of their most frequently used and in some cases a favorite [sic]”.

I have certainly found lenses around that length to be the most useful on set.  A 32mm is often my first choice for handheld, Steadicam, or anything approaching a POV. It’s great for wides because it compresses things a little and crops out unnecessary information while still taking plenty of the scene in. It’s also good for mids and medium close-ups, making the viewer feel involved in the conversation.

When I had to commit to a single prime lens to seal up in a splash housing for a critical ocean scene in The Little Mermaid, I quickly chose a 32mm, knowing that I could get wides and tights just by repositioning myself.

A scene from “The Little Mermaid” which I shot on a 32mm Cooke S4

I’ve found a 32mm useful in situations where coverage was limited. Many scenes in Above the Clouds were captured as a simple shot-reverse: both mids, both on the 32mm. This was done partly to save time, partly because most of the sets were cramped, and partly because it was a very effective way to get close to the characters without losing the body language, which was essential for the comedy. We basically combined the virtues of wides and close-ups into a single shot size!

In addition to the normal lens’ own virtues, I believe that it serves as a useful marker post between wide lenses and long lenses. In the same way that an editor should have a reason to cut, in a perfect world a cinematographer should have a reason to deviate from the normal lens. Choose a lens shorter than the normal and you are deliberately choosing to expand the space, to make things grander, to enhance perspective and push planes apart. Select a lens longer than the normal and you’re opting for portraiture, compression, stylisation, maybe even claustrophobia. Thinking about all this consciously and consistently throughout a production can add immeasurably to the impact of the story.
The Normal Lens

Camerimage 2017: Tuesday

This is the second part of my report from my time at Camerimage, the Polish film festival focused on cinematography. Read part one here.


Panavision: The BEauty of 8K Large Format

Bydgoszcz’s town square

It was a chilly but bright morning as I strolled into Bydgoszcz and made straight for the MCK Orzeł, where I planned to spend most of the day. With only a few minutes to go until the scheduled start time, the queue for Panavision’s large format seminar had spilt out onto the street. The tickets ran out before I reached the desk, but there was a live video feed in the cinema’s bar. In many ways this was better than going into the auditorium – sitting in a comfy chair with the bar close at hand, and a table to make notes on.

My article for Red Shark News about the future of large format cinematography has been surprisingly popular, and it contains plenty of detail about this Panavision seminar, so I won’t repeated myself here. I will say that it converted me from a high resolution sceptic to a believer, because the speakers demonstrated that footage acquired in high rez – even when downscaled – retain much of its smoothness, high bit depth and dynamic range. “More resolution evokes the imagination of the brain,” was how colourist Ian Vertovec summed it up.

At the end of the session, Red Shark’s David Shapton and Matt Gregory emerged from the auditorium and joined me for lunch at the bar. We had all found the seminar very interesting, and Matt was quick to get us all tickets to the Panasonic 4K seminar coming up later in the day. The pair then went off to other things, while I headed to the kiosk to get a ticket for the imminent John Toll seminar. But of course I’d left it too late, they were all gone, and so I returned to my comfy chair in the bar to watch via video feed again.


Panavision workshops: A conversation with John Toll, ASC

John Toll, ASC

John Toll, ASC was the recipient of this year’s Lifetime Achievement Award at Camerimage, and this seminar was an epic journey through this career. He explained how he learnt his craft as a camera operator for the late great Conrad Hall, ASC and Jordan Cronenweth, ASC.

The talk then focused on some of Toll’s biggest movies, beginning with the period drama Legends of the Fall starring Brad Pitt and Anthony Hopkins. The movie was largely daylight exterior (something that was to become a theme across Toll’s work) so the cinematographer insisted on twelve weeks of prep, the same as the production designer. This allowed him to be part of selecting locations and choosing orientations for the buildings to get the optimal sun path. Toll said he was lucky that the 1st AD was willing to be flexible with the schedule, observing the mood of the weather each day and shooting scenes that matched that mood.

Gaffer Jim Plannette joined Toll on the stage to discuss the huge night exterior battle sequence. This employed three Musco lights (a Musco being fifteen 6K pars on a 100ft boom arm) which three-quarter-backlit every angle. To get crisp, grain-free blacks, Toll overexposed and printed down.

Braveheart was covered next, with 1st AC Graham Hall joining the panel. Hall had a difficult time with the film’s battle scenes, featuring as they did so much movement, improv and slo-mo. Toll revealed how the immersive style of the action was based on a sixties TV documentary about Culloden that coincidentally both he and director Mel Gibson had seen. A lot of colour timing was required to give consistency to the battles, which were shot over weeks, at all times of day.

The discussion then turned to Terrence Malick’s The Thin Red Line. The Australian locations featured very difficult, uneven terrain, so Toll used an Akela Crane. The crane’s arm was so long (75ft) that the arc of its movement couldn’t be detected on camera. Its use had to be carefully planned though, because each time it needed to be moved it had to be disassembled and reassembled on a special platform. 80% of the film was actually handheld, and Toll operated himself so as to respond to the spontaneity and improv which Malick encourage from his cast.

The Akela Crane in use on “The Thin Red Line”

Toll told a funny story about a shot of shadows moving across long grass which was praised by critics. It was inserted to cover a continuity error, the build-up to the battle having been shot in heavy cloud, while the battle itself was shot in full sun. A happy accident!

Time was running short, so the moderator powered through Almost Famous (where parallels were drawn between the explosive battle scenes of Toll’s earlier movies and the crowd scenes at the rock concerts, punctuated by flashing cameras), Vanilla Sky and Billy Lynn’s Long Halftime Walk. This latter film, directed by Ang Lee, is notable for its acquisition in 120fps 4K stereo. You can read more about it on the British Cinematographer website.


Panasonic Seminar: Varicam Experience

A Panasonic Varicam LT with Fujinon zoom rigged for action on “Arrested Development”

I remained at the MCK and, meeting up with Dave and Matt again, finally got into the auditorium, for the Panasonic seminar. Moderated by British Cinematographer‘s Ronnie Prince, the panel brought together a trio of DPs who shoot Netflix shows on the Varicam: Bobby Shore, CSC (Anne with an E), Pepe Avila del Pino (Ozark) and Patrick Alexander Stewart (Arrested Development).

Both Shore and del Pino admitted that they were most comfortable with the Arri Alexa, but due to Netflix’s strict rules on 4K acquisition (the Alexa tops out at 3.2K) they had to find another camera. They plumped for the Panasonic Varicam, a 4K camera best known for having dual native ISOs: 800, in common with the Alexa, Red and many others, and 5000, two and two-thirds stops faster. Being native, both ISOs have the same dynamic range, the same log curve and in theory are equally clean.

Panasonic, I think, were keen to push ISO 5000 in this seminar, but unfortunately Shore and del Pino shot almost exclusively at 800. Stewart did shoot Arrested Development at 5000, interiors and night scenes at least, but down-rated it to 2500. Otherwise, he said, the sets would have been too dark for the actors to feel like they were in a believable daytime environment. I think that’s a fascinating, unexpected side effect of low light sensitivity! Stewart lit the stages with large Quasar softboxes and paired the Varicam with Fujinon zooms and occasional Xeen primes.

Del Pino chose Zeiss Super Speeds for night scenes and Hawk V anamorphics for day scenes on Ozark. He liked the claustrophobia of cropping the anamorphic images to 2:1, the show’s delivery ratio, while the Super Speeds produced a creaminess he found appealing. He also mentioned that the Varicam’s sensor handled greens very well, which was important for him, given how much of Ozark takes places in woods.

Anne with an E was lensed on vintage Panavision Standard and Super Speeds – “the oldest, craziest lenses we could find,” says Bobby Shore. He liked their low resolving power, their weird flares and how they fell apart when wide open. Part of the show’s signature look are ECUs of the freckled title character, which were captured on a 27mm Primo for a more detailed, tactile image.

Inspired by the work of Robbie Ryan, BSC (Wuthering Heights), Shore kept the lighting naturalistic, mixing tungsten and HMI sources on a set that was treated like a location. He also shot through a Panaflasher, a special lens filter with built-in lighting which reduces contrast and adds a colour tint of your choice, but this effect was dialled out in post. Indeed, Shore raised the issue of DPs’ images being altered after the fact, an issue I explore fully in another Red Shark article.

By the way, I’ve been watching Anne with an E since the festival and I can thoroughly recommend it.

When the seminar was over, I went for dinner with Dave, Matt and Chris Bouchard, at a very nice (but once again cheap) Asian fusion restaurant. Then we met up for drinks with some of the reps from Red, and I got talking to a DP who had shot squid from a submarine for an episode of Blue Planet. After another drink or two with Chris at the Cheat bar, I called it a night.

Tune in next week for the final part of my Camerimage blog.

Camerimage 2017: Tuesday

Camerimage 2017: Monday

This week I attended Camerimage for the first time. Centred around the Opera Nova theatre beside the river Brda in Bydgoszcz, Poland, Camerimage is an international film festival celebrating the art of cinematography. It’s a bit like Cannes for DPs, but colder. This is the first part of my account of my three days at the annual hub of motion picture imaging.

The Ryanair flight was dirt cheap but trouble free, and at 9:50am I found myself on the tarmac of Bydgoszcz airport. There I met David Shapton and Matt Gregory, founders of Red Shark News, for the first time. I’ve been contributing articles to Red Shark for a few months so it was nice to finally meet these gentlemen in person.

A taxi (also dirt cheap) dropped me at the Opera Nova – only about three miles from the airport – where I picked up my pass and goodie bag. Bizarrely, said goodies included an Ikea catalogue. How did they know that us DPs love flat-pack furniture so much?


Canon Workshop: Stephen Goldblatt

From the Opera Nova I hurried to a college across the river, where the sports hall formed the venue for a Canon workshop run by Stephen Goldblatt, ASC, BSC, the man behind the lens for the likes of Lethal Weapon 2 and Batman Forever. The blurb for this workshop described Goldblatt as “a master of low light shooting”, and it was certainly pitch black when I walked in a few minutes late, and gingerly picked my way around to the far side of the hall to find a seat.

Lighting through lace

On a purpose-built bedroom set, Goldblatt was recreating lighting from the Robert Redford / Jane Fonda romantic drama Our Souls at Night, shot on the Sony F55 and Canon C300 Mark II. To practical lamps on either side of the bed he added egg-crated tungsten soft-boxes to beef up each one. He simulated moonlight through an imagined off-camera window by placing a lace curtain in front of a blue-gelled lamp and blowing it gently with a fan. An additional egg-crated soft-box provided a low level of blue toplight.

As he worked, Goldblatt revealed how he doesn’t miss ceulloid, loving how relatively easy it is now to light night exteriors or moving car scenes. “But just because you don’t need much light,” he cautioned, “it doesn’t mean you don’t want to control it.” Other developments coming down the pipe do not inspire him so much; he feels that high resolutions and HDR are unnecessary, pushed by marketing people rather than creatives.

He placed great emphasis on the importance of the eyes. “A common failing of newer DPs is that they worry more about the set than the eyes,” he said, before explaining how he will often walk beside the handheld camera with a torch, providing eye-light. He also stressed the importance of eye-lines. Although in any one shot it’s not that important how wide or tight the eye-line is, or how high or low, across the two hours of a feature film the decisions have a cumulative effect.

Trying out a Xeen lens in the exhibition hall

Goldblatt no longer uses a light meter. “Trust your eye, develop your eye,” he advised, adding that you must have a strong voice to remain in control of the images through postproduction.

After grabbing lunch, I returned to the Opera Nova to browse the exhibition hall. This closely resembled a mini BSC Expo or Media Production Show, with all the major camera and lens manufacturers displaying their wares, along with several lighting companies. I had a play with some of the cameras, including the actual Alexa 65 used on Rogue One.

Then I met up with Chris Bouchard, one of The Little Mermaid‘s two directors, who had arrived in Poland the previous day. We sauntered over to another venue, the MCK Orzeł, an independent cinema with a nice, chilled, film-buff-friendly atmosphere. The auditorium itself was packed though as we settled in for a seminar on “The Future of Digital Formats”.


Red Seminar: The Future of Digital Formats

Promoting Red’s Monstro sensor, the session was mostly about the benefits of shooting in high resolutions, and giving yourself the maximum flexibility in post. You can read my thoughts on both of those topics in upcoming Red Shark articles.

One of the speakers, Christopher Probst, ASC (DP of Mindhunter and technical editor of American Cinematographer magazine) made some interesting points about ISO. “Traditionally, low ISOs were used for bright scenes like day exteriors, and high ISOs were used for darker scenes like night exteriors,” he explained. “That was based on reducing the grain, getting the cleanest possible image on film.” He advised the opposite for digital capture. “Use a low ISO for nights to get more shadow detail, and a high ISO for days to get more highlight detail [in the sky, for example].”

“Independence Day: Resurgence” – DP: Markus Forderer, BVK

Another interesting nugget came from Markus Förderer, BVK. On Independence Day: Resurgence he switched between spherical, 1.3x anamorphic and 2x anamorphic lenses depending on the situation. For example, flatter lenses were better for wide shots – where anamorphics would distort straight lines – and for VFX work.


Hawk Vantage Seminar: Top cinematographers tell their Hawk stories

I ducked out of the Red session early so that I could pop back to the Opera Nova for the Hawk Vantage seminar, bumping into my Perplexed Music gaffer Sam Meyer on the way. Hawk were launching three new sets of lenses: MiniHawk (T1.7 hybrid anamorphics), Hawk Class-X (T2.2 2x anamorphics) and Hawk65 (T2.2).

A Hawk T1 in the exhibition hall

The MiniHawks in particular seem very exciting. Daniel Pearl, ASC showed us some stunning frame grabs from the upcoming Dennis Quaid vehicle Motivated Seller, shot using these lenses on Alexa Mini. Whilst having key advantages of spherical lenses (speed, small size, low weight, extremely close focus) the MiniHawks have a unique and beautiful cigar-shaped bokeh.

While Pearl had used the latest Hawks, Magdalena Górka, PSC had shot with some old ones, the C series, for Brad Silberling’s drama An Ordinary Man. “I had to frame everything centrally because that’s the only place that was sharp!” she laughed. Also addressing focus fall-off, Andrzej Bartkowiak, ASC (Speed, The Devil’s Advocate) stated, “I like anamorphic because the shallow depth of field allows you to direct the viewer’s eye more.”

Stuart Dryburgh, ASC (The Secret Life of Walter Mitty, Bridget Jones’s Diary) talked about shooting 1.3x anamorphic. He has done this on three-perf 35mm (to achieve a Scope aspect ratio), on an Alexa in 16:9 mode (again for 2.39:1) and on an Alexa in 4:3 mode (to get 1.85:1). He also recommended shooting on Super-16 with 1.3x glass, citing the example of Ed Sheeran’s “Thinking Out Loud” video, which Pearl shot.

Peter Flinckenberg, FCK (Upswing, Concrete Night) noted that, with the shift to digital acquisition, the DP is no longer a magician, “but you can bring back that magic with lighting and glass that has character.”


CW Sonderoptic: Exploring Large format cinematography & Leica lenses

I took my leave, dashing back to the MCK Orzeł for another lens-themed seminar, this time by CWSonderoptic, the makers of Leica. The first half of this panel revolved around a short film shot by Darius Khondji, ASC, AFC (Seven, Delicatessen) on an Alexa 65 with the new Leica Thalias.

The second half was all about Tod Campbell, DP of Stranger Things and Mr. Robot, focusing on the latter show. The second season of Mr. Robot was shot on Leica Summicrons after Campbell found that the Cookes used on season one distorted the many straight lines which became such a key part of the show’s unique look. “I look at season two as kind of the birth of the photography for the show,” he said. With a laugh he added: “Sorry that the lighting looks like shit in season one. I was learning!” (See my spherical lens tests for my own thoughts on Cookes and Leicas.)

One of my favourite shots from “Mr. Robot”

Campbell revealed that season three of Mr. Robot has a different look again, using much more camera movement and “twice as much atmos”. For this season he paired Canon K35 glass with an 8K camera, but due to the Canons’ low resolution he employed Leica Summiluxes for the wide shots.

He also shared some interesting information about his testing process, admitting that he doesn’t really know how other DPs test. He doesn’t use charts, he just makes it up. He always includes a candle, a practical lamp, some kind of highlight in the background, and random foreground objects (as background bokeh can differ from foreground bokeh).


Christopher Doyle Seminar

When the Leica seminar ended I went back to the Opera Nova, where Chris and I had dinner at the nice (and once again cheap – are you detecting a theme?) restaurant. Despite having got up at 4am (3am local time) I wasn’t feeling too tired, so we headed upstairs to the 10pm seminar by Christopher Doyle, HKSC (Hero, Lady in the Water). Many people were nursing beers, including Doyle himself, and the lecture theatre was dimly illuminated by mood lighting. Clearly this session was not going to be like the daytime ones.

“We’re going to fuck things up,” Doyle began, dispelling all doubts. He proceeded to talk disjointedly but entertainingly about his work on The White Girl and what I think was a separate film about a camera obscura. His oratory was liberally sprinkled with great one-liners, a few of which I reproduce here for your edification:

  • There are only three people in filmmaking: the actor, the audience and the cinematographer in between them.
  • If actors don’t feel loved, the performance will not come across on camera.
  • Give the idea the image it deserves.
  • [Vittorio] Storaro [legendary DP of Apocalypse Now amongst others] can’t tell you how to do it. You have to find it for yourself.
  • People in space – that’s what cinematography’s about.
  • The location is very important. It gives the energy, it imposes the style.
  • The lens doesn’t matter; it’s what it shows that’s important.
  • You never sleep because you care too much – that’s what filmmaking is.
With Chris Bouchard in front of the Opera Nova

Doyle also picked up on a piece of dialogue from a clip he screened: “What is it?” / “I don’t know yet.” It was a great summation of finding the essence of a shot, he said.

Having had our fill of aphorisms, Chris Bouchard and I slipped out to get a drink. The Cheat, the pop-up bar across the road, was absolutely packed, and my early morning was finally catching up with me, so I called it a night. The highstreet of Bydgoszcz was quiet and chilly as I walked briskly to my hotel, curiously located down a service road behind the city’s football stadium, reflecting on all that I had learnt that day.

Tune in next week for tales from my second day at Camerimage.

Camerimage 2017: Monday

The Cinematography of “Perplexed Music”

In June I was recommended by a mutual friend to shoot a short drama called Perplexed Music, inspired by the Elizabeth Barrett Browning sonnet of the same name. It’s a passion project from writer-director Mark McGann, with his brother Paul McGann (Doctor Who, Alien 3, Withnail & I) in the lead role of a man grieving for his deceased partner.

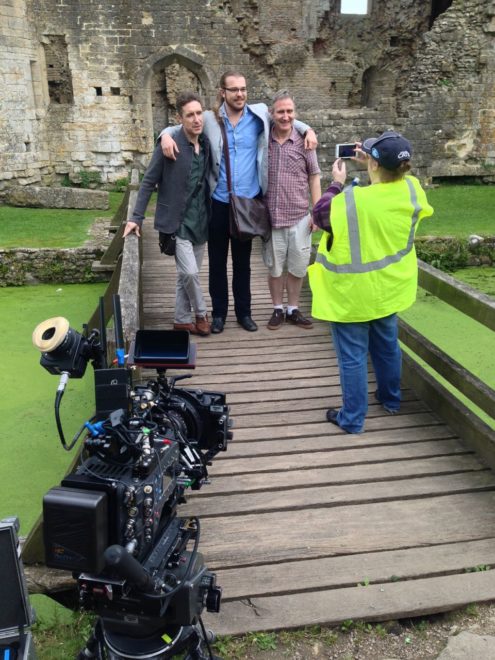
Paul and Mark pose with one of the supporting artists between takes.

Mark was keen from the outset to shoot on an Alexa, and I was quick to agree. Arri Rental very kindly gave us an amazing deal on an Alexa Classic and a set of Ultra Primes. As on Above the Clouds, we used a Blackmagic Micro Cinema Camera as a B-cam, capturing two specific angles that were impossible on the Alexa with our limited grip budget.

Throughout July, Mark and I had a very satisfying creative dialogue about the cinematic techniques we would use to tell the story of Paul’s character, The Man, who never speaks. I had been watching a lot of Mr. Robot, and was keen to use unusual compositions as that show does. The visual grammar that we ultimately developed eschewed The Rule of Thirds, either squeezing The Man right into the side of frame – at times when things are too much for him – or placing him dead centre for moments of clarity and acceptance, and for flashbacks to when his partner was alive.

The Blackmagic Micro Cinema Camera is mounted on a combo lighting stand to capture a high angle through a streetlamp.

While testing lenses at Arri Rental a few weeks prior to the shoot, I took the opportunity to shoot some frame-rate tests between 24 and 48fps. Since the film has so little dialogue, I figured there was nothing to stop us using a lot of slow motion if we wanted to. I didn’t want it to look like a music video though. I thought perhaps a very subtle over-cranking, creating languid blinks and slightly heavier movement, would add to the burden of The Man’s grief. Mark agreed as soon as he saw the tests, and we ended up shooting a number of set-ups at 28 and 30fps, plus 40fps for a pivotal sequence.

I also tested various ISO settings on the Alexa (click here for full details, stills and video from this test). Based on these, I decided to use ISO 1600 for the majority of the film, partly for the extra latitude in the highlights, and partly to add grittiness to The Man’s grief-stricken world, in the form of a little picture noise. When we started shooting the flashbacks, on the spur of the moment I decided to switch to ISO 400 for these. A few years back I shot the music video below on a Red Epic and, for reasons I forget, one set-up was done at a lower ISO than the rest. I remember the feeling this gave, when I saw the final edit, of everything suddenly being smooth and hyper-real. I thought that would be a great feeling to give to the flashbacks.

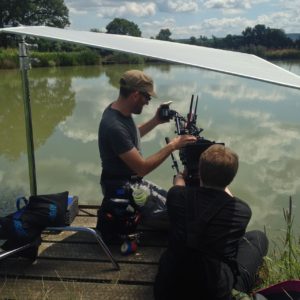
1st AC Rupert Peddle and 2nd AC Ben Davies set up a lakeside close-up under a diffusion frame which will soften the light on Paul.

Much of Perplexed Music was day exterior, but a couple of sequences required lighting. In the opening café scene, I fired HMIs through two windows, but kept their light away from The Man, keying him with a practical to put him in his own little world. Meanwhile, a happy couple he’s watching are bathed in sunlight (sometimes real, sometimes not) warmed up with a quarter CTO, and bouncing beautifully off their table to give them a healthy glow.

For night interiors at The Man’s home, I was keen to rely on practicals as much as possible. Firstly there wasn’t much space in the little cottage, secondly I didn’t want the hassle of having to shift them around to keep them out of frame when we changed angle, and thirdly it just looks more natural. So aside from a tungsten bounce in a corner of the living room we knew would never be seen, I stuck to practical table lamps and exterior lighting.

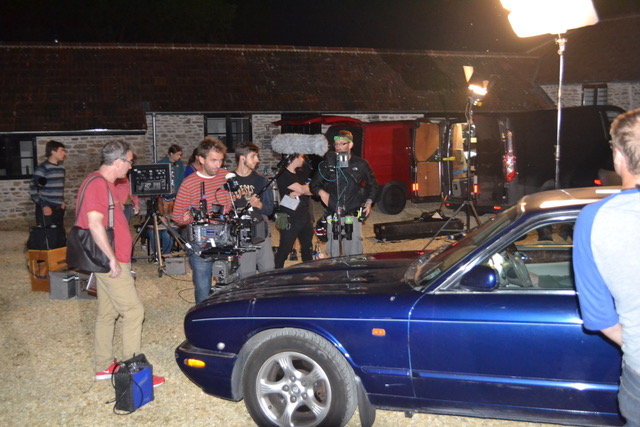
Setting up for a night exterior shot. Photo: Gary Horton

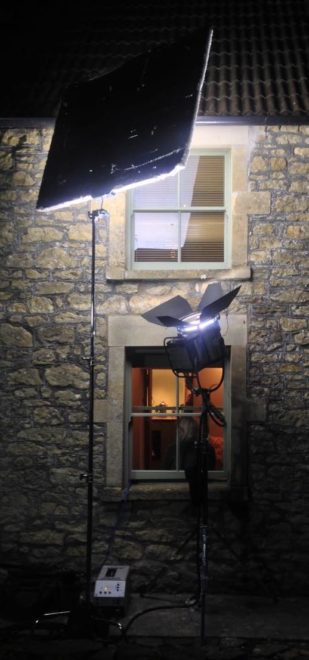
I had planned to use direct HMI sources for moonlight through the windows, but my gaffer Sam suggested going softer so that we wouldn’t have hard shadows inside which would need filling. I saw that he was right, so we used a kino through one window and a 2.5K HMI bounced into poly through another (pictured at left).

Perplexed Music was shot over five days in Frome in Somerset and Rame in Cornwall. The latter provided us with a spectacular cliff-top and the isolated St. Michael’s Chapel on the peak of the headland. Here we employed the services of The Fly Company, who captured two dramatic, sweeping shots on their DJI Inspire 2 drone. We were all extremely impressed by what they were able to achieve, especially as it was done in very windy conditions, in between rain showers.

We completed the final set-ups of the schedule as the winds began gusting up to 60mph, and poor Paul could barely stand upright! I was certainly glad we picked the Alexa to shoot on, because anything lighter would probably have shaken during takes, if not blown over!

Lining up a shot with director Mark McGann. Photo: Gary Horton

I had a fantastic time working with Mark and Paul, and the whole cast and crew. We were sad to part ways at the end of the week, and we all look forward to seeing the finished film soon. And at this point, dear reader, I ask for your help. Currently a Kickstarter campaign is underway for postproduction. It’s well over 50% funded at the time of writing, but every little helps in our quest to reach the finishing line. Rewards for backers include thank you video messages from Paul and Mark, and tickets to a private screening in December. Even if you can’t contribute, please consider sharing the page on social media. Thanks!

https://www.kickstarter.com/projects/perplexedmusic/perplexed-music-post-production

The Cinematography of “Perplexed Music”

5 Facts About the Cinematography of “Dunkirk”

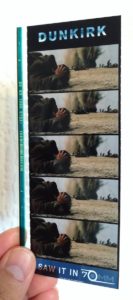
Some have hailed it as a masterpiece, others have complained it left them cold. Personally, seeing it on 70mm, I found Dunkirk a highly immersive and visceral film, cinematic in the truest sense of the word. The huge, sharp images free from any (apparent) CGI tampering, combined with the nerve-jangling gunshots and rumbling engines of the superlative soundtrack, gave me an experience unlike any other I can recall in recent movie-going history. I can imagine that it was less effective projected from a DCP onto a smaller screen, which may account for the underwhelmed reactions of some.

But however you feel about Dunkirk as a film, it’s hard not to admire its technical accomplishments. Here are five unique aspects of its cinematography.


1. It was shot on two huge formats.

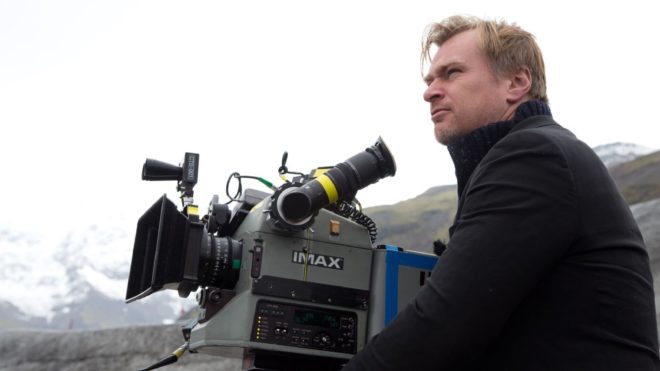
Director Christopher Nolan has long been a champion of large-format celluloid capture, eschewing the digital imaging which has become the dominant medium in recent years. “I think IMAX is the best film format that was ever invented,” says Nolan in a DGA interview. “It’s the gold standard and what any other technology has to match up to, but none have, in my opinion.”

Imax is a process which uses 65mm film (printed on 70mm for exhibition, with the extra space used for the soundtrack) running horizontally through the gate, yielding an image over eight times larger than Academy 35mm. Following some test shots in The Prestige, Nolan captured whole sequences from The Dark KnightThe Dark Knight Rises and Interstellar in Imax.

For Dunkirk, Nolan and cinematographer Hoyte van Hoytema, ASC, FSF, NSC were determined to eliminate 35mm altogether, to maintain the highest possible resolution throughout the movie. Imax cameras are noisy, so they shot dialogue scenes on standard 65mm – running vertically through the gate – but Imax footage makes up over 70% of the finished film.


2. The movie was framed with three different aspect ratios in mind.

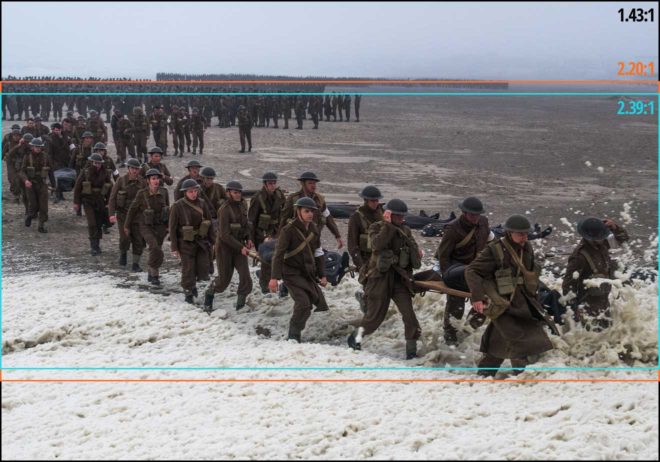
Those who watched Dunkirk in an Imax cinema got to see the native aspect ratio each sequence was captured in, i.e. 2:20:1 for the standard 65mm dialogue scenes but the much taller 1.43:1 for the Imax material, the bulk of the film. Those, like me, who attended a standard 70mm screening, saw it in 2:20:1 throughout. And those hapless individuals who watched it digitally apparently saw the standard Scope ratio of 2.39:1, at least in some cases.

This means that, when composing his shots, van Hoytema had to have two ratios in mind for the dialogue scenes and three for everything else. “Framing was primarily for the 2.40 [a.k.a. 2:39:1], then protecting what was outside of it,” 1st AC Bob Hall explains. This left close-ups, for example, with a large amount of headroom in 1.43:1, but the huge size of Imax screens made such framing desirable anyway.  “Imax is such an immersive experience that it’s not so much the composition that the cinematographer’s done as where your eyes are going on the screen that creates the composition.”


3. Parts of the camera rig were worn as a backpack.

Breaking with the accepted norms of large format cinematography, van Hoytema captured a significant proportion of the movie handheld. The 65mm camera package weighed over 40kg – about three times the weight of a typical Alexa rig – with the Imax camera only a little lighter. To avoid adding the weight of the batteries, video transmitter, Cinetape display and Preston (wireless follow focus) brain, these were placed in a special tethered backpack which was either worn by key grip Ryan Monro or, for water tank work, floated on a small raft.

Unfortunately, Hall quickly found that electromagnetic interference from the Imax camera rendered the Cinetape inoperable, so he ended up relying on his extensive experience to keep the images sharp. “I had to go back to the technology of the 1980s, where I basically guess how far famous people are from me,” he remarks drily in this enlightening podcast from Studio Daily.


4. A periscope lens was used to shoot spitfire cockpit interiors.

“I wanted to tell an intensively subjective version of this story,” says Nolan. To that end he requested over-the-shoulder views out of the windscreens of Spitfires in flight. Furthermore, he wanted to be able to pan and tilt to follow other aircraft passing by. Given the huge size of the Imax camera, there was no room to rotate it within the cockpit. Instead, custom periscope lenses were built which could snake over the pilot’s shoulder, and pan and tilt independently of the camera body, using prisms to maintain the correct image orientation to the film plane.

Other glass used on Dunkirk included an 80mm Imax lens belonging to Nolan himself, and converted stills lenses.

Note that the camera is mounted upside-down, to compensate for the flipped image generated by the prism in the periscope lens.


5. At one point the camera sunk to the bottom of the sea for an hour and a half.

A specific Spitfire POV required was from a damaged plane diving towards the sea and hitting the water. The practical effects department devised a catapult to launch an unmanned mock-up from a ship, the grips built a crash housing for the Imax camera which would be inside, and a plan was devised to recover it before the mock-up sank. But they weren’t quick enough, and the crew watched the plane and the camera disappear beneath the waves and plunge to the bottom of the English Channel, where it sat for 90 minutes until divers retrieved it. Incredibly, once dried out and developed, the film footage was found to be completely undamaged. “The shot was all there, in full colour and clarity,” says van Hoytema in the American Cinematographer article. “This material would have been lost if shot digitally.”


5 Facts About the Cinematography of “Dunkirk”

Anamorphic Lens Tests

Anamorphic cinematography, first dabbled with in the 1920s, was popularised by Twentieth Century Fox in the fifties as CinemaScope. Television was growing in popularity and the studios were inventing gimmicks left, right and centre to encourage audiences back into cinemas. Fox’s idea was to immerse viewers in an image far wider than they were used to, but with minimal modifications to existing 4-perf 35mm projectors. They developed a system of anamorphic lenses containing elements which compressed the image horizontally by a factor of two. By placing a corresponding anamorphosing lens onto existing projectors, the image was unsqueezed into an aspect ratio of 2.55:1, or later 2.39:1.

Since those early days of CinemaScope, anamorphic cinematography has become associated with the biggest Hollywood blockbusters. Its optical features – streak flares, oval bokeh and curved horizontal lines – have been seared into our collective consciousness, indelibly associated with high production values.

I’ve not yet been fortunate enough to shoot anamorphic, but I was able to test a few lenses at Arri Rental recently, with the help of Rupert Peddle and Bex Clives. Last week I wrote about the spherical lenses which we tested; our anamorphic tests followed the same methodology.

Again we were shooting on an Alexa XT Plus in log C ProRes 4444 XQ, this time in 4:3 mode, a resolution of 2048×1536. Since all of the lenses had a standard 2:1 anamorphosing ratio, the images unsqueezed to a super-wide 2.66:1 ratio. (This is because the lenses were designed to be used on 35mm film with space left to one side for the optical soundtrack.) You can see the full width of this ratio in the first split-screen image in the video, at 2:08, and in the second image below, but otherwise I have horizontally cropped the footage to the standard 2.39:1 ratio.

We tested the following glass:

Series Length Speed CF* Weight
Hawk V 35mm T2.2 30″ 5.6kg
Cooke Xtal 30mm T2.8 ? 3kg
Kowa Mirrorscope 40mm T2.2 36″ 1.15kg
Kowa Mirrorscope 30mm T2.3 ? ?

* CF = close focus

For consistency with the spherical lenses, we used lengths around 32mm, but in the anamorphic format this is a pretty wide lens, not a mid-range lens. We shot at T2.8, again for consistency, but I hear that many anamorphics don’t perform well wider than T4.

We were only able to test what Arri Rental happened to have on the shelves that day. The biggest and presumably most expensive was the Hawk V-series. Next  in size and weight was the Cooke Xtal – pronounced “crystal” – a 1970s lens based on the much-loved Speed Panchros. The smallest and lightest, was the Kowa Mirrorscope, with a list price of £1,200 per week for a set of four. (Sorry, I couldn’t find any pricing info for the others online.) Note that there isn’t really a 30mm Mirrorscope; to get this length you put a wide angle adapter on the 40mm. As this extra element decreases the optical performance, we tested it with and without, hence the two lengths.

Here’s the video…


Skin tones

Click on the image to see it at full quality.

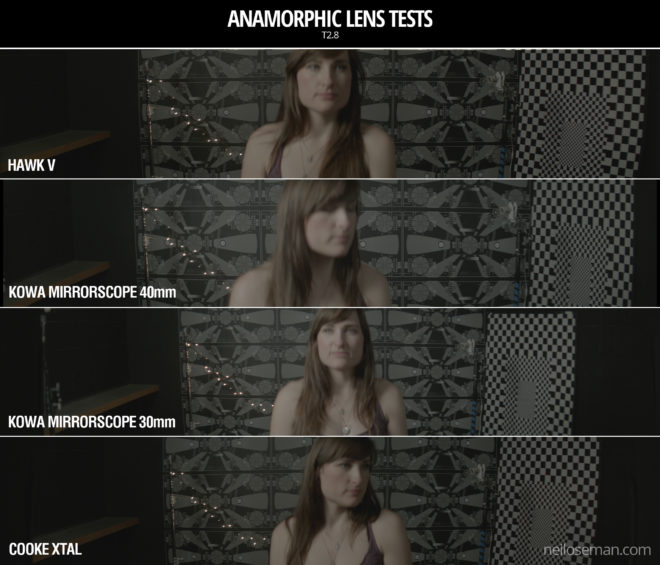
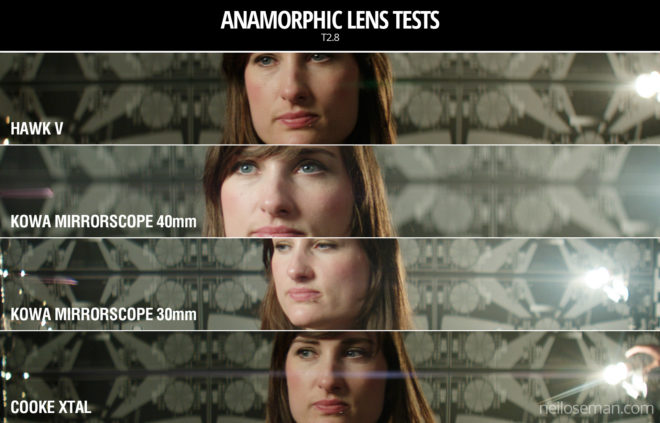
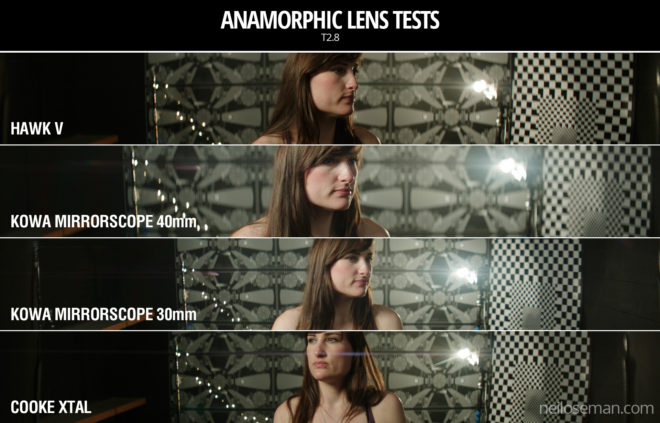
To my eye, the Hawk has a fairly rich, warm skin tone, while the Cooke – as with the spherical S4 tested last week – seems a little grey and flat. The Kowa is inexplicably brighter than the other two lenses, which makes it hard to compare, but perhaps it’s a little cooler in tone?


Sharpness

Focus is more critical with anamorphic lenses than spherical ones. From a forum posting by Max Jacoby:

Anamorphic lenses have what is known as a “curved field of focus” that works similarly to the curved movie screens in some large Cinerama theatres. This is one reason that one needs to expose these lenses at a deeper stop. If one doesn’t, the curved field will not be covered by depth of field and either the edges or centre of the frame will be soft.

One day I’d like to re-test these lenses at a lower stop, T4 or T5.6, where they will all undoubtedly perform much better. But in this T2.8 test, on Bex’s face in the centre of frame, the Hawk V and the Kowa Mirrorscope 40mm – both almost a full stop from their maximum apertures – are clearly the sharpest of the bunch. The Cooke Xtal, which is wide open, is unsurprisingly softer. The 30mm adapter on the Mirrorscope completely destroys the image, not only making it very soft but also introducing colour aberration.

Now let’s look at the checkerboard at the side of frame and see if we can spot any differences in sharpness there…

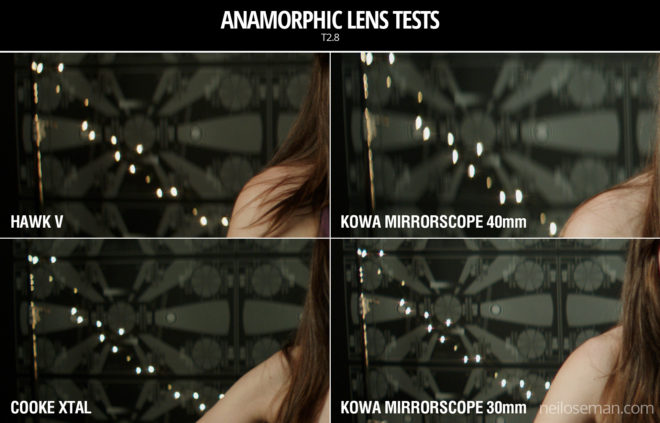
It seems to me that the Kowa, both with and without the adapter, has a greater difference in sharpness between the centre and edges of frame than the the Hawk and Cooke. With the latter two lenses, the checkerboard is reasonably sharp, at least on the lefthand side, with some ghosting/blur visible towards the righthand side. The same thing can be observed on the chart in the flare tests at the end of the video.


Breathing & Bokeh

All of these lenses have a noticeable degree of breathe, which I suppose is to be expected from anamorphics. The Hawk V has roughly oval bokeh, the Cooke’s is more circular, while the Mirrorscope has interesting D-shaped bokeh.


Flare

The Hawk V doesn’t flare much at all, which is apparently due to the anamorphic element being in the middle of the lens, rather than at the front. The Kowa has a nice streak and glow around the light source, with a funky purple artefact on the opposite side of frame. But it’s the Cooke Xtal which provides the most classic lens flare, with a horizontal line across most of the frame and a partial star pattern around the source, despite the lens being wide open.

At the end of the video you can see how the flares develop on each lens as the light source moves horizontally across frame.


Distortion

A bulging effect is very obvious on all of these lenses, due to the focal lengths being quite wide for anamorphic. Notice how at 40mm on the Kowa Mirrorscope this curvature of the image is significantly reduced.

It’s hard to compare the levels of distortion because none of the focal lengths are exactly the same, except for the Cooke Xtal and the Kowa Mirrorscope with the 30mm adapter on. The Cooke’s top right and bottom left corners appear to be stretched away from the centre relative to the other two corners. I suppose that strange and funky stuff like this is exactly why you choose vintage glass.

Interestingly, the Cooke’s image appears a little tighter than the Kowa’s, which combined with my inability to find any evidence online of the existence of a 30mm Xtal, leads me to suspect we may have been given a mislabelled 32mm.


Conclusions

When we got to the end of our spherical tests and started putting the anamorphics on, I was shocked by the drop in sharpness. But as noted earlier, this is because anamorphics really need to be used with a smaller aperture than the T2.8 I often shoot at. If I learnt nothing else from this test, I learnt that anamorphic needs more light!

I would love to put the Cooke Xtal’s lovely flares and general vintage look to good use on a period movie one day. The Hawk V would be a good choice if I wanted the anamorphic look with warm, dynamic skin tones. The Kowa system seemed a little cheap and cobbled-together, but could well be a good solution for anamorphic on a budget, as long as I stayed away from the 30mm adapter!

I hope you’ve found these tests useful. Thanks again to 1st AC Rupert Peddle, 2nd AC Bex Clives and Arri Rental UK for making them possible.

Anamorphic Lens Tests

Spherical Lens Tests

The other week I spent a day at Arri Rental in Uxbridge, in the Bafta Room no less, conducting various camera and lens tests. I’ve done a number a productions now where I wanted to test but there wasn’t the time or money, so for a while I’ve been meaning to go into Arri on my own time and do some general tests for my education and edification. An upcoming short provided the catalyst for me to get around to it at last.

Aided by 1st AC Rupert Peddle and 2nd AC Bex Clives, I tested a dozen lenses, some spherical, some anamorphic. Today I will cover the spherical lenses; next time I’ll look at the anamorphics.


Method

We shot on an Alexa XT Plus in log C ProRes 4444 XQ at 3.2K. In the video the image has been downscaled to 1080P and a standard Rec.709 LUT has been added.

I set the Alexa to ISO 800 and lit Bex to a T2.8 using a 650W tungsten fresnel bounced off poly. For fill I caught a little of the spill from the fresnel with a matte silver bounce board on the opposite side of camera. I placed fairy lights in the background to observe the bokeh (out of focus areas) and turned on a 100W globe during each take to see what the flare did.

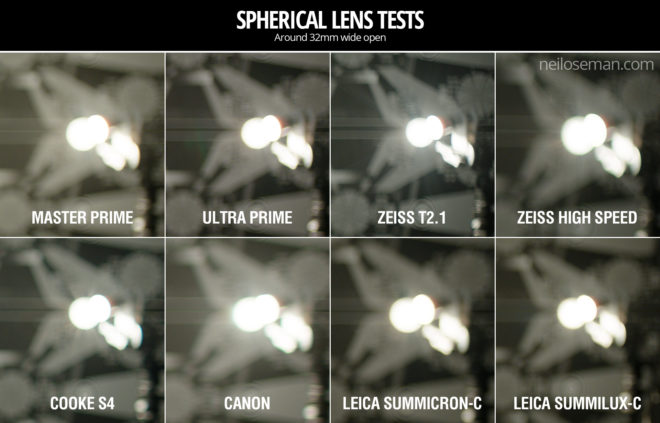
We shot all the lenses at 2.8 – the stop I most commonly use – and also wide open (compensating with the shutter angle), but the direct 2.8 comparison proved most useful, so that’s mainly what you’ll see in the video. We tested a single length: 35mm or the closest available to it.

What we didn’t do was shoot grey-scale or colour charts, or do any testing of vignettes or distortion. (The day after doing these tests, Shane Hurlbut, ASC published an Inner Circle post about how to tests lenses, so I immediately learnt what my omissions were!)

We tested the following lenses:

Series Length Speed CF* Weight Price
Leica Summilux-C 29mm T1.4 18″ 1.7kg £27K
Arri/Zeiss Master Prime 35mm T1.3 14″ 2.2kg £16K
Cooke S4 32mm T2 6″ 1.85kg £14K
Leica Summicron-C 35mm T2 14″ 1.3kg £13K
Zeiss High Speed
(a.k.a. Superspeed Mk III)
35mm T1.3 14″ 0.79kg £12K
(refurb)
Arri/Zeiss Ultra Prime 32mm T1.9 15″ 1.1kg £10K
Zeiss T2.1 32mm T2.1 24″ 0.45kg £4K
(used)
Canon 35mm T1.5 12″ 1.1kg £3K

* CF = close focus

Here’s the video…


Skin tones

Click the image to see it at best quality.

The Arri/Zeiss Master Prime and the two Leicas seem to have the most vibrant skin tones. To my eye, the Leicas have a slight creaminess that’s very pleasing. The Canon looks just a little cooler and less dynamic. I was surprised to find that the Cooke S4, the lens I’ve used most, appears to have a grey, flat skin tone compared with the Master Prime, Leicas and Canon. I would rank the Ultra Prime and Superspeed next, on a par except that the Ultra Prime has a noticeable magenta cast. My least favourite skin tones are on the Zeiss T2.1, which comparatively makes poor Bex look a little bit ill!

Some of the nuances will be lost in the YouTube and Jpeg compression, but this is a very subjective assessment anyway, so feel free to completely disagree with all of the above. Any of the differences noted above could be corrected by grading, to some extent . But remember that the lens is at the very start of the light’s journey from set to screen, and any wavelengths that don’t get through it are lost forever. It’s like fluorescent lamps with colours missing from the spectrum; you can’t put those back in in post.


Sharpness

I have to say, I’m unable to detect any difference in sharpness between the Master Prime, Cooke S4, Canon and Leicas. The Ultra Prime and Superspeed both look a hair softer, while the T2.1 is very soft.


Breathing

Breathing is the slight zooming effect that you get with some lenses when you pull focus. Looking at 4:44 in the video you can clearly see the differences in breathing between the eight lenses. Because this part of the video is showing a crop of the bottom left corner of the image, the breathing manifests as a shift to the left (zoom in) as the lens is racked closer (goes soft) and a shift to the right (zoom out) as it’s racked deeper (goes sharp).

All the Zeiss lenses except the Master Prime have a significant amount of breath when seen in isolation like this, but not enough to be noticeable to an audience in most real-world situations. The Cooke S4 has a little bit of breathe, and the Canon a hair less. The Master Prime and the Leicas are rock solid.


Bokeh

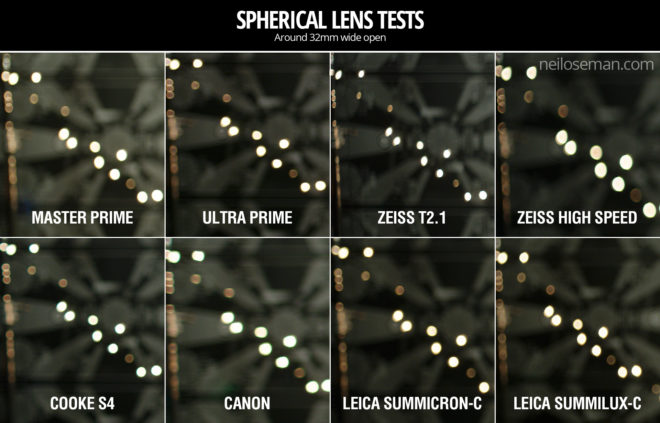
Small points of light, when thrown out of focus, most clearly demonstrate the bokeh pattern of a lens. The shape of the bokeh is determined by the number of iris blades and the shape of those blades. Generally a circle is preferred, because it’s a natural shape, but for certain stories a more unusual shape might be appropriate. The shape of the iris changes with the T-stop, hence the T2.8 and wide open images above.

Immediately noticeable is the difference in the Cooke S4’s bokeh between wide open (circular) and T2.8 (octagonal). All of the other lenses have round bokeh at T2.8, apart from the Superspeed, which has heptagonal (seven-sided) bokeh.

It’s entirely subjective which bokeh you prefer. The only other thing I’ll point out is that the Canon’s bokeh wide open is very fuzzy, with noticeable colour aberration, though this may be due to the bright highlight rather than the defocusing.


Flare

Flare patterns also vary with aperture. The smaller the aperture, the more of a star effect you will get, as the light interacts with the corners in the iris blades. The Summilux shows this most clearly, with a pronounced star at T2.8 (two stops down from its maximum aperture) and almost none when wide open. The Cooke S4 also has a nice star pattern at T2.8. With the other lenses it’s much more subtle, and the Canon has almost none.


Conclusions

The real revelations in these tests, for me, were the Leicas. The Summilux in particular is a beautiful lens, with rich, dynamic skin tones, nice bokeh, no breathing, plus the bonus of nice star flares. I will definitely be looking to work with this glass in the future, although given the price tag that may be optimistic!

The Summicron also performed incredibly well, matching the more expensive Summilux and Master Prime in every respect except speed. I can see this becoming my new go-to lens.

The Master Prime of course produced a beautiful, sharp, clean image, but it lacks character. It might work nicely for science fiction, a drama requiring a neutral look, or something where filtration was being used to give the image character.

The Canon impressed me too – no mean feat given that it’s the cheapest lens we tested. With nice skin tones and attractive flares, I could see this working well for a romantic movie.

The Zeiss T2.1 did not appeal to me, with poor sharpness and cold, washed-out skin tones, so I would avoid it.

The Superspeed is a decent lens, but in most cases I’d plump for an Ultra Prime instead. Ultra Primes are certainly easier to work with for the 1st AC, and have proven to be a good workhorse lens for drama. (I shot Above the Clouds on them.)

The Cooke S4 has been my go-to glass up to now, and while it will probably remain my first choice for period pieces, due to its gentle focus fall-off, I’m excited to try some of the other glass in this test on other productions.

I’ll say it one last time: this is all subjective. Our visual preferences are what make every director of photography unique.

Tune in next week when I’ll look at the anamorphic lenses: Hawk-V, Cooke Xtal and Kowa Mirrorscope.

Spherical Lens Tests

“Barry Lyndon”: The Full Story of the Famous f/0.7 Lenses

After seeing Barry Lyndon (1975) on the big screen this week, I felt compelled to write a blog post about its cinematography. But what aspect of the cinematography? The painterly look? The many zooms? The use of natural light?

What I knew for certain is that I should definitely not write about the entirely candlelit scenes lensed on f/0.7 Nasa glass, because everyone knows that story. However, reading the vintage American Cinematographer article and some other material, I found the details surrounding this groundbreaking use of high-speed lenses so interesting that I decided to do it anyway.
 

The Vision

Barry Lyndon is the 18th century tale of a low-born Irishman who strives – through various misadventures, and ups and downs of fortune – to become a gentleman. The key visual influence of director Stanley Kubrick and DP John Alcott, BSC were the great painters of the story’s era, such as Vermeer.

Next week’s post will look at this painterly influence in Barry Lyndon more closely, but for now the important thing is the use of candlelight on those classical canvases, and Kubrick’s desire to replicate that look. According to lens expert Ed DiGuilio, who was tasked with adapting the f/0.7 glass for Lyndon, Kubrick “wanted to preserve the natural patina and feeling of these old castles at night as they actually were”.

Typically in movies, a candle in frame may motivate the lighting, but most of the illumination on the actors actually comes from an orange-gelled lamp just out of frame. Kubrick wasn’t interested in shooting Lyndon that way. He wanted all the light in those night interior scenes to genuinely come from the candles themselves.


The Problem

How much light does a candle shed? Conveniently, there is a unit of illumination called the foot-candle. One foot-candle is the amount of light received from a standard candle one foot away. Without going into the detail of what a “standard” candle is, it is enough for our purposes to say that the scene below has a key light of about three foot-candles…

… because there are three candles, about a foot away from the actor’s face. (The level of your key light, and consequently where you set your aperture, is almost always measured at your subject’s face, as that is usually the focus of the shot and the most important thing to get correctly exposed. This is why we DPs are always waving light meters in actors’ faces.)

If we look at an exposure table, such as this one, we can see that a three foot-candle key can be correctly exposed with an aperture of T1.4 and an EI (exposure index) of 800. Today that would be no problem, with many digital cameras having a native EI of 800, and the availability of fast lenses like Zeiss Master Primes and Super Speeds.

In the mid-seventies however, long before the advent of digital cameras, things were not so simple. Kubrick and Alcott had little choice but to shoot on Eastman Kodak 100T 5254. Those first three digits denote the film stock’s exposure index: 100. Alcott pushed the stock (brought the brightness up during processing) one stop, re-rating it to an EI of 200. But it still needed four times more light, or two stops more light than our modern-day Alexa or Red. (Check out my post on f-stops and T-stops if you’re getting lost.)

If we’re losing two stops on the EI, we need to gain two stops on the aperture to compensate. And two stops up from T1.4 is T0.7. You may notice that T0.7 isn’t on that table I linked to. This is because a lens with such a large relative aperture pretty much doesn’t exist.

Pretty much…


The Solution

Kubrick obsessively researched the problem. He eventually discovered that Nasa had commissioned Carl Zeiss to build ten Planar 50mm f/0.7 stills lenses in the sixties, which were used to take photos of the dark side of the moon. (I was unable to find out the T-stop of these lenses, but I’ll assume it was close enough to T0.7 for it to make little difference to my calculations above.) The developments leading to these lenses stretched back through Nazi military applications during WW2 all the way to the late Victorian era, when the double-Gauss cell at the core of the lenses was first invented.

Anyway, Kubrick promptly bought three of the Zeiss Planars. He liked to own equipment himself, rather than hire it in, and to this end he had also purchased at least one Mitchell BNC camera. As befits Kubrick’s perfectionism, these were perhaps the world’s most precisely engineered cameras, previously used for special effects work.

This is where Ed DiGuilio comes in: “[Kubrick] called one day to ask me if I thought I could fit a Zeiss lens he had procured… to his BNC.” It wasn’t simply a case of the f/0.7 glass having the wrong mount. The rear element was so large and needed to be so close to the film plane that DiGuilio had to extensively modify the camera, literally cutting parts out of it.

Ed DiGuilio (left), President of Cinema Products Corporation, working on adapting a zoom lens for Kubrick’s Mitchell BNC

Once this was done, extensive testing ensued. The focus scale (distances marked on the barrel) had to be calibrated from scratch, and indeed the focus ring was re-engineered to allow the precision focusing that the lens’ tiny depth of field would require. Whereas the focus ring on a stills lens will turn about 90° to go from infinity to close focus, and the ring on a cine lens might turn 270°, the rings on these unique Planars now turned a whopping 720° – two whole revolutions!

50mm is a very useful lens length for close-ups, but Kubrick understandably wanted a wider option as well. Accordingly, DiGuilio located an adapter designed to adjust the throw of cinema projector lenses. Mounted onto one of the 50s, it gave an effective focal length of 36.5mm with only very minor light loss. A 24mm version was also tested, but Kubrick disliked the amount of distortion in its images, and rejected it.


The Execution

The colour brown and the trousers of Doug Milsone, Barry Lyndon‘s focus puller, cannot have been strangers to each other. Imagine trying to hold focus on this dolly-back at f/0.7!

By my calculations (which were difficult, because most depth of field tables/calculators don’t go to f/0.7!) an MCU on Kubrick’s 50mm Planar with the subject at 2.5m (8.2ft) and the iris wide open would have had a depth of field of about 43mm (1.7″). To get this same depth of field at f2.8, a popular working stop for cinematographers today, the subject would have to be just 1m (3.3ft) from the sensor plane, which would be a biggish close-up. And remember that focus monitors, peaking and Cine Tape did not exist in the seventies.

To give Milsone a fighting chance, a unique system of focus assist was developed. While the main camera shot an actor from the front, a CCTV camera captured them in profile. This profile image was piped to a monitor, over which a grid was placed. This grid was marked off with distances so that Milsone could see how much the actor had moved by, far more accurately than judging it by eye from beside the lens.

Another problem thrown up by the low-light cinematography was with the viewfinder. Interestingly, the Mitchell BNC was a non-reflex camera, meaning that it didn’t have a mirror on the shutter, reflecting the image to the viewfinder when the shutter was closed. Instead, the camera body racked over to one side to allow the viewfinder to get an image during line-ups and rehearsals, and when it was actually rolling the operator got their images from a side viewfinder with its own lens – just like in a disposable 35mm stills camera. The original prism-based viewfinder on Kubrick’s Mitchell BNC suffered from far too much light loss for a candlelit image to be visible through it, so it was replaced with a mirror-based viewfinder adapted from a Technicolor camera.

The shots resulting from all of these technical challenges are quite soft to the modern eye, but I think that only adds to their beauty. Barry Lyndon captured the exquisite fragility of candelight, and 42 years on the images are still unique and captivating.

“Barry Lyndon”: The Full Story of the Famous f/0.7 Lenses

The Cinematography of “Night Owls”

I wrote the bulk of this post over two years ago, when I wrapped photography on Sophie Black’s short drama Night Owls. As usual for no-budget shorts, there followed a long postproduction and then a festival run (it premiered at London Short Film Festival this January) which prevented us releasing any footage online.

But this week a number of great things have happened for the film. Firstly, Night Owls has been released online – you can see it here – and every view counts towards Promofest’s “Short of the Year” competition, so have a watch and help us win! Secondly, the film won an Honourable Mention and Best Actor (Jonny McPherson) at the LA Film Awards. Thirdly, my work on the film won me Best Cinematography at the Festigious International Film Festival.

10476500_250955778426856_3738960460160087990_n
Photo by Elly Lucas

So this is the perfect time to finally publish this look at the decisions and techniques I used in lighting and lensing the film. Night Owls was one of the first projects I shot on my Blackmagic Production Camera, and you can read what I thought of the camera in action in this post from May 2014.

Sophie wanted a soft, warm and cozy look to the short, which is set over a single night, mostly in one room, and tells how a teenage girl and an older man become unlikely friends. At the same time, the dialogue-driven script had moments which hinted at darkness and suffering in the past of both characters. And a cozy look suggests practicals like table lamps, which by their nature cast pools of light and leave other areas in darkness.

On a practical level – if you’ll excuse the pun – I knew that the need to hide lights that would boost the apparent output of the practicals would limit my options in the wide shots, and therefore also in the close-ups which would of course have to match. When shooting a day interior, you can easily stick a huge light outside the window and then shoot pretty much anywhere in the room, crabbing the light to one side or the other if it threatens to come into shot or cast a shadow of the camera. In a night scene with practicals, it’s not so simple.

Dedo rail
Dedo rail

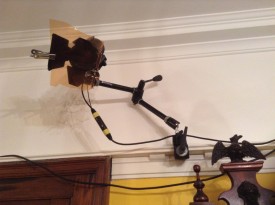
We knew in advance that we could not screw anything into the location’s ceiling, so I was relieved to find that the room had a nice, chunky picture rail all the way around. This soon became a dedo rail, as I used magic arms and k-clamps to rig two of the little spotlights in a classic cross-lighting formation. What I mean by this is that each light was positioned so as to provide backlight on one character and frontlight on the other. This is almost always my starting point when lighting a scene with two characters, and it really came into its own on this project. (See my post on cross-backlighting for more info.)

We had to shoot most of the scenes during the day, so the windows were blacked out. The one that appears on camera was tented around so that we could shine in a blue-gelled redhead, to suggest moonlight, without allowing any daylight in. Another blue-gelled redhead was set in the hall outside the door, creating depth and colour contrast. Our 1.2K HMI was placed in the next room, right at the far end. In front of it we rigged a sort of faux stained glass panel, that had conveniently broken out of another door in the house just the previous week, in order to cast a window-like shadow and give the impression of moonlight coming through a window in the next room.

The reason we rigged so many cool sources was that the first scene in the living room featured only Kent (played by Jonny McPherson), and Sophie had requested that the images only become warmer when Mari (played by Holly Rushbrooke) enters the film. We turned on fewer of the practicals for this first scene, but it was still necessary for their light (represented by the dedos) to be warm in colour to establish that for the later scenes. To counteract this and bring everything back into the blues a bit more, I set up a third dedo, gelled blue, to produce a cool lens flare.

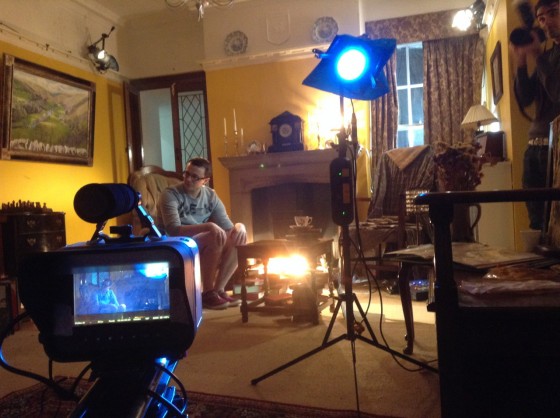
Setting up for the first living room scene. The crossed dedos can be seen in the top left and top right, while the dedo in the foreground is solely to produce lens flare.

Sophie and I had talked about various ways of softening the image. We considered hiring a black promist filter, but after rewatching Christopher Ecclestone’s season of Doctor Who, which appears to be have been entirely shot using a black promist, I decided the look was far too cheesy. In the end we went for a set of Zeiss lenses which had had their anti-flare coating ground off. We felt that lens flares would give some sparkle and magic to the images, as well as giving us the opportunity to soften the contrast in the image when necessary. The flares were usually created by an additional lamp, often a dedo or a battery-powered pag light held by Col, aimed directly at the lens.

When Mari enters, Kent has lit the fire, so Col and I set up our usual cluster of 100W tungsten bulbs covered with an orange gel and rigged to a dimmer board. With hindsight we could have gone much more orange with the gel and much more flickery with the dimmer board action, but since the fire at the location was a wood burning stove with only a very small window, it’s probably good that the source of the light remains ambiguous. For the close-ups, the cluster of four bulbs was rearranged into a straight line, which gave a lovely, soft underlight to the character’s faces.

Scn6_wide_overhead
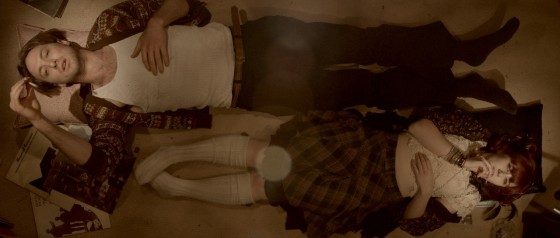
Night Owls’ signature overhead shot. Sophie had a far more complicated shot planned, but it just wasn’t achievable with equipment we could afford.
Shooting the top-down shot. The redhead in the centre of the image is providing lens flare.
Shooting the top-down shot. The redhead in the centre of the image is providing lens flare. The white blob at the end of the C-stand arm on the left is a 100W bulb surrounded by a string-of-crystals lampshade.

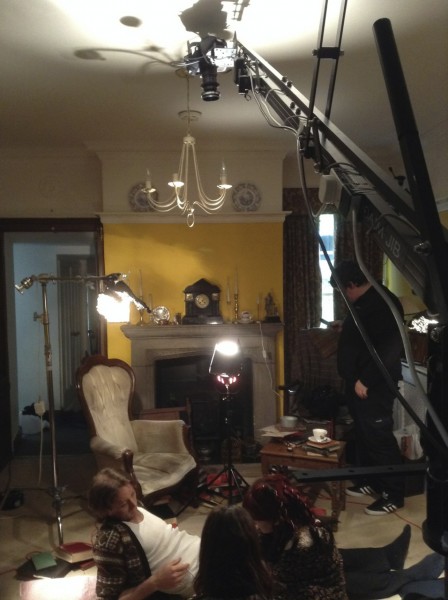
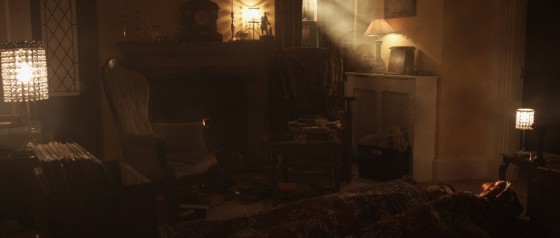
A major scene later on sees the two characters lying top-and-tail on the floor, and was shot from a jib kindly provided by All Doors Lead Somewhere Productions. Overhead shots of people lying down can look very flat, but rather than trying to combat that with cross-lighting, I decided to embrace it and light entirely from above. Sophie and Anya Kordecki, the production designer, had found these great practical lights surrounded by strings of crystals, which cast lovely shadows. Knowing that two of these lights were supposed to be just out of shot on either side of frame, I took some license and rigged them one directly over each character’s face, replacing the 40W bulbs with 100W ones. This created a nice pattern of light and shadow radiating out from the faces. To add further contrast, I spotted two dedos up on the actors as well, one for each, gelled with half CTB, so that the centre of each radial pattern had a cooler, brighter circle of light. I decided to shoot on a white balance of 4,500K so that these centre spots would appear white and the radiating pattern would appear slightly orange.

When the characters sit up later in the scene, the two practical lights were almost perfectly positioned to provide cross-backlight. Again I used the dedos to produce the light that is supposedly coming from the practicals. I cheated Mari’s key light around quite a bit; it should really have lit the camera-right side of her face given where the practical was positioned, but we lost too much of her expression that way when she looked at Kent, not to mention that it didn’t look as aesthetically pleasing.

The film noir shot. A dedo just to the left of the visible practical provides the hot backlight, while Mari's key is a second dedo also off left, but in front of her. A miniscule amount of fill is provided by another practical behind the camera.
The film noir shot. A dedo out the rear left of frame provides the hot backlight, while Mari’s key is a second dedo also off left, but in front of her. A miniscule amount of fill is provided by another practical behind the camera.

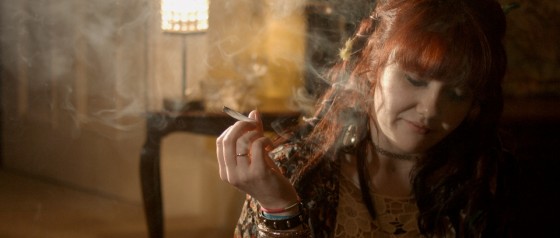
I hadn’t been intending to use so much hardlight. I’d actually purchased a sheet of unbleached muslin prior to the shoot with the aim of rigging some kind of book light, and I almost did it for these sitting-up close-ups. But Sophie had asked for Mari’s close-up to have a film noir look, highlighting the smoke from her spliff, besides which the weed was bringing out some home truths for the characters, so it made sense to go with stark lighting. The dedos were perfect for this, with their intense, focused light showing up the smoke brilliantly when shone from behind, and spotlighting the actors when shone in from the side. The dark sides of the characters’ faces were lit by a tiny amount of light that’s genuinely coming from the practicals.

The sun - a 1.2K HMI - bursts through.
The sun – a 1.2K HMI – bursts through.

Near the end of the film, the sun rises, throwing a shaft of light into the room. This was supplied by the 1.2K HMI. With hindsight, cranking up a wind-up stand would have been the best way to create the rising effect, but we didn’t have one, so instead the lamp remained static and Col lowered a sheet of card to give the impression of the sun rising over the horizon. Copious smoke was used so that the beam of “sunlight” would show up on camera.

The 1.2K HMI backlights Mari and the rain, while Kent holds a practical just out of frame for key.

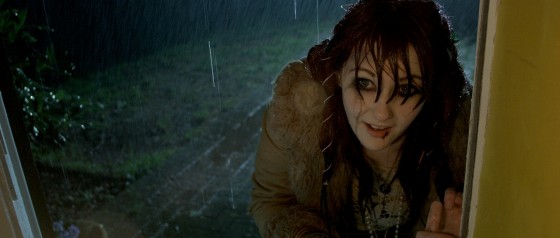
Night Owls is book-ended by doorstep scenes, the first set at night during a rainstorm, the other on a sunny morning. For both scenes I used the HMI as backlight. This was particularly neccesary for the night scene in order for the rain – actually created by a hosepipe – to show up. (For more on faking rain, check out this post.) At night I set my white balance to 3,200K so that the HMI would appear blue, suggesting moonlight, and in the morning I gelled the HMI with Light Straw and shot on a 5,600K white balance. Fill light was provided at night by the electric candelabra Kent was holding, and in the morning by a makeshift bounce card (a square piece of mountboard covered in silver wrapping paper) hidden from camera by Kent’s body, plus a blue-gelled redhead off to the side of the hall. When we turned round to shoot outdoors looking in, it was necessary to diffuse or dim the HMI, and to break up its light (which now looked very flat due to the lamp being so close to the camera) using tree branches.

That’s about it! Though I think I would do some things differently if I was shooting it now (more soft light, definitely), I’m still really proud of the film and the work I did on it. It’s very satisfying that Night Owls is now gaining the recognition it deserves. Don’t forget to check the film out here. And if you want to know more about the lighting set-ups described above, subscribe to my Instagram feed to see some lighting diagrams and behind-the-scenes photos over the next few days.

Images from Night Owls courtesy of Triskelle Pictures, Stella Vision and Team Chameleon. Produced by Sophia Ramcharan and Lauren Parker. Starring Jonny McPherson and Holly Rushbrooke.

The Cinematography of “Night Owls”

Lensing Ren – episode 1

Here is the first in a series of cinematography videos I’m publishing to compliment the five episodes of Ren: The Girl with the Mark as they are released over the coming weeks. These videos will tell you the how, what and why of photographing the show. This week I discuss the camera equipment used, differentiating characters photographically, and lighting Karn’s magical woodland house.

Here is the lighting plan for Karn’s house:

Karns-house-1080p

And here is a video blog from the set of Karn’s house:

You may be interested to read my article on Masculine and Feminine Lighting, which gives some more detail on the techniques used to light Ren and Karn in the riverside scene.

See also: 5 Tips for Perfect Shafts of Light and Lighting Techniques #6: Cross-light.

Check back next Saturday for another instalment of Lensing Ren, and meanwhile watch the next episode of Ren itself from Tuesday at 8pm GMT at rentheseries.com

Lensing Ren – episode 1