Here’s another lighting breakdown from the short filmAnnabel Lee, which has won many awards at festivals around the world, including seven now for Best Cinematography.
I wanted the cottage to feel like a safe place for Annabel and E early in the film. When they come back inside and discuss going to the village for food, I knew I wanted a bright beam of sunlight coming in somewhere. I also knew that, as is usual for most DPs in most scenes, I wanted the lighting to be short-key, i.e. coming from the opposite of the characters’ eye-lines to the camera. The blocking of the scene made this difficult though, with Annabel and E standing against a wall and closed door. In the story the cottage does not have working electricity, so I couldn’t imply a ceiling light behind them to edge them out from the wall. Normally I would have suggested to the director, Amy Coop, that we flip things around and wedge the camera in between the cast and the wall so that we could use the depth of the kitchen as a background and the kitchen window as the source of key-light. But it had been agreed with the art department that we would never show the kitchen, which had not been dressed and was full of catering supplies.
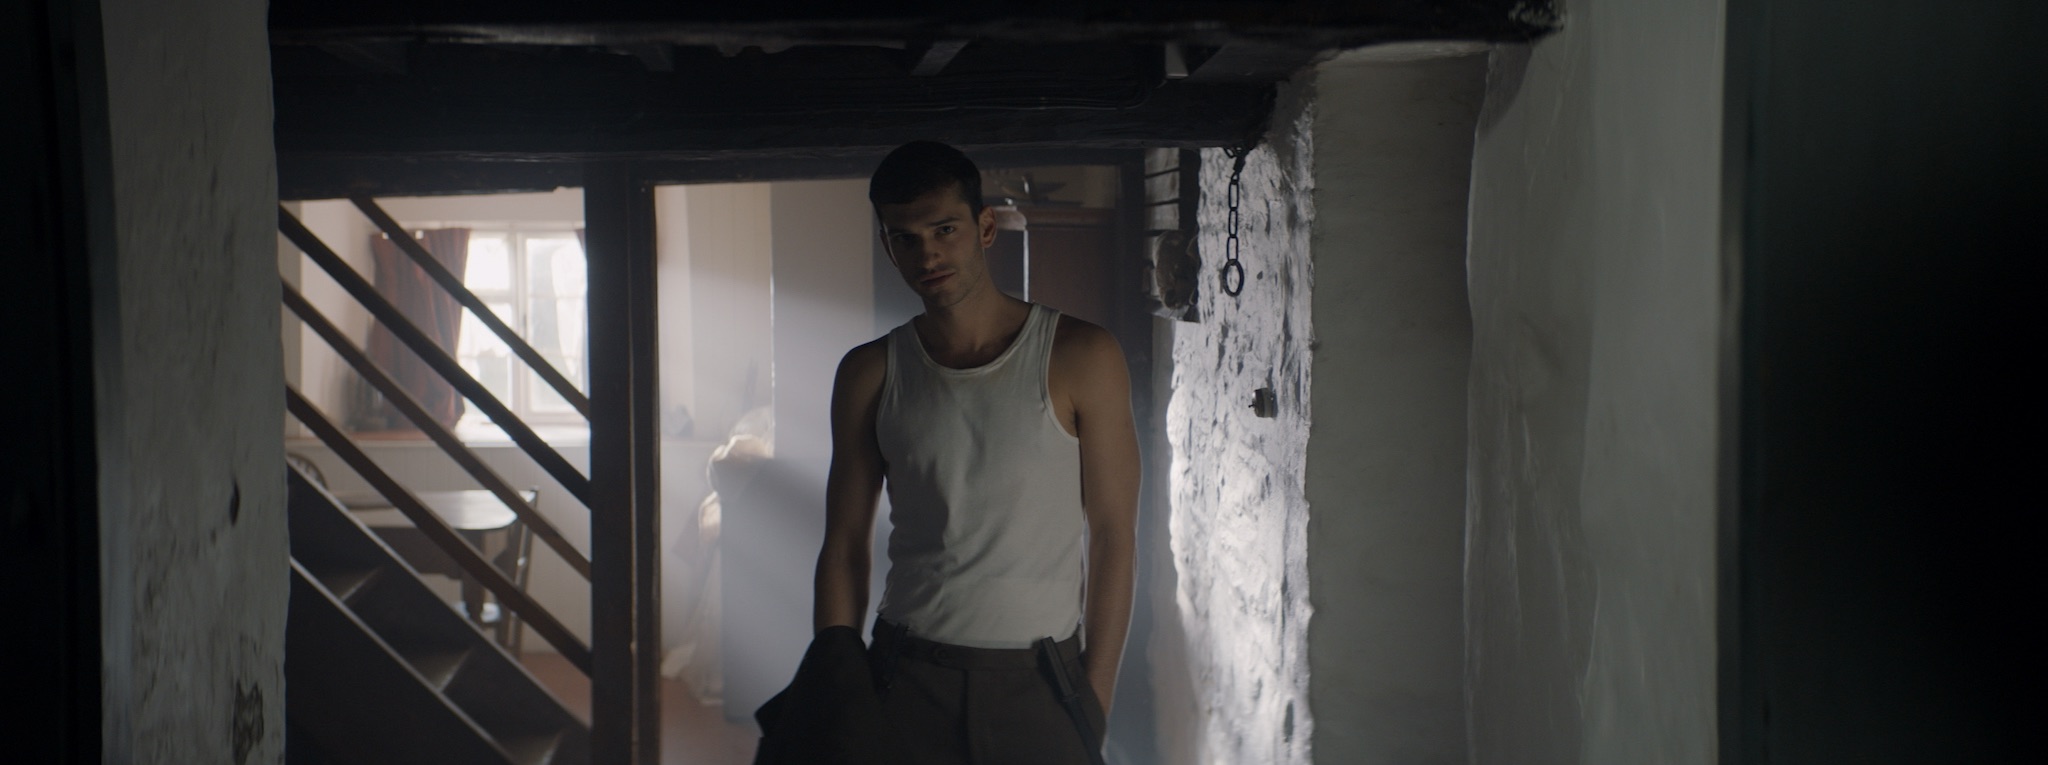
The solution was firing a 2.5K HMI in through one of the dining room windows to create a bright rectangle of light on the white wall. This rectangle of bounce became the source of key-light for the scene. We added a matt silver bounce board just out of the bottom of frame on the two-shot, and clamped silver card to the door for the close-ups, to increase the amount of bounce. The unseen kitchen window (behind camera in the two-shot) was blacked out to create contrast. I particularly like E’s close-up, where the diffuse light coming from the HMI’s beam in the haze gives him a lovely rim (stop sniggering).
Adding to the fun was the fact that it was a Steadicam scene. The two-shot had to follow E through into the dining room, almost all of which would be seen on camera, and end on a new two-shot. We put our second 2.5K outside the smaller window (camera left in the shot below), firing through a diffusion frame, to bring up the level in the room. I think we might have put an LED panel outside the bigger window, but it didn’t really do anything useful without coming into shot.
For more on the cinematography of Annabel Lee, visit these links:
Last week, Annabel Lee– a short I photographed at the end of 2018 – won its sixth and seventh cinematography awards, its festival run having been somewhat delayed by Covid. I’ve previously written a couple of posts around shooting specific parts of Annabel Lee – here’s one about a Steadicam shot with a raven, and another about the church scene – and today I want to dissect the clip above. The sequence sees our two young refugees, Annabel and E, arriving at the Devonshire cottage where they’ll await passage to France.
I was a last-minute replacement for another DP who had to pull out, so the crew, kit list and locations were all in place when I joined. Director Amy Coop had chosen to shoot on an Alexa Mini with Cooke anamorphic glass, and gaffer Bertil Mulvad and the previous DP had put together a package including a nine-light Maxi Brute, a couple of 2.5K HMIs and some LiteMats.
The Brute is serving as the moon in the exteriors, backlighting the (special effects) rain at least when we’re looking towards the driver. (If you’re not familiar with Maxi Brutes, they’re banks of 1K tungsten pars. Ours was gelled blue and rigged on a cherry-picker.) The topography of the location made it impossible to cheat the backlight around when we shot towards Annabel and E; rain doesn’t show up well unless it’s backlit, so this was quite frustrating.
We didn’t have any other sources going on except the period car’s tungsten headlights. It was very tricky to get the cast to hit the exact spots where the headlights would catch them while not shadowing themselves as they held out their hands with umbrellas or brooches.
Inside the cottage it’s a story point that the electricity doesn’t work, so until E lights the oil lamp we could only simulate moonlight and the headlights streaming in through the window. These latter were indeed a simulation, as we didn’t have the picture car at the time we shot inside. There was a whole sequence of bad luck that night when the camera van got stuck on the single-lane dirt track to the cottage, stranding certain crucial vehicles outside and sealing us all inside for three hours after wrap, until the RAC arrived and towed the camera van. So the “headlights” were a couple of tungsten fresnels, probably 650s, which were panned off and dimmed when the car supposedly departs. We also tried to dim them invisibly so that we could get more light on E as he comes in the door and avoid the Close Encounters look when the window comes into shot, but after a few takes of failing to make it undetectable we had to abandon the idea.
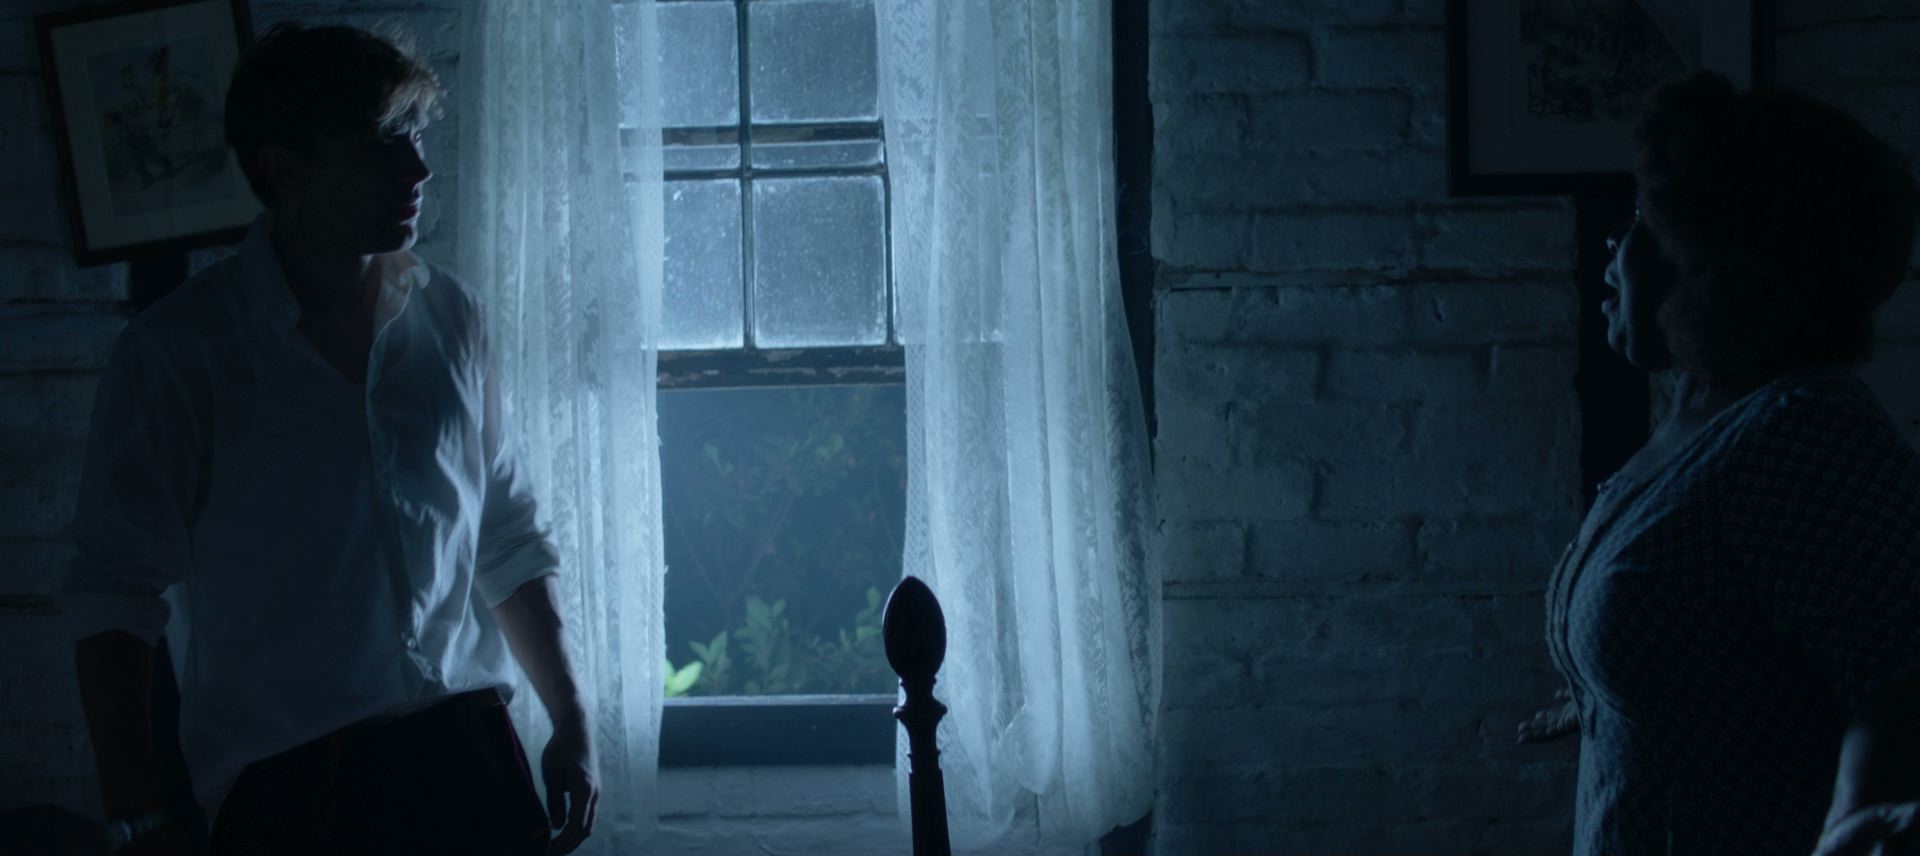
We also didn’t have the rain machine for the interiors, so as E opens the door you might briefly glimpse water being poured from an upstairs window by the art department, backlit by an LED panel. We put one of the HMIs outside a window that’s always off camera left to give us some “moonlight” in the room, create colour contrast with the tungsten headlights and the flame of the oil lamp, and ensure that we weren’t left in complete darkness when the “car” departs. Annabel looks right into it as she hugs E.
When the action moves upstairs, an HMI shines in through the window again. I remember it gave us real camera-shadow problems at the end of the scene, because Steadicam operator Rupert Peddle had to end with his back to that window and the talent in front of him (though the clip above cuts off before we get to that bit). The practical oil lamp does a lot of the work making this scene look great. I was sad that I had to put a little fill in the foreground to make E’s bruises at least a tiny bit visible; this was a LiteMat panel set to a very low intensity and bounced off the wall right of camera.
It’s worth mentioning the aspect ratio. My recollection is that I framed for 2.39:1, which is normal for anamorphic shooting. With the Alexa Mini in 4:3 mode, 2x anamorphic lenses produce an 8:3 or 2.66:1 image, which you would typically crop at the sides to 2.39 in post. When I arrived at the grade Annabel Lee was all in 2.66:1 and Amy wanted to keep it that way. I’m not generally a fan of changing aspect ratios in post because it ruins all the composition I worked hard to get right on set, but there’s no denying that this film looks beautiful in the super-wide ratio.
Finally, let me say a huge thank you to all the people who helped make the cinematography the award-winning success it has become, crucially drone operators Mighty Sky, underwater DP Ian Creed and colourist Caroline Morin. I’m sure the judges for these awards were swayed more by the beautiful aerial and aquatic work than the stuff I actually did!
So far, this blog series about my cinematography of The Little Mermaid has covered the biggest and most complex scenes in the movie. Today I’m going to look at some smaller scenes, and how I employed the cinematography tenet of lighting from the back to quickly build a look for these which has depth, mood and drama.
Many of these examples are specifically cross-backlighting, something I covered in my Lighting Techniques series, but I’ll quickly recap since it has so much relevance here. It involves lighting two characters facing each other with two sources, on the far side of the eye-line (short key), crossed so that each source keys one character and often backlights the other too.
So with that in mind, let’s proceed to the examples from my shooting diary.
Day 1
The first week is pretty much all in houses with just a few principals, so an easy start. Day 1’s schedule is tight though. We start in a third floor bedroom – no way lamps are getting up to those windows from outside, so I’m relying on natural light augmented with a bit of cross-backlight cheated inside the room. (There’s a Kino Flo shining at Elle over Cam’s right shoulder, for example.) Once the haze is in it looks great. After we get the main coverage, we head out to the garden for the next scene, while the ‘B’ camera team steps in to pick up a couple of inserts…
Day 3
…It’s a night scene and the grips have tented the window. To get a nice blue glow coming in, I have two 4×4 Kino Flos set either side of the window (outside), and they give a great wrapping backlight to the actors and the set dressing. Smoke and a cool white balance of 3,200K (the Kinos are tubed for 5,600K) complete the look. It owes a lot to a scene from Hook, one of Blake’s (director Blake Harris) reference movies which I watched during preprod. This stuff definitely filters in and inspires things!
Day 13
Our first day on stage. It’s weird to be back at the former supermarket I spent five weeks of preproduction in. The first set, Locke’s chamber, is very confined and the walls don’t wild, so it’s quite slow-going to work in there. We fire a 5K fresnel through the stained glass window at the back of the set. Then I fall back on the tried and tested method of cross-backlighting even though I know that it will be hard to hide the lamps (a 650W fresnel in both of the upper rear corners of the set) from camera. In the end I have the art department dress drapes in front of them. For the villain’s single I leave the light hard, but for the hero’s single we use bounce boards to wrap the light around his face more…
Day 28
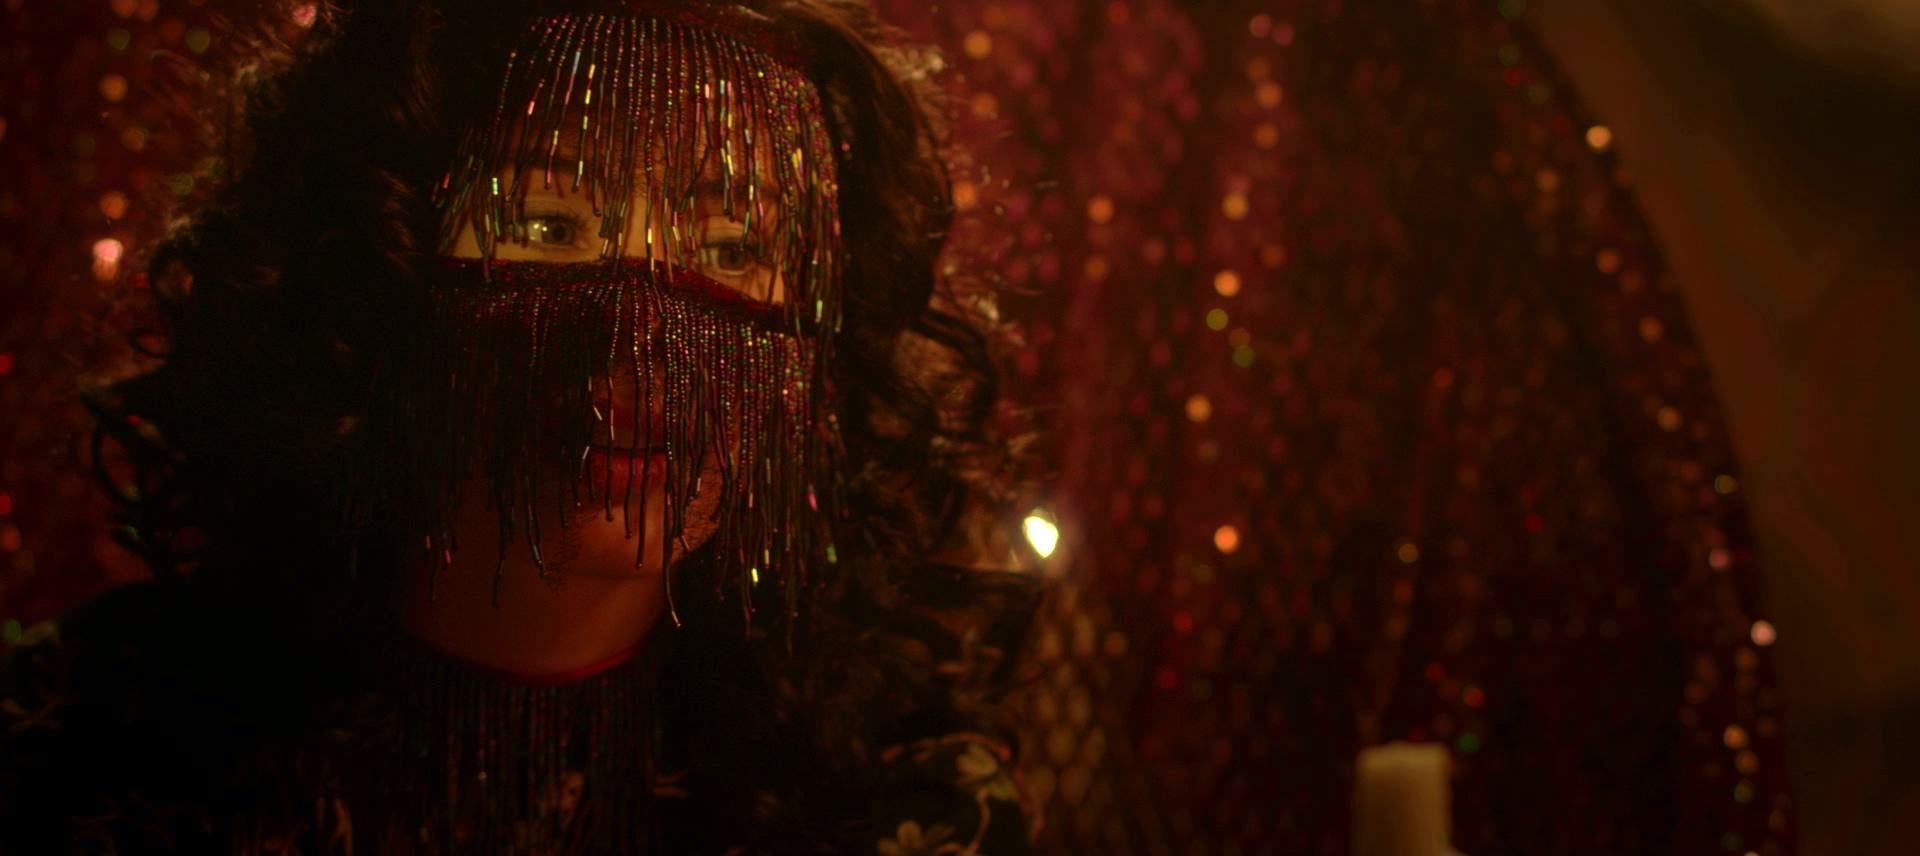
We start with the fortune-teller’s tent, another small set constructed on stage. In fact, it’s just an Easy-Up artfully draped with fabrics. Initially there’s nowhere to get light in from except the front, but I know that this will leave the scene looking flat and fake, so I work with the art department again to make holes in the top rear corners. Through those we shine tungsten-bubbled “Fat Boy” Kino Flos. (These 2ft 4-bank units are giving the dual kickers on Cam in the centre, and the beautiful down-light on the background fabrics, bringing out the ruching. Each one also provides a little key-light on the two ladies.) The other sources are “moonlight” coming in through the entrance, linking us to the circus exteriors, and a stylised slash of light across Thora’s eyes from a Source Four, suggested by Jason (key grip Jason Batey). Adding foreground practicals is an important final touch to expand the depth and scale of the set…
Day 31
It’s the last day of principal photography. Our big scene of the day is the newspaper office where Cam works, which is a set in the front of the studio, using the building’s real windows. We fire the 12K in and gel it with half CTS for a nice morning sunlight effect. We’re shooting towards the windows, which have blinds, so we get some nice shafts of light, though sometimes it’s a little too smokey. Running haze is a pretty skilled and tricky job, and involves considering the lens length and backlight, which both affect how much the smoke shows up on camera. When we get it right, combined with the dark wood period furniture, it totally sells the 1937 setting. Apparently people at video village are loving it, saying it looks like Mad Men….
Next week, in the final part of my blog series on The Little Mermaid, I’ll share my experiences of shooting the sunset denouement while up to my waist in the Atlantic Ocean.
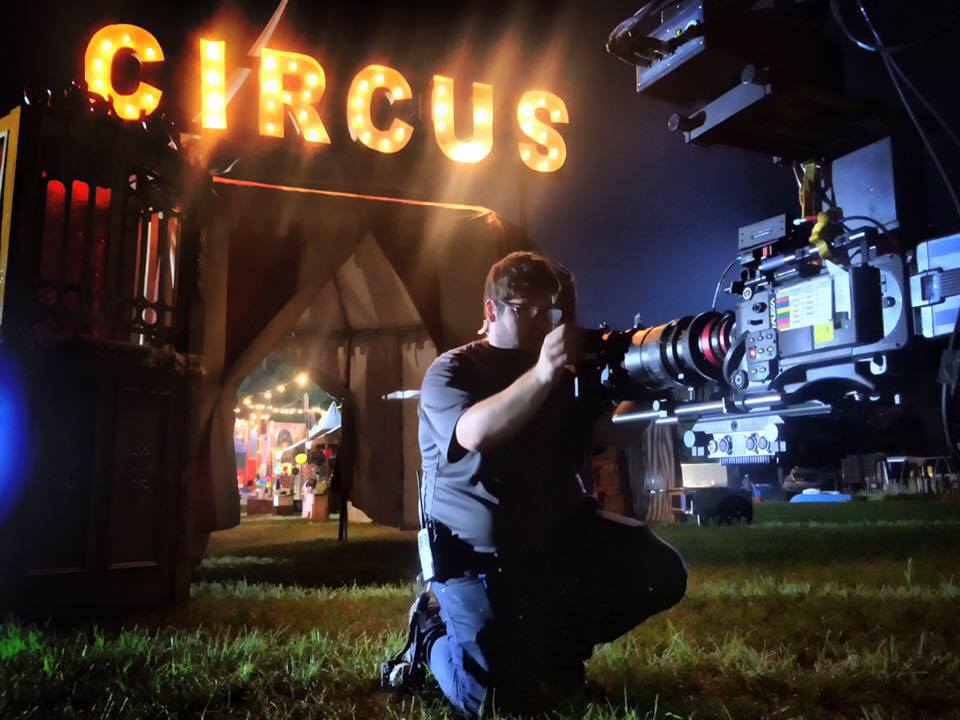
‘B’ cam 2nd AC Matt Dixon preps the camera on the crane’s Scorpio remote head. Photo: Tim Gill
The biggest set on The Little Mermaid was the circus, an area the size of a football pitch which was transformed into a period spectacle. The big top and many other pieces were driven across the country from LA, and during our first week of principal photography the art department were hard at work setting it all up and dressing it.
Today’s post is about how I lit the night exterior scenes on this huge set. To that end I’m going to focus on the two biggest shots in the sequence: a tracking shot outside the big top, and the crane-up which first reveals the circus to the audience. Below, as well as my diary entries from the shoot, you’ll find a little behind-the-scenes video I grabbed on my phone for the tracking shot, and a lighting plan for the crane shot.
Day 7
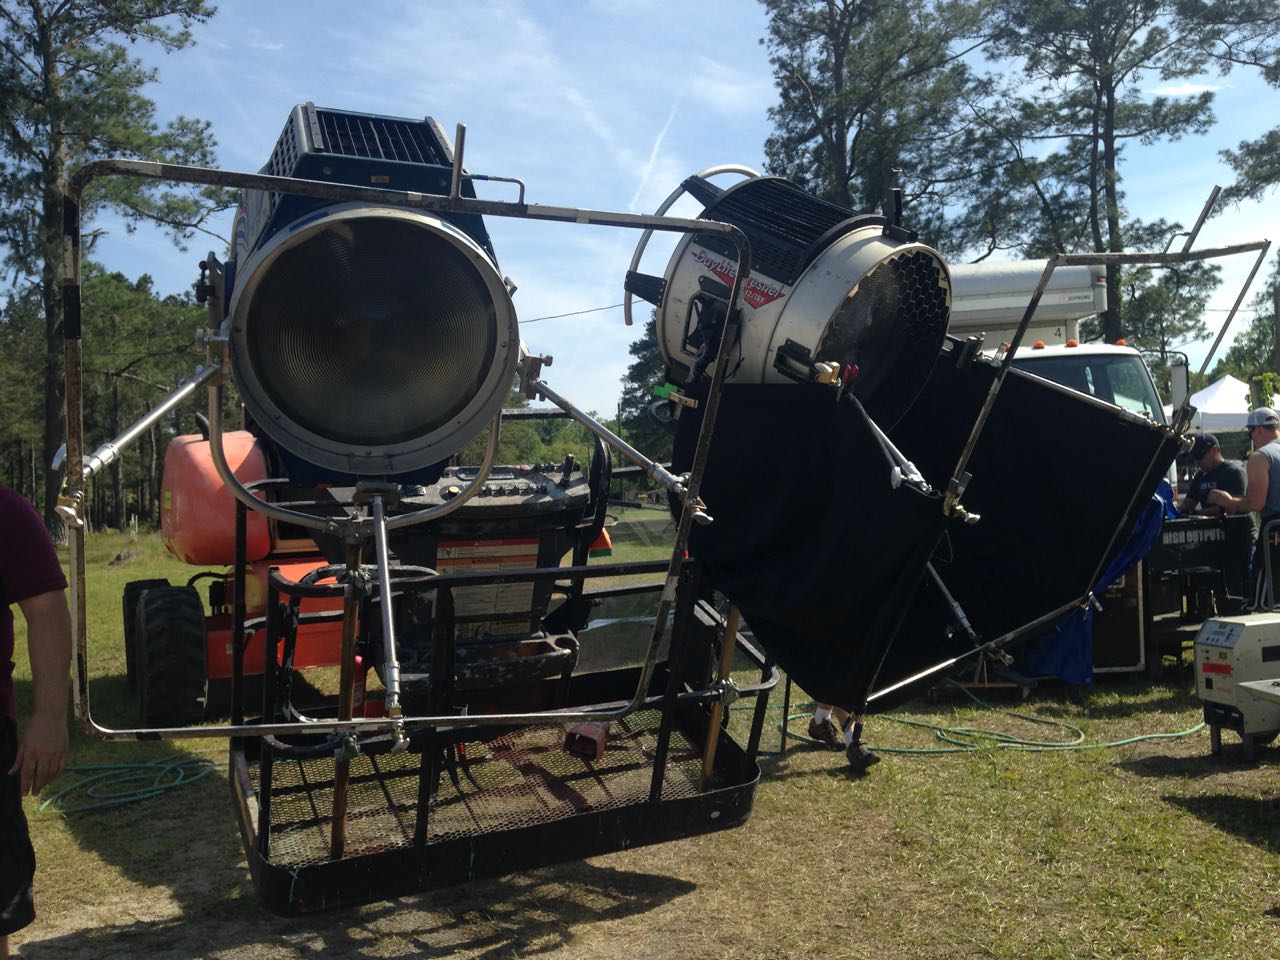
The two 18K HMI fresnels rigged on the condor
A couple of daylight pick-ups today, then we start setting up for a big night scene. The camera will dolly with Cam and Elle from the exit of the big top, past candy floss and ‘healing water’ stalls where bits of dialogue will happen, and finally reveal a ferris wheel in the distance. We block while the sun’s still up, and paint in the light as night sets in. We are trying to light most of it in a way that will also work for our big crane shot reveal of the circus later in the week, because repositioning large HMIs – especially the two 18Ks we’re flying on a condor (cherry-picker) – is very time-consuming. Inevitably it doesn’t quite work out that way, and one of the 18Ks has to die for now at least.
The ferris wheel is backlit by a 12K, with a little front-light from a 5K tungsten fresnel. Cross-light on the talent comes from the working 18K and a 6K on the opposite side of frame. Nine-light Maxi Brutes illuminate the tent from inside, some of that light spilling out onto the talent, while par cans uplight a row of banners outside. A 1K baby provides edge-light to the talent in their final position. A 300W fresnel inside the healing water wagon spills out, and a bare 40W globe inside the umbrella of the candy floss stall gives us a little glow there.
The final lamp to go up is another 300W fresnel, because the directors are concerned that the ’sold out’ sign on the healing water wagon isn’t clear enough. We end up firing it in from the front because there’s no time for anything else, but as always with front-light, I deeply regret it. Ideally we would have armed it out from the roof of the wagon to rake down the side of it.
Once the supporting artists are choreographed, the shot looks great.
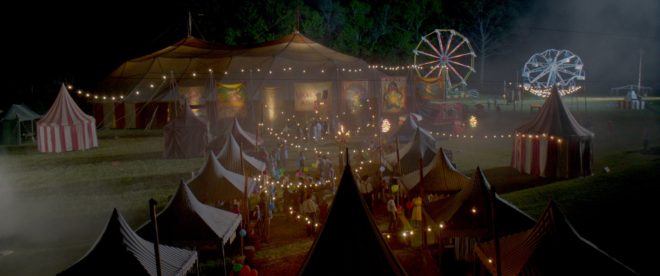
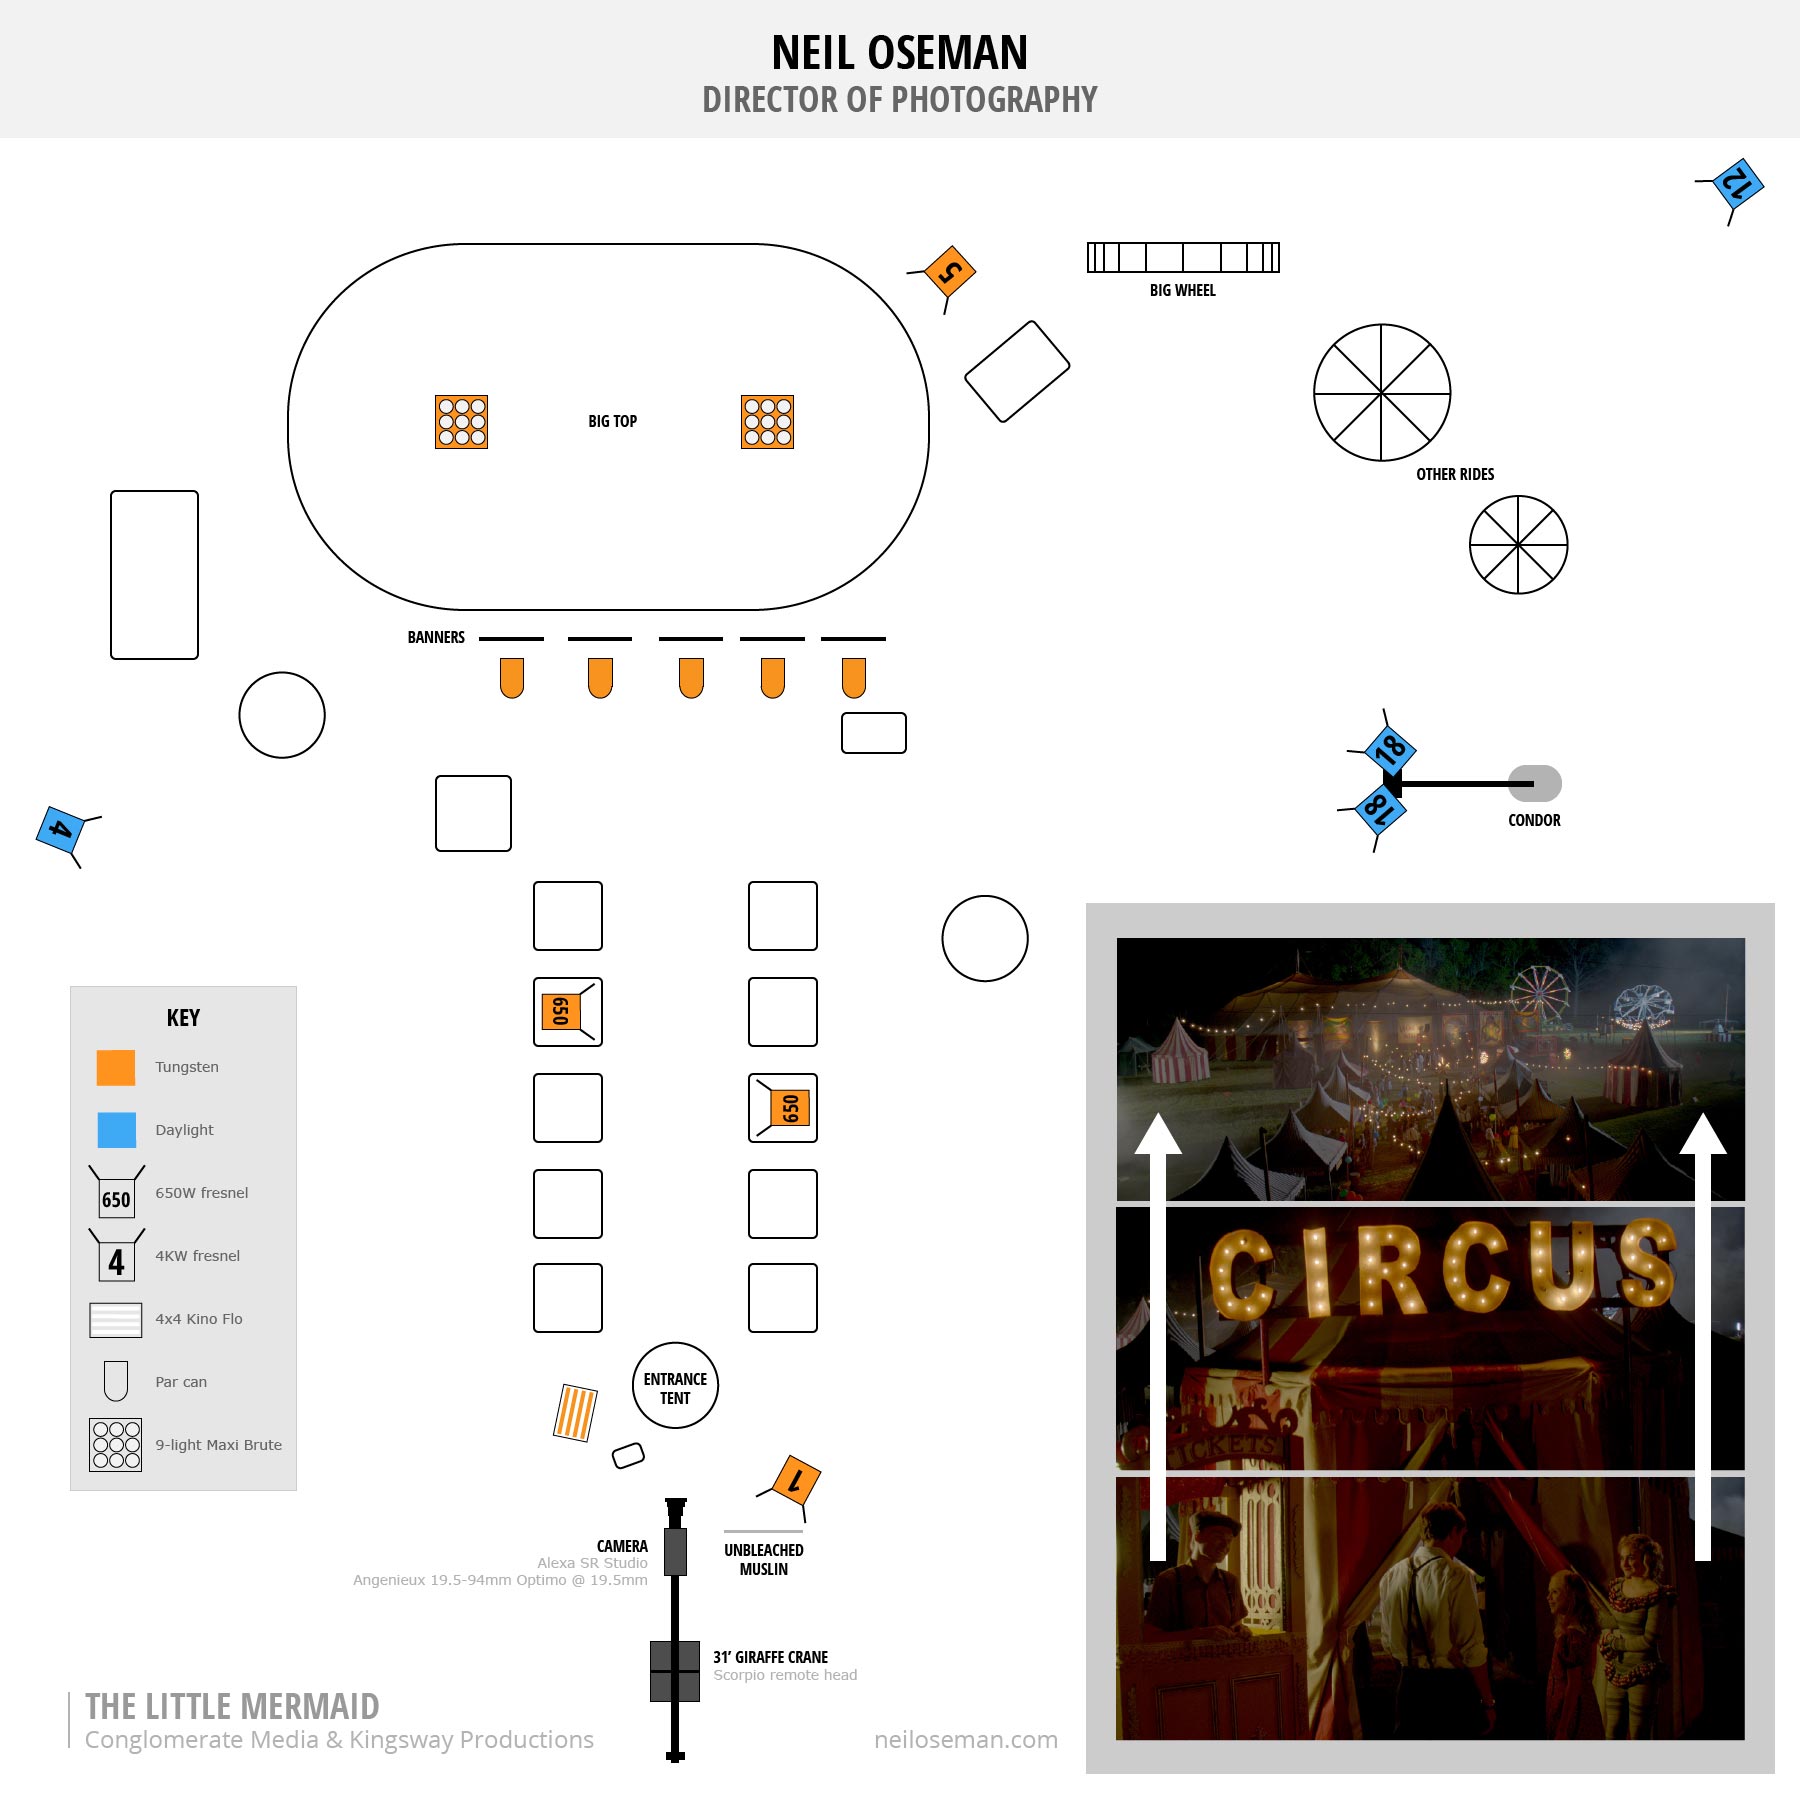
We start with a big crane shot revealing the whole circus at night. For this shot we have the following lamps burning: 2 x 18Ks (on a condor), 1 x 12K, 1 x 4K – all those are providing moonlight or starlight, with varying degrees of blue gel on them; 2 x Nine-light Maxi Brutes making the big top glow from inside; a 5K spilling some orange glow on the background; 2 or 3 smaller tungsten units spilling out light from inside the smaller tents; and lighting the foreground, a 4×4 Kino and a 1K baby bounced off unbleached muslin. There are also numerous practicals on, including the lights on the ferris wheel, the illuminated ‘circus’ sign, several par can up-lighters, and about 7KW of fairy lights. Totalling over 80KW, it is easily the biggest lighting set-up of my career. Although the grip and electrical crew is relatively small given the scale of the set-up, they handle it with aplomb.
We have rebuilt our Giraffe crane to its maximum 31ft configuration, so we can swoop up over the entrance tent, past the ’circus’ sign, and reveal the twinkling string-lights of the midway leading to the big top, and the rides beyond.
Here’s a retrospective lighting plan for this crane shot (not to scale); click to enlarge it. Note that additional tents were added in postproduction, as you can see in the trailer.
Ideally we would have had two condors, with an 18K on each, and put one of them way back behind the trees, to maintain a consistent direction of moonlight, but budget and the practicalities of the location made this impossible.
The ‘A’ camera on the dolly, with the two 18Ks on the condor in the background
One thing that was a little different to my original plan was the hard 4K edging the roofs of the midway tents on the lefthand side. This was meant to be a pair of 6Ks firing through a diffusion frame, to get a much softer, less “sourcey” look than the hard “moonlight” from the 18Ks. But unfortunately both our 6Ks were malfunctioning.
Another change was the lighting of the midway itself. We had a tungsten helium balloon on the truck, which I had planned to float above the midway to provide warm ambience. As it turned out, the practical string lights, although only 40W each, were so numerous that they provided ample illumination in the centre of the frame.
Later on in production, I was chatting to one of the ADs about this scene and he expressed surprise at how well I had handled it, given that it was so much bigger than any lighting set-up I’d previously done. Honestly it never fazed me. Lighting is entirely scaleable; the principles are identical, whether your set is a small bathroom or a football pitch. I’d done so much night exterior in my career, I’d just never had the big toys I wanted before. I’ll let you in on a secret though: the only reason I knew to ask for 18Ks and a condor was from reading American Cinematographer!
In my next post I’ll discuss shooting some of Poppy Drayton’s key scenes as the eponymous mermaid, including her introduction inside the big top. Don’t forget that The Little Mermaid is currently showing in movie theatres across the US and on Amazon in the UK.
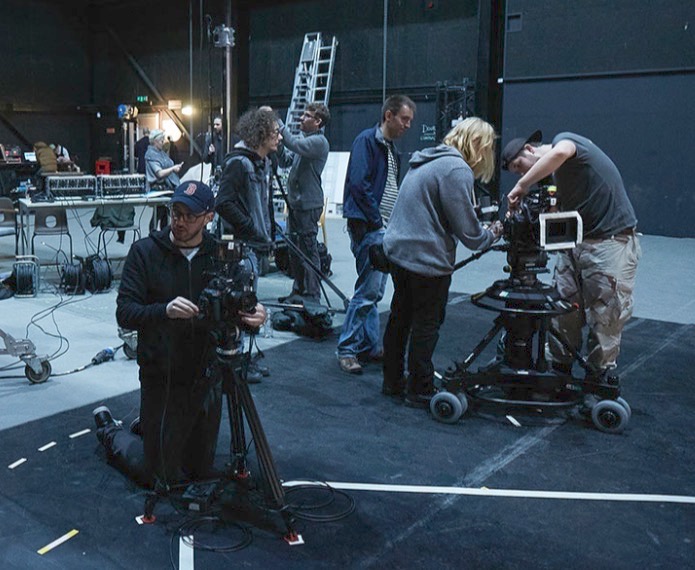
Last week I discussed the technical and creative decisions that went into the camerawork of The Knowledge, a fake game show for an art installation conceived by Ian Wolter and directed by Jonnie Howard. This week I’ll break down the choices and challenges involved in lighting the film.
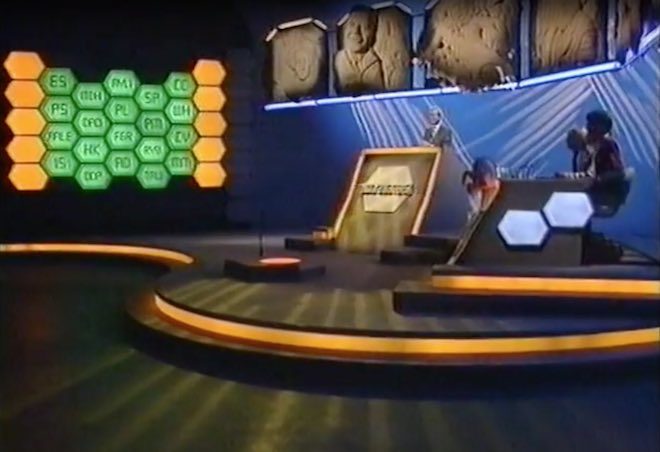
The eighties quiz shows which I looked at during prep were all lit with the dullest, flattest light imaginable. It was only when I moved forward to the nineties shows which Jonnie and I grew up on, like Blockbusters and The Generation Game, that I started to see some creativity in the lighting design: strip-lights and glowing panels in the sets, spotlights and gobos on the backgrounds, and moodier lighting states for quick-fire rounds.
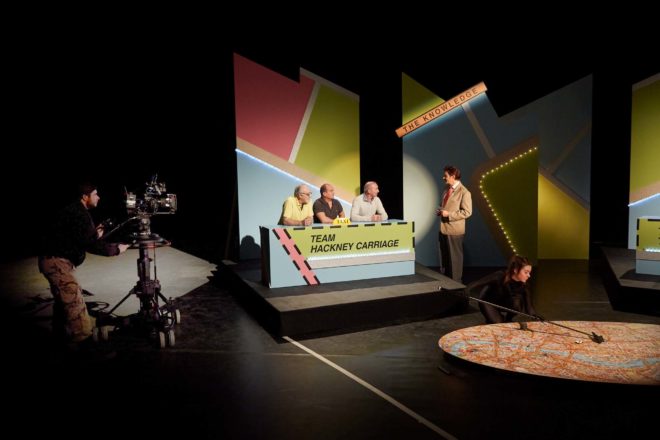
Jonnie and I both wanted TheKnowledge‘s lightingto be closer to this nineties look. He was keen to give each team a glowing taxi sign on their desks, which would be the only source of illumination on the contestants at certain moments. Designer Amanda Stekly and I came up with plans for additional practicals – ultimately LED string-lights – that would follow the map-like lines in the set’s back walls.
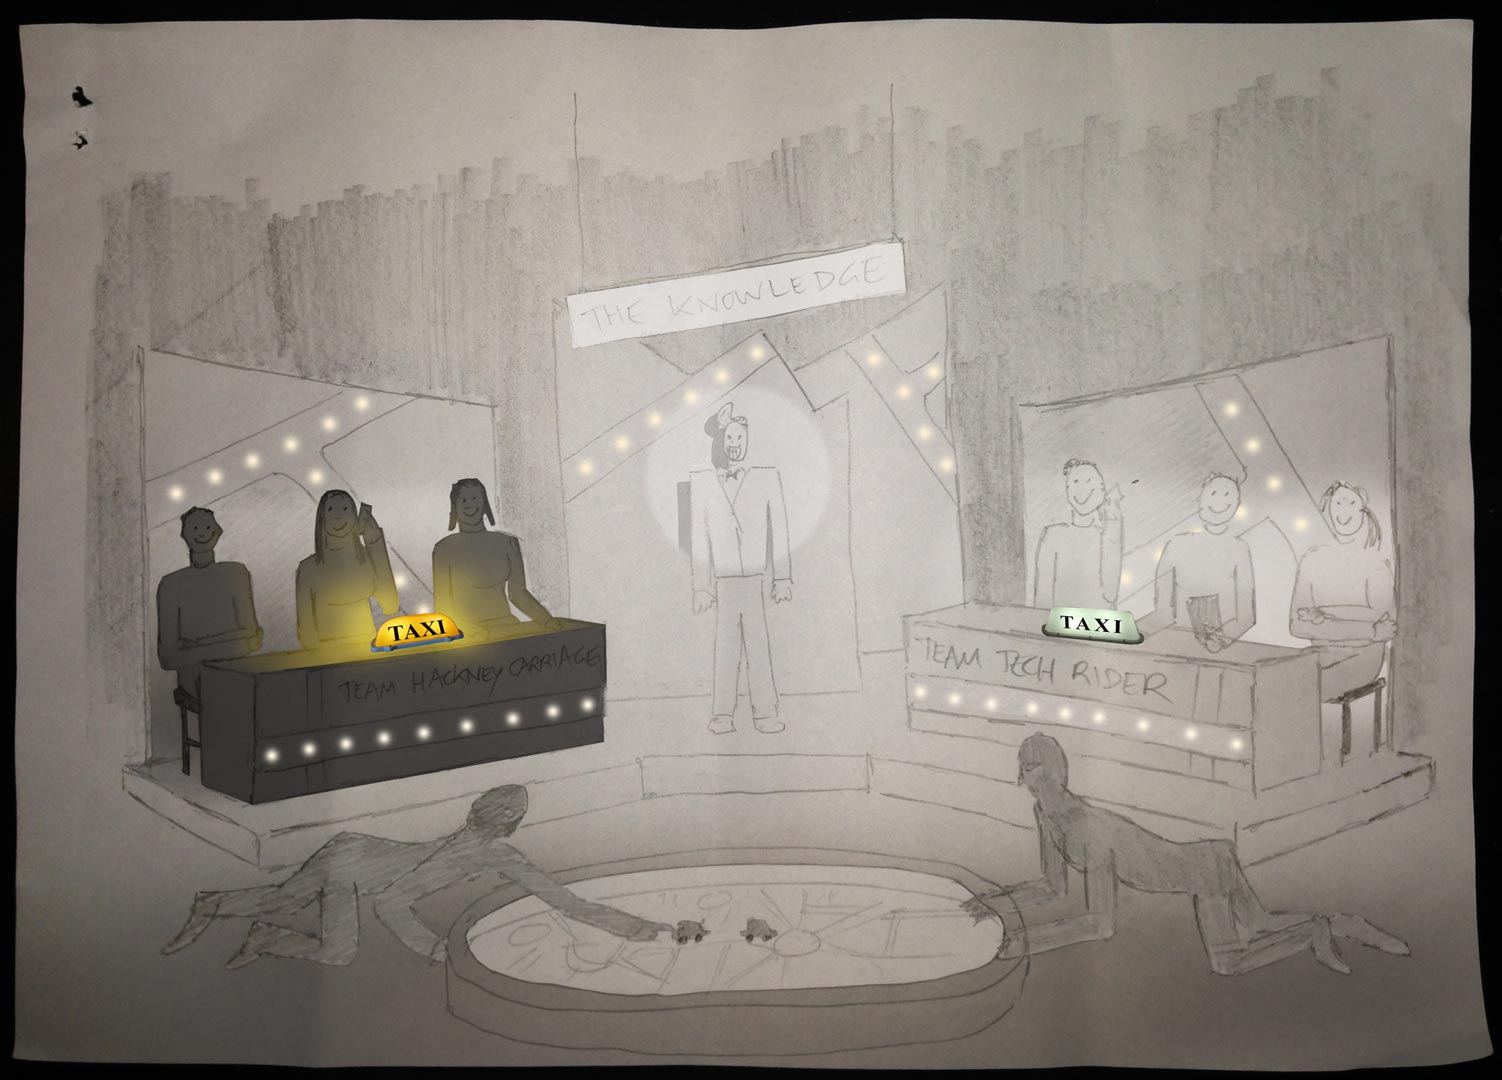
Once the set design had been finalised, I did my own dodgy pencil sketch and Photoshopped it to create two different lighting previsualisations for Jonnie.
He felt that these were a little too sophisticated, so after some discussion I produced a revised previz…
…and a secondary version showing a lighting state with one team in shadow.
These were approved, so now it was a case of turning those images into reality.
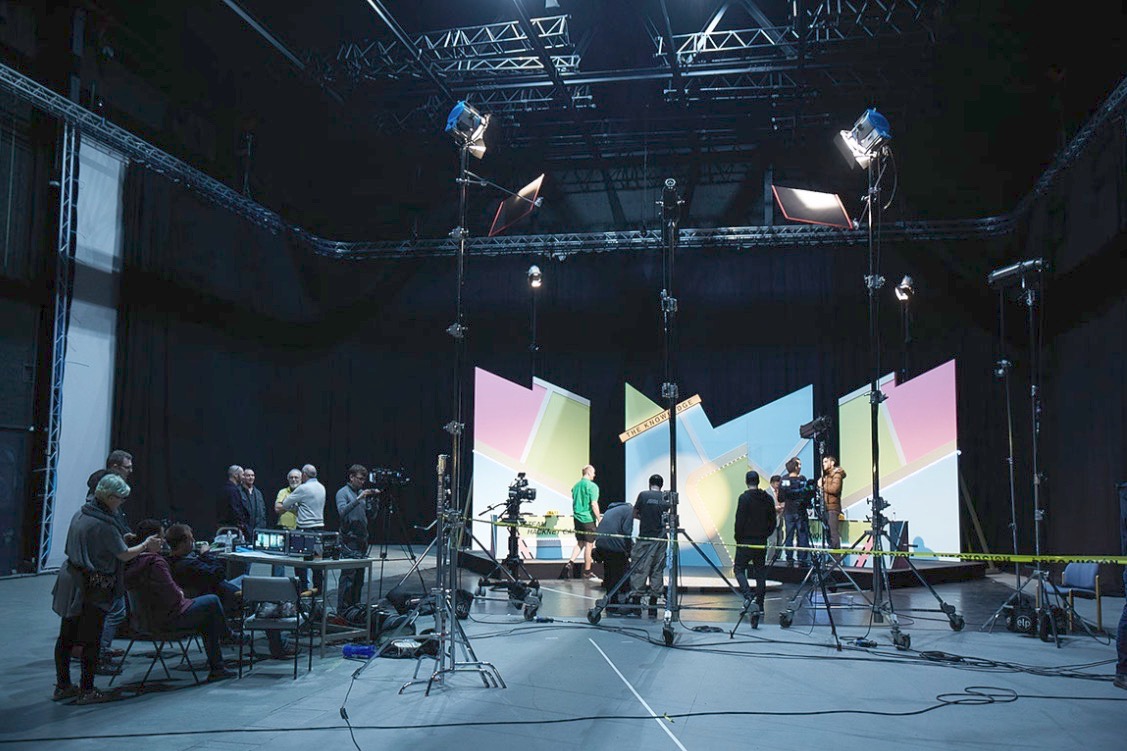
We were shooting on a soundstage, but for budget reasons we opted not to use the lighting grid. I must admit that this worried me for a little while. The key-light needed to come from the front, contrary to normal principles of good cinematography, but very much in keeping with how TV game shows are lit. I was concerned that the light stands and the cameras would get in each others’ way, but my gaffer Ben Millar assured me it could be done, and of course he was right.
Ben ordered several five-section Strato Safe stands (or Fuck-offs as they’re charmingly known). These were so high that, even when placed far enough back to leave room for the cameras, we could get the 45° key angle which we needed in order to avoid seeing the contestants’ shadows on the back walls. (A steep key like this is sometimes known as a butterfly key, for the shape of the shadow which the subject’s nose casts on their upper lip.) Using the barn doors, and double nets on friction arms in front of the lamp-heads, Ben feathered the key-light to hit as little as possible of the back walls and the fronts of the desks. As well as giving the light some shape, this prevented the practical LEDs from getting washed out.
Note the nets mounted below the key-lights (the tallest ones). Photo: Laura Radford
Once those key-lights were established (a 5K fresnel for each team), we set a 2K backlight for each team as well. These were immediately behind the set, their stands wrapped in duvetyne, and the necks well and truly broken to give a very toppy backlight. A third 2K was placed between the staggered central panels of the set, spilling a streak of light out through the gap from which host Robert Jezek would emerge.
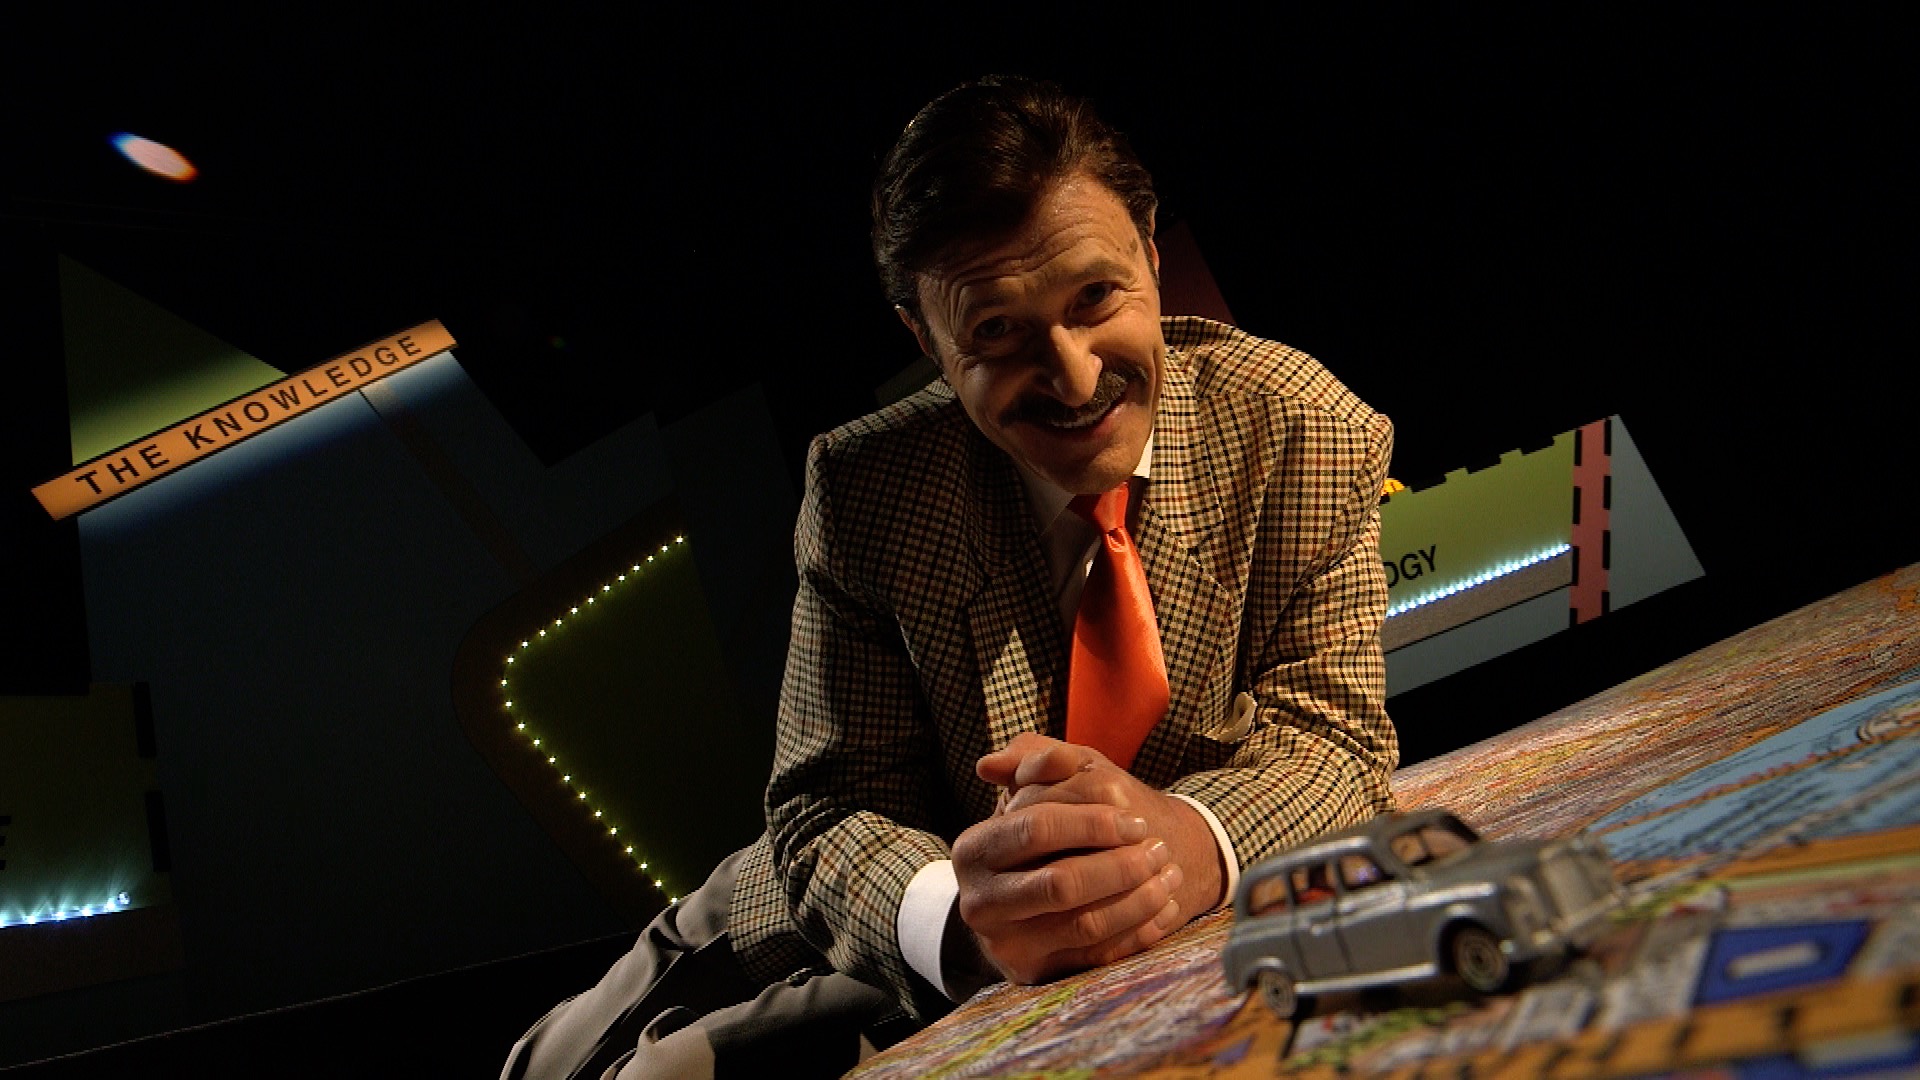
A trio of Source Fours with 15-30mm zoom lenses were used for targeted illumination of certain areas. One was aimed at The Knowledge sign, its cutters adjusted to form a rectangle of light around it. Another was focused on the oval map on the floor, which would come into play during the latter part of the show. The last Source Four was used as a follow-spot on Robert. We had to dim it considerably to keep the exposure in range, which conveniently made him look like he had a fake tan! Ben hooked everything, in fact, up to a dimmer board, so that various lighting cues could be accomplished in camera.
The bulk of the film was recorded in a single day, following a day’s set assembly and a day of pre-rigging. A skeleton crew returned the next day to shoot pick-ups and promos, a couple of which you can see on Vimeo here.
I’ll leave you with some frame grabs from the finished film. Find out more about Ian Wolter’s work at ianwolter.com.
Robert Jezek as gameshow host Robert O’Reilly. Photo: Laura Radford
Last week saw the UK premier of The Knowledge, an art installation film, at the FLUX Exhibition hosted by Chelsea College of Arts. Conceived by award-winning, multi-disciplinary artist Ian Wolter,The Knowledge comments on the topical issue of artificial intelligence threatening jobs. It takes the form of a fake game show, pitting a team of traditional London cabbies (schooled in the titular Knowledge) against a team of smart-phoning minicab drivers. Although shot entirely on stage, the film’s central conceit is that the teams are each guiding a driver across London, to see whether technology or human experience will bring its car to the finish line first.
You can see a couple of brief promos on Vimeo here. It’s a unique project, and one that I knew would be an interesting challenge as soon as I heard of it from my friend Amanda Stekly, producer and production designer. This week and next I’ll describe the creative and technical decisions that went into photographing the piece, beginning this week with the camera side of things.
Photo: Laura Radford
I had never shot a multi-camera studio production like this before, so my first move was to sit down with my regular 1st AC and steadicam operator Rupert Peddle, and his friend Jackie D’Souza-Toulson. Jackie has extensive experience operating as part of a multi-camera team for live TV and events. This conversation answered such basic questions as, could the operators each pull their own focus? (yes) and allowed me to form the beginnings of a plan for crew and kit.
At the monitors with Jonnie. Photo: Laura Howard
Ian and Amanda wanted the film to have a dated look, and referenced such eighties quiz shows as 3-2-1 and Blankety Blank. Director Jonnie Howard and I knew that we had to supply the finished film in HD, which ruled out shooting on vintage analogue video cameras. Interlaced recording was rejected for similar reasons, though if memory serves, I did end up shooting at a shutter angle of 360 degrees to produce a more fluid motion suggestive of interlaced material.
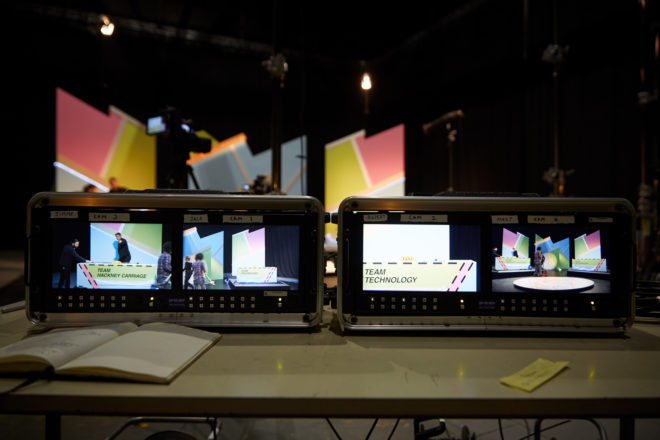
I was very keen that the images should NOT look cinematic. Jonnie was able to supply two Canon C100s – which I’ve always thought have a sharp, “video-ish” look – and L-series glass. I set these to 1600 ISO to give us the biggest possible depth of field. For the remaining two cameras, I chose ENG models, a Canon XF-300 (owned by Rupert) and XF-305. In an ideal world, all four cameras would have been ENG models, to ensure huge depth of field and an overall TV look, but some compromise was necessary for budget reasons, and at least they all used Canon sensors. We hired a rack of four matching 9″ monitors so we could ensure a consistent look on set.
Photo: Laura Radford
One Canon C100, with an L-series zoom, was mounted on a pedestal and outfitted with Rupert’s follow focus system, allowing Jackie to pull focus from the panning handle. The other C100 would shoot a locked-off wide, and was the first camera to be set up. A 14mm Samyang lens made the set look huge, and I placed it low down to emphasise the map in the foreground, and to make it easy for the other cameras to shoot over it. Once that frame was set, we taped a large V shape on the floor to indicate the edges of the wide shot. As long as the lights and other cameras stayed out of that area, they would be safe.
Jackie operates the pedestal-mounted C100. Photo: Laura Radford
Generally Jackie’s pedestal-mounted C100 followed the host, Robert Jezek, or captured the interesting moving shots, while Rupert and the third operator, Jimmy Buchanan, cross-shot the two teams on the XF-100 and XF-105. No filtration was used, except for a four-point star filter on one camera when glitter canons are fired at the end of the game. This cheesiness was inspired by the 3-2-1 clips I watched for research, in which star filters were used for the tacky sequences showing the prizes on offer.
Next week I’ll discuss lighting the show. Meanwhile, find out more about Ian’s work at ianwolter.com.
From time to time I help out my friend Kate Madison shooting show reels for actors. The fun and the challenge is in creating and lighting little micro-sets to capture angles that look like they might be lifted out of a scene from a much larger production, all with limited equipment.
Here’s an interesting shot from a recent showreel for Dana Hajaj. This was intended to resemble a Good Wife style legal drama, though actually the first reference that the lawyer’s office setting brought to my mind was Ally McBeal. I remember how they often had hot sunlight coming in through their office windows which would hit the talent from the chest down, while softer, indirect daylight would illuminate the faces.
Clearly this technique wasn’t exactly going to work for an MCU, but it did get me thinking about windows as two-in-one sources: a hard source which adds interest and ‘sheen’ to the image but is too harsh to hit faces with, and a soft sources for faces. Often cinematographers will use two different lights through the same window to achieve these two distinct effects. (I sometimes employ what I call a “Window Wrap” to this end.)
Now, the set for this showreel shot was just a red wall and sconce. (We tried a plant in the corner but couldn’t get it to work.) I wanted to suggest what the rest of the set might be, beyond the borders of this MCU, and simulating a window seemed like a natural choice. Furthermore, a window with Venetian blinds would help sell what was really a living room as a place of business. But this was not film noir; I didn’t want stripes of light on Dana’s face. Instead I used them to add interest to the wall.
Kate had a slatted-top stool in the hall which threw convincing “blinds” shadows when clamped to a C-stand in front of an 800W Arrilite. Ideally the shadows would have been sharper, but without a Dedo or a par this was the best I could do.
To get the maximum richness from the practical, I put a topper (black wrap clipped to the stool!) on the 800 to keep it off the sconce, and placed CTO inside the lampshade to warm up the fluorescent bulb.
To key Dana, I fired a 1K Arrilite into a 4’x4′ polyboard which was positioned next to the stool. Tungsten bounced off poly gives a beautiful soft, matt quality of light, and is a great way to key talent.
The backlight comes from a 1’x1′ LED panel set to about 4500K. What is the motivation for this source? North light coming from another window maybe? The great thing about micro-sets is there’s no wide shot so I don’t have to worry about that if I don’t want to! The motivation is that cold backlight looks good on black hair, and that’s that.
As we prepared to roll, I wondered if I should increase the contrast more. I could have done this by (a) flagging the poly bounce to prevent it filling in the “blinds” shadows on the wall and (b) bringing in negative fill on the talent’s camera right side to kill the ambience. But I decided that more contrast was not appropriate for this kind of piece.
For another scene for Dana’s reel, we mocked up a remote Arabian campsite on Kate’s patio! Kate used a piece of fabric hung from a post and two light stands to represent the tent.
I wanted to give the impression that if we cut to a wide shot – which of course we never do, but if we did – that it would show a vast landscape, perhaps a desert, all backlit by moonlight. On this hypothetical production, I would generate that moonlight with 18Ks on condor cranes, gelled with Steel Blue.
But on this tight shot I was able to achieve the same effect with two far smaller sources, both gelled with Steel Blue. (This is a blue with more green in it than CTB. It’s prettier and has connotations of many 80s and 90s thrillers and action movies that seemed to use copious amounts of this gel.) In the deep background is an LED panel, 3/4 backlighting a couple of blurry apple trees that could maybe play as vegetation around an oasis. Immediately behind the “tent” is a 40″ C-stand, top floor, with a 1K Arrilite on it. So close to the talent, the 1K comes down at a steep enough angle to imply moonlight, or an 18K on a condor, depending on how you want to look at it.
The flames from the fire pit weren’t doing much to light Dana, so I bounced another 1K off a gold reflector on the floor next to the fire. During takes I wiggled the reflector to add dynamics to the light.
To add a final touch of production value, I suggested a foreground practical. Kate found a candle lantern which we hung from a flag arm just in front of camera. Every frame of a Blockbuster movie is packed with details, so things like this help a lot to sell the scale.
The 1K “moon” backlight is at top left. The gold reflector for the fire source is in the bottom centre, with the 1K bouncing into it visible two-thirds of the way down the right-hand edge of this image. The camera is just out of the bottom right corner of this frame. Not pictured is the LED background light, way back off left of this frame.
Season one of Ren: The Girl with the Mark has come to an end, and to ease the pain a little, here’s one last video breakdown of the show’s cinematography. This week I talk about the exterior scenes from daylight through sunset to night.
Here is the lighting plan for the final scene:
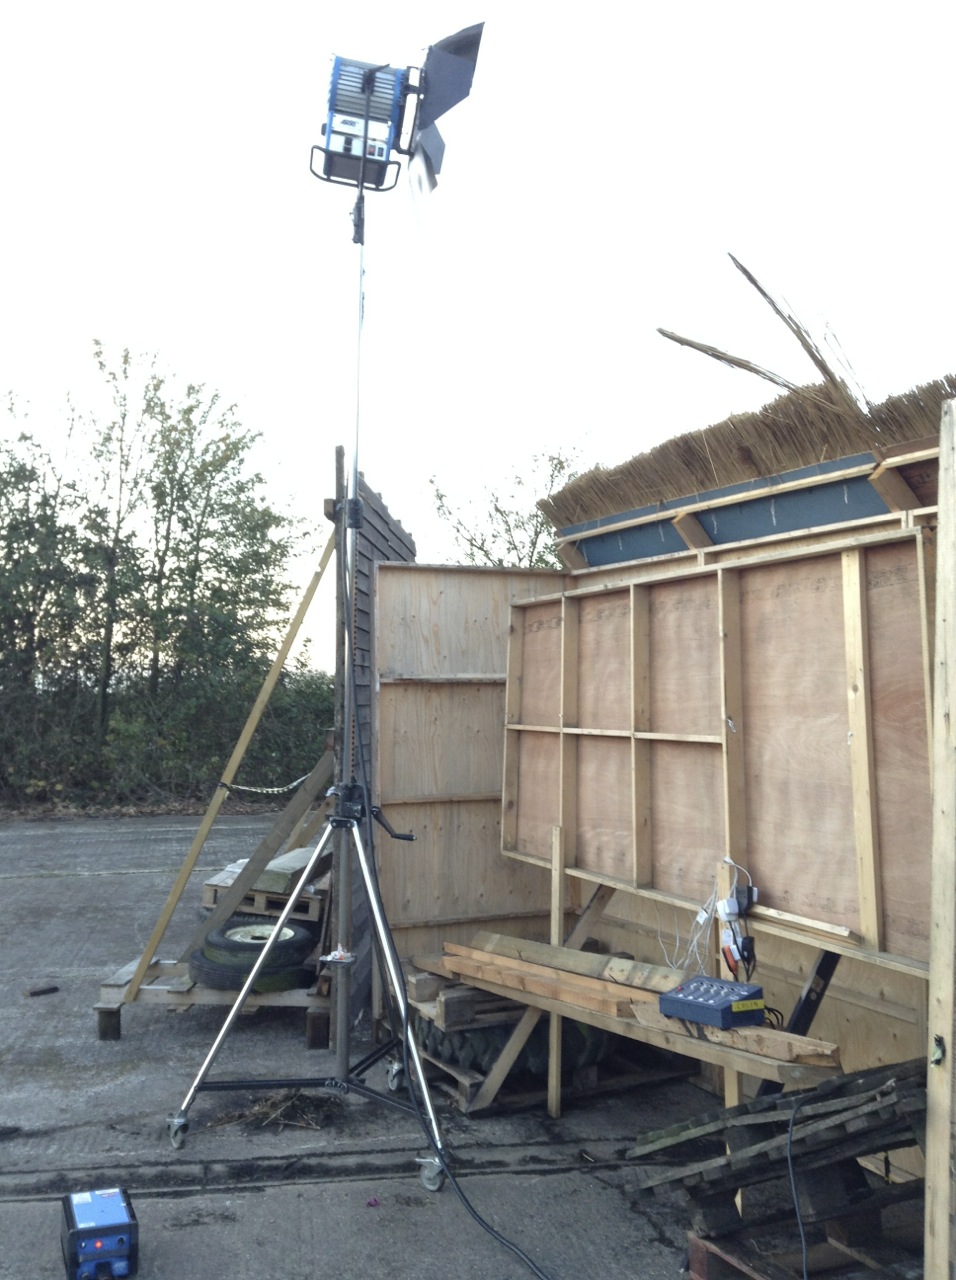
Check out the article I wrote during the shoot about the sunset scene if you’re still hungry for details. And here is an unpublished blog post I wrote during the shoot about the village night exteriors…
The 2.5K HMI backlight. The dimmer board for the Cyclotron can be seen in the lower right.
The last two days of principal photography on Ren were actually night shoots. It was great to take the village set that I’d shot in natural light for five weeks and chuck some of my own light at it.
In his American Cinematographer interview about The Monuments Men (February 2014), Phedon Papamichael said, “My big night-exterior lighting setups usually have one source” – often a backlight, judging by the examples given in the article – “and then I use whatever practicals are in the shot.” My approach is much the same, though a big source for me is a 2.5K HMI, not an Arri T12, sadly!
One of the Urban Sodium-gelled 800W Arrilites beefing up the braziers
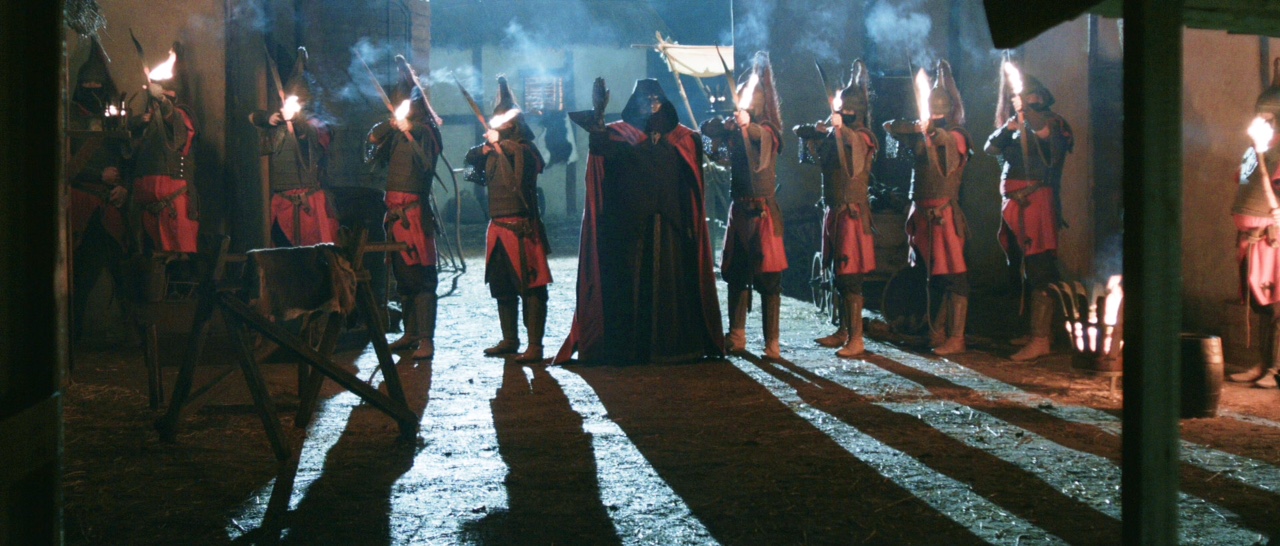
I knew our key shot was going to be Ren’s POV looking up the street to the Kah’Nath Master flanked by several archers, with Karn and Baynon in the background. I set up my 2.5K dead in the back of the shot, its stand hidden by the furthest house facade.
One of the Urban Sodium-gelled 800W Arrilites beefing up the braziers
The plan was for the archers to light their arrows from two braziers, one either side of the street, so Chris Dane and Amanda Stekly dressed these in accordingly. I set up an Arrilite 800 near each one, choosing Urban Sodium gel to give the “firelight” a grungy colour appropriate to the bad guys. (I was shooting on a tungsten white balance to turn the HMI moonlight blue.)
The dimmers controlling the Arrilites
Chris – by this time well-attuned to my lighting needs – also rigged a third brazier to act as the key light for himself (Karn) and James Malpas (Baynon), towards the back of the set. The Arrilite for this one I gelled with full CTO for a yellower, friendlier colour.
All three Arrilites were run through in-line dimmers, and various bystanders were co-opted to flicker them throughout the evening.
The Cyclotron
I rigged a Cyclotron behind the window of the background house – four 100W bulbs under a sheet of CTO, wired to Colin’s dimmer board so they too could be flickered, suggesting firelight inside the house.
The Celotex bounce board
I figured that the front of this house would still be very dark, being out of range of the Arrilites and facing away from the HMI, so I had gaffer Richard Roberts rig a Celotex board to bounce some of the HMI light back onto it. As it turned out, when it got dark and we fired everything up, there was lots of bounce off the set pieces closest to the HMI anyway. This was a nice bonus that gave us more options when blocking Karn and Baynon’s actions, without having to set up extra lamps.
A sunset view of the lighting set-up from roughly the master camera position. The LED panel on the left was used only as a work light.
When the braziers were lit and the Master and soldiers strode onto the set in their awesome costumes (courtesy of Miriam Spring Davies and stand-in wardrobe supervisor Claire Finn), we all felt we had a truly epic sequence in the can.
If you’ve missed any of Lensing Ren or Ren itself, here’s a playlist featuring every episode of the fantasy series, interspersed with the corresponding cinematography breakdowns:
On Tuesday the penultimate episode of Ren: The Girl with the Mark was released and so here’s my video breaking down the cinematography of that fourth episode. This week I cover lighting the guardroom and the prison cell, and demonstrate cross-backlighting.
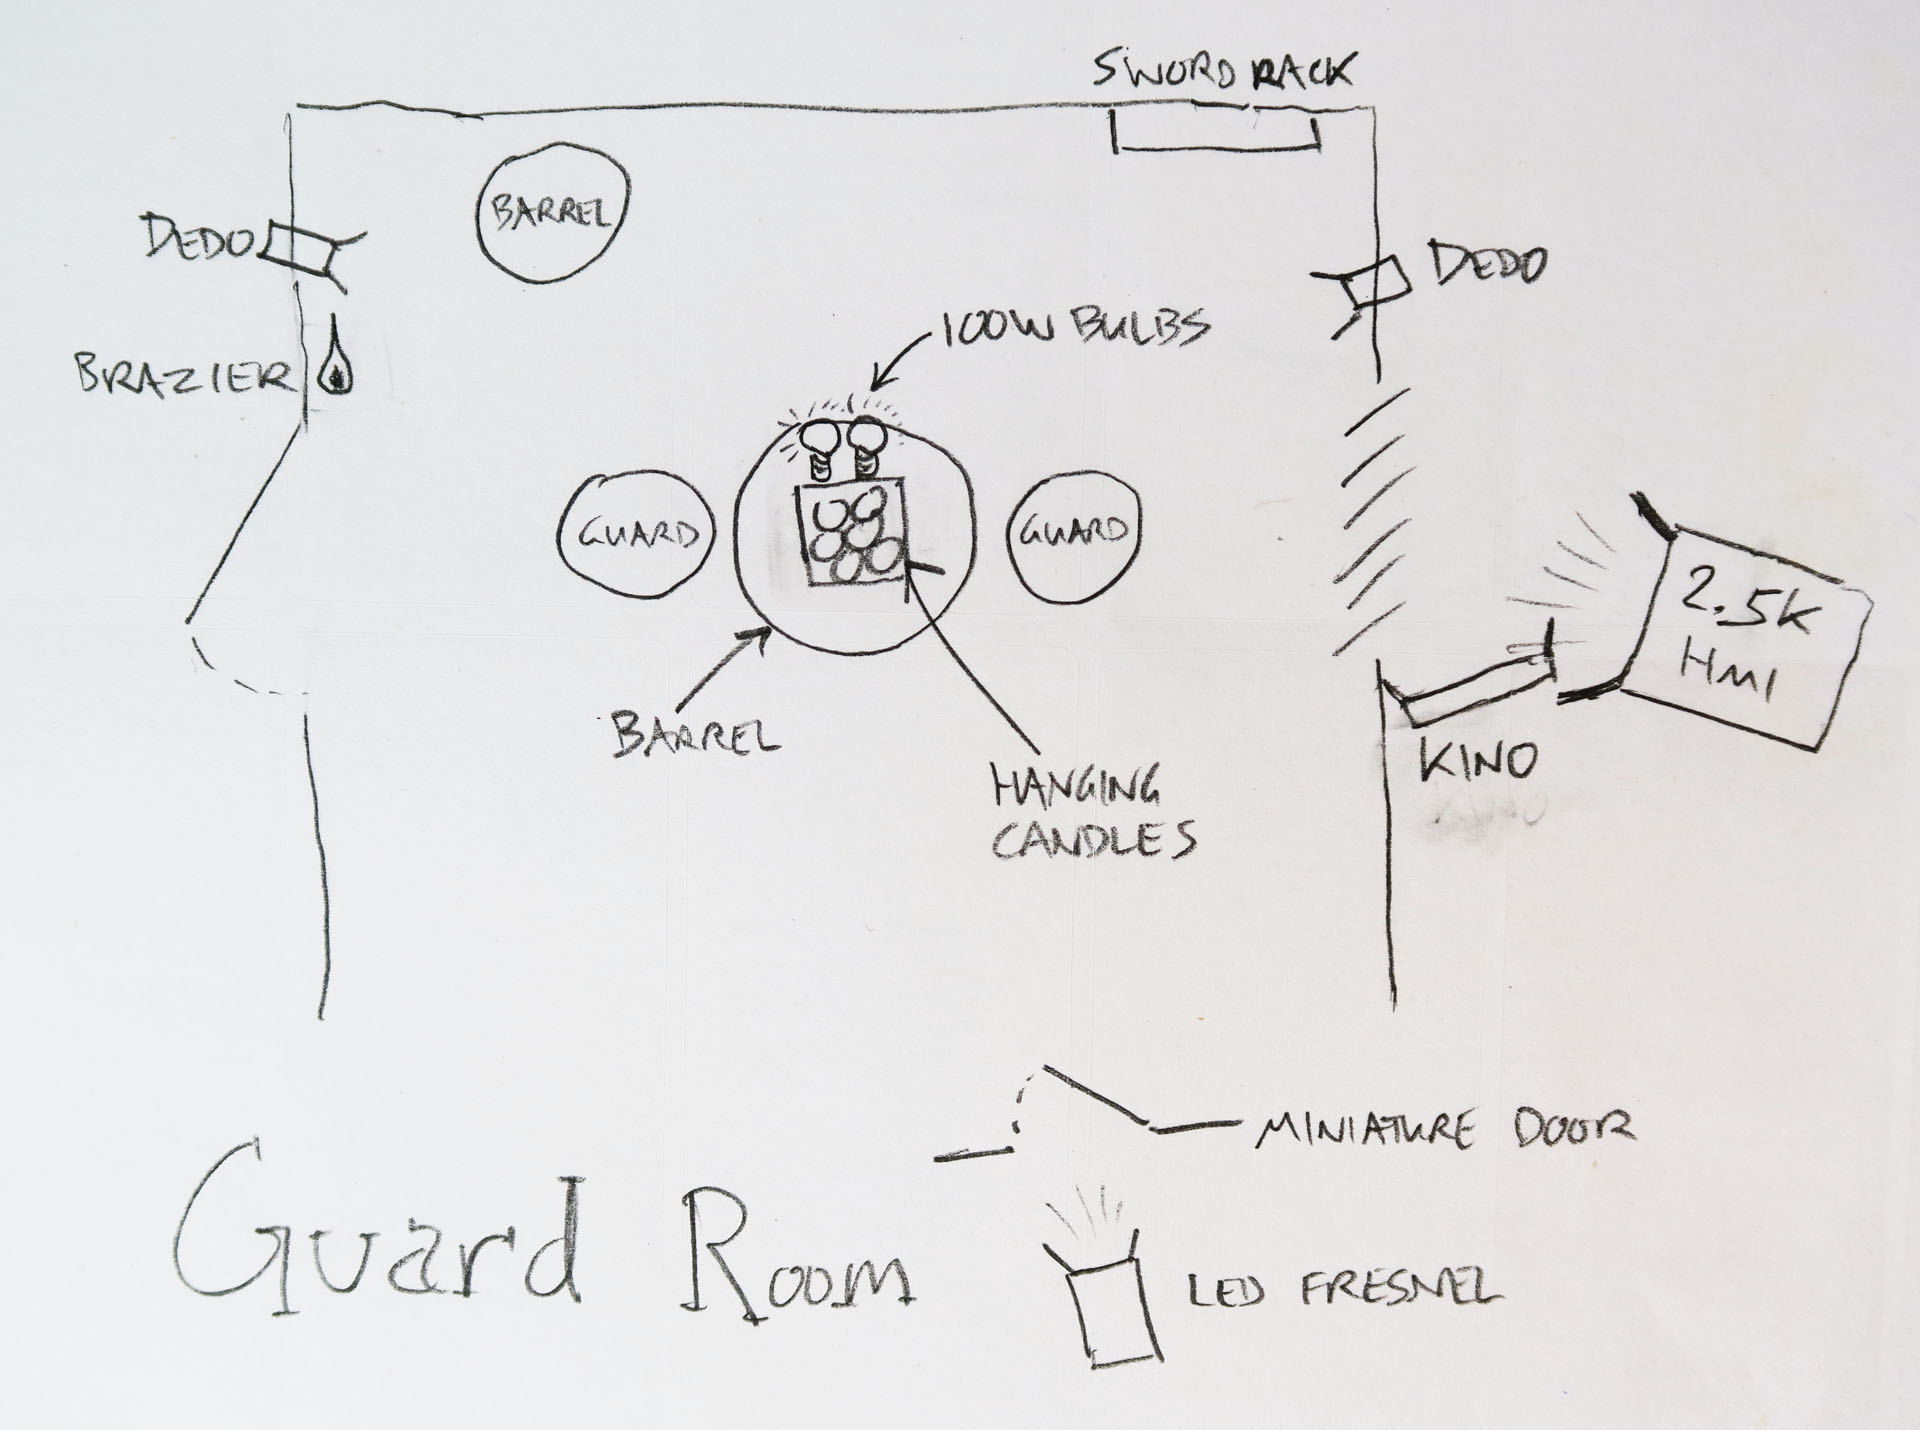
Here are the lighting plans for the guardroom and the cell:
You may also be interested to read the blog I wrote during the shoot about Lighting the Prison Cell, and my post explaining the technique of Cross-backlighting. And here is an unpublished post I wrote during the shoot about the guardroom….
The guard room shoot came at the end of a long and intense week of shooting interiors. By Sunday most of the lead actors had left, we had crested the hill and the end of principal photography was in sight. The atmosphere was even more relaxed and informal than usual, particularly as everyone’s favourite spouter of inappropriate comments, Richard “Squish” Roberts, was playing the lead jailor.
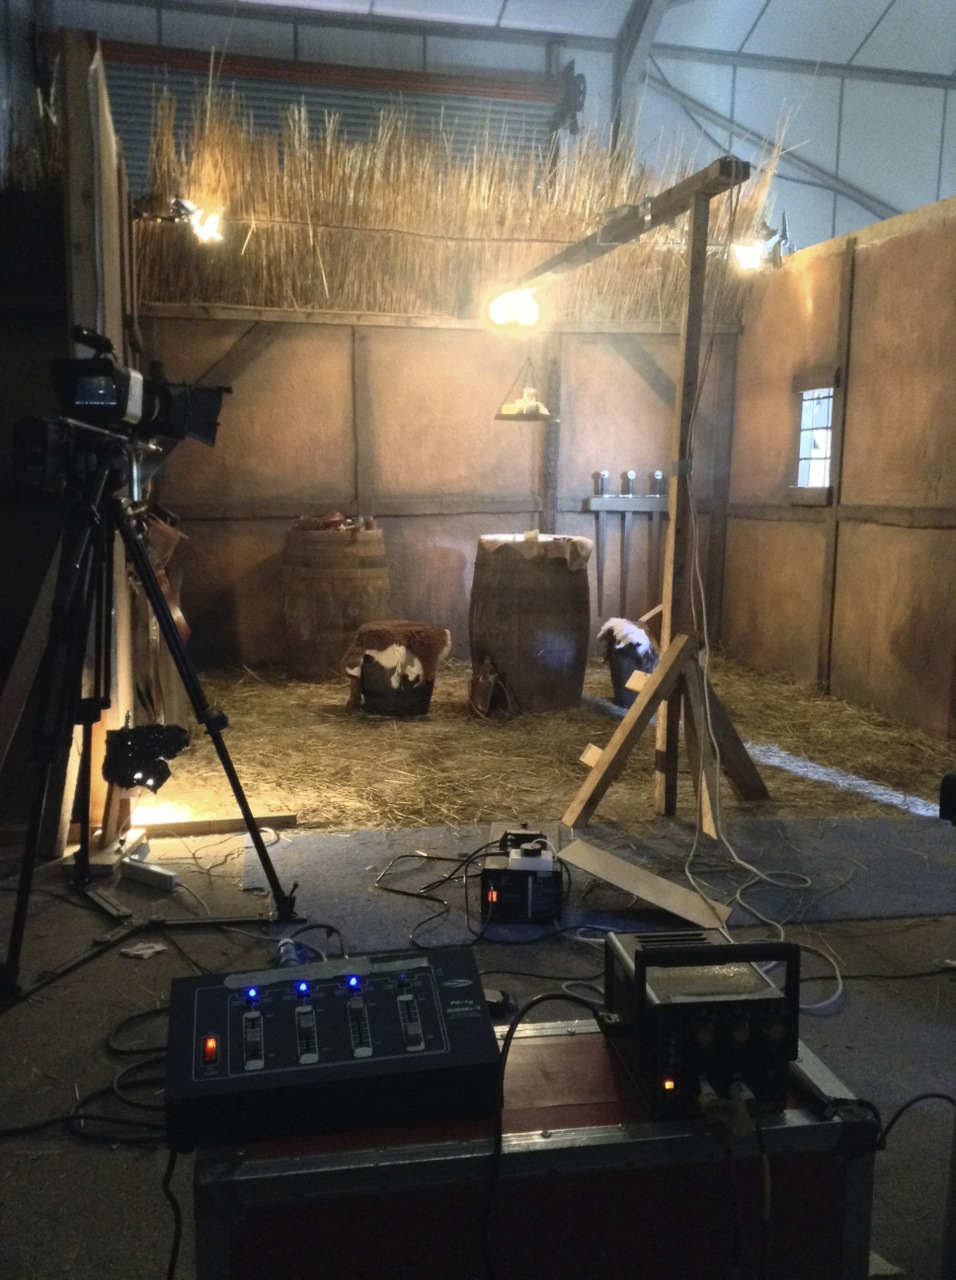
A behind-the-scenes view of the lighting set-up for the window and swords
Ren’s bedroom had been repainted and redressed to be the Kah’Nath guard room. This meant a single, small window again, and as usual I couldn’t resist blasting a 2.5K HMI through there for a shaft of hot, smoky sunlight.
The Window Wrap in action on the swords
I wanted to highlight the rack of swords next to the window, which the shaft of light wasn’t catching, so I used a variant on my Window Wrap technique. I put a 2′ 4-bank kinoflo outside the window at such an angle as to light up the swords without blocking any of the HMI light.
I was interested to find that the art team had done something a bit different with the room’s candles, hanging a cluster of them from an overhead beam. I asked for the “table” (actually a barrel) – where the guards would be playing a board game – to be placed directly under that.
The Dedos (left and right of the picture) and 100W globes used to enhance the light from the candles
The candles wouldn’t shed light directly down on the game in the classic single-light-source-coming-straight-down-onto-the-poker-table style, but I felt it would give me an excuse to cross-backlight. I clamped a Dedo to the top of each side of the set, each one spotted on one of the two characters who would face each other across the barrel.
A view of the finished lighting set-up from over the dimmer boards. On the floor to the right can be seen the shaft of light from the LED fresnel coming through the fake door (off right).
These Dedos couldn’t be flickered, being the kind which go into a single control box with only three discreet settings for brightness. So to introduce some dynamics, and soften the light a bit, I clipped a dimmable 100W bulb to either side of the beam from which the candles hung. This would also ensure that Hunter would be lit when he stood next to the barrel.
An additional light source in the set was a small brazier on the wall next to the dungeon door. This seemed bright enough to shed plenty of light by itself, particularly as Squish would be standing right next to it for a large part of the scene.
The final touch for lighting was to re-use the fake door to create the effect of daylight spilling in as characters exited and entered from off camera. This time I placed an LED fresnel behind it.
Check back next Saturday for another instalment of Lensing Ren, and meanwhile watch the next episode of Ren itself from Tuesday at 8pm GMT at rentheseries.com
It’s the mid-point of season one of Ren: The Girl with the Mark and here’s my video breaking down the cinematography of that third episode. Topics covered this week include grip equipment, aspect ratio, smoke and faking candlelight.
Here is the lighting plan for Ren’s bedroom:
There is more on simulating firelight in my First Musketeer blog post Candlelight.
For my thoughts on composing for the cinemascope aspect ratio, take a look at 2.39:1 Composition.
Check back next Saturday for another instalment of Lensing Ren, and meanwhile watch the next episode of Ren itself from Tuesday at 8pm GMT at rentheseries.com