If you’ve done much still photography, particularly on celluloid, you will probably have heard of the Sunny 16 Rule. It’s a useful shortcut for correctly exposing bright day exteriors without needing a light meter. Is it of any use in digital cinematography though? Yes, and I’ll explain how.
How the rule Works
Sunny 16 is very simple: if the sun is out, set your aperture to f/16 and your shutter speed denominator to the same as your ISO. For example, at ISO 100 set the shutter to 1/100th of a second. At ISO 400 set the shutter to 1/400th of a second – or 1/500th of a second, if that’s the closest option the camera permits – and so on.
You can use the rule to work out other combinations from there. Say your ISO is 100 but you want the sharper, less motion-blurred look of a 1/400th shutter. That’s two stops slower, so open the aperture from f/16 to f/8. (Check out my exposure series if this is all Dutch to you.)
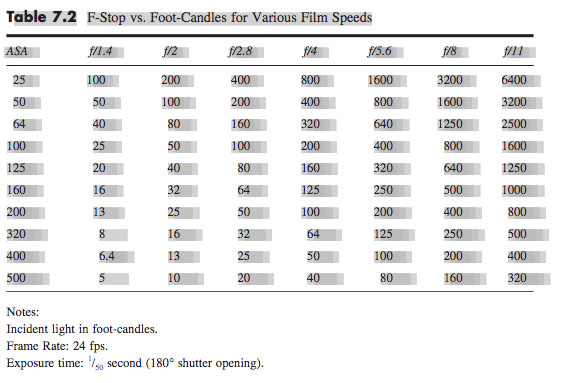
The Sunny 16 Rule works because the sun outputs a constant amount of light and is a constant distance from the earth – at least constant enough to make no significant difference. The sun’s illuminance at the earth’s surface is about 10,000 foot-candles. The following formula relates illuminance (b) to f-stop (f), shutter speed (s) and ISO (i):
Using Sunny 16 in the case of ISO 100 and a shutter speed of 1/100th of a second, this formula gives us…
… 6,400 foot-candles. Less than 10,000fc, certainly, but remember this is only a rule of thumb – and one designed for film, which isn’t hurt at all by a little over-exposure. The rule probably accounts for the fact that you may want to see into the shadows a bit too. (See my article “How Big a Light Do I Need?” for explanations of illuminance and foot-candles and more on the above formula.)
Anyway, you can see from the equation why the shutter speed denominator and ISO cancel each other out if they’re the same.
Using the rule in cinematography
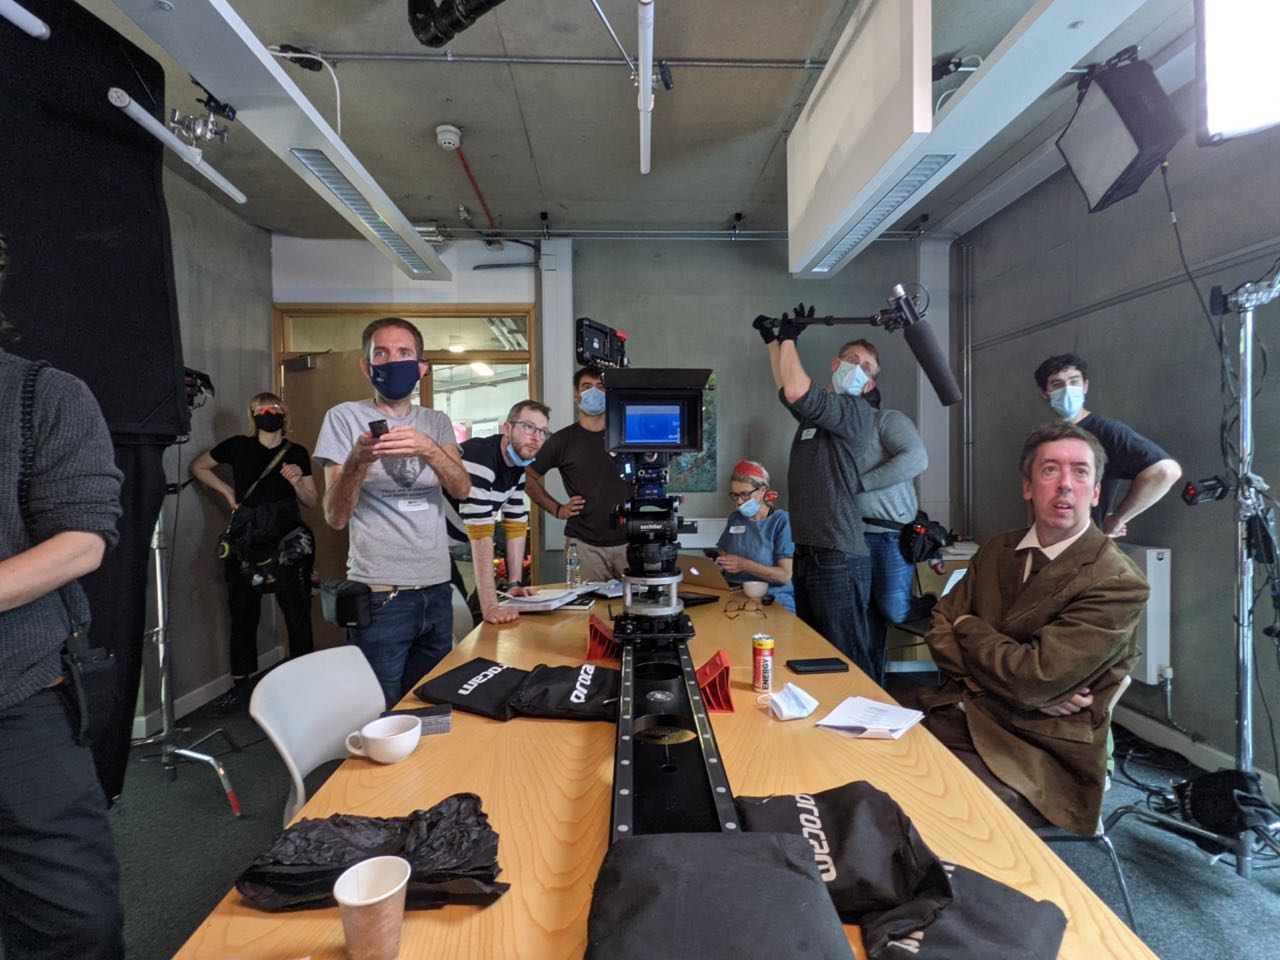
A few weeks ago when I was on the banks of the River Cam setting up for a scene in Harvey Greenfield is Running Late, my 1st AC Hamish Nichols asked which ND filter I wanted in the matte box. It was 5:30am; the sun had barely risen and certainly wasn’t high enough yet to reach me and my light meter over the trees and buildings on the horizon. But I knew that it would be hitting us by the time we turned over, and that the weather forecast was for a completely cloudless day, indeed the hottest day of the year at that time. So I was able to predict that we’d need the 2.1 ND.
How did I work this out? From the Sunny 16 Rule as follows:
I was shooting with a 1/50th of a second shutter interval (a 172.8° shutter angle at 24fps), so the Rule told me that f/16 (or T16) at ISO 50 would be the right exposure.
I was actually at ISO 800, which is four stops faster than ISO 50. (Doubling 50 four times gives you 800.)
I wanted to shoot at T5.6, which is three stops faster than T16.
That’s a total of seven stops too much light. To find the right optical density of ND filter you multiply that by 0.3, so 0.3 x 7 = 2.1. (More on this in my ND filters post.)
Everything on a film set sucks up time, so the more you know in advance, the more efficient you can be. Little tricks like this mean you don’t have to do a last-minute filter swing and waste five minutes that the director could have used for another take.
I remembered the comment recently when double Oscar-winning cinematographer Janusz Kamiński said something similar in an interview with British Cinematographer. He lamented what he perceives as a loss of lighting skills that accompanied the transition from celluloid to digital filmmaking: “Now everyone shoots dark… Pictures are so murky you need to crank up the TV to see it… They just don’t know how to light.”
I think there’s a tremendous amount of talent in today’s world of digital cinematography, but the technology might have encouraged a trend towards darker images. With celluloid it was always better to err on the side of over-exposure, as highlights would fall off attractively but shadows could get lost in the grain. With digital it is more advisable to lean towards under-exposure, to avoid the harsh clipping of highlights.
We should also consider that modern digital cameras have more dynamic range than film, so there is less risk inherent in under-exposing a scene, especially as you can see on your histogram exactly what detail you’re retaining. But the same should be true of over-exposure too.
The demand from streaming platforms for HDR delivery also encourages DPs and colourists to play more with very dark (or very bright) images. Most viewers will still see the results in SDR, however, and some crucial information at the edges of the dynamic range could get lost in the transfer.
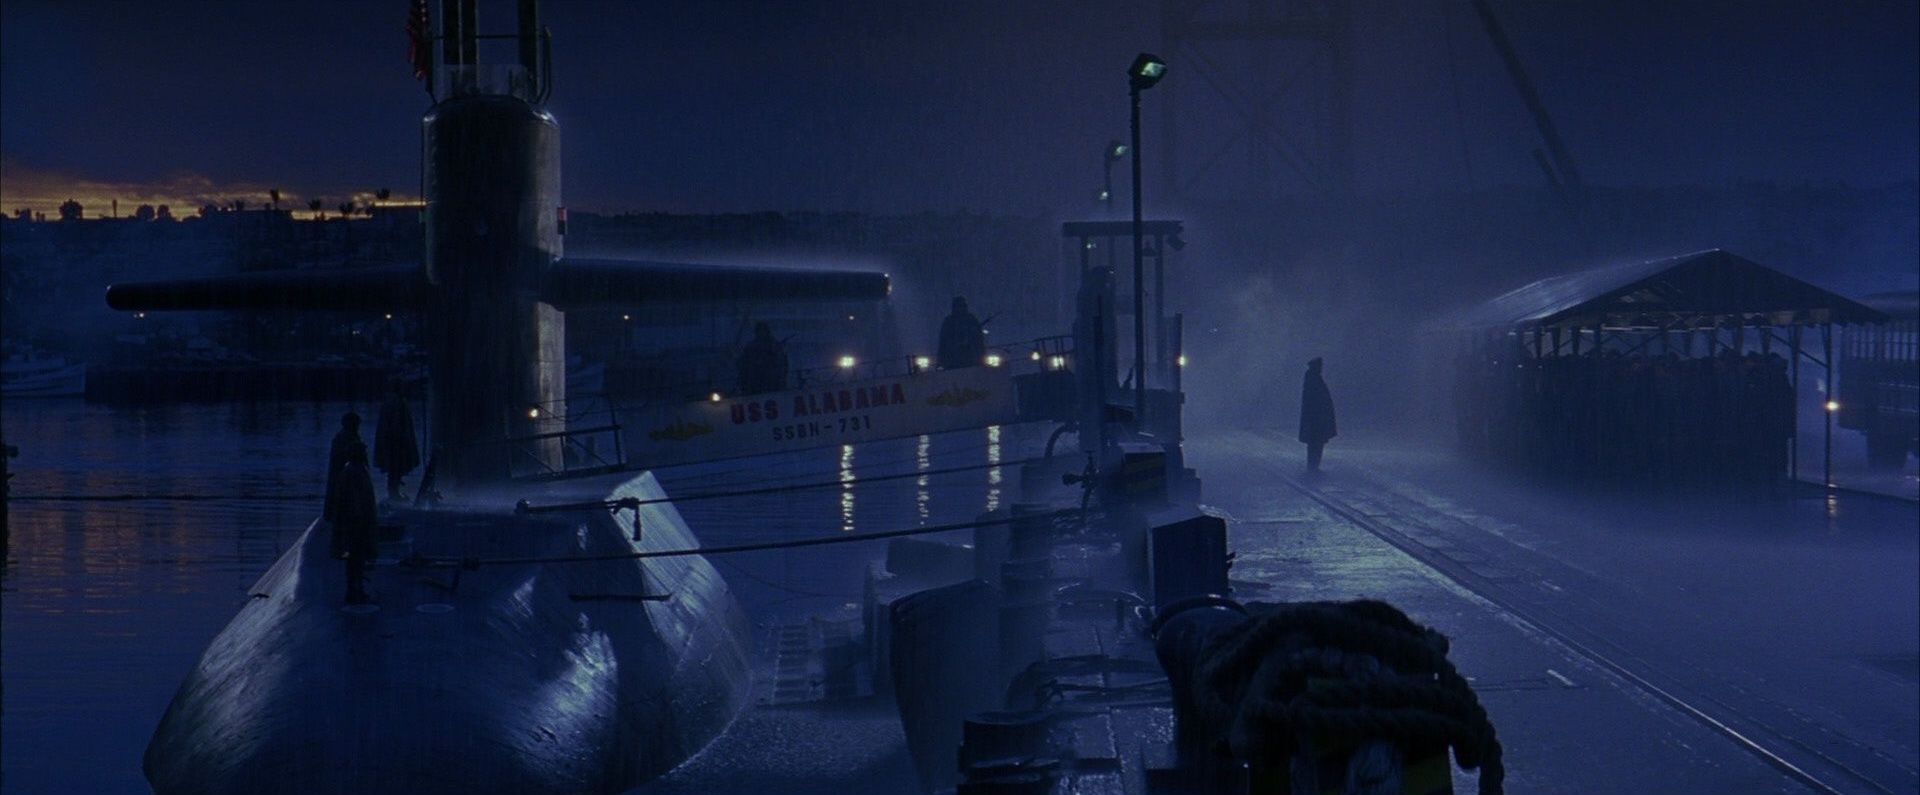
“Crimson Tide” (1995, DP: Dariusz Wolski, ASC)
The trend for darker images may have started even before the digital revolution though. “I think contemporary photography is going away from pretty pictures,” Dariusz Wolski told American Cinematographer in 1996, well over a decade before digital capture became the norm. “Something that is dark is really dark, and something that is bright is very bright. The idea is to stretch photography, to make it more extreme.”
Wolski may have been onto something there: a trend towards more naturalistic images. You have only to look at a film made in the first half of the 20th century to see that lighting has become much more realistic and less stylised since then. Darker doesn’t necessarily mean more realistic, but perhaps it has become a convenient trick to suggest realism, much like blue lighting is a convenient trick to suggest night that has very little basis in how things look in the real world.
The most noticeable increase in darker images has been in TV – traditionally bright and flat because of the inherently contrasty nature of the cathode ray tube and the many lights and reflections contaminating the screen in a typical living room. Flat-screens are less reflective, less contrasty and generally bigger – and a dimmer image is easier for the eye to interpret when it’s bigger.
Perhaps people are more likely to draw the curtains or turn off the lights if they’ve splashed out on a TV so large that it feels a bit like a cinema, but what about all the mobile devices we have today? I went through a phase of watching a lot of Netflix shows on an iPad Mini on trains, and I was forever trying to keep the daylight off the screen so that I could see what was going on. It was annoying, but it was my own fault for watching it in a form that the programme-makers couldn’t reasonably be expected to cater for.
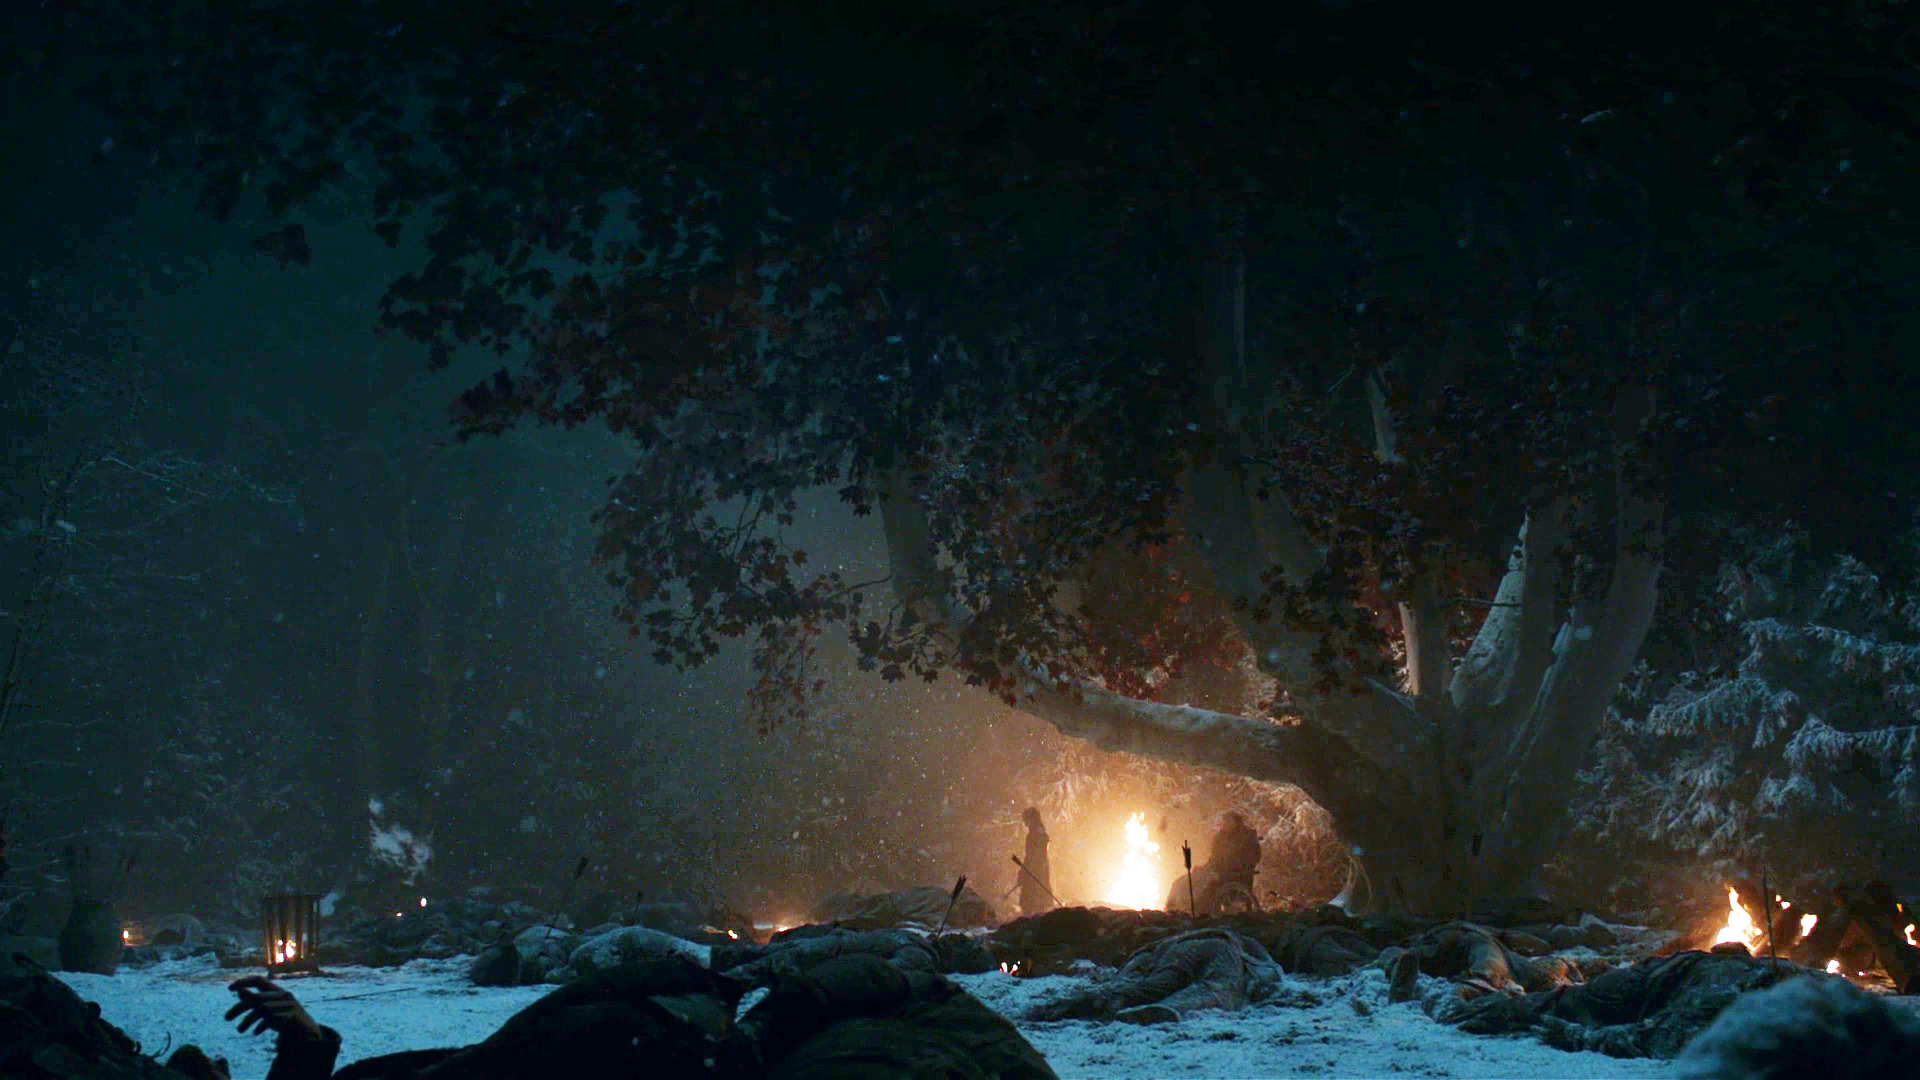
A shot from “Games of Thrones: The Long Night” (2019, DP: Fabian Wagner, ASC, BSC) which has been brightened by disgruntled fans
“A lot of people… watch it on small iPads, which in no way can do justice to a show like that anyway,” said DP Fabian Wagner in defence of the infamously dark Battle of Winterfell in Game of Thrones. I’ve never seen it, and I’m all for a DP’s right to shoot an image the way they see fit, but it sounds like he might have gone too far in this case. After all, surely any technique that distracts the audience or takes them out of the story has defeated its purpose.
So, the odd extreme case like this aside, is modern cinematography too dark? I think there is an over-reliance on moodiness sometimes, a bit like how early DSLR filmmakers were too reliant on a tiny depth of field. DPs today have so much choice in all aspects of crafting an image; it is a shame to discount the option of a bright frame, which can be just as expressive as a dark one.
But if a DP wants to choose darkness, that is up to them. Risks like Fabian Wagner took are an important part of any art-form. Without them, cinematography would go stale. And I for one would certainly not want that, the odd negative Instagram comment notwithstanding.
Inside a lens, amongst the various glass elements, is an ingenious mechanism which we call the iris. Just like your biological iris, it controls the amount of light passing through the pupil to form an image. I’ve written about the iris’s use to control exposure before, and its well-known side effect of controlling depth of field. But here are five things that aren’t so commonly known about irises.
1. f-stops and the entrance pupil
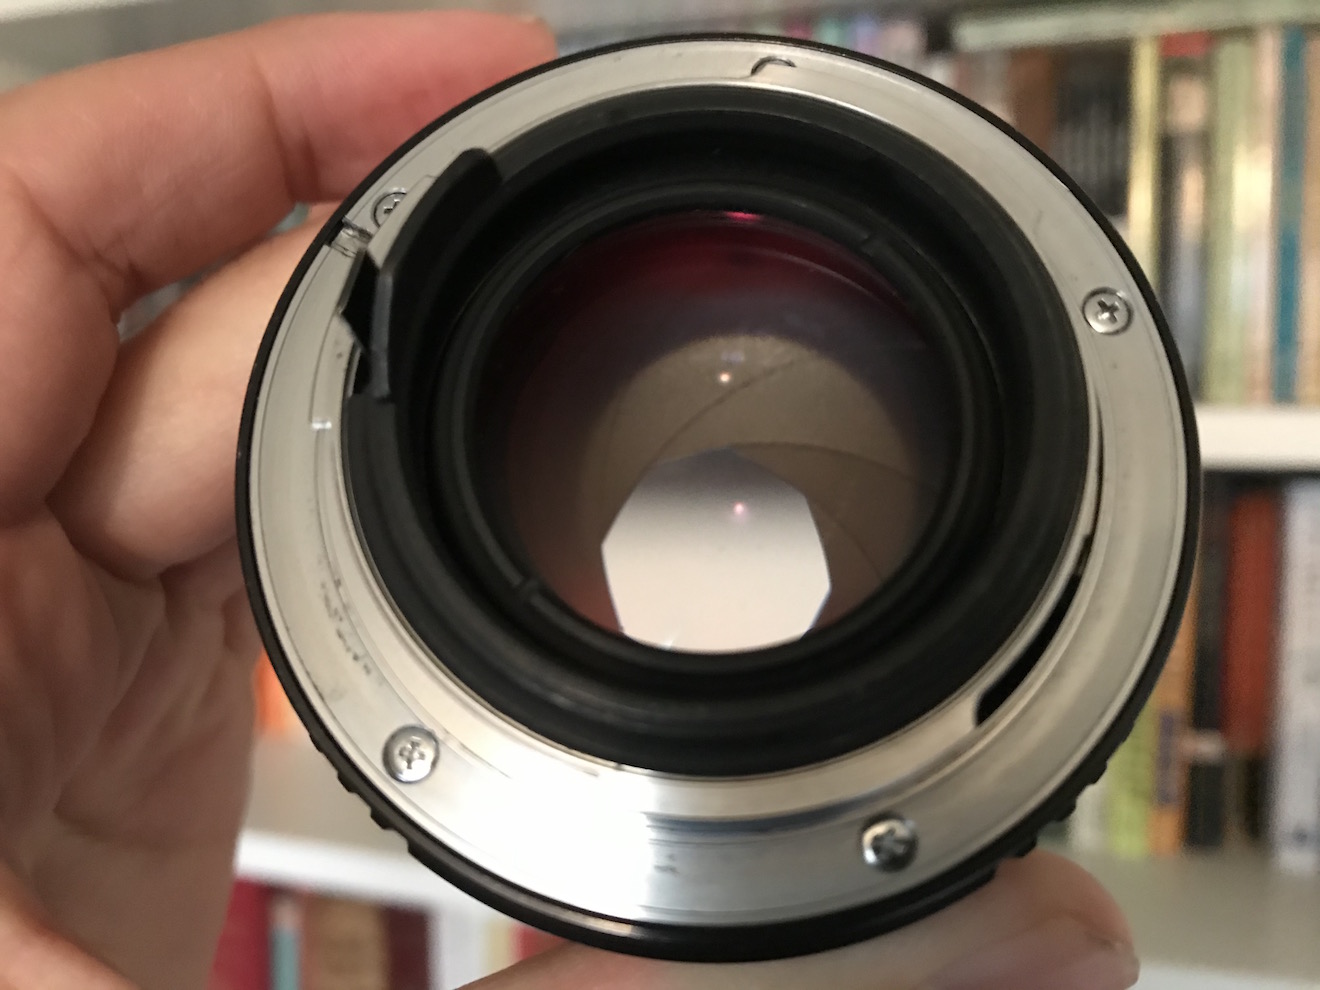
This image shows the exit pupil because it’s seen through the rear element of the lens. A view through the front element would show the entrance pupil.
The f-number of a lens is the ratio of the focal length to the diameter of the aperture, but did you know that it isn’t the actual diameter of the aperture that’s used in this calculation? It’s the apparent diameter as viewed through the front of the lens. A lens might have a magnifying front element, causing the aperture to appear larger than its physical size, or a reducing one, causing it to appear smaller. Either way, it’s this apparent aperture – known as the entrance pupil – which is used to find the f-number.
2. No-parallax point
The no-parallax point of a lens is located at its entrance pupil. Sometimes called the nodal point, although that’s technically something different, this is the point around which the camera must pan and tilt if you want to eliminate all parallax. This is important for forced perspective work, for panoramas stitched together from multiple shots, and other types of VFX.
3. Focus
If you need to check your focal distance with a tape measure, many cameras have a handy Phi symbol on the side indicating where the sensor plane is located so that you can measure from that point. But technically you should be measuring to the entrance pupil. The sensor plane marker is just a convenient shortcut because the entrance pupil is in a different place for every lens and changes when the lens is refocused or zoomed. In most cases the depth of field is large enough for the shortcut to give perfectly acceptable results, however.
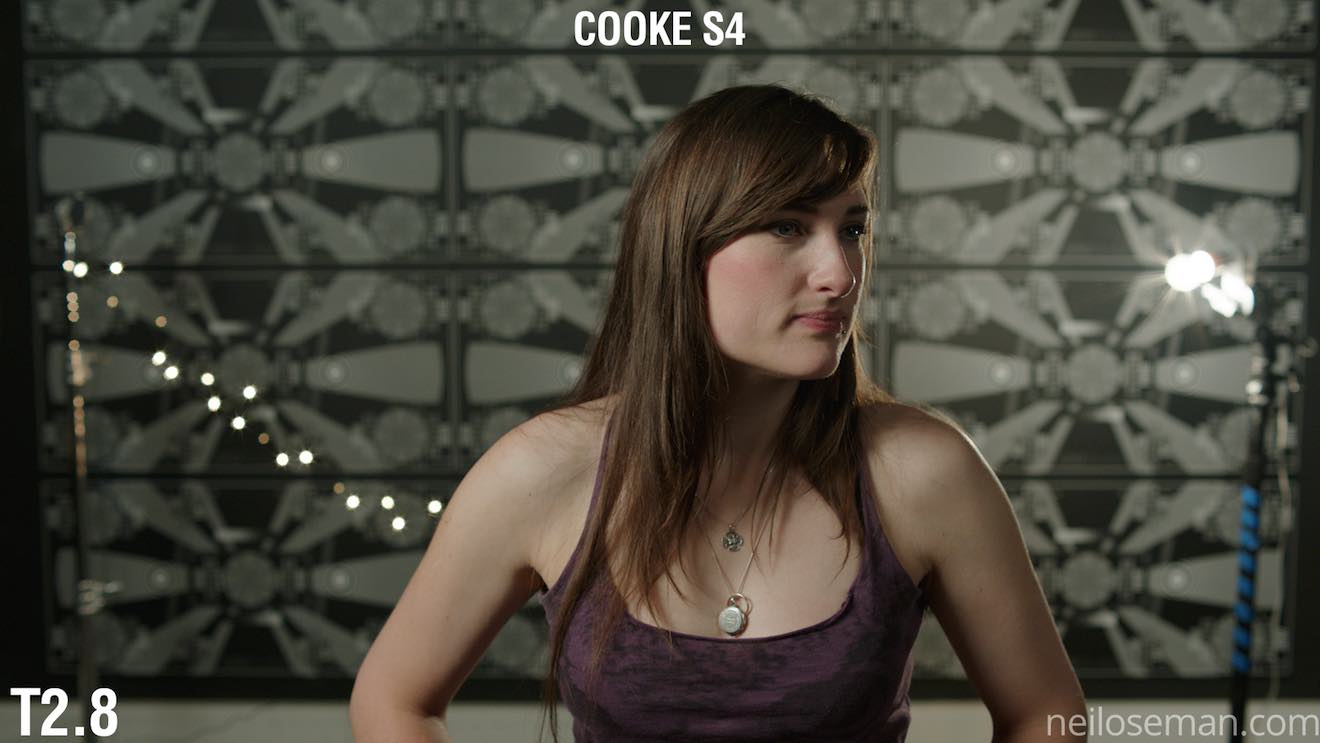
4. Bokeh shape
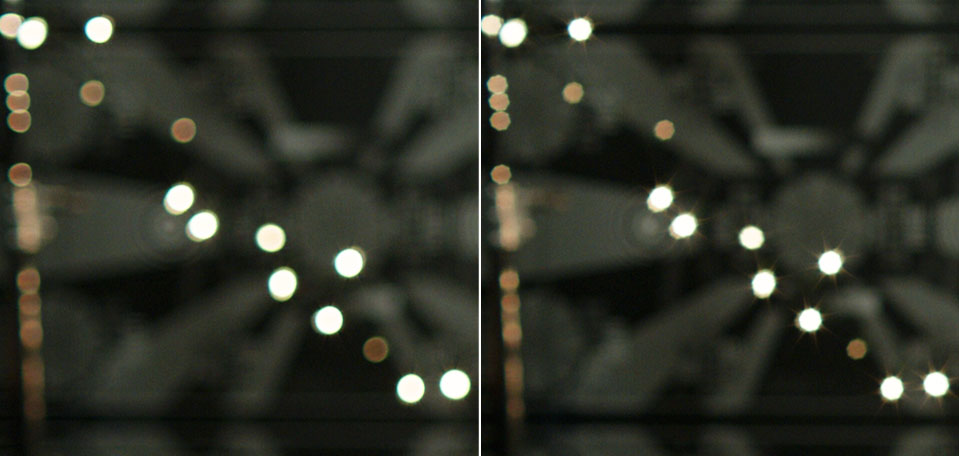
The bokeh of a 32mm Cooke S4 wide open at T2 (left) and stopped down to T2.8 (right). Note also the diffraction spikes visible in the righthand image.
The shape of the entrance pupil determines the shape of the image’s bokeh (out of focus areas), most noticeable in small highlights such as background fairy lights. The pupil’s shape is determined both by the number of iris blades and the shape of their edges. The edges are often curved to approximate a circle when the iris is wide open, but form more of a polygon when stopped down. For example, a Cooke S4 produces octagonal bokeh at most aperture settings, indicating eight iris blades. Incidentally, an anamorphic lens has a roughly circular aperture like any other lens, but the entrance pupil (and hence the bokeh) is typically oval because of the anamorphosing effect of the front elements.
5. Diffraction spikes
When the edge of an iris blade is straight or roughly straight, it spreads out the light in a perpendicular direction, creating a diffraction spike. The result is a star pattern around bright lights, typically most visible at high f-stops. Every blade produces a pair of spikes in opposite directions, so the number of points in the star is equal to twice the number of iris blades – as long as that number is odd. If the number of blades is even, diffraction spikes from opposite sides of the iris overlap, so the number of apparent spikes is the same as the number of blades, as in the eight-pointed Cooke diffraction pictured above right.
An actor’s view by Alan Hay as I fiddle with a TV’s settings to reduce its flickering on camera
In last week’s post I mentioned the minor trouble we had on Harvey Greenfield is Running Late with a flickering TV screen in the background of shot. In today’s post I’m going to look at the underlying maths, find out why the 144° shutter angle I ultimately chose gave the best results and how to calculate the exposure compensation when you change your shutter angle like this.
If you haven’t already read my exposure series, particularly the posts about shutter and ISO, I suggest you look at those before diving into this one.
Working out the shutter interval
Harvey Greenfield was shot at 24fps here in the UK, where the mains current alternates at 50Hz (i.e. 50 cycles per second). To avoid certain light sources and any screens in shot from flickering, you generally want to match your shutter interval – the period of time during which light is allowed to charge the sensor’s photosites – to the AC frequency, i.e. 1/50th of a second in the UK. That works out to a shutter angle of 172.8° because…
frame rate x shutter interval x 360 = shutter angle
24 x (1 ÷ 50) x 360 = 172.8
So, as with all features I shoot in the UK, I captured most of Harvey at a shutter angle of 172.8°.
Going back to the TV problem, I scrolled through the Red Gemini’s available shutter angles until I found the one that gave the least flicker: 144°. With the twin wonders of hindsight and maths I can work out what frequency the TV was operating at, using the first version of the formula above.
24 x (360 ÷ 144) = 60
144° with a frame rate of 24 meant that the Red was capturing 1/60th of a second’s worth of light each frame. To produce (almost) no flickering at this camera setting, the TV was evidently operating at 60Hz.
The TV screen reflects in the Soft FX filter.
Working out the exposure compensation
Reducing your shutter angle reduces the amount of light captured by the sensor each frame, i.e. it reduces the exposure. I was happy with the depth of field and didn’t want to change the aperture, so instead I compensated by increasing the ISO from 800 to 1280. This was a guess made under time pressure on set, but now I can calculate the right exposure compensation at my leisure.
Fortunately, unlike f-stops, shutter angles and ISO are linear scales. Double the shutter angle or ISO and you double the exposure; halve the shutter angle or ISO and you halve the exposure. This makes the maths relatively easy.
172.8° was my original shutter angle. Let’s think of this as 100% exposure. When I went down to 144°, what percentage of the original exposure was that? I still remember the mantra from calculating maths workbook scores in secondary school: “What you got divided by what you could have got, times 100.”
(144 ÷ 172.8) x 100 = 83%
Now we turn to the ISO. At its original value, 800, the camera is only providing 83% of the desired exposure, thanks to the reduced shutter angle. What must we increase the ISO to in order to hit 100% again?
(800 ÷ ?) x 100 = 83%
800 ÷ ? = 0.83
800 ÷ 0.83 = ? = 960
So I should have been at ISO 960 ideally. The closest available setting on the Red is ISO 1000, not 1280 as I selected, so I was actually over-exposing by a third of a stop. Given that we were shooting in RAW, so the ISO is only metadata, and I could see from the false colours display that nothing was clipping, this is a very minor error indeed.
“The question we have to ask ourselves is: how many 83 percents are left? And the answer is: not many.”
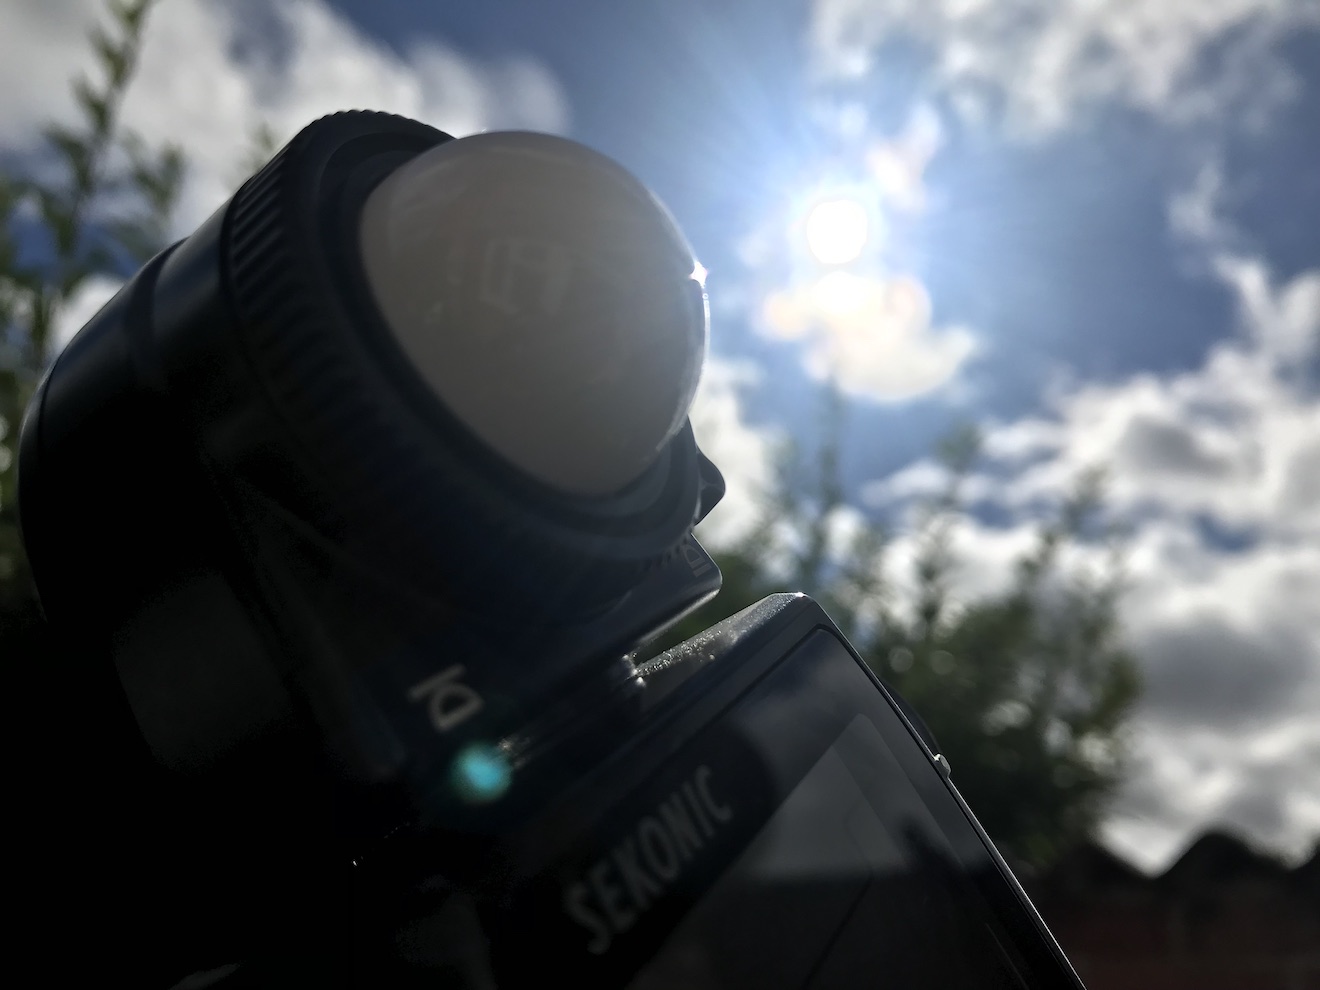
Letting the meter do the maths
One more thing. My Sekonic L-758D light meter assumes a 180° shutter (so I set it to 25fps when I’m actually shooting 24fps at 172.8°, as both work out to 1/50th of a second). Another way I could have worked the correct exposure out, if I’d clocked the 60Hz frequency of the TV at the time, is to have set the meter to 30fps (1/60th of a second at 180°) and then changed the ISO until it gave me the stop I wanted.
So far in this series we have seen how we can adjust exposure using aperture, which affects depth of field, ND filters, which can help us retain the depth of field we want, and shutter angle, which affects motion blur and flickering of certain light sources. In this final part we’ll look at ISO, perhaps the most misunderstood element of exposure, if indeed we can technically classify it as part of exposure at all!
What is ISO?
The acronym stands for International Organization for Standardization, the body which in 1974 combined the old ASA (American Standards Association) units of film speed with the German DIN standard. That’s why you’ll often hear the terms ISO and ASA used interchangeably.
Two different cameras filming the same scene with the same filters, aperture and shutter settings will not necessarily produce an image of equal brightness, because the ways that their electronics convert light into video signals are different. That is why we need ISO, which defines the relationship between the amount of light reaching the sensor (or film) and the brightness of the resulting image.
For example, a common ISO to shoot at today is 800. One way of defining ISO 800 is that it’s the setting required to correctly expose a key-light of 12 foot-candles with a lens set to T2.8 and a 180° shutter at 24fps (1/48th of a second).
If we double the ISO we double the effective sensitivity of the camera, or halve the amount of light it requires. So at ISO 1600 we would only need 6 foot-candles of light (all the other settings being the same), and at ISO 3200 we would need just 3 foot-candles. Conversely, at ISO 400 we would need about 25 foot-candles, or 50 at ISO 200.
A Flawed Analogy
Note that I said “effective” sensitivity. This is an important point. In the photochemical world, ISO indeed denotes the light sensitivity of the film stock. It is tempting to see digital ISO as representing the sensitivity of the sensor, and changing the ISO as analogous to loading a different film stock. But in reality the sensitivity of a digital sensor is fixed, and the ISO only determines the amount of gain applied to the sensor data before it is processed (which may happen in camera if you’re shooting linear or log, or in post if you’re shooting RAW).
So a better analogy is that altering the ISO is like altering how long the lab develops the exposed film negative for. This alters the film’s exposure index (EI), hence some digital cameras using the term EI in their menus instead of ISO or ASA.
We can take this analogy further. Film manufacturers specify a recommended development time, an arbitrary period designed to produce the optimal image. If you increase (push) or decrease (pull) the development time you will get a lighter or darker image respectively, but the quality of the image will be reduced in various ways. Similarly, digital camera manufacturers specify a native ISO, which is essentially the recommended amount of gain applied to the sensor data to produce what the manufacturer feels is the best image, and if you move away from that native ISO you’ll get a subjectively “lower quality” image.
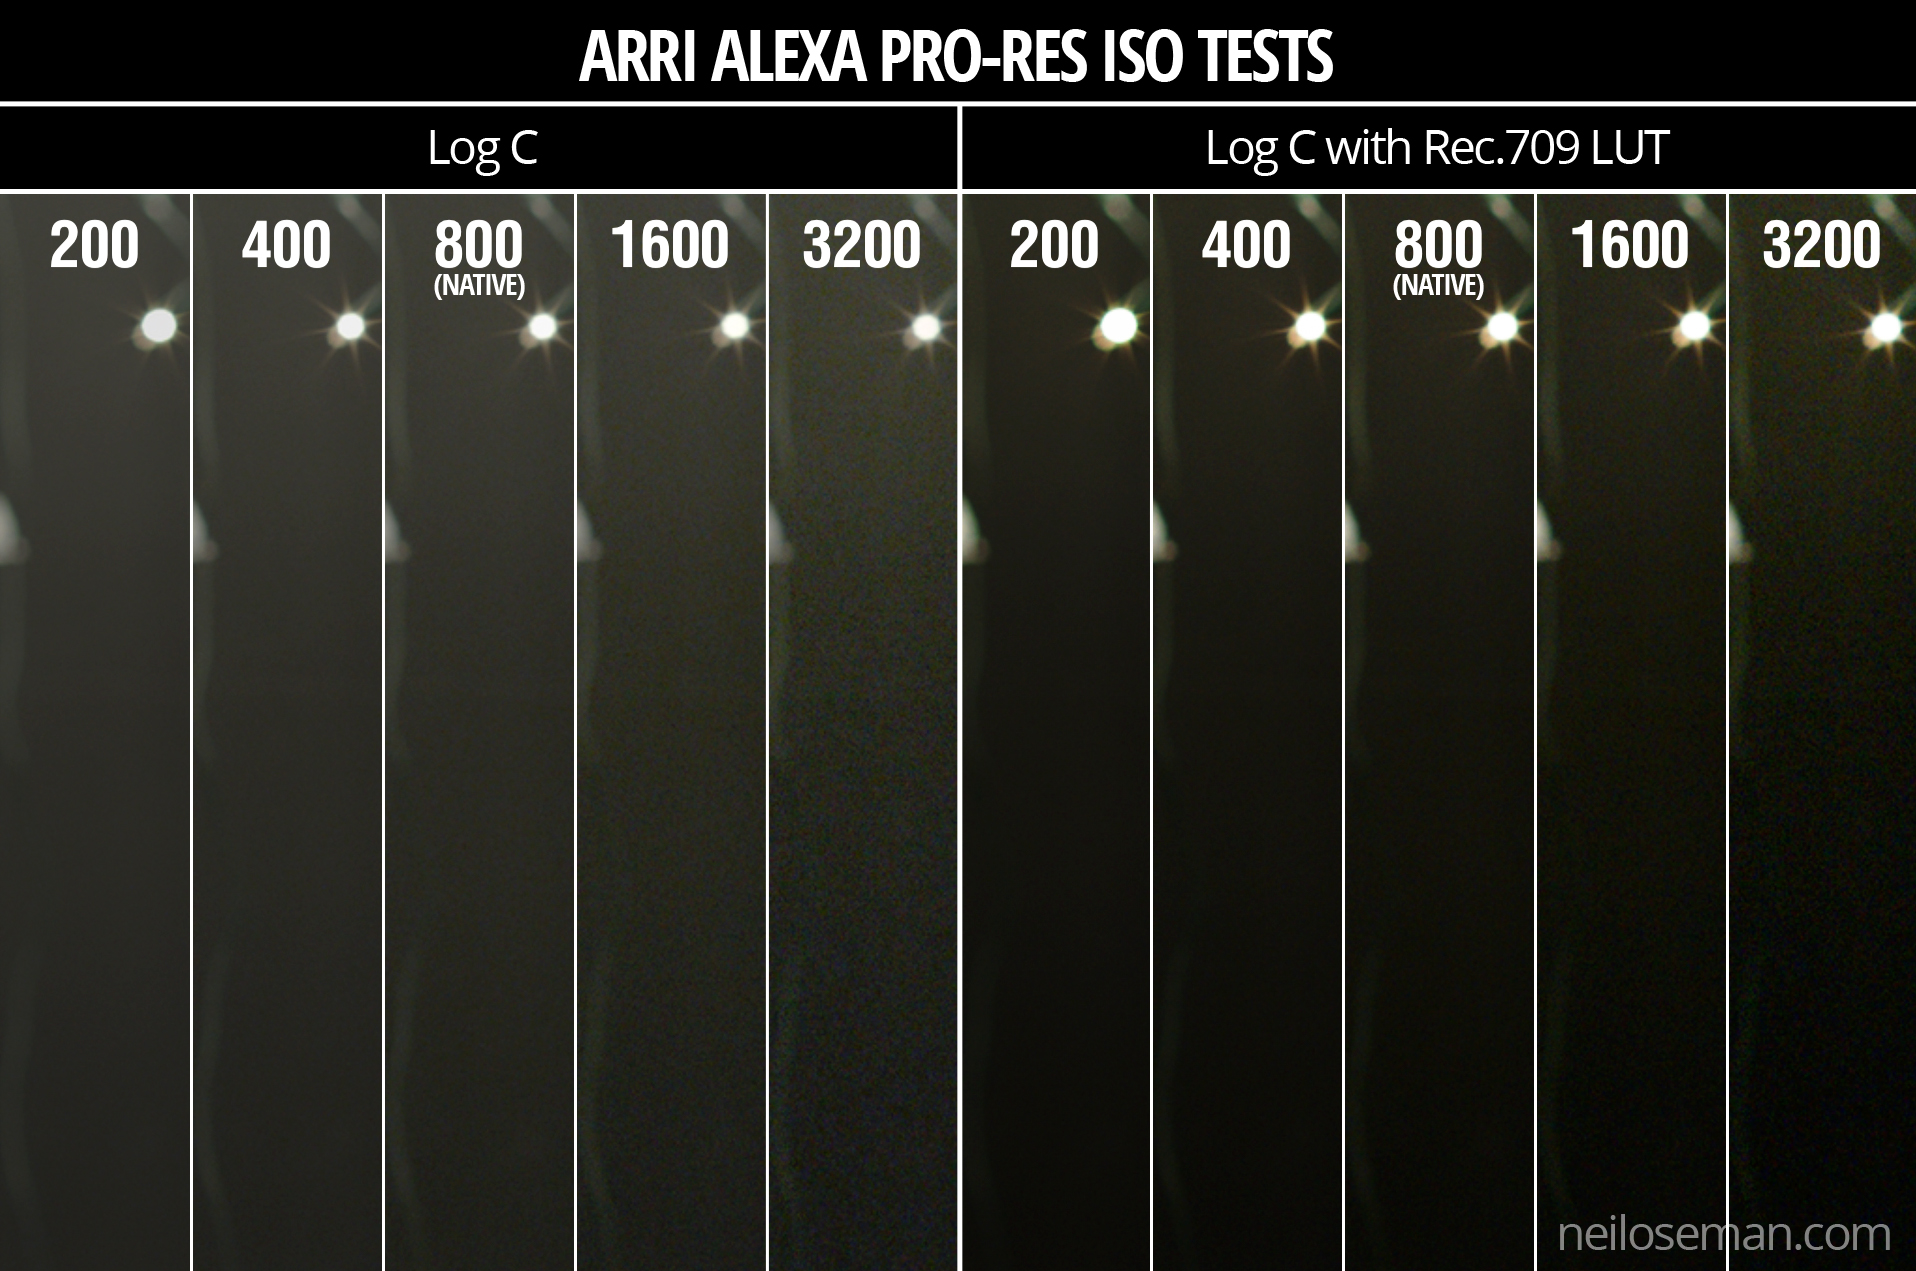
Compare the graininess/smoothness of the blacks in these images from my 2017 tests. Click to enlarge.
The most obvious side effect of increasing the ISO is more noticeable noise in the image. It’s exactly the same as turning up the volume on an amplifier; you hear more hiss because the noise floor is being boosted along with the signal itself.
I remember the days of Mini-DV cameras, which instead of ISO had gain; my Canon XL1 had gain settings of -3dB, +6dB and +12dB. It was the exact same thing, just with a different name. What the XL1 called 0dB of gain was what we call the native ISO today.
ISO and Dynamic range
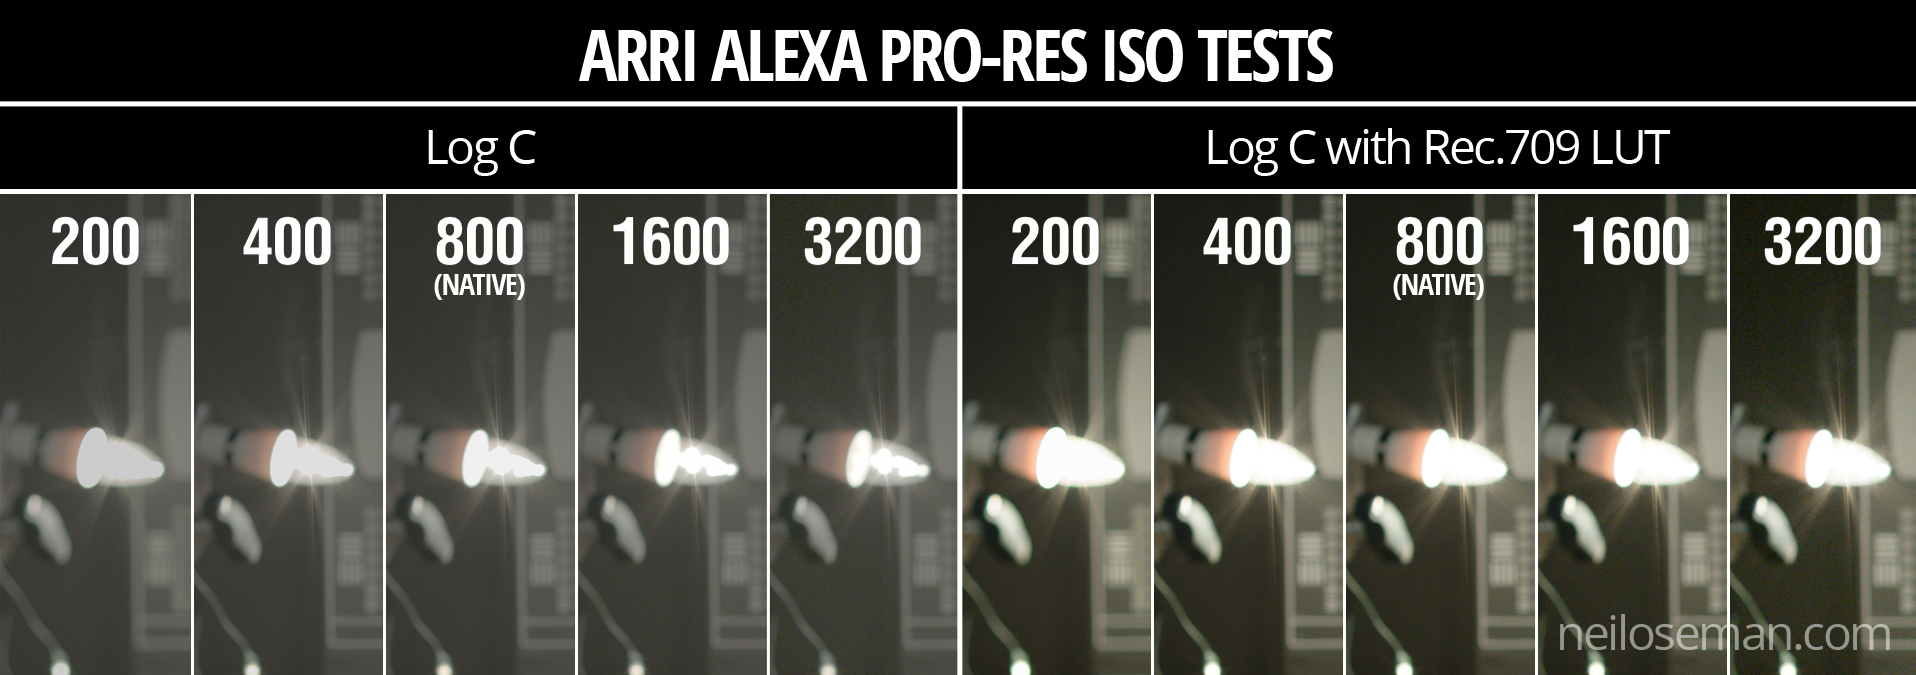
At this point we need to bring in the concept of dynamic range. Let’s take the Arri Alexa as an example. This camera has a dynamic range of 14 stops. At its native ISO of 800, those 14 stops of dynamic range are equally distributed above and below “correct” exposure (known as middle grey), so you can overexpose by up to seven stops, and underexpose by up to seven stops, without losing detail.
If you change the Alexa’s ISO, those limits of under- and overexposure still apply, but they’re shifted around middle grey. For example, at 400 ISO you have eight stops of detail below middle grey, but only six above it. This means that, assuming you adjust your iris, shutter or filters to compensate for the change in ISO, you can trade-off highlight detail for shadow detail, or vice versa.
Imagine underexposing a shot by one stop and bringing it back up in post. You increase the highlight detail, because you’re letting half the light through to the sensor, reducing the risk of clipped whites, but you also increase the noise when you bring it up in post. This is basically what you’re doing when you increase your ISO, except that if you’re recording in linear or log then the restoration of brightness and increase in gain happen within the camera, rather than in post with RAW.
Note the increased detail in the bulb at higher ISOs. Click to enlarge..
We can summarise all this as follows:
Doubling the ISO…
increases overall brightness by one stop, and
increases picture noise.
Then adjusting the exposure to compensate (e.g. closing the iris one stop)…
restores overall brightness to its original value,
gives you one more stop of detail in the highlights, and
gives you one less stop of detail in the shadows.
Alternatively, halving the ISO…
decreases overall brightness by one stop, and
decreases picture noise.
Then adjusting the exposure to compensate (e.g. opening the iris one stop)…
restores overall brightness to its original value,
gives you one less stop of detail in the highlights, and
gives you one more stop of detail in the shadows.
Conclusion
This brings me to the end of my exposure series. We’ve seen that choosing the “correct” exposure is a balancing act, taking into account not just the intended brightness of the image but also the desired depth of field, bokeh, lens flares, motion blur, flicker prevention, noise and dynamic range. I hope this series has helped you to make the best creative decisions on your next production.
In the first two parts of this series we saw how exposure can be controlled using the lens aperture – with side effects including changes to the depth of field – and neutral density (ND) filters. Today we will look at another means of exposure control: shutter angle.
The Physical Shutters of Film Cameras
As with aperture, an understanding of what’s going on under the hood is useful, and that begins with celluloid. Let’s imagine we’re shooting on film at 24fps, the most common frame rate. The film can’t move continuously through the gate (the opening behind the lens where the focused light strikes the film) or we would end up recording just a long vertical streak of light. The film must remain stationary long enough to expose an image, before being moved on by a distance of four perforations (the standard height of a 35mm film frame) so that the next frame can be exposed. Crucially, light must not hit the film while it is being moved, or vertical streaking will occur.
Joram van Hartingsveldt, CC BY-SA 3.0
This is where the shutter comes in. The shutter is a portion of a disc that spins in front of the gate. The standard shutter angle is 180°, meaning that the shutter is a semi-circle. We always describe shutter angles by the portion of the disc which is missing, so a 270° shutter (admitting 1.5x the light of a 180° shutter) is a quarter of a circle, and a 90° shutter (admitting half the light of a 180° shutter) is three-quarters.
The shutter spins continuously at the same speed as the frame rate – so at 24fps the shutter makes 24 revolutions per second. So with a 180° shutter, each 24th of a second is divided into two halves, i.e. 48ths of a second:
During one 48th of a second, the missing part of the shutter is over the gate, allowing the light to pass through and the stationary film to be exposed.
During the other 48th of a second, the shutter blocks the gate to prevent light hitting the film as it is advanced. The shutter has a mirrored surface so that light from the lens is reflected up the viewfinder, allowing the camera operator to see what they’re shooting.
Intervals vs. Angles
If you come from a stills or ENG background, you may be more used to talking about shutter intervals rather than angles. The two things are related as follows:
For example, 24 x (360 ÷ 180) = 48 so a film running at 24fps, shot with a 180° shutter, shows us only a 48th of a second’s worth of light on each frame. This has been the standard frame rate and shutter angle in cinema since the introduction of sound in the late 1920s. The amount of motion blur captured in a 48th of a second is the amount that we as an audience have been trained to expect from motion pictures all our lives.
A greater (larger shutter angle, longer shutter interval) or lesser (smaller shutter angle, shorter shutter interval) amount of motion blur looks unusual to us and thus can be used to creative effect. Saving Private Ryan features one of the best-known examples of a small shutter angle in its D-day landing sequence, where the lack of motion blur creates a crisp, hyper-real effect that draws you into the horror of the battle. The effect has been endlessly copied since then, to the point that it now feels almost mandatory to shoot action scenes with a small shutter angle.
Large shutter angles are less common, but the extra motion blur can imply a drugged, fatigued or dream-like state.
In today’s digital environment, only the Arri Alexa Studio has a physical shutter. In other cameras, the sensor’s photo-sites are allowed to charge with light over a certain period of time – still referred to as the shutter interval, even though no actual shutter is involved. The same principles apply and the same 180° angle of the virtual shutter is standard. The camera will allow you to select a shutter angle/interval from a number of options, and on some models like the Canon C300 there is a menu setting to switch between displaying the shutter setting as an angle or an interval.
When to Change the Shutter Angle
Sometimes it is necessary to change the shutter angle to avoid flickering. Some luminous devices, such as TV screens and monitors, or HMI lighting not set to flicker-free mode, will appear to strobe, pulse or roll on camera. This is due to them turning on and off multiple times per second, in sync with the alternating current of the mains power supply, but not necessarily in sync with the shutter. For example, if you shoot a domestic fluorescent lamp in the UK, where the mains AC cycles at 50Hz, your 1/48th (180° at 24fps) shutter will be out of sync and the lamp will appear to throb or flicker on camera. The solution is to set the shutter to 172.8° (1/50th), which is indeed what most DPs do when shooting features in the UK. Round multiples of the AC frequency like 1/100th will also work.
You may notice that I have barely mentioned exposure so far in this article. This is because, unlike stills photographers, DPs rarely use the shutter as a means of adjusting exposure. An exception is that we may increase the shutter angle when the daylight is fading, to grab an extra shot. By doubling the shutter angle from 172.8° to 345.6° we double the light admitted, i.e. we gain one stop. As long as there isn’t any fast movement, the extra motion blur is likely to go unnoticed by the audience.
One of the hallmarks of amateur cinematography is that sunny scenes have no motion blur, due to the operator (or the camera’s auto mode) decreasing the shutter interval to avoid over-exposure. It is preferable to use ND filters to cut light on bright days, as covered in part two of this series.
For the best results, the 180° (or thereabouts) shutter angle should be retained when shooting slow motion as well. If your camera displays intervals rather than angles, ideally your interval denominator should be double the frame rate. So if you want to shoot at 50fps, set the shutter interval to 1/100th. For 100fps, set the shutter to 1/200th, and so on.
If you do need to change the shutter angle for creative or technical reasons, you will usually want to compensate with the aperture. If you halve the time the shutter is open for, you must double the area of the aperture to maintain the same exposure, and vice versa. For example, if your iris was set to T4 and you change the shutter from 180° to 90° you will need to stop up to T2.8. (Refer back to my article on aperture if you need to refresh your memory about T-stops.)
In the final part of this series we’ll get to grips with ISO.
Learn more about exposure in my online course, Cinematic Lighting. Until this Thursday (19/11/20) you can get it for the special price of £15.99 by using the voucher code INSTA90.
This is the first in a series of posts where I will look in detail at the four means of controlling the brightness of a digital video image: aperture, neutral density (ND) filters, shutter angle and ISO. It is not uncommon for newer cinematographers to have only a partial understanding of these topics, enough to get by in most situations; that was certainly the case with me for many years. The aim of this series is to give you an understanding of the underlying mechanics which will enable you to make more informed creative decisions.
You can change any one of the four factors, or any combination of them, to reach your desired level of exposure. However, most of them will also affect the image in other ways; for example, aperture affects depth of field. One of the key responsibilities of the director of photography is to use each of the four factors not just to create the ideal exposure, but to make appropriate use of these “side effects” as well.
f-stops and t-stops
The most common way of altering exposure is to adjust the aperture, a.k.a. the iris, sometimes described as changing “the stop”. Just like the pupil in our eyes, the aperture of a photographic lens is a (roughly) circular opening which can be expanded or contracted to permit more or less light through to the sensor.
You will have seen a series of numbers like this printed on the sides of lenses:
1 1.4 2 2.8 4 5.6 8 11 16 22 32
These are ratios – ratios of the lens’ focal length to its iris diameter. So a 50mm lens with a 25mm diameter iris is at f/2. Other lengths of lens would have different iris diameters at f/2 (e.g. 10mm diameter for a 20mm lens) but they would all produce an image of the same brightness. That’s why we use f-stops to talk about iris rather than diameters.
But why not label a lens 1, 2, 3, 4…? Why 1, 1.2, 2, 2.8…? These magic numbers are f-stops. A lens set to f/1.4 will let in twice as much light as (or “one stop more than”) a lens set to f/2, which in turn will let in twice as much as one set to f/2.8, and so on. Conversely, a lens set to f/2.8 will let in half as much light as (or “one stop less than”) a lens set to f/2, and so on. (Note that a number between any of these f-stops, e.g. f/1.8, is properly called an f-number, but not an f-stop.) These doublings or halvings – technically known as a base-2 logarithmic scale – are a fundamental concept in exposure, and mimic our eyes’ response to light.
If you think back to high-school maths and the πr² squared formula for calculating the area of a circle from its radius, the reason for the seemingly random series of numbers will start to become clear. Letting in twice as much light requires twice as much area for those light rays to fall on, and remember that the f-number is the ratio of the focal length to the iris diameter, so you can see how square roots are going to get involved and why f-stops aren’t just plain old round numbers.
If you’re shooting with a cine lens, rather than a stills lens, you’ll see the same series of numbers on the barrel, but here they are T-stops rather than f-stops. T-stops are f-stops adjusted to compensate for the light transmission efficiency. Two different lenses set to, say, f/2 will not necessarily produce equally bright images, because some percentage of light travelling through the elements will always be lost, and that percentage will vary depending on the quality of the glass and the number of elements. A lens with 100% light transmission would have the same f-number and T-number, but in practice the T-number will always be a little bigger than the f-number. For example, Cooke’s 15-40mm zoom is rated at a maximum aperture of T2 or f/1.84.
Fast and slow lenses
When buying or renting a lens, one of the first things you will want to know is its maximum aperture. Lenses are often described as being fast (larger maximum aperture, denoted by a smaller f- or T-number like T1.4) or slow (smaller maximum aperture, denoted by a bigger f- or T-number like T4). These terms come from the fact that the shutter speed would need to be faster or slower to capture the same amount of light… but more on that later in the series.
Faster lenses are generally more expensive, but that expense may well be outweighed by the savings made on lighting equipment. Let’s take a simple example, and imagine an interview lit by a 4-bank Kino Flo and exposed at T2.8. If our lens can open one stop wider (known as stopping up) to T2 then we double the amount of light reaching the sensor. We can therefore halve the level of light – by turning off two of the Kino Flo’s tubes or by renting a cheaper 2-bank unit in the first place. If we can stop up further, to T1.4, then we only need one Kino tube to achieve the same exposure.
Side effects
One of the first things that budding cinematographers learn is that wider apertures make for a smaller depth of field, i.e. the range of distances within which a subject will be in focus is smaller. In simple terms, the background of the image is blurrier when the depth of field is shallower.
It is often tempting to go for the shallowest possible depth of field, because it feels more cinematic and helps conceal shortcomings in the production design, but that is not the right look for every story. A DP will often choose a stop to shoot at based on the depth of field they desire. That choice of stop may affect the entire lighting budget; if you want to shoot at a very slow T14 like Douglas Slocombe did for the Indiana Jones trilogy, you’re going to need several trucks full of lights!
There is another side effect of adjusting the aperture which is less obvious. Lenses are manufactured to perform best in the middle of their iris range. If you open a lens up to its maximum aperture or close it down to its minimum, the image will soften a little. Therefore another advantage of faster lenses is the ability to get further away from their maximum aperture (and poorest image quality) with the same amount of light.
Finally it is worth noting that the appearance of bokeh (out of focus areas) and lens flares also changes with aperture. The Cooke S4 range, for example, renders out-of-focus highlights as circles when wide open, but as octagons when stopped down. With all lenses, the star pattern seen around bright light sources will be stronger when the aperture is smaller. You should shoot tests – like these I conducted in 2017 – if these image artefacts are a critical part of your film’s look.
Next time we’ll look at how we can use ND filters to control exposure without compromising our choice of stop.
Learn how to use exposure practically with my Cinematic Lighting online couse. Enter voucher code INSTA90 for an amazing 90% off.
The high dynamic range of the ARRI Alexa Mini allowed me to retain all the sky detail in this shot from “Above the Clouds”.
Recently I’ve been pondering which camera to shoot an upcoming project on, so I consulted the ASC’s comparison chart. Amongst the many specs compared is dynamic range, and I noticed that the ARRI Alexa’s was given as 14+ stops, while the Blackmagic URSA’s is 15. Having used both cameras a fair bit, I can tell you that there’s no way in Hell that the Ursa has a higher dynamic range than the Alexa. So what’s going on here?
What is dynamic range?
To put it simply, dynamic range is the level of contrast that an imaging system can handle. To quote Alan Roberts, who we’ll come back to later:
This is normally calculated as the ratio of the exposure which just causes white clipping to the exposure level below which no details can be seen.
A photosite on a digital camera’s sensor outputs a voltage proportional to the amount of light hitting it, but at some point the voltage reaches a maximum, and no matter how much more light you add, it won’t change. At the other end of the scale, a photosite may receive so little light that it outputs no voltage, or at least nothing that’s discernible from the inherent electronic noise in the system. These upper and lower limits of brightness may be narrowed by image processing within the camera, with RAW recording usually retaining the full dynamic range, while linear Rec. 709 severely curtails it.
In photography and cinematography, we measure dynamic range in stops – doublings and halvings of light which I explain fully in this article. One stop is a ratio of 2:1, five stops are 32:1, thirteen stops are almost 10,000:1
It’s worth pausing here to point out the difference between dynamic range and latitude, a term which is sometimes regarded as synonymous, but it’s not. The latitude is a measure of how much the camera can be over- or under-exposed without losing any detail, and is dependent on both the dynamic range of the camera and the dynamic range of the scene. (A low-contrast scene will allow more latitude for incorrect exposure than a high-contrast scene.)
Problems of Measurement
Before digital cinema cameras were developed, video had a dynamic range of about seven stops. You could measure this relatively easily by shooting a greyscale chart and observing the waveform of the recorded image to see where the highlights levelled off and the shadows disappeared into the noise floor. With today’s dynamic ranges into double digits, simple charts are no longer practical, because you can’t manufacture white enough paper or black enough ink.
For his excellent video on dynamic range, Filmmaker IQ’s John Hess built a device fitted with a row of 1W LEDs, using layers of neutral density gel to make each one a stop darker than its neighbour. For the purposes of his demonstration, this works fine, but as Phil Rhodes points out on RedShark News, you start running into the issue of the dynamic range of the lens.
It may seem strange to think that a lens has dynamic range, and in the past when I’ve heard other DPs talk about certain glass being more or less contrasty, I admit that I haven’t thought much about what that means. What it means is flare, and not the good anamorphic streak kind, but the general veiling whereby a strong light shining into the lens will raise the overall brightness of the image as it bounces around the different elements. This lifts the shadows, producing a certain amount of milkiness. Even with high contrast lenses, ones which are less prone to veiling, the brightest light on your test device will cause some glare over the darkest one, when measuring the kind of dynamic range today’s cameras enjoy.
Manufacturer Measurements
Going back to my original query about the Alexa versus the URSA, let’s see exactly what the manufacturers say. ARRI specifically states that its sensor’s dynamic range is over 14 stops “as measured with the ARRI Dynamic Range Test Chart”. So what is this chart and how does it work? The official sales blurb runs thusly:
The ARRI DRTC-1 is a special test chart and analysis software for measurement of dynamic range and sensitivity of digital cameras. Through a unique stray light reduction concept this system is able to accurately measure up to 15.5 stops of dynamic range.
The “stray light reduction” is presumably to reduce the veiling mentioned earlier and provide more accurate results. This could be as simple as covering or turning off the brighter lights when measuring the dimmer ones.
I found a bit more information about the test chart in a 2011 camera shoot-out video, from that momentous time when digital was supplanting film as the cinematic acquisition format of choice. Rather than John Hess’s ND gel technique, the DRTC-1 opts for something else to regulate its light output, as ARRI’s Michael Bravin explains in the video:
There’s a piece of motion picture film behind it that’s checked with a densitometer, and what you do is you set the exposure for your camera, and where you lose detail in the vertical and horizontal lines is your clipping point, and where you lose detail because of noise in the shadow areas is your lowest exposure… and in between you end up finding the number of stops of dynamic range.
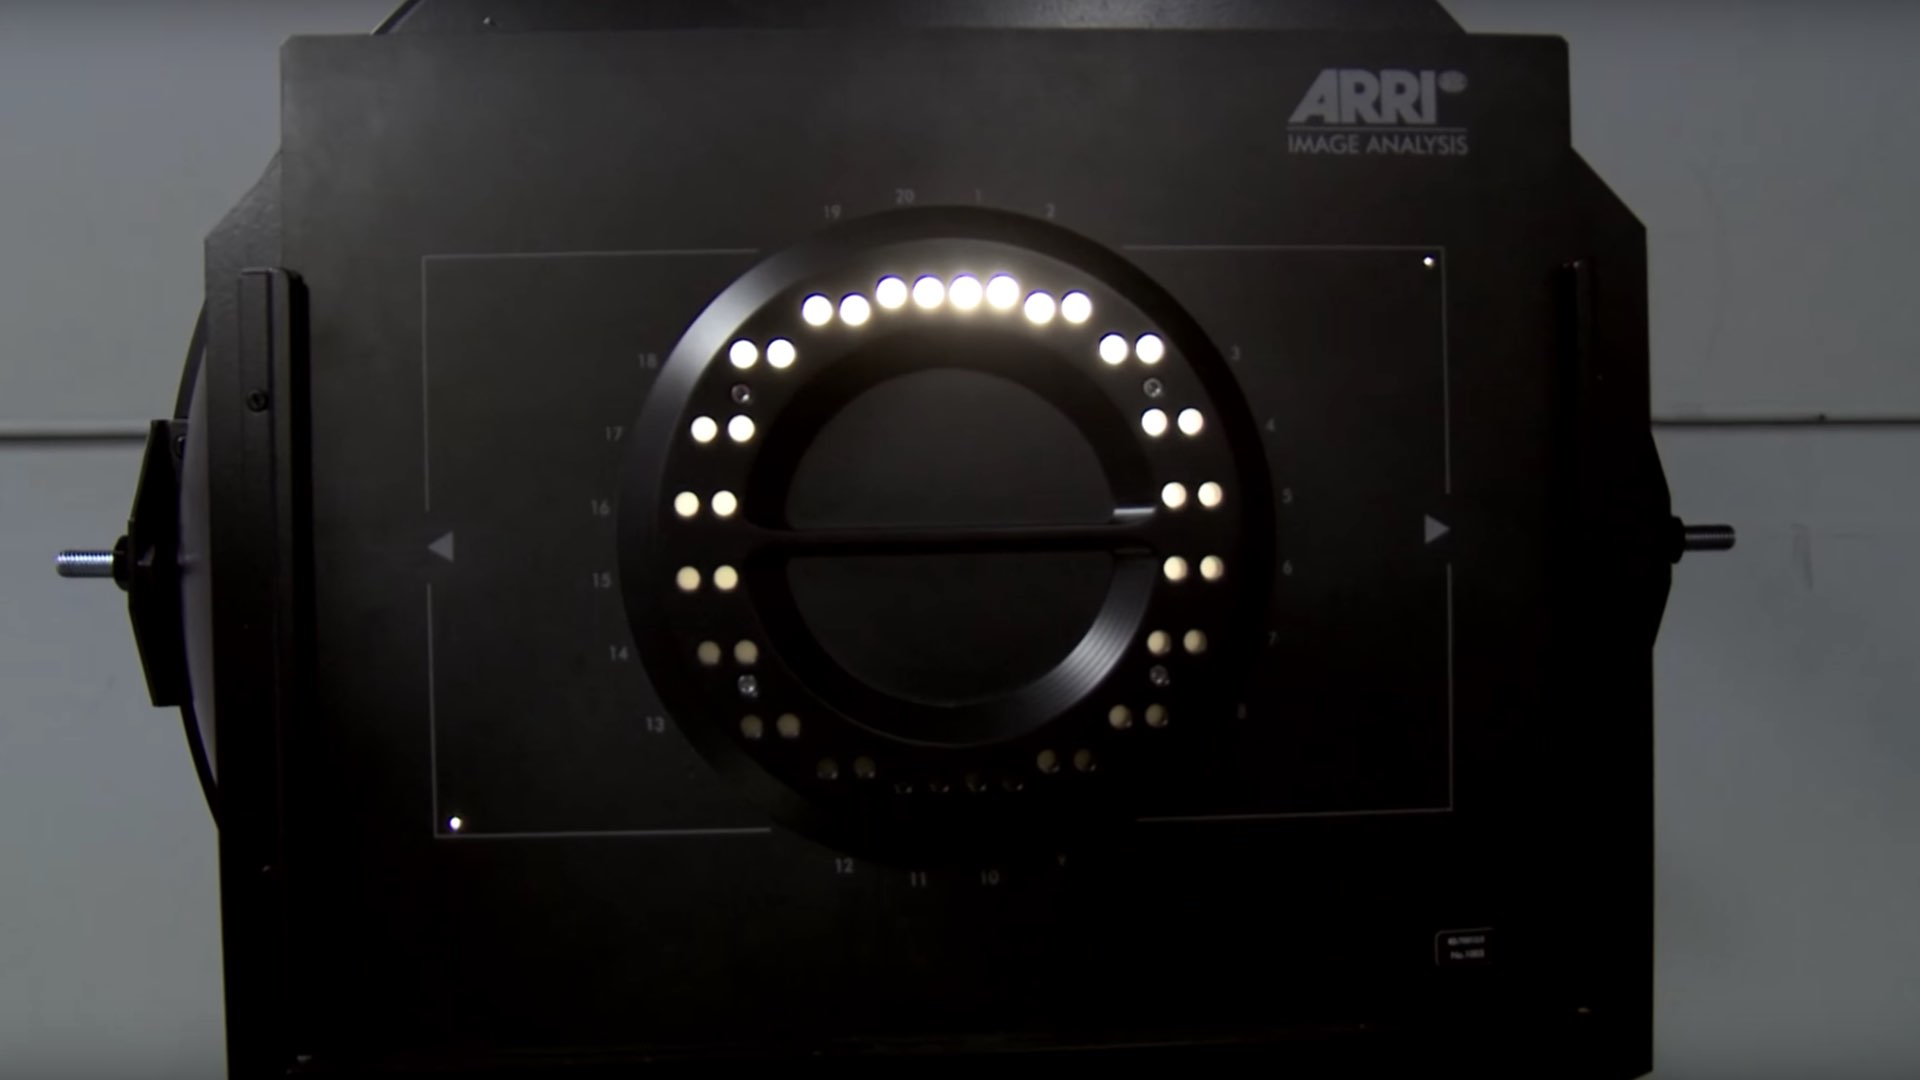
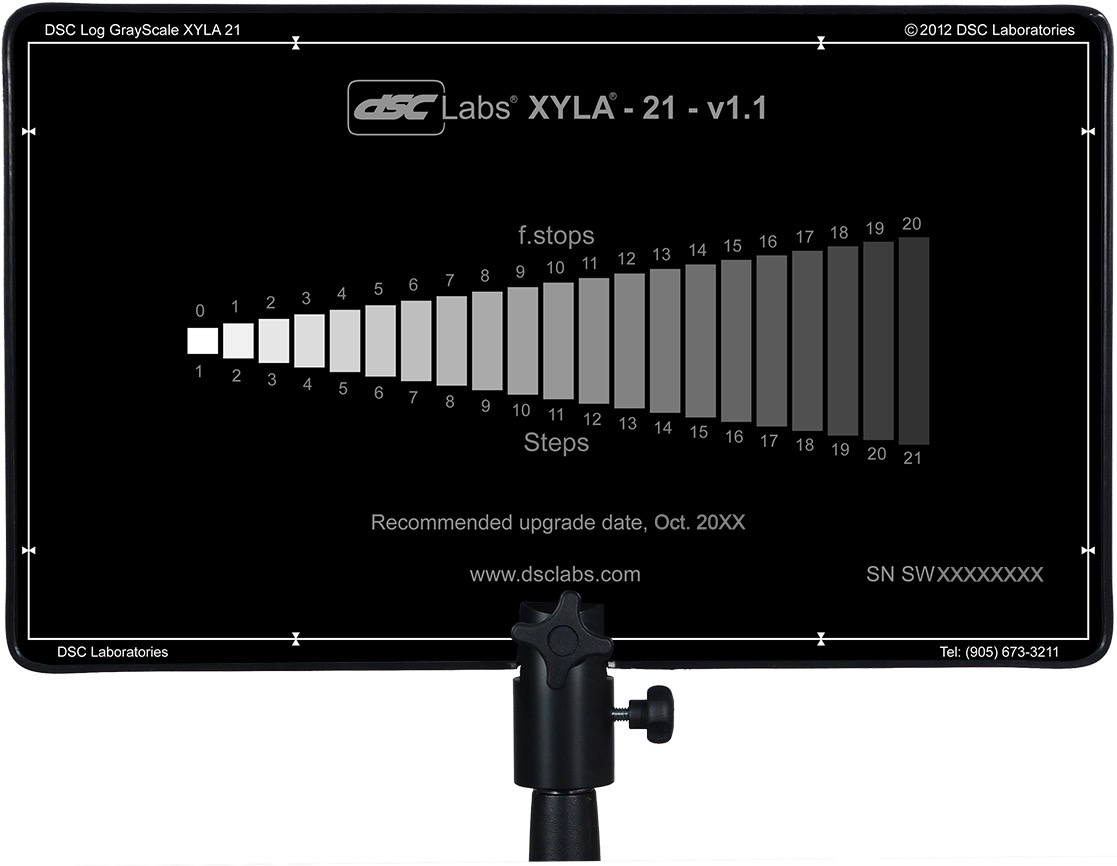
Blackmagic Design do not state how they measure the dynamic range of their cameras, but it may be a DSC Labs Xlya. This illuminated chart boasts a shutter system which “allows users to isolate and evaluate individual steps”, plus a “stepped xylophone shape” to minimise flare problems.
I used to do a lot of consulting with DSC Labs, who make camera test charts, so I own a 20-stop dynamic range chart (DSC Labs Xyla). This is what most manufacturers use to test dynamic range (although not ARRI, because our engineers don’t feel it’s precise enough) and I see what companies claim as usable stops. You can see that they are just barely above the noise floor.
Conclusions
Obviously these ARRI folks I keep quoting may be biased. I wanted to find an independent test that measures both Blackmagics and Alexas with the same conditions and methodology, but I couldn’t find one. There is plenty of anecdotal evidence that Alexas have a bigger dynamic range, in fact that’s widely accepted as fact, but quantifying the difference is harder. The most solid thing I could find is this, from a 2017 article about the Blackmagic Ursa Mini 4.6K (first generation):
The camera was measured at just over 14 stops of dynamic range in RAW 4:1 [and 13 stops in ProRes]. This is a good result, especially considering the price of the camera. To put this into perspective Alan measured the Canon C300 mkII at 15 stops of dynamic range. Both the URSA Mini 4.6 and C300 mkII are bettered by the ARRI Alexa and Amira, but then that comes as no surprise given their reputation and price.
The Alan mentioned is Alan Roberts, something of a legend when it comes to testing cameras. It is interesting to note that he is one of the key players behind the TLCI (Television Lighting Consistency Index), a mooted replacement for CRI (Colour Rendering Index). It’s interesting because this whole dynamic range business is starting to remind me of my investigation into CRI, and is leading me to a similar conclusion, that the numbers which the manufacturers give you are all but useless in real-world cinematography.
Whereas CRI at least has a standardised test, there’s no such thing for dynamic range. Therefore, until there is more transparency from manufacturers about how they measure it, I’d recommend ignoring their published values. As always when choosing a camera, shoot your own tests if at all possible. Even the most reliable numbers can’t tell you whether you’re going to like a camera’s look or not, or whether it’s right for the story you want to tell.
When tests aren’t possible, and I know that’s often the case in low-budget land, at least try to find an independent comparison. I’ll leave you with this video from the Slanted Lens, which compares the URSA Mini Pro G2 with the ARRI Amira (which uses the same Alev III sensor as the Alexa). They don’t measure the dynamic range, but you can at least see the images side by side, and in the end it’s the images that matter, not the numbers.
This is the latest in my series about analogue photography. Previously, I’ve covered the science behind film capture, and how to develop your own black-and-white film. Now we’ll proceed to the next step: taking your negative and producing a print from it. Along the way we’ll discover the analogue origins of Photoshop’s dodge and burn tools.
Contact printing
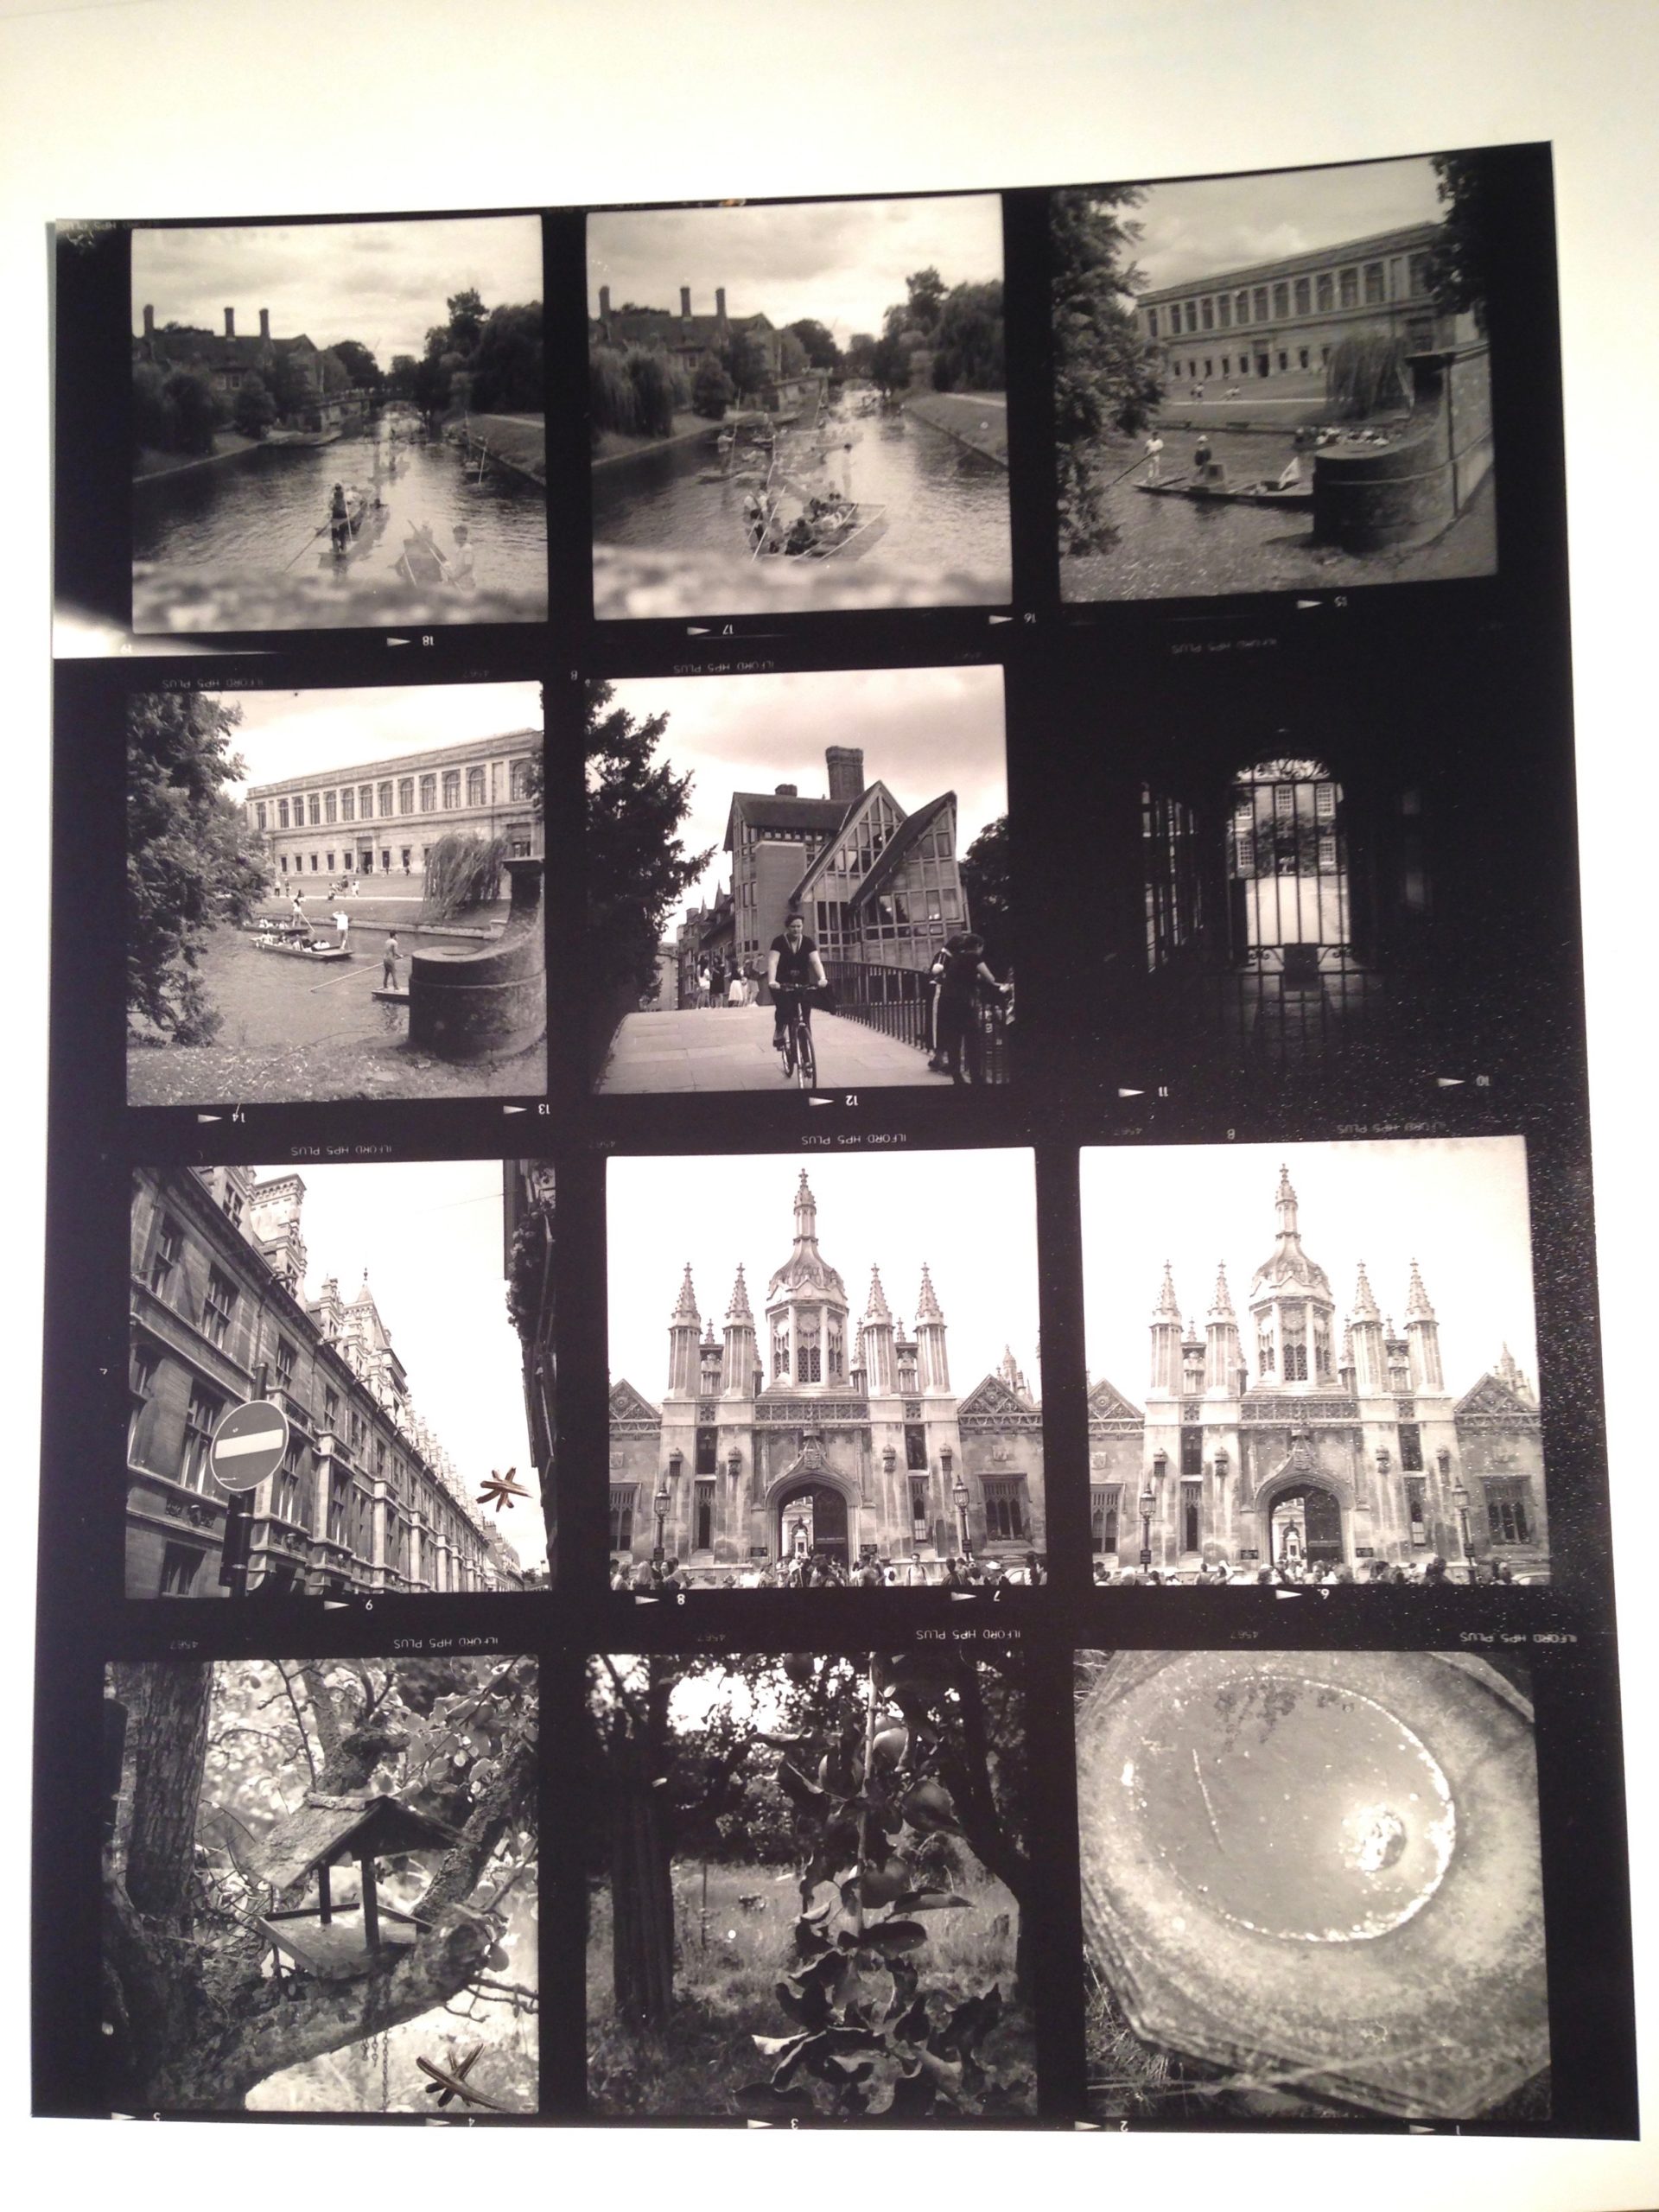
35mm contact sheet
To briefly summarise my earlier posts, we’ve seen that photographic emulsion – with the exception of colour slide film – turns black when exposed to light, and remains transparent when not. This is how we end up with a negative, in which dark areas correspond to the highlights in the scene, and light areas correspond with the shadows.
The simplest way to make a positive print from a negative is contact-printing, so called because the negative is placed in direct contact with the photographic printing paper. This is typically done in a spring-loaded contact printing frame, the top of which is made of glass. You shine light through the glass, usually from an enlarger – see below – for a measured period of time, determined by trial and error. Where the negative is dark (highlights) the light can’t get through, and the photographic emulsion on the paper remains transparent, allowing the white paper base to show through. Where the negative is transparent (shadows) the light passes through, and the emulsion – once developed and fixed in the same way as the original film – turns black. Thus a positive image is produced.
Normally you would contact-print multiple strips of negative at the same time, perhaps an entire roll of film’s worth, if your paper is large enough to fit them all. Then you can examine them through a loupe to decide which ones are worth enlarging. You have probably seen contact sheets, complete with circled images, stars and arrows indicating which frames the photographer or picture editor likes, where they might crop it, and which areas need doctoring. In fact, contact sheets are so aesthetically pleasing that it’s not uncommon these days for graphic designers to create fake digital ones.
The correct exposure time for a contact print can be found by exposing the whole sheet for, say, ten seconds, then covering a third of it with a piece of card, exposing it for another ten seconds, then covering that same third plus another third and exposing it for ten seconds more. Once developed, you can decide which exposure you like best, or try another set of timings.
120 contact sheet
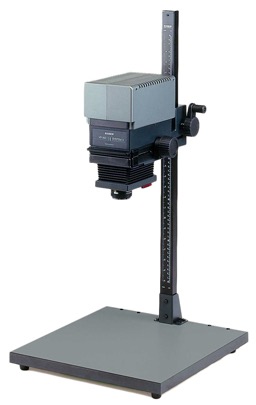
Making an enlargement
Contact prints are all well and good, but they’re always the same size as the camera negative, which usually isn’t big enough for a finished product, especially with 35mm. This is where an enlarger comes in.
An enlarger is essentially a projector mounted on a stand. You place the negative of your chosen image into a drawer called the negative carrier. Above this is a bulb, and below it is a lens. When the bulb is turned on, light shines through the negative, and the lens focuses the image (upside-down of course) onto the paper below. By adjusting the height of the enlarger’s stand, you can alter the size of the projected image.
Just like a camera lens, an enlarger’s lens has adjustable focus and aperture. You can scrutinise the projected image using a loupe; if you can see the grain of the film, you know that the image is sharply focused.
The aperture is marked in f-stops as you would expect, and just like when shooting, you can trade off the iris size against the exposure time. For example, a print exposed for 30 seconds at f/8 will have the same brightness as one exposed for 15 seconds at f/5.6. (Opening from f/8 to f/5.6 doubles the light, or increases exposure by one stop, while halving the time cuts the light back to its original value.)
Dodging and burning
As with contact-printing, the optimum exposure for an enlargement can be found by test-printing strips for different lengths of time. This brings us to dodging and burning, which are respectively methods of decreasing or increasing the exposure time of specific parts of the image.
Remember that the printing paper starts off bright white, and turns black with exposure, so to brighten part of the image you need to reduce its exposure. This can be achieved by placing anything opaque between the projector lens and the paper for part of the exposure time. Typically a circle of cardboard on a piece of wire is used; this is known as a dodger. That’s the “lollipop” you see in the Photoshop icon. It’s important to keep the dodger moving during the exposure, otherwise you’ll end up with a sharply-defined bright area (not to mention a visible line where the wire handle was) rather than something subtle.
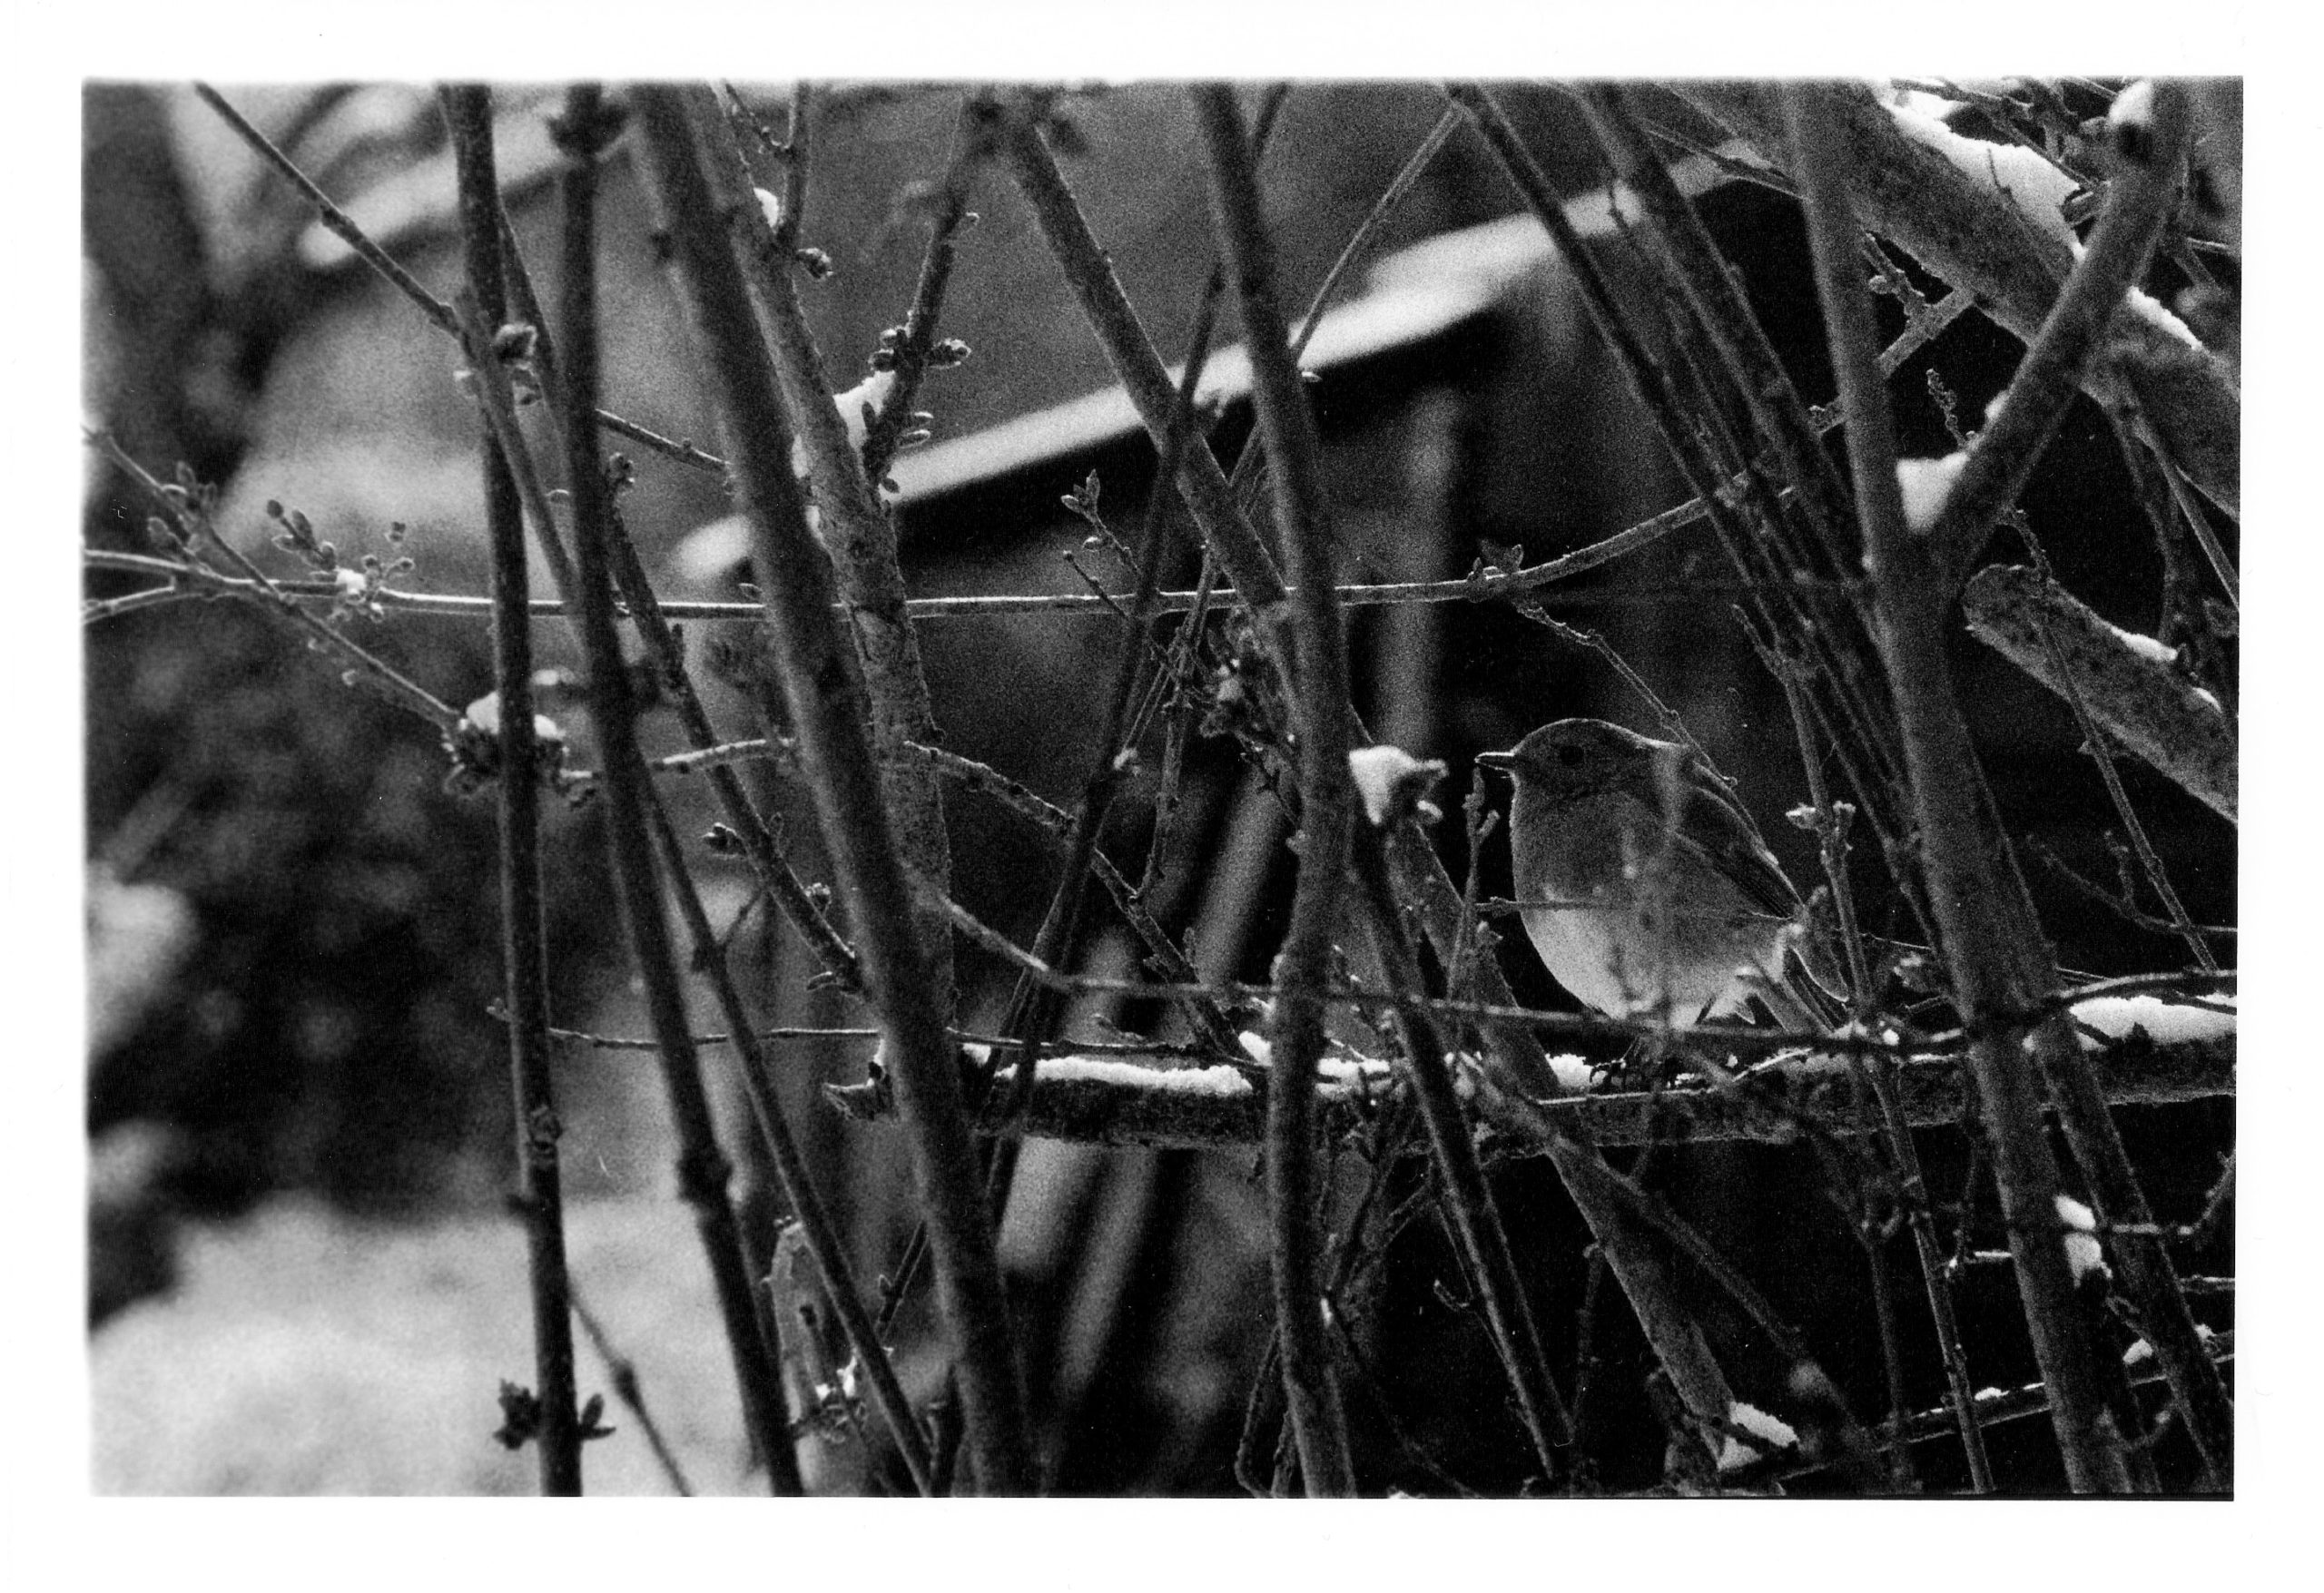
I dodged the robin in this image, to help him stand out.
Let me just say that dodging is a joyful thing to do. It’s such a primitive-looking tool, but you feel like a child with a magic wand when you’re using it, and it can improve an image no end. It’s common practice today for digital colourists to power-window a face and increase its luminance to draw the eye to it; photographers have been doing this for decades and decades.
Burning is of couse the opposite of dodging, i.e. increasing the exposure time of part of the picture to make it darker. One common application is to bring back detail in a bright sky. To do this you would first of all expose the entire image in such a way that the land will look good. Then, before developing, you would use a piece of card to cover the land, and expose the sky for maybe five or ten seconds more. Again, you would keep the card in constant motion to blend the edges of the effect.
To burn a smaller area, you would cut a hole in a piece of card, or simply form your hands into a rough hole, as depicted in the Photoshop icon.
Requirements of a darkroom
The crucial thing which I haven’t yet mentioned is that all of the above needs to take place in near-darkness. Black-and-white photographic paper is less sensitive to the red end of the spectrum, so a dim red lamp known as a safe-light can be used to see what you’re doing. Anything brighter – even your phone’s screen – will fog your photographic paper as soon as you take it out of its lightproof box.
Once your print is exposed, you need to agitate it in a tray of diluted developer for a couple of minutes, then dip it in a tray of water, then place it in a tray of diluted fixer. Only then can you turn on the main lights, but you must still fix the image for five minutes, then leave it in running water for ten minutes before drying it. (This all assumes you’re using resin-coated paper.)
Because you need an enlarger, which is fairly bulky, and space for the trays of chemicals, and running water, all in a room that is one hundred per cent lightproof, printing is a difficult thing to do at home. Fortunately there are a number of darkrooms available for hire around the country, so why not search for a local one and give analogue printing a go?
With many of us looking for new hobbies to see us through the zombie apocalypse Covid-19 lockdown, analogue photography may be the perfect one for an out-of-work DP. While few of us may get to experience the magic and discipline of shooting motion picture film, stills film is accessible to all. With a range of stocks on the market, bargain second-hand cameras on eBay, seemingly no end of vintage glass, and even home starter kits for processing your own images, there’s nothing to stop you giving it a go.
Since taking them up again In 2018, I’ve found that 35mm and 120 photography have had a positive impact on my digital cinematography. Here are five ways in which I think celluloid photography can help you too sharpen your filmmaking skills.
1. Thinking before you click
When you only have 36 shots on your roll and that roll cost you money, you suddenly have a different attitude to clicking the shutter. Is this image worthy of a place amongst those 36? If you’re shooting medium or large-format then the effect is multiplied. In fact, given that we all carry phone cameras with us everywhere we go, there has to be a pretty compelling reason to lug an SLR or view camera around. That’s bound to raise your game, making you think longer and harder about composition and content, to make every frame of celluloid a minor work of art.
2. Judging exposure
I know a gaffer who can step outside and tell you what f-stop the light is, using only his naked eye. This is largely because he is a keen analogue photographer. You can expose film by relying on your camera’s built-in TTL (through the lens) meter, but since you can’t see the results until the film is processed, analogue photographers tend to use other methods as well, or instead, to ensure a well-exposed negative. Rules like “Sunny Sixteen” (on a sunny day, set the aperture to f/16 and the shutter speed reciprocal to match the ISO, e.g. 1/200th of a second at ISO 200) and the use of handheld incident meters make you more aware of the light levels around you. A DP with this experience can get their lighting right more quickly.
3. Pre-visualising results
We digital DPs can fall into the habit of not looking at things with our eyes, always going straight to the viewfinder or the monitor to judge how things look. Since the optical viewfinder of an analogue camera tells you little more than the framing, you tend to spend less time looking through the camera and more using your eye and your mind to visualise how the image will look. This is especially true when it comes to white balance, exposure and the distribution of tones across a finished print, none of which are revealed by an analogue viewfinder. Exercising your mind like this gives you better intuition and increases your ability to plan a shoot, through storyboarding, for example.
4. Grading
If you take your analogue ethic through to post production by processing and printing your own photographs, there is even more to learn. Although detailed manipulation of motion pictures in post is relatively new, people have been doctoring still photos pretty much since the birth of the medium in the mid-19th century. Discovering the low-tech origins of Photoshop’s dodge and burn tools to adjust highlights and shadows is a pure joy, like waving a magic wand over your prints. More importantly, although the printing process is quick, it’s not instantaneous like Resolve or Baselight, so you do need to look carefully at your print, visualise the changes you’d like to make, and then execute them. As a DP, this makes you more critical of your own work and as a colourist, it enables you to work more efficiently by quickly identifying how a shot can be improved.
5. Understanding
Finally, working with the medium which digital was designed to imitate gives you a better understanding of that imitation. It was only when I learnt about push- and pull-processing – varying the development time of a film to alter the brightness of the final image – that my understanding of digital ISO really clicked. Indeed, some argue that electronic cameras don’t really have ISO, that it’s just a simulation to help users from an analogue background to understand what’s going on. If all you’ve ever used is the simulation (digital), then you’re unlikely to grasp the concepts in the same way that you would if you’ve tried the original (analogue).


 A few weeks ago when I was on the banks of the River Cam setting up for a scene in Harvey Greenfield is Running Late, my 1st AC Hamish Nichols asked which ND filter I wanted in the matte box. It was 5:30am; the sun had barely risen and certainly wasn’t high enough yet to reach me and my light meter over the trees and buildings on the horizon. But I knew that it would be hitting us by the time we turned over, and that the weather forecast was for a completely cloudless day, indeed the hottest day of the year at that time. So I was able to predict that we’d need the 2.1 ND.