Beautiful/Realistic/Cheap: The Lighting Triangle

We’re all familiar with the “good/fast/cheap” triangle. You can pick any two, but never all three. When it comes to lighting films, I would posit that there is a slightly different triangle of truth labelled “beautiful/realistic/cheap”. When you’re working to a tight budget, a DP often has to choose between beautiful or realistic lighting, where a better-funded cinematographer can have both.

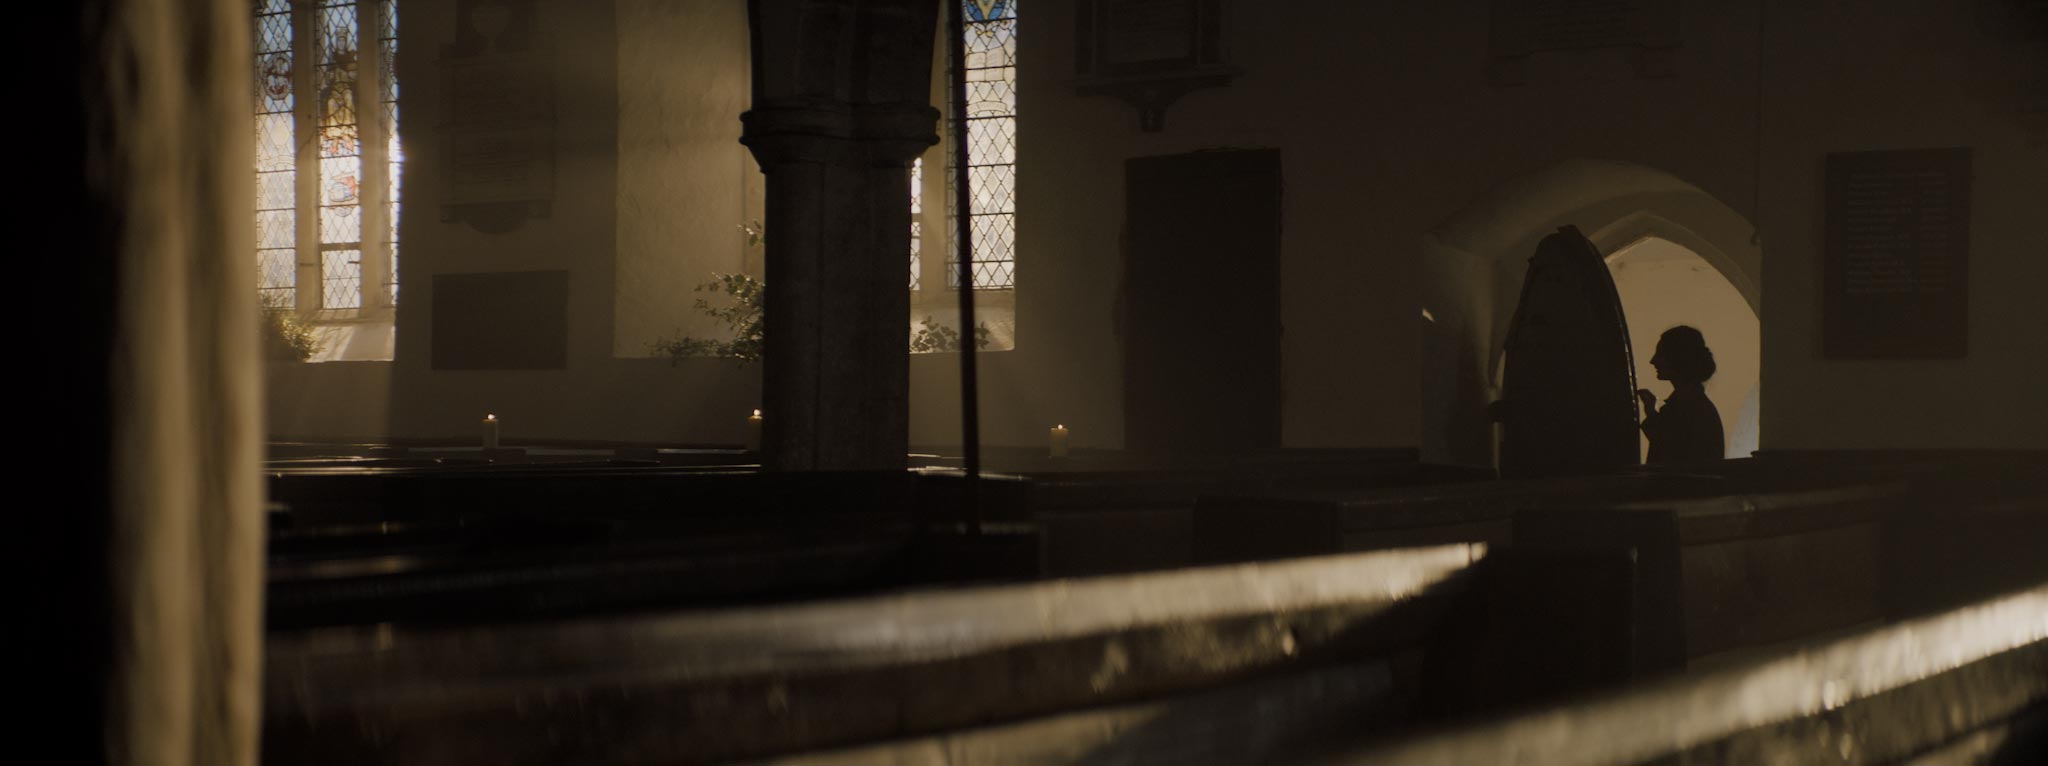
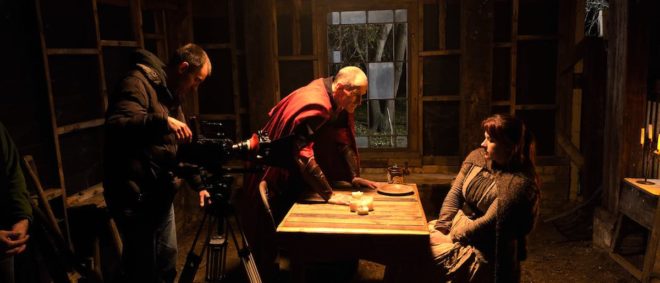
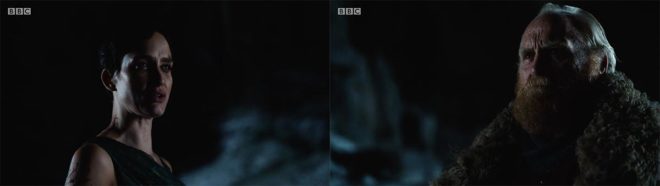
I first started thinking about this in 2018 when I shot Annabel Lee. Specifically it was when we were shooting a scene from this short period drama – directed by Amy Coop – in a church. Our equipment package was on the larger side for a short, but still far from ideal for lighting up a building of that size. Our biggest instrument was a Nine-light Maxi Brute, which is a grid of 1KW par globes, then we had a couple of 2.5K HMIs and nothing else of any signifcant power.

Director Amy Coop during the church recce for “Annabel Lee”

The master shot for the scene was a side-on dolly move parallel to the central aisle, with three large stained-glass windows visible in the background. My choices were either to put a Maxi Brute or an HMI outside each window, to use only natural light, or to key the scene from somewhere inside the building. The first option was beautiful but not realistic, as I shall explain, the second option would have been realistic but not beautiful (and probably under-exposed) and the third would have been neither.

I went with the hard source outside of each window. I could not diffuse or bounce the light because that would have reduced the intensity to pretty much nothing. (Stained-glass windows don’t transmit a lot of light through them.) For the same reason, the lamps had to be pretty close to the glass.

The result is that, during this dolly shot, each of the three lamps is visible at one time or another. You can’t tell they’re lamps – the blown-out panes of glass disguise them – but the fact that there are three of them rather gives away that they are not the sun! (There is also the issue that contiguous scenes outside the church have overcast light, but that is a discontinuity I have noticed in many other films and series.)

I voiced my concerns to Amy at the time – trying to shirk responsibility, I suppose! Fortunately she found it beautiful enough to let the realism slide.

But I couldn’t help thinking that, with a larger budget and thus larger instruments, I could have had both beauty and realism. If I had had three 18K HMIs, for example, plus the pre-rig time to put them on condors or scaffolding towers, they could all have been high enough and far enough back from the windows that they wouldn’t have been seen. I would still have got the same angle of light and the nice shafts in the smoke, but they would have passed much more convincingly as a single sun source. Hell, if I’d had the budget for a 100KW SoftSun then I really could have done it with one source!

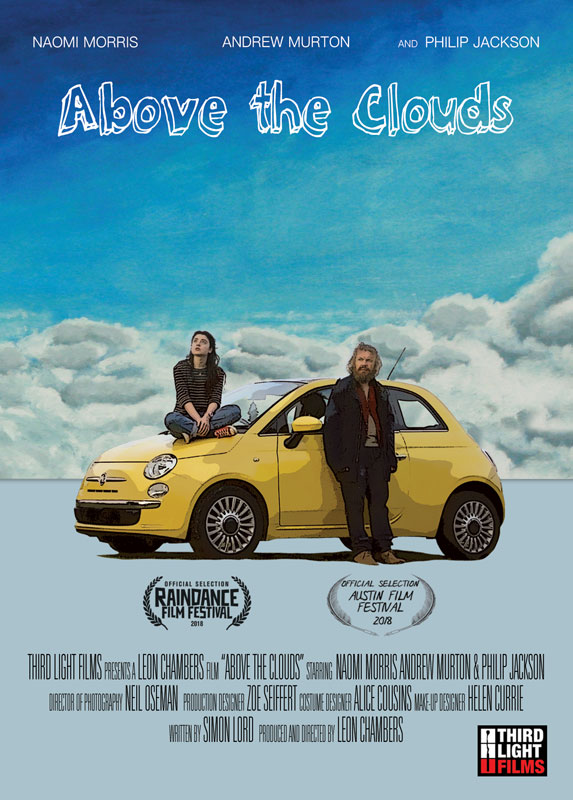
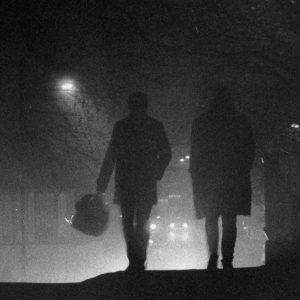
There have been many other examples of the beauty/realism problem throughout my career. One that springs to mind is Above the Clouds, where the 2.5K HMI which I was using as a backlight for a night exterior was in an unrealistic position. The ground behind the action sloped downwards, so the HMI on its wind-up stand threw shafts of light upwards. With the money for a cherry-picker, a far more moon-like high-angle could have been achieved. Without such funds, my only alternative was to sacrifice the beauty of a backlight altogether, which I was not willing to do.

The difference between that example and Annabel Lee is that Clouds director Leon Chambers was unable to accept the unrealistic lighting, and ended up cutting around it. So I think it’s quite important to get on the same page as your director when you’re lighting with limited means.

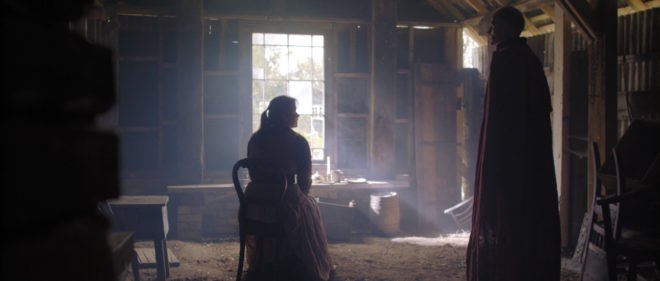
I remember asking Paul Hyett when we were prepping Heretiks, “How do you feel about shafts of ‘sunlight’ coming into a room from two different directions?” He replied that “two different directions is fine, but not three.” That was a very nice, clear drawing of the line between beauty (or at least stylisation) and realism, which helped me enormously during production.

The beauty/realism/cost triangle is one we all have to navigate. Although it might sometimes give us regrets about what could have been, as long we’re on the same page as our directors we should still get results we can all live with.

Beautiful/Realistic/Cheap: The Lighting Triangle

Working with White Walls

White walls are the bane of a DP’s existence. They bounce light around everywhere, killing the mood, and they look cheap and boring in the background of your shot. Nonetheless, with so many contemporary buildings decorated this way, it’s a challenge we all have to face. Today I’m going to look back on two short films I’ve photographed, and explain the different approaches I took to get the white-walled locations looking nice.

Finding Hope is a moving drama about a couple grieving for the baby they have lost. It was shot largely at the home of the producer, Jean Maye, on a Sony FS7 with Sigma and Pentax stills glass.

Exit Eve is a non-linear narrative about the dehumanisation of an au pair by her wealthy employers. With a fairly respectable budget for a short, this production shot in a luxurious Battersea townhouse on an Arri Alexa Classic with Ultra Primes.


“Crown”-inspired colour contrast

Cheap 300W dimmers like these are great for practicals.

It was January 2017 when we made Finding Hope, and I’d recently been watching a lot of The Crown. I liked how that series punctuated its daylight interior frames with pools of orange light from practicals. We couldn’t afford much of a lighting package, and I thought that pairing existing pracs with dimmers and tungsten bulbs would be a cheap and easy way to break up the white walls and bring some warmth – perhaps a visual representation of the titular hope – into the heavy story.

I shot all the daylight interiors at 5600K to get that warmth out of the pracs. Meanwhile I shaped the natural light as far as possible with the existing curtains, and beefed it up with a 1.2K HMI where I could. I used no haze or lens diffusion on the film because I felt it needed the unforgiving edges.

For close-ups, I often cheated the pracs a little closer and tweaked the angle, but I chose not to supplement them with movie lamps. The FS7’s native ISO of 2500 helped a lot, especially in a nighttime scene where the grieving parents finally let each other in. Director Krysten Resnick had decided that there would be tea-lights on the kitchen counter, and I asked art director Justine Arbuthnot to increase the number as much as she dared. They became the key-light, and again I tweaked them around for the close-ups.

My favourite scene in Finding Hope is another nighttime one, in which Crystal Leaity sits at a piano while Kevin Leslie watches from the doorway. I continued the theme of warm practicals, bouncing a bare 100W globe off the wall as Crystal’s key, and shaping the existing hall light with some black wrap, but I alternated that with layers of contrasting blue light: the HMI’s “moonlight” coming in through the window, and the flicker of a TV in the deep background. This latter was a blue-gelled 800W tungsten lamp bounced off a wobbling reflector.

When I saw the finished film, I was very pleased that the colourist had leant into the warm/cool contrast throughout the piece, even teasing it out of the daylight exteriors.


Trapped in a stark white townhouse

I took a different approach to colour in Exit Eve. Director Charlie Parham already knew that he wanted strong red lighting in party scenes, and I felt that this would be most effective if I kept colour out of the lighting elsewhere. As the film approaches its climax, I did start to bring in the orange of outside streetlamps, and glimpses of the party’s red, but otherwise I kept the light stark and white.

Converted from a Victorian schoolhouse, the location had high ceilings, huge windows and multiple floors, so I knew that I would mostly have to live with whatever natural light did or didn’t shine in. We were shooting during the heatwave of 2018, with many long handheld takes following lead actor Thalissa Teixeria from room to room and floor to floor, so even the Alexa’s dynamic range struggled to cope with the variations in light level.

For a night scene in the top floor bedroom, I found that the existing practicals were perfectly placed to provide shape and backlight. I white-balanced to 3600K to keep most of the colour out of them, and rigged black solids behind the camera to prevent the white walls from filling in the shadows.

(Incidentally, the night portions of this sequence were shot as one continuous take, despite comprising two different scenes set months apart. The actors did a quick-change and the bed was redressed by the art department while it was out frame, but sadly this tour de force was chopped up in the final cut.)

I had most control over the lighting when it came to the denouement in the ground floor living area. Here I was inspired by the work of Bradford Young, ASC to backlight the closed blinds (with tungsten units gelled to represent streetlights) and allow the actors inside to go a bit dim and murky. For a key moment we put a red gel on one of the existing spotlights in the living room and let the cast step into it.

So there we have it, two different approaches to lighting in a while-walled location: creating colour contrast with dimmed practicals, or embracing the starkness and saving the colour for dramatic moments. How will you tackle your next magnolia-hued background?

For another example of how I’ve tackled white-walled locations, see my Forever Alone blog.

Working with White Walls

“Above the Clouds”: The Spoiler Blogs

During 2016-2017 I blogged about the production of Above the Clouds, a comedy road movie which I shot for director Leon Chambers. It premiered at Raindance in 2018, closely followed by Austin Film Festival, where it won the audience award for Best Narrative Feature, the first of four gongs it would collect.

In two decades of filmmaking, Above the Clouds is easily in the top five productions I’m most proud of. Since this January it has been available on AmazoniTunesGoogle Play and other platforms, and I highly recommend you give it a watch. DO NOT continue reading this blog unless you have, because what follows are two blog entries that I held back due to spoilers.


DAY 14

(from Week 3)

The script calls for Charlie to be seen sitting in the window seat of a plane as it rises quite literally above the clouds. This is another micro-set filmed in Leon’s living room, in fact half in the living room and half in the hall, to leave enough room for the lights beyond.

Although the view out of the window will be added in post, I need to simulate the lighting effect of bursting through the clouds. My plan involves a 1.2K HMI, and a 4×4 poly board held horizontally with a triple layer of 4×4 Opal sheets hanging from one edge.

We start with the HMI pointed straight into the window and the poly board held high up so that the Opal hangs in front of the lamp. As the plane supposedly rises through the cloud layer, Colin lowers the poly until it is below the level of the lamp, while Gary tilts the HMI down so its light skips off the poly (like sun skipping off the top of clouds) and bounces back up into the window. Gary then tilts the HMI back up to point straight into the window, to suggest further banking or climbing of the aircraft. This direct light is so hot that it bounces off the armrest of Charlie’s seat and gives a glow to her cheek which syncs perfectly with a smile she’s doing.


DAY 25

(from February 2017 pick-ups)

Today’s set is a dark room. A photographer’s dark room, that is. Not just a random dimly-lit room.

We begin with only the red safe-light in play. The wall-mounted practical has a 15W bulb, so it needs some serious help to illuminate the room. Micky rigs a 1K pup with Medium Red gel and fires it over the top of the set, above the practical. The effect is very convincing. Pure red light can make everything look out of focus on camera, which is why I chose the slightly magenta Medium Red gel, rather than the more realistic Primary Red. The colourist will be able to add some green/yellow to correct this.

During the scene, Naomi pulls a cord and the normal lights come on. These are two hanging practicals, fitted with dimmed 100W tungsten globes. In a very similar set-up to yesterday, we use a 2K with a chimera, poking over the set wall on the camera’s down-side, to enhance and soften the practicals’ light.

To read all the Above the Clouds blogs from the start, click here.

“Above the Clouds”: The Spoiler Blogs

Cinematic Lighting: An Online Course Available Now

My online course, Cinematic Lighting, is available now on Udemy. It’s an advanced and in-depth guide to arguably the most important part of a director of photography’s job: designing the illumination.

The course is aimed at cinematography students, camera operators looking to move up to DP, corporate/industrial filmmakers looking to move into drama, and indie filmmakers looking to increase their production values.

Rather than demonstrating techniques in isolation in a studio, the course takes place entirely on location. The intent is to show the realities of creating beautiful lighting while dealing with the usual challenges of real independent film production, like time, weather and equipment, as well as meeting the requirements of the script.

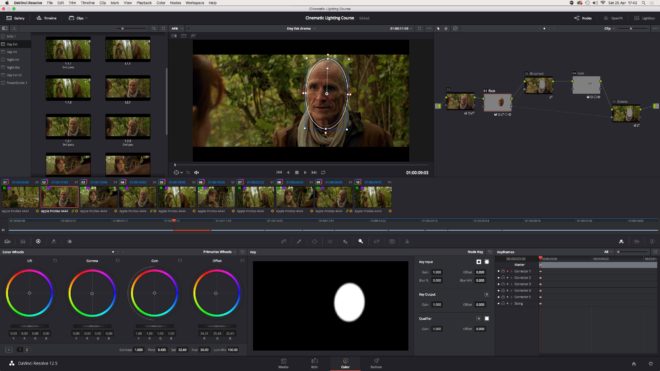
Cinematic Lighting consists of four hour-long modules: Day Exterior, Day Interior, Night Interior and Night Exterior. Each module follows the blocking, lighting and shooting of a short scripted scene (inspired by the fantasy web series Ren: The Girl with the Mark) with two actors in full costume. Watch me and my team set up all the fixtures, control the light with flags and rags, and make adjustments when the camera moves around for the coverage. Every step of the way, I explain what I’m doing and why, as well as the alternatives you could consider for your own films. Each module concludes with the final edited scene so that you can see the end result.

Students should already have a grasp of basic cinematography concepts like white balance and depth of field. A familiarity with the principle of three-point lighting will be useful, but not essential.

You will learn:

  • how to create depth and contrast in your shots;
  • how to light for both the master shot and the coverage;
  • how and when to use HMI, fluorescent, LED and traditional tungsten lighting;
  • how to use natural light to your advantage, and how to mould it;
  • how to use a light meter and false colours to correctly expose your image;
  • how to use smoke or haze to create atmosphere, and
  • how to simulate sunlight, moonlight and firelight.

Get lifetime access to Cinematic Lighting now.

Below is a full breakdown of the course content.


MODULE 1: DAY EXTERIOR

Learn how to block your scene to make the most of the natural light, and how to modify that light with flags, bounce and diffusion, as well as how to expose your image correctly.

1.1 Principles & Prep

  • What to look for on a recce/scout
  • How to predict the sun path using apps or a compass
  • How to block action relative to the sun
  • Three-point lighting
  • The importance of depth in cinematography
  • When to shoot in cross-light vs. backlight
  • How to get rippling reflections off water

1.2 Blocking for Success

  • Observing a rehearsal with actors Kate and Ivan
  • What to look for in the blocking
  • How to get reflections off a blade
  • When to shoot the master shot
  • How to choose what order to shoot your coverage in
  • Using a white poly/bead-board as bounce

1.3 Exposure

  • Why light meters are still important
  • Dynamic range and log recording
  • How to use an incident meter and a spot reflectance meter
  • The f-stop series
  • How to use false colours
  • How to arrive at the right exposure from all this information
  • How to select the appropriate ND (neutral density) filter
  • Shooting the wide shot

1.4 Shaping the Singles

  • Short- and broad-key lighting
  • Types of reflector
  • Positioning a reflector
  • Paying attention to eye reflections
  • Negative fill
  • How to use 4×4 floppy flags
  • Shooting Ivan’s close-up
  • Using a trace frame
  • “Health bounce”
  • Shooting Kate’s close-up
  • Summary
  • The final edited scene

MODULE 2: DAY INTERIOR

This module introduces some common lighting instruments, demonstrates how to imitate natural light entering a room, and how to create depth and contrast with black-out and smoke.

2.1 Scouting & Equipment

  • Identifying light sources in the room
  • Using apps or a compass to predict how sun will enter through the windows
  • The principle of dark-to-light depth
  • Using curtains to modify interior light
  • Introduction to some common lighting instruments: Dedolights, Kino Flos, an HMI and a Rayzr MC LED panel

2.2 Lighting through a Window

  • Observing the blocking with actors Kate and Ivan
  • Direct lighting using an HMI
  • Controlling contrast with black-out
  • Diffusing the light with a trace frame
  • Bouncing the light off poly/bead-board
  • Bouncing the light off parts of the set
  • Use of a light meter and false colours to set the correct exposure

2.3 Atmosphere

  • Use of smoke or haze to add atmosphere to the scene
  • Reasons to add atmosphere
  • The concept of aerial perspective
  • Shooting the master shot
  • Comparison of the final shot to the other versions demonstrated in 2.2 and 2.3

2.4 Lighting the Reverse

  • Use of viewfinder apps to find a frame and select a lens
  • Challenges of front-light
  • Adjusting the window light to highlight certain areas
  • Demonstrating a “window wrap” using a Kino Flo
  • Using light readings and ND filters to arrive at the correct exposure
  • Shooting the reverse
  • Summary
  • The final edited scene

MODULE 3: NIGHT INTERIOR

Create a moody night-time look indoors using practical sources, toplight, and simulated moonlight and firelight.

3.1 Internal vs. External Light

  • Observing the blocking with actors Kate and Ivan
  • Approaches to lighting a night interior scene
  • Lighting from outside with an HMI “moon”
  • Working with bounced “moonlight” inside the room
  • Choosing an overhead source as the key light

3.2 Working with Toplight

  • Time and safety considerations of working with top-light
  • Rigging a top-light safely
  • Controlling top-light spill on the set walls
  • Using unbleached muslin to soften and warm up the light
  • The inverse square law

3.3 Firelight & Moonlight

  • Working with practical candles
  • Reinforcing candles with a hidden LED fixture
  • Simulating an off-camera fireplace
  • Lighting the view outside the window
  • Bringing moonlight into the room to add colour contrast and depth
  • Shooting the master shot

3.4 Tweaking for the Coverage

  • Checking the blocking for the first single
  • Filling in shadows using additional unbleached muslin
  • Flagging the top-light to control the background
  • Adjusting the external light to maintain colour contrast
  • Shooting Kate’s single
  • Adjusting the fireplace effect to work for a close-up
  • Shooting Ivan’s single
  • Summary
  • The final edited scene

MODULE 4: NIGHT EXTERIOR

Paint with light on the blank canvas of night; set up an artificial moon; create depth, contrast and colour contrast; and use shadows to your advantage.

4.1 Setting the Moon

  • Observing the blocking with actors Kate and Ivan
  • Principles of night exterior lighting
  • Creating believable moonlight
  • Features of HMI lighting
  • Choosing a position and height for the HMI “moon”

4.2 Finessing the Master

  • Use of a practical fire source
  • Reinforcing a practical fire with an LED fixture
  • Colour contrast
  • Using a Kino Flo as an additional soft source
  • Tackling a difficult shadow
  • Reading and adjusting lighting ratios using an incident meter
  • Working with smoke/atmos outdoors
  • Shooting the master shot

4.3 Shooting the Singles

  • Adjusting the existing sources to work for a close-up
  • Shooting Ivan’s single
  • Diffusing the HMI
  • Monitoring exposure using false colours
  • Shooting Kate’s single

4.4 Lighting the Reverse

  • The pros and cons of flipping the backlight
  • Example of cheating the moonlight around
  • Using established sources to your advantage
  • Adding diffusion vs. a gobo to the HMI
  • Creating a “branch-a-loris”
  • Shooting the reverse
  • Summary
  • The final edited scene

APPENDICES

Useful links, a full kit list and a deleted scene

Get lifetime access to Cinematic Lighting now.

Cinematic Lighting: An Online Course Available Now

Secondary Grades are Nothing New

Last week I posted an article I wrote a while back (originally for RedShark News), entitled “Why You Can’t Relight Footage in Post”. You may detect that this article comes from a slightly anti-colourist place. I have been, for most of my career, afraid of grading – afraid of colourists ruining my images, indignant that my amazing material should even need grading. Arrogance? Ego? Delusion? Perhaps, but I suspect all DPs have felt this way from time to time.

I think I have finally started to let go of this fear and to understand the symbiotic relationship betwixt DP and colourist. As I mentioned a couple of weeks ago, one of the things I’ve been doing to keep myself occupied during the Covid-19 lockdown is learning to grade. This is so that I can grade the dramatic scenes in my upcoming lighting course, but also an attempt to understand a colourist’s job better. The course I’m taking is this one by Matthew Falconer on Udemy. At 31 hours, it takes some serious commitment to complete, commitment I fear I lack. But I’ve got through enough to have learnt the ins and outs of Davinci Resolve, where to start when correcting an image, the techniques of primary and secondary grades, and how to use the scopes and waveforms. I would certainly recommend the course if you want to learn the craft.

As I worked my way through grading the supplied demo footage, I was struck by two similarities. Firstly, as I tracked an actor’s face and brightened it up, I felt like I was in the darkroom dodging a print. (Dodging involves blocking some of the light reaching a certain part of the image when making an enlargement from a film negative, resulting in a brighter patch.) Subtly lifting the brightness and contrast of your subject’s face can really help draw the viewer’s eye to the right part of the image, but digital colourists were hardly the first people to recognise this. Photographers have been dodging – and the opposite, burning – prints pretty much since the invention of the negative process almost 200 years ago.

The second similarity struck me when I was drawing a power curve around an actor’s shirt in order to adjust its colour separately from the rest of the image. I was reminded of this image from Painting with Light, John Alton’s seminal 1949 work on cinematography…


The chin scrim is a U-shaped scrim… used to cut the light off hot white collars worn with black dinner jackets.

It’s hard for a modern cinematographer to imagine blocking static enough for such a scrim to be useful, or indeed a schedule generous enough to permit the setting-up of such an esoteric tool. But this was how you did a power window in 1949: in camera.

Sometimes I’ve thought that modern grading, particularly secondaries (which target only specific areas of the image) are unnecessary; after all, we got through a century of cinema just fine without them. But in a world where DPs don’t have the time to set up chin scrims, and can’t possibly expect a spark to follow an actor around with one, adding one in post is a great solution. Our cameras might have more dynamic range than 1940s film stock, meaning that that white collar probably won’t blow out, but we certainly don’t want it distracting the eye in the final grade.

Like I said in my previous post, what digital grading does so well are adjustments of emphasis. This is not to belittle the process at all. Those adjustments of emphasis make a huge difference. And while the laws of physics mean that a scene can’t feasibly be relit in post, they also mean that a chin scrim can’t feasibly follow an actor around a set, and you can’t realistically brighten an actor’s face with a follow spot.

What I’m trying to say is, do what’s possible on set, and do what’s impossible in post. This is how lighting and grading work in harmony.

Secondary Grades are Nothing New

Why You Can’t Re-light Footage in Post

The concept of “re-lighting in post” is one that has enjoyed a popularity amongst some no-budget filmmakers, and which sometimes gets bandied around on much bigger sets as well. If there isn’t the time, the money or perhaps simply the will to light a scene well on the day, the flexibility of RAW recording and the power of modern grading software mean that the lighting can be completely changed in postproduction, so the idea goes.

I can understand why it’s attractive. Lighting equipment can be expensive, and setting it up and finessing it is one of the biggest consumers of time on any set. The time of a single wizard colourist can seem appealingly cost-effective – especially on an unpaid, no-budget production! – compared with the money pit that is a crew, cast, location, catering, etc, etc. Delaying the pain until a little further down the line can seem like a no-brainer.

There’s just one problem: re-lighting footage is fundamentally impossible. To even talk about “re-lighting” footage demonstrates a complete misunderstanding of what photographing a film actually is.

This video, captured at a trillion frames per second, shows the tranmission and reflection of light.

The word “photography” comes from Greek, meaning “drawing with light”. This is not just an excuse for pompous DPs to compare themselves with the great artists of the past as they “paint with light”; it is a concise explanation of what a camera does.

A camera can’t record a face. It can’t record a room, or a landscape, or an animal, or objects of any kind. The only thing a camera can record is light. All photographs and videos are patterns of light which the viewer’s brain reverse-engineers into a three-dimensional scene, just as our brains reverse-engineer the patterns of light on the retinae every moment of every day, to make sense of our surroundings.

The light from this object gets gradually brighter then gradually darker again – therefore it is a curved surface. There is light on the top of that nose but not on the underneath, so it must be sticking out. These oval surfaces are absorbing all the red and blue light and reflecting only green, so it must be plant life. Such are the deductions made continuously by the brain’s visual centre.

A compound lens for a prototype light-field camera by Adobe

To suggest that footage can be re-lit is to suggest that recorded light can somehow be separated from the underlying physical objects off which that light reflected. Now of course that is within the realms of today’s technology; you could analyse a filmed scene and build a virtual 3D model of it to match the footage. Then you could “re-light” this recreated scene, but it would be a hell of a lot of work and would, at best, occupy the Uncanny Valley.

Some day, perhaps some day quite soon, artificial intelligence will be clever enough to do this for us. Feed in a 2D video and the computer will analyse the parallax and light shading to build a moving 3D model to match it, allowing a complete change of lighting and indeed composition.

Volumetric capture is already a functioning technology, currently using a mix of infrared and visible-light cameras in an environment lit as flatly as possible for maximum information – like log footage pushed to its inevitable conclusion. By surrounding the subject with cameras, a moving 3D image results.

Sir David Attenborough getting his volume captured by Microsoft

Such rigs are a type of light-field imaging, a technology that reared its head a few years ago in the form of Lytro, with viral videos showing how depth of field and even camera angle (to a limited extent) could be altered with this seemingly magical system. But even Lytro was capturing light, albeit it in a way that allowed for much more digital manipulation.

Perhaps movies will eventually be captured with some kind of Radar-type technology, bouncing electromagnetic waves outside the visible spectrum off the sets and actors to build a moving 3D model. At that point the need for light will have been completely eliminated from the production process, and the job of the director of photography will be purely a postproduction one.

While I suspect most DPs would prefer to be on a physical set than hunched over a computer, we would certainly make the transition if that was the only way to retain meaningful authorship of the image. After all, most of us are already keen to attend grading sessions to ensure our vision survives postproduction.

The Lytro Illum 2015 CP+ by Morio – own work, CC BY-SA 3.0, https://commons.wikimedia.org/w/index.php?curid=38422894

But for the moment at least, lighting must be done on set; re-lighting after the fact is just not possible in any practical way. This is not to take away from the amazing things that a skilled colourist can do, but the vignettes, the split-toning, the power windows, the masking and the tracking – these are adjustments of emphasis.

A soft shadow can be added, but without 3D modelling it can never fall and move as a real shadow would. A face can be brightened, but the quality of light falling on it can’t be changed from soft to hard. The angle of that light can’t be altered. Cinematographers refer to a key-light as the “modelling” light for a reason: because it defines the 3D model which your brain reverse-engineers when it sees the image.

So if you’re ever tempted to leave the job of lighting to postproduction, remember that your footage is literally made of light. If you don’t take the time to get your lighting right, you might as well not have any footage at all.

Why You Can’t Re-light Footage in Post

Cinematic Lighting Course: Coming Soon

I’m using my time in Covid-19 lockdown for a few different things, some more worthy than others. Lying-in is a big one. Watching all of Lost again. Exercising more. But also I’ve got a big editing project to complete, a project of my own, the perfect task to get me through the long days at home.

Last November I shot Cinematic Lighting, a four-hour online course. It’s something I’d been thinking about for a while, especially over the last year or so as my Instagram following has sky-rocketed (about 33,000 at the time of writing). DPs and cinematography students follow my feed for the lighting diagrams I post every Friday, showing exactly how a lighting set-up was achieved, but some commenters had started to ask why I made certain creative decisions. So the idea for the course was born.

Lighting diagram for the Night Exterior module’s master shot

Cinematic Lighting consists of four modules: day exterior, day interior, night interior and night exterior. In each module I light and shoot a half-page scene with two actors, Kate Madison and Ivan Moy, with behind-the-scenes cameras following my every move. As I do it – with the assistance of gaffer Jeremy Dawson and spark Gareth Neal – I explain how and why I’m doing it. Sometimes I demonstrate alternative options I could have chosen. I talk about characterisation and how to match it with lighting. I quote John Alton and Christopher Nolan. I show clips from other productions I’ve shot and tell the stories behind them. I explain how to use a light meter and get your head around f-stops, T-stops and ND filters. I demonstrate the power of smoke. But most importantly I lay my creative process bare as I work.

Setting up a single in the Night Interior module. Photo: Ashram Maharaj

The original intention was for the course to be a reward on the Kickstarter campaign for Ren: The Girl with the Mark‘s second season, but sadly that campaign was unsuccessful. Over the next couple of months I’ll be investigating my options for releasing this course, and rest assured that I’ll let you know as soon as it’s available.

Meanwhile, postproduction work continues on it. The main thing left to do is the grading of the finished dramatic scenes; each module concludes with a polished edit of the scene which I’ve shot. Rather than hire a colourist, I’ve decided it’s time to finally learn a few things about grading myself. To that end, I’ve purchased a Udemy course and am currently learning how to do fancy secondaries in Davinci Resolve – another good use of my lockdown time, I feel. More on this in a future post.

Meanwhile, stay safe and REMAIN INDOORS.

Filming the introduction to the Day Exterior module. Photo: Colin Ramsay

Cinematic Lighting Course: Coming Soon

5 Steps to Lighting a Forest at Night

EXT. FOREST - NIGHT

A simple enough slug line, and fairly common, but amongst the most challenging for a cinematographer. In this article I’ll break down into five manageable steps my process of lighting woodlands at night.


1. Set up the moon.

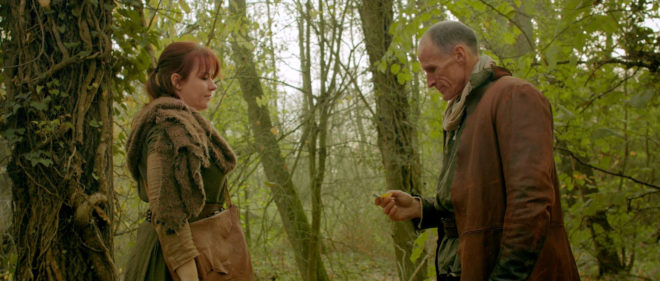
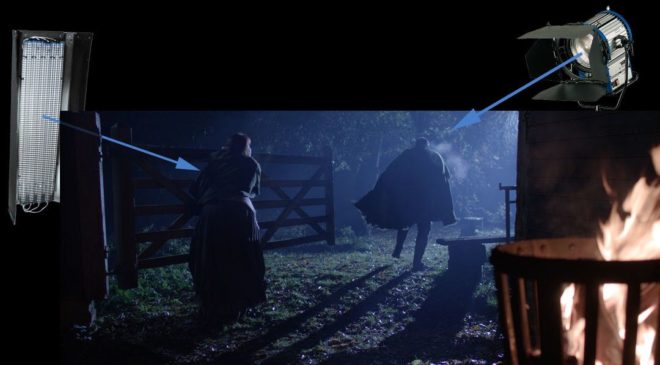
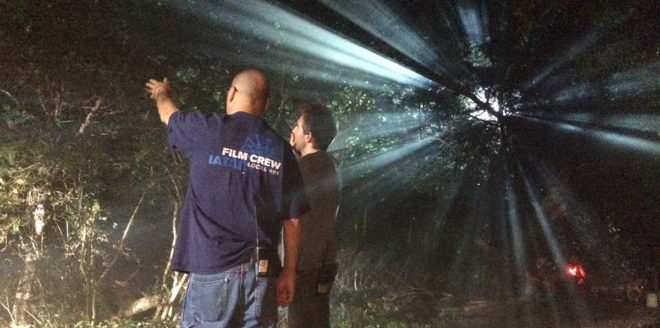
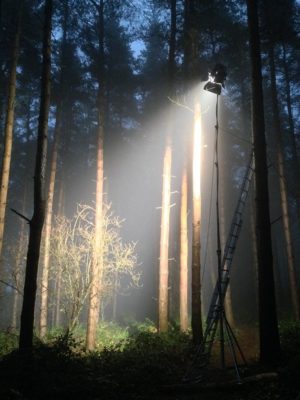
Forests typically have no artificial illumination, except perhaps practical torches carried by the cast. This means that the DP will primarily be simulating moonlight.

Your “moon” should usually be the largest HMI that your production can afford, as high up and far away as you can get it. (If your production can’t afford an HMI, I would advise against attempting night exteriors in a forest.) Ideally this would be a 12K or 18K on a cherry-picker, but in low-budget land you’re more likely to be dealing with a 2.5K on a triple wind-up stand.

Why is height important? Firstly, it’s more realistic. Real moonlight rarely comes from 15ft off the ground! Secondly, it’s hard to keep the lamp out of shot when you’re shooting towards it. A stand might seem quite tall when you’re right next to it, but as soon as you put it far away, it comes into shot quite easily. If you can use the terrain to give your HMI extra height, or acquire scaffolding or some other means of safely raising your light up, you’ll save yourself a lot of headaches.

In this shot from “The Little Mermaid” (dir. Blake Harris), a 12K HMI on a cherry-picker creates the shafts of moonlight, while another HMI through diffusion provides the frontlight. (This frontlight was orange to represent sunrise, but the scene was altered in the grade to be pure night.)

The size of the HMI is of course going to determine how large an area you can light to a sufficient exposure to record a noise-free image. Using a good low-light camera is going to help you out here. I shot a couple of recent forest night scenes on a Blackmagic Pocket Cinema Camera, which has dual native ISOs, the higher being 3200. Combined with a Speedbooster, this camera required only 1 or 2 foot-candles of illuminance, meaning that our 2.5K HMI could be a good 150 feet away from the action. (See also: “How Big a Light do I Need?”)


2. Plan for the reverse.

A fake moon looks great as a backlight, but what happens when it comes time to shoot the reverse? Often the schedule is too tight to move the HMI all the way around to the other side, particularly if it’s rigged up high, so you may need to embrace it as frontlight.

Frontlight is generally flat and undesirable, but it can be interesting when it’s broken up with shadows, and that’s exactly what the trees of a forest will do. Sometimes the pattern of light and dark is so strong and camouflaging that it can be hard to pick out your subject until they move. One day I intend to try this effect in a horror film as a way of concealing a monster.

One thing to look out for with frontlight is unwanted shadows, i.e. those of the camera and boom. Again, the higher up your HMI is, the less of an issue this will be.

If you can afford it, a second HMI set up in the opposite direction is an ideal way to maintain backlight; just pan one off and strike up the other. I’ve known directors to complain that this breaks continuity, but arguably it does the opposite. Frontlight and backlight look very different, especially when smoke is involved (and I’ll come to that in a minute). Isn’t it smoother to intercut two backlit shots than a backlit one and frontlit one? Ultimately it’s a matter of opinion.

An example of cheated moonlight directions in “His Dark Materials” – DP: David Luther


3. Consider Ground lights.

One thing I’ve been experimenting with lately is ground lights. For this you need a forest that has at least a little undulation in its terrain. You set up lights directly on the ground, pointed towards camera but hidden from it behind mounds or ridges in the deep background.

Detail from one of my 35mm stills: pedestrians backlit by car headlights in mist. Shot on Ilford Delta 3200

I once tried this with an HMI and it just looked weird, like there was a rave going on in the next field, but with soft lights it is much more effective. Try fluorescent tubes, long LED panels or even rows of festoon lights. When smoke catches them they create a beautiful glow in the background. Use a warm colour to suggest urban lighting in the distance, or leave it cold and it will pass unquestioned as ambience.

Put your cast in front of this ground glow and you will get some lovely silhouettes. Very effective silhouettes can also be captured in front of smoky shafts of hard light from your “moon”.


4. Fill in the faces.

All of the above looks great, but sooner or later the director is going to want to see the actors’ faces. Such is the cross a DP must bear.

On one recent project I relied on practical torches – sometimes bounced back to the cast with silver reflectors – or a soft LED ball on a boom pole, following the cast around.

Big-budget movies often rig some kind of soft toplight over the entire area they’re shooting in, but this requires a lot of prep time and money, and I expect it’s quite vulnerable to wind.

A recipe that I use a lot for all kinds of night exteriors is a hard backlight and a soft sidelight, both from the same side of camera. You don’t question where the sidelight is coming from when it’s from the same general direction as the “moon” backlight. In a forest you just have to be careful not to end up with very hot, bright trees near the sidelight, so have flags and nets at the ready.

This shot (from a film not yet released, hence the blurring) is backlit by a 2.5K HMI and side-lit by a 1×1 Aladdin LED with a softbox, both from camera right.


5. Don’t forget the Smoke.

Finally, as I’ve already hinted, smoke is very important for a cinematic forest scene. The best options are a gas-powered smoke gun called an Artem or a “Tube of Death”. This latter is a plastic tube connected to a fan and an electric smoke machine. The fan forces smoke into the tube and out of little holes along its length, creating an even spread of smoke.

A Tube of Death in action on the set of “The Little Mermaid”

All smoke is highly suspectible to changes in the wind. An Artem is easier to pick up and move around when the wind changes, and it doesn’t require a power supply, but you will lose time waiting for it to heat up and for the smoke and gas canisters to be changed. Whichever one you pick though, the smoke will add a tremendous amount of depth and texture to the image.

Overall, nighttime forest work scenes may be challenging, but they offer some of the greatest opportunities for moody and creative lighting. Just don’t forget your thermals and your waterproofs!

5 Steps to Lighting a Forest at Night

The Cinematography of “First Man”

A miniature Saturn V rocket is prepared for filming

If you’re a DP, you’re probably familiar with the “Guess the Format” game. Whenever you see a movie, you find yourself trying to guess what format it was shot on. Film or digital? Camera? Glass? Resolution?

As I sat in the cinema last autumn watching First Man, I was definitely playing the game. First Man tells the true story of Neil Armstrong’s (Ryan Gosling) extraterrestrial career, including his test flights in the hypersonic  X-15, his execution of the first ever docking in space aboard Gemini 8, the tragic deaths of his colleagues in the launchpad fire of Apollo 1, and of course the historic Apollo 11.

The game was given away fairly early on when I noticed frames with dust on, a sure sign of celluloid acquisition. (Though most movies have so much digital clean-up now that a lack of dust doesn’t necessarily mean that film wasn’t involved.) I automatically assumed 35mm, though as the film went on I occasionally wondered if I could possibly be watching Super-16? There was something of the analogue home movie about certain scenes, the way the searing highlights of the sun blasting into the space capsules rolled off and bloomed.

When I got home I tracked down this Studio Daily podcast and my suspicions were confirmed, but we’ll get to that in a minute.


Cinéma Vérité

Let’s start at the beginning. First Man was directed by Damien Chazelle and photographed by Linus Sandgren, FSF, the same team who made La La Land, for which both men won Oscars. What I remember most about the cinematography of that earlier film is the palette of bright but slightly sickly colours, and the choreographed Steadicam moves.

First Man couldn’t be more different, adopting a cinéma vérité approach that often looks like it could be real and previously-unseen Nasa footage. Sandgren used zoom lenses and a documentary approach to achieve this feeling:

When you do a documentary about a person and you’re there in their house with them and they’re sad or they’re talking, maybe you don’t walk in there and stand in the perfect camera position. You can’t really get the perfect angles. That in itself creates some sort of humbleness to the characters; you are a little respectful and leave them a little alone to watch them from a distance or a little bit from behind.

Similarly, scenes in the spacecraft relied heavily on POVs through the small windows of the capsule, which is all that the astronauts or a hypothetical documentary camera operator would have been able to see. This blinkered view, combined with evocative and terrifying sound design – all metallic creaks, clanks and deafening booms, like the world itself is ending – makes the spaceflight sequences incredibly visceral.


Multiple gauges

Scale comparison of film formats. Note that Imax is originated on 65mm stock and printed on 70mm to allow room for the soundtrack.

Documentaries in the sixties would have been shot on Super-16, which is part of the reason that Sandgren and Chazelle chose it as one of their acquisition formats. The full breakdown of formats is as follows:

  • Super-16 was employed for intense or emotional material, specifically early sequences relating to the death of Armstrong’s young daughter, and scenes inside the various spacecraft. As well as the creative considerations, the smaller size of Super-16 equipment was presumably advantageous from a practical point of view inside the cramped sets.
  • 35mm was used for most of the non-space scenes. Sandgren differentiated the scenes at Nasa from those at Armstrong’s home by push-processing the former and pull-processing the latter. What this means is that Nasa scenes were underexposed by one stop and overdeveloped, resulting in a detailed, contrasty, grainy look, while the home scenes were overexposed and underdeveloped to produce a cleaner, softer, milkier look. 35mm was also used for wide shots in scenes that were primarily Super-16, to ensure sufficient definition.
  • Imax (horizontally-fed 65mm) was reserved for scenes on the moon.


In-camera effects

In keeping with the vintage aesthetic of celluloid capture, the visual effects were captured in-camera wherever possible. I’ve written in the past about the rise of LED screens as a replacement for green-screen and a source of interactive lighting. I guessed that First Man was using this technology from ECUs which showed the crescent of Earth reflected in Ryan Gosling’s eyes. Such things can be added in post, of course, but First Man‘s VFX have the unmistakeable ring of in-camera authenticity.

Imposing a “no green-screen” rule, Chazelle and his team used a huge LED screen to display the views out of the spacecraft windows. A 180° arc of 60′ diameter and 35′ in height, this screen was bright enough to provide all the interactive lighting that Sandgren required. His only addition was a 5K tungsten par or 18K HMI on a crane arm to represent the direct light of the sun.

The old-school approach extended to building and filming miniatures, of the Saturn V rocket and its launch tower for example. For a sequence of Armstrong in an elevator ascending the tower, the LED screen behind Gosling displayed footage of this miniature.

For external views of the capsules in space, the filmmakers tried to limit themselves to realistic shots which a camera mounted on the bodywork might have been able to capture. This put me in mind of Christopher Nolan’s Interstellar, which used the same technique to sell the verisimilitude of its space vehicles. In an age when any conceivable camera move can be executed, it can be very powerful to stick to simple angles which tap into decades of history – not just from cinema but from documentaries and motorsports coverage too.


Lunar Lighting

For scenes on earth, Landgren walked a line between naturalism and expression, influenced by legendary DPs like Gordon Willis, ASC. My favourite shot is a wide of Armstrong’s street at night, as he and his ill-fated friend Ed White (Jason Clarke) part company after a drinking session. The mundane suburban setting is bathed in blue moonbeams, as if the the moon’s fingers are reaching out to draw the characters in.

Scenes on the lunar surface were captured at night on an outdoor set the size of three football pitches. To achieve absolute authenticity, Sandgren needed a single light source (representing the sun) fixed at 15° above the horizon. Covering an area that size was going to require one hell of a single source, so he went to Luminys, makers of the Softsun.

Softsuns

Softsuns are lamps of frankly ridiculous power. The 50KW model was used, amongst other things, to blast majestic streams of light through the windows of Buckingham Palace on The Crown, but Sandgren turned to the 100KW model. Even that proved insufficient, so he challenged Luminys to build a 200KW model, which they did.

The result is a completely stark and realistic depiction of a place where the sun is the only illumination, with no atmosphere to diffuse or redistribute it, no sky to glow and fill in the shadows. This ties in neatly with a prevailing theme in the film, that of associating black with death, when Armstrong symbolically casts his deceased daughter’s bracelet into an obsidian crater.

First Man may prove unsatisfying for some, with Armstrong’s taciturn and emotionally closed-off nature making his motivations unclear, but cinematically it is a tour de force. Taking a human perspective on extraordinary accomplishments, deftly blending utterly convincing VFX and immersive cinéma vérité photography, First Man recalls the similarly analogue and similarly gripping Dunkirk as well as the documentary-like approach of 1983’s The Right Stuff. The film is currently available on DVD, Blu-ray and VOD, and I highly recommend you check it out.

The Cinematography of “First Man”

Pick-ups for “Rory’s Way”

In August 2016 I was recommended to a production manager who was crewing up a small pick-ups shoot in London. The pick-ups were for Rory’s Way, or The Etruscan Smile as it was then known, a $12 million feature based on the best-selling novel of the latter name, starring Brian Cox and Thora Birch. Apparently test screenings had shown that the film’s ending wasn’t quite satisfying enough, and parts of it were to be remounted.

I was given a storyboard consisting of actual frame-grabs from the original version of the scene, alongside notes explaining how the action would be different. Not to give too much away, but the scene involves Brian’s character in bed, and a baby in a cot next to him. The changes simply involved Brian giving a different reaction to what the baby is doing. The bed was to be set up on stage against a blue screen, and composited into backgrounds extracted from the principal photography footage. The baby’s performance was not to be changed, so he was to be rotoscoped out of the original footage too.

I was sent the camera report, 2nd AC’s notebook and script notes from principal photography. The crew had known that the view out of the bedroom window would be added in post, and that separate takes of the baby and Brian would be digitally combined, so they recorded plenty of information for the VFX team. Between the three documents, I had the focal length, focal distance, aperture, white balance, shutter angle, filters, lens height and tilt of every set-up in the scene.

My next step was to email  the main unit DP, who was none other than Javier Aguirresarobe, ASC, AE – the man behind the lens on Thor: Ragnarok, Nicole Kidman vehicle The Others, two of the Twilight films, and Woody Allen’s Vicky Cristina Barcelona. Needless to say, I was honoured to be recreating the work of such an experienced cinematographer.

Unit still of Javier Aguirresarobe, ASC, AE on location in Scotland for “Rory’s Way”/”The Etruscan Smile”

Javier told me that he had shot with Arri/Zeiss Master Primes, and explained the feel and colour of lighting he had been going for. He had used an 81C (coral) filter to warm up the image a little, and a 1/8th Black Promist for diffusion.

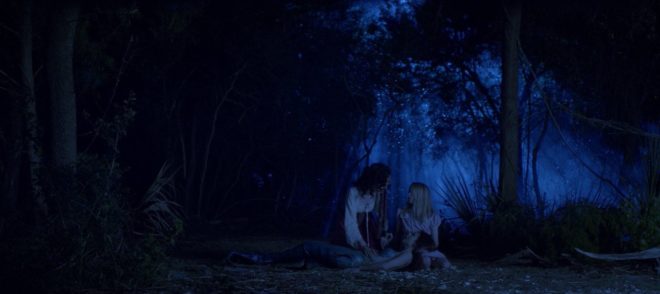
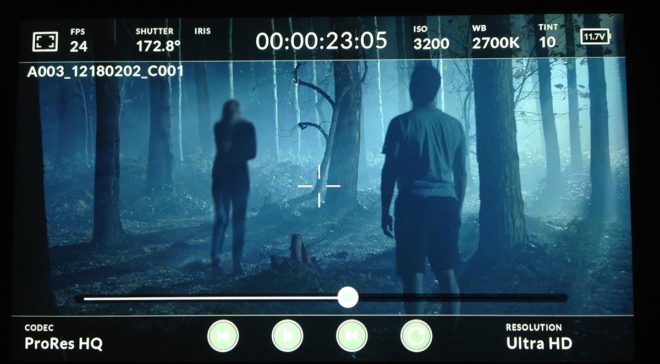
After that, I sat down over coffee with Ben Millar, my gaffer. We analysed the footage from principal photography and reverse-engineered the lighting. I say “we”; it was mostly Ben. This is why a DP hires a good gaffer!

The pick-ups shoot was a single day. The afternoon before, the director and the camera department convened at the studio. The plan was to go through each of the set-ups using a stand-in in the bed. For each set-up, we first used the camera logs and script notes to put on the correct lens and filters, and set the sticks to the right height and tilt. Then, with a print-out of the original shot taped underneath the monitor, we nudged the camera around until we had the closest possible match in framing. This done, ACs Max Quinton and Bex Clives marked the tripod position on the floor with tape, writing the lens length, height, filters etc. on the tape itself to make things super-efficient the next day.

The pick-ups set was nothing more than a bed surrounded by blue screens. The bright gap between the screens represents the window from the original location.

On the morning of the shoot, the lighting department had two or three hours to set up before Brian was called. We used mostly Kinoflos, with a lot of flags to represent window frames through which light sources had been shining on the original set. The VFX supervisor Stephen Coren and I checked the histograms on the monitor to ensure the blue screen was lit evenly and to the level he required.

We were ready to roll in plenty of time, and things went more or less to plan, with the addition of an extra shot or two. The editorial team were in the next room, checking our shots against the original material, and they reported that all was well.

We finished up with a single wide night interior shot for an earlier scene in the movie. This was an interesting one, because we had to extrapolate the lighting for the whole room from a single close-up that had been shot in principal photography. Our wide shot, recorded entirely against blue, would be dropped into a wide shot from principal – a daylight wide shot, that would be digitally painted and retimed for night.

At the time of writing, Rory’s Way has just hit UK cinemas, but I have yet to see it. For all I know it might have been re-edited again, but hopefully my shots are still in there! Either way, it was a fascinating exercise to analyse and reproduce the work of a top cinematographer.

Pick-ups for “Rory’s Way”