“Terminator 2: Judgment Day” Retrospective

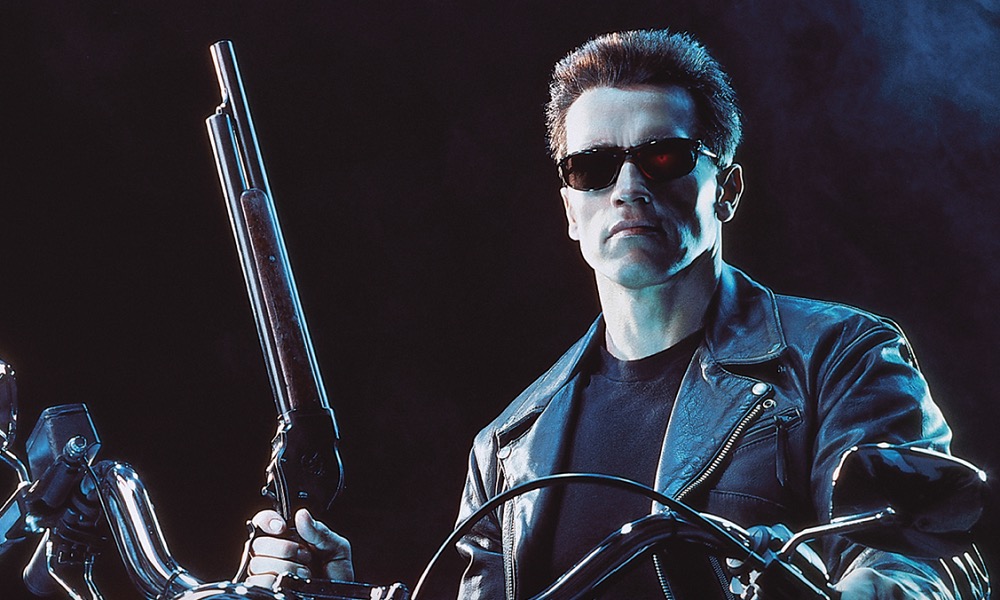
Next month, Terminator 2: Judgment Day turns 30. Made by a director and star at the peaks of their powers, T2 was the most expensive film ever at the time, and remains both the highest-grossing movie of Arnold Schwarzenegger’s career and the sequel which furthest out-performed its progenitor. It is also one of a handful of films that changed the world of visual effects forever, signalling as it did – to borrow the subtitle from its woeful follow-up – the rise of the machines.

No fate but what we make: Linda Hamilton as Sarah Connor

The original Terminator, a low-budget surprise hit in 1984, launched director James Cameron’s career and cemented Schwarzenegger’s stardom, but it wasn’t until 1990 that the sequel was green-lit, mainly due to rights issues. At the Cannes Film Festival that year, Cameron handed executive producer Mario Kassar his script.

Today it’s easy to forget how risky it was to turn the Terminator, an iconic villain, an unstoppable, merciless death machine from an apocalyptic future, into a good guy who doesn’t kill anyone, stands on one leg when ordered, and looks like a horse when he attempts to smile. But Kassar didn’t balk, granting Cameron a budget ten times what he had had for the original, while stipulating that the film had to be in cinemas just 14 months later.

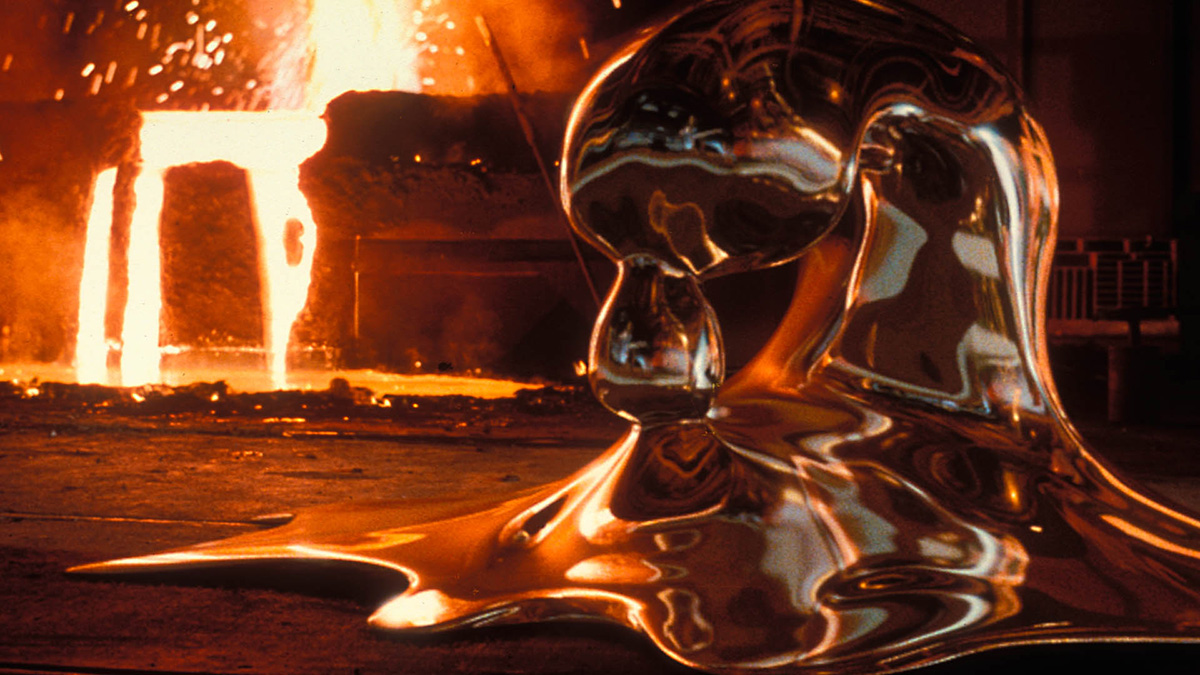
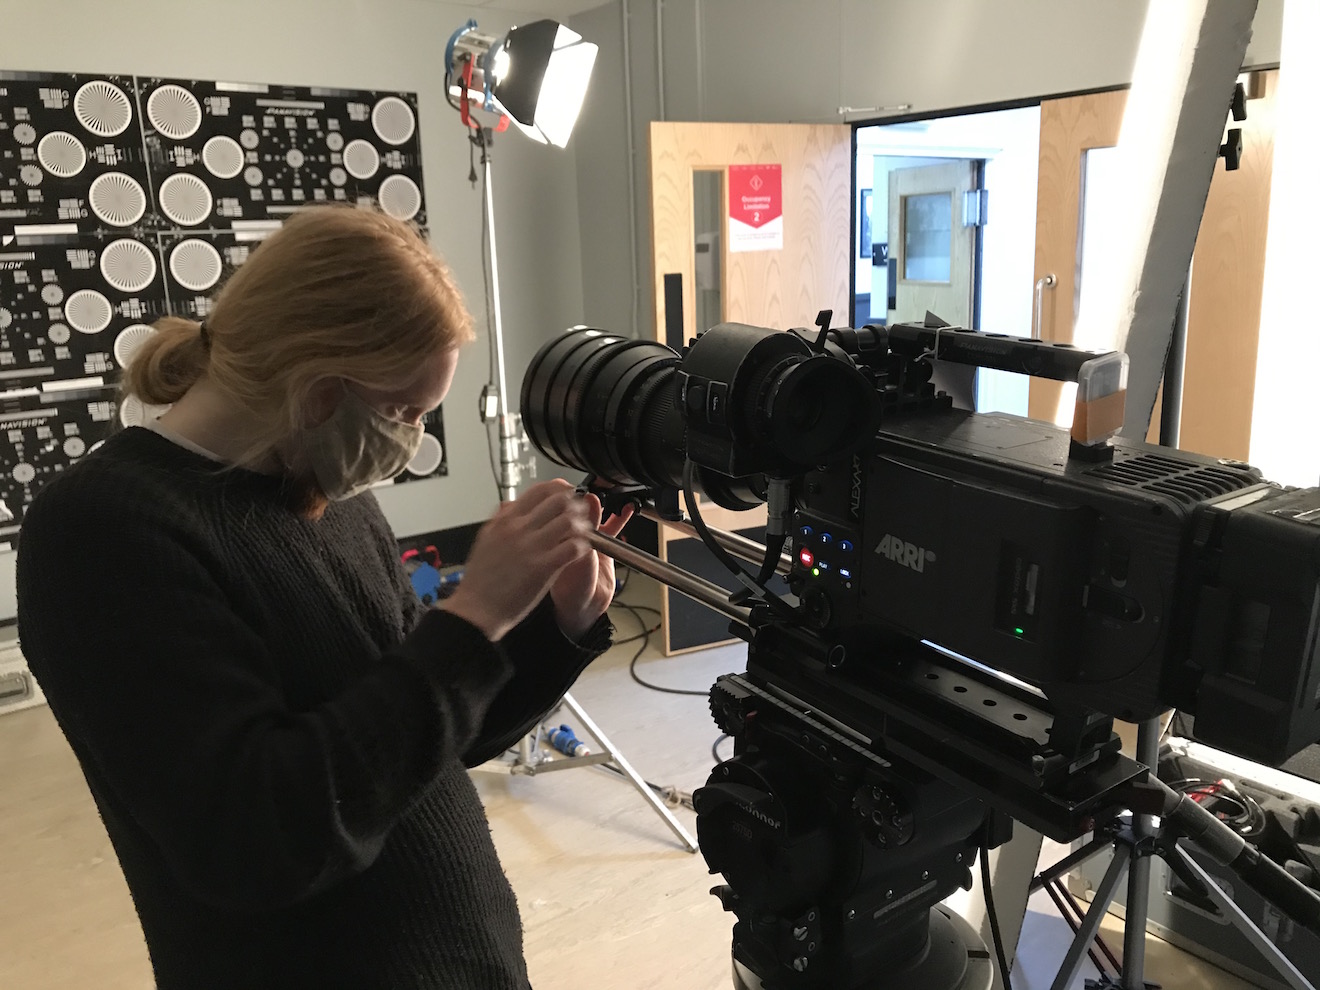
Even with some expensive sequences cut – including John Connor sending Kyle Reese back through time in the heart of Skynet HQ, a scene that would ultimately materialise in Terminator Genisys – the script was lengthy and extremely ambitious. Beginning on October 8th, 1990, the shooting schedule was front-loaded with effects shots to give the maximum time for CGI pioneers Industrial Light and Magic to realise the liquid metal T-1000 (Robert Patrick).

Rather than CGI, the T-1000’s head in this shot is a chrome model lifted into frame by a crew member.

To further ease ILM’s burden, every trick in the book was employed to get T-1000 shots in camera wherever possible: quick shots of the villain’s fight with the T-800 (Schwarzenegger) in the steel mill finale were done with a stuntman in a foil suit; a chrome bust of Patrick was hand-raised into frame for a helicopter pilot’s reaction shot; the reforming of the shattered T-1000 was achieved by blowing mercury around with a hair dryer; bullet hits on the character’s torso were represented by spring-loaded silver “flowers” that burst out of a pre-scored shirt on cue.

One of the chilling full-size T-800 endoskeleton puppets created by Stan Winston Studio for the Future War sequence

Stan Winston Studio also constructed a number of cable-controlled puppets to show more extensive damage to the morphing menace. These included “Splash Head”, a bust of Patrick with the head split in two by a shotgun blast, and “Pretzel Man”, the nightmarish result of a grenade hit moments before the T-1000 falls to its doom in the molten steel.

Traditional models and rear projection are used throughout the film. A few instances are all too obvious to a modern audience, but most still look great and some are virtually undetectable. Did you know that the roll-over and crash of the cryo-tanker were shot with miniatures? Or that the T-800 plucking John off his bike in the drainage channel was filmed against a rear projection screen?

Plenty of the action was accomplished without such trickery. The production added a third storey to a disused office building near Silicon Valley, then blew it up with 100 gallons of petrol, to show the demise of Cyberdyne Systems. DP Adam Greenberg lit 5.5 miles of freeway for the car chase, and pilot Chuck Tamburro really did fly the T-1000’s police helicopter under a 20ft underpass.

Chaotic, confusing action scenes are the norm today, but it is notable that T2’s action is thrilling yet never unclear. The film sends somewhat mixed messages though, with its horrific images of nuclear annihilation and the T-800’s morality lessons from John juxtaposed with indulgent violence and a reverence for firearms. “I think of T2 as a violent movie about world peace,” Cameron paradoxically stated. “It’s an action movie about the value of human life.”

More Stan Winston puppets were used to depict Sarah’s death by nuclear blast in her nightmare.

Meanwhile, 25 person-years of human life were being devoted by ILM to the T-1000’s metallic morphing abilities. Assistant VFX supervisor Mark Dippé noted: “We were pushing the limits of everything – the amount of disc space we had, the amount of memory we had in the computers, the amount of CPUs we had. Each shot, even though it only lasted about five seconds on the screen, typically would take about eight weeks to complete.”

Robert Patrick shooting reference footage for ILM’s animators

The team began by painting a 2×2” grid on a near-naked Patrick and shooting reference footage of him walking, before laser-scanning his head at the appropriately-named Cyberware Laboratory. Four separate computer models of the T-1000 were built on Silicon Graphics Iris 4Ds, from an amorphous blob to a fully-detailed chrome replica of Patrick, each with corresponding points in 3D space so that the custom software Model Interp could morph between them.

Other custom applications included Body Sock, a solution to gaps that initially appeared when the models flexed their joints, Polyalloy Shader, which gave the T-1000 its chrome appearance, and Make Sticky, with which images of Patrick were texture-mapped onto the distorting 3D model, as when he melts through a barred gate at the mental hospital.

The film’s legacy in visual effects – for which it won the 1992 Oscar – cannot be understated. A straight line can be drawn from the water tendril in Cameron’s The Abyss, through T2 to Jurassic Park and all the way on to Avatar, with which Cameron again broke the record for the highest-grossing film of all time. The Avatar sequels will undoubtedly push the technology even further, but for many Cameron fans his greatest achievement will always be Terminator 2: Judgment Day, with its perfect blend of huge stunts, traditional effects and groundbreaking CGI.

“Terminator 2: Judgment Day” Retrospective

The Art and Science of White Balance

Mixed colour temperatures in “Annabel Lee”

Colour temperature starts with something mysterious called a “black body”, a theoretical object which absorbs all frequencies of electromagnetic radiation and emits it according to Planck’s Law. Put simply, Planck’s Law states that as the temperature of such a body increases, the light which it emits moves toward the blue end of the spectrum. (Remember from chemistry lessons how the tip of the blue flame was the hottest part of the Bunsen Burner?)

Colour temperature is measured in kelvins, a scale of temperature that begins at absolute zero (-273°C), the coldest temperature physically possible in the universe. To convert centigrade to kelvin, simply add 273.

Tungsten bulbs emit an orange light - dim them down and it gets even more orangey.The surface of the sun has a temperature of 5,778K (5,505°C), so it emits a relatively blue light. The filament of a tungsten studio lamp reaches roughly 3,200K (2,927°C), providing more of an orange light. Connect that fixture to a dimmer and bring it down to 50% intensity and you might get a colour temperature of 2,950K, even more orange.

Incandescent lamps and the sun’s surface follow Planck’s Law fairly closely, but not all light sources rely on thermal radiation, and so their colour output is not dependent on temperature alone. This leads us to the concept of “correlated colour temperature”.

Colour temperature chartThe correlated colour temperature of a source is the temperature which a black body would have to be at in order to emit the same colour of light as that source. For example, the earth’s atmosphere isn’t 7,100K hot, but the light from a clear sky is as blue as a Planckian body glowing at that temperature would be. Therefore a clear blue sky has a correlated colour temperature (CCT) of 7,100K.

LED and fluorescent lights can have their colour cast at least partly defined by CCT, though since CCT is one-dimensional, measuring only the amount of blue versus red, it may give us an incomplete picture. The amounts of green and magenta which LEDs and fluorescents emit varies too, and some parts of the spectrum might be missing altogether, but that’s a whole other can of worms.

The human eye-brain system ignores most differences of colour temperature in daily life, accepting all but the most extreme examples as white light. In professional cinematography, we choose a white balance either to render colours as our eyes perceive them or for creative effect.

6000K HMI lighting photographed at 3200K to give a moonlight feel to “Heretiks”

Most cameras today have a number of white balance presets, such as tungsten, sunny day and cloudy day, and the options to dial in a numerical colour temperature directly or to tell the camera that what it’s currently looking at (typically a white sheet of paper) is indeed white. These work by applying or reducing gain to the red or blue channels of the electronic image.

Interestingly, this means that all cameras have a “native” white balance, a white balance setting at which the least total gain is applied to the colour channels. Arri quotes 5,600K for the Alexa, and indeed the silicon in all digital sensors is inherently less sensitive to blue light than red, making large amounts of blue gain necessary under tungsten lighting. In an extreme scenario – shooting dark, saturated blues in tungsten mode, for example – this might result in objectionable picture noise, but the vast majority of the time it isn’t an issue.

Left: daylight white balance preset (5,600K). Right: tungsten white balance preset (3,200K)

The difficulty with white balance is mixed lighting. A typical example is a person standing in a room with a window on one side of them and a tungsten lamp on the other. Set your camera’s white balance to daylight (perhaps 5,600K) and the window side of their face looks correct, but the other side looks orange. Change the white balance to tungsten (3,200K) and you will correct that side of the subject’s face, but the daylight side will now look blue.

Throughout much of the history of colour cinematography, this sort of thing was considered to be an error. To correct it, you would add CTB (colour temperature blue) gel to the tungsten lamp or perhaps even place CTO (colour temperature orange) gel over the window. Nowadays, of course, we have bi-colour and RGB LED fixtures whose colour temperature can be instantly changed, but more importantly there has been a shift in taste. We’re no longer tied to making all light look white.

A practical light of the “wrong” colour temperatures in “Finding Hope”

To give just one example, Suzie Lavelle, award-winning DP of Normal People, almost always shoots at 4,300K, halfway between typical tungsten and daylight temperatures. She allows her practical lamps to look warm and cozy, while daylight sources come out as a contrasting blue.

It is important to understand colour temperature as a DP, so that you can plan your lighting set-ups and know what colours will be obtained from different sources. However, the choice of white balance is ultimately a creative one, perhaps made at the monitor, dialling through the kelvins to see what you like, or even changed completely in post-production.

The Art and Science of White Balance

The Cinematography of “Alder”

Back in February 2019 I spent a long day in Black Park, a forest behind Pinewood Studio, shooting a short film called Alder for director Vanda Ladeira. A little late perhaps, but here are my reflections on the cinematography and general experience of making this experimental fairytale.

The film is about a forager (Odne Stenseth) who does not realise he is being watched by the very spirit of the forest, the titular Alder (Libby Welsh). As he cuts a sprig of holly, or steps on a mushroom, he is unknowingly causing her pain. Meanwhile a group of ghosts – Alder’s former victims? – cavort in the woodland, and strips of film made with ground-up human bone reach out from the trees to ensnare the forager.

Vanda contacted me after seeing my work on Ren: The Girl with the Mark. She was keen for Alder’s lair to have the same feel as Karn’s house in that series. We had a number of meetings to discuss the tone, visuals and the logistics of the shoot, which initially was going to take place over two days but was eventually compressed to one.

In October 2018 we conducted a recce in a forest that we ultimately weren’t able to use. I remember at the time that I was considering shooting the project on celluloid, tying in with the plot point about Alder making film from her victims’ bones. I dropped the idea after taking light readings on that recce – when it was very overcast – and realising just how dark it could be under the tree canopy.

We ultimately shot on a Blackmagic Ursa Mini and Xeen primes, provided along with the lighting kit by gaffer Jeremy Dawson. The Blackmagic sensors seem to do very well with earthy tones, as I noticed on the village set of Ren, and the Ursa rendered the browns of the bracken, the soil and the forager’s costume nicely. Jeremy also provided us with a jib which enabled us to underscore the forager’s action with some definite moves: an introductory crane down; a dramatic pull up as he drives his knife into a tree; and a frantic boom down with him as he searches for his lost compass. In Alder’s lair we kept the camera drifting from side to side or up and down to bring energy to her more static scenes.

Lighting for the forager’s scenes was all natural, with just a little bounce or negative fill from time to time to keep some shape to the image. An Artem smoke gun, operated by Claire Finn, was used on almost every shot to give the forest some life and mystery, and also to keep the backgrounds from getting too busy; the grey wall of smoke serves to fade the background slightly, keeping the eye focused on the foreground action.

As there was no dialogue, I was free to change the frame rate expressively. Examples include: over-cranking close-ups of the forager’s feet and hands in contact with nature, emphasing the sensuality of his unwitting connection to Alder; over-cranking the dance of the ghosts to make their movements even more beautiful and supernatural; and under-cranking the forager slightly to enhance his panic when he finds himself lost and surrounded.

Alder’s lair was a set built by Denisa Dumitrescu in the forest. I took broadly the same approach to lighting it as I had for the reference scene from Ren, making some holes in the branch-covered roof and shining a blinder (a bank of four LED spotlights) through it to produce dappled shafts of sunlight. On the floor around Alder were a number of candles; we beefed up the light from these by skipping an 800W tungsten lamp off a bounce board on the floor.

The biggest challenge was the meeting between the two main characters, a scene scripted for daylight which we were forced to shoot after dark due to running behind schedule. It was the longest and most important scene in the film and suddenly the cinematography had to be completely improvised. We did not have anywhere near the lighting package that a woodland night exterior normally calls for – just 800W tungsten lamps, a few LED fixtures, and a generator only powerful enough to run one of each.

What I ended up doing was putting an 800 in the background, ostensibly as a setting sun, and bouncing a blinder off poly-board as fill. We shot the whole scene through in a single handheld shot, once with smoke and once without, then picked up a few close-ups.I tried to hide the lack of light in the background by allowing the 800 to flare the lens and render the smoke almost impenetrable at times. Vanda and her editor, Tom Chandler, leant into the strange, stylised look and bravely intercut the smoky and smokeless takes. The result is much more magical and expressive than what we would have shot if we had still had daylight.

You can watch the finished film here. It won me Best Cinematographer at the New York Cinematography Awards (August 2019) and Film Craft Award: Cinematography at Play Short International Film Awards (2019).

The Cinematography of “Alder”

How to Make a Living from Cinematography

Seven years ago, I transitioned to making a living purely as a director of photography on drama. I’ve since added writing and making an online course to my repertoire, but drama is still paying most of the bills. If you’re doing bits of what you love around a day job in an office, or freelance corporate videos, being able to leave those things behind you and pay the rent with stuff you enjoy doing can seem like the Holy Grail. So below I’m going to list the three things which I think, in combination, allowed me to make that transition.


1. Quantity of experience: putting in the hard graft

When I stopped doing corporates in 2014, I had been in the industry for a decade and a half. I had made two no-budget features off my own back, and photographed half a dozen other no-budget features and countless shorts, as well as the rent-paying work on participatory films, training videos and web video content. (Whether this kind of stuff really counts as being in “the industry” is debatable, but that’s a subject for another post.)

When I apply for a job I always start by introducing myself as a DP with x years of experience, because I think it speaks volumes about my passion and commitment, and proves that I must have talent and be pleasant to work with, if I’ve been able to keep doing it for so long.

The number of IMDb credits I had is also important. I had almost 50 at the time I made the jump, over half of those as a cinematographer.

How many years of experience and how many IMDb credits you need before you can make the jump could be more or fewer than I needed, depending on the other two factors on this list and the quality of the contacts you make. (I haven’t included contacts as a separate item on this list because it comes naturally out of the jobs you do. Artificially generating contacts, for example by attending networking events, does not lead to jobs or career progression, at least not in my experience.)


2. Quality of experience: getting that killer production on your reel

I first noticed a change occurring in my career when I added material from Ren: The Girl with the Mark to my showreel. There was a noticeable increase in how often I was getting short-listed and selected for jobs. And The First Musketeer, in conjunction with Ren, led directly to my first paid feature film DP gig.

What was it about these two projects which enabled them to do for my career what fifteen years’ worth of other no-budget projects couldn’t? Production value. Simple as that. They looked like “real” TV or film, and not in the way that your friends and family will look at anything you shot and go, “Wow, that looks like a real film!” They looked – even to people in the industry – like productions that had serious money behind them. And people are lazy when they’re looking at showreels. If they’re hiring for a job that has serious money behind it, they want to see material on your showreel that appears to have serious money behind it.

Most scripts that you will read for shorts or no-budget features will be written to make them achievable with little or no money. Often they will be set mainly in one house (the director’s, or a bland-looking Airbnb) in the present day, with no production design and only three or four characters. If the script is well written, and you’re an actor, then working on such a project could be great for your career. For most crew members, it’s a waste of time.

For DPs in particular, quality production design is incredibly important on your showreel. Most people who watch your reel won’t really be able to separate the cinematography from the overall look of the piece – the art, the costumes, the make-up, the locations – so getting showreel material that is visually stunning from all departments is the only way to kick your career up to the next level.


3. The Fear: making a living at it because you have to

Before I stopped doing corporates, I thought I was making every effort to get work as a drama DP. But I was wrong. As soon as I gave up the safety net of corporates, my whole attitude to drama work changed. Suddenly I had to do it, and I had to get paid reasonably well for it, otherwise I wouldn’t be able to pay my rent. It made me drive a harder bargain when negotiating my fee, it made me turn down unpaid projects and as a consequence it changed the way producers and directors saw me, and the kinds of projects they would consider me for.

Do not underestimate the value of The Fear. It’s not a magic wand, and you do need to have the experience and the killer production(s) on your reel before you make the jump, but The Fear will give you wings and help you get to the other side.

How to Make a Living from Cinematography

6 Things to Beware of with Vintage Lenses

Ever since digital cinematography became the norm, DPs have sought to counter the format’s perfection with characterful vintage lenses. Having just completed a feature film shoot, Hamlet, on Cooke Panchros and a Cooke 10:1 Varotal, I’m over the moon with the beautiful, creamy, organic look they brought to the production. However, I can’t deny that they have some disadvantages over modern glass which you should take into consideration before choosing the vintage approach.


1. Softness

Vintage lenses simply aren’t as sharp as their modern counterparts, particularly at the edges of frame and particularly when the iris is wide open. On Hamlet I deliberately shot with the Panchros wide open to soften the image, rather than adding a diffusion filter like I’ve often done in the past, but that look is not for everyone, and it does make things a little harder for your focus puller. Be sure to test the sharpness and view the results on a large screen before committing.


2. BreathING

https://www.youtube.com/watch?v=YcpLAk34fkk

Breathe is the phenomenon whereby a lens appears to zoom slightly in or out when the focus is pulled. The Cooke Varotal is especially prone to this. As a result, my focus puller Aristide Russo had to be very gentle with his pulls otherwise the breathing was distracting.


3. Veiling

Many DPs love lens flares, and beautiful, natural flares were one of the reasons I picked the vintage Cooke glass. But look out for veiling flare – a milkiness and lift in the shadows affecting the whole frame. I noticed this a lot when shooting under the practical fluorescents in Hamlet‘s stage set, especially with handheld shots where the veiling would appear and disappear depending on the camera’s angle to the lights. I decided to embrace it and make it part of the film’s look, but if maintaining high contrast at all times is important to you, lenses without modern coatings may not be the right choice.


4. Vignetting

Check for dark patches in the corners of your image. The Varotal I used vignetted at certain parts of the zoom range and not at others, so the dark corners would appear and disappear during a zoom. Although not ideal, it isn’t noticeable most of the time. Besides, I figured that most colourists add vignettes to most shots anyway, so I was simply saving them a little time!


5. Mechanics

Older lenses are, quite naturally, less reliable. Even if they have been rehoused, like our Cooke “Century” Panchros had been in 2000, you may find that the iris and/or focus sticks sometimes. Our 25mm started to play up halfway through our shoot, forcing Aris to use the rosettes to support the matte box, otherwise the motor wasn’t powerful enough to turn the focus ring. This possibility was flagged for me during testing when we had a similar issue with the 50mm. Even if all your lenses seem to be fine during prep, know that a vintage lens could start misbehaving at any time, and your rental house may not have another on the shelf to replace it with.


6. Uniformity

Don’t expect a set of vintage primes to all have the same maximum aperture or the same external configuration. The iris ring might be buried in the matte box, the matte box might not fit on at all, or it may be impossible to engage both iris and focus motors at the same time.


All this sounds quite negative, but the flares, softness, breathing and vignettes can be absolutely beautiful. Be aware of the downsides of using vintage glass, absolutely, but if they suit your story then embrace the flaws and get ready to be blown away by your dailies.

In case you missed them the first time, I’ll leave you with some highlights from my Hamlet lens tests.

6 Things to Beware of with Vintage Lenses

Undisclosed Project: Culmination

Today filming begins on the Shakespearian feature I have been prepping since early February. All of last week was again spent in rehearsals, this time focusing on the second half of the script.

By the end of the week I had storyboarded almost the entire film, using Artemis Pro. The production designer was able to print these out and go through them looking for any backgrounds that he might not yet have dressed, or any obtrusive existing objects that should be removed. The 1st AD was also using them to help him plan, as he had not been present at rehearsals. This led to a minor panic when I erroneously included some characters in the background of a shot that those actors were not scheduled for!

Aside from producing these storyboards and getting a fantastic understanding of how all the scenes are going to be played and blocked, a big benefit of the rehearsal weeks was the opportunity to get to know the cast. Normally I have to wave a big camera in an actor’s face the first time I meet them. It’s much better to ease them and me into the process the way we’ve done on this production. A particular highlight was when the well-known lead actor performed some of the famous soliloquies – in the absence of a camera – right into my eyes.

It was a very busy week for all concerned. When the cast weren’t in rehearsals they were in costume fittings or make-up tests, or training for the sword-fight, or doing press interviews.

The gaffer started work on Wednesday, and was joined by the best boy and spark on Thursday. After loading in the equipment, their first task was to re-globe all the sconces and ceiling lights in the auditorium. Later they gelled all the emergency lights to make them dimmer and warmer in colour, ran distro to various convenient points, and cut poly-boards to size.

The camera kit also turned up on Thursday, a slightly surreal event for me after so long working in the building with just my laptop and iPhone. For a few scenes Sean wants to create a kaleidoscopic effect, so I had purchased some cheap kaleidoscope party glasses, a 6” teaching prism, and a set of crystals which can be hung off the matte box. Ironically the cheap glasses give the best effect! These will be hand-bashed in front of the lens, whereas the prism can be clamped to a noga arm for a more controlled effect.

I gave the focus puller a tour of the building so that he could start to think about monitor positions. That will definitely be a tricky aspect of the production with all the cramped backstage spaces.

I feel better-prepared now than I have ever felt going into a feature. It is such a contrast to, say, Heretiks, where I had just one week to get up to speed, and the gaffer had no prep time whatsoever. Nonetheless, there are some things you just can’t work out until the day, and that’s where the stress and excitement come from!

I’ll continue to write a blog during production, but I won’t be publishing it until the film is released. So there will be no new posts for the next few weeks, but normal service will resume in May! See you on the other side.

Undisclosed Project: Culmination

Undisclosed Project: Observation

Well, it’s all very real now. For six weeks I’ve been documenting my non-continuous prep period on a feature film adaptation of a well-known Shakespeare play. It won’t be announced to the press until it is close to release, so I still can’t share the title or any other identifying details. I’ll go so far as to say that it’s being shot in a theatre (though not all on stage), and the director is from a theatre background

On Monday I checked into the hotel and began the first of two full-time prep weeks. Unusually, these two weeks are filled with rehearsals. I may, once or twice, have worked on a film that had perhaps a single day of rehearsals. Two weeks is unheard of, but of course it’s perfectly normal in theatre.

The strange thing for me is that just when a scene is taking shape – the point where I’d normally get involved, when the blocking is nearly final and it’s time to think about shots – we move on to the next one. The last bit of the rehearsals will be done, as normal, on the day of shooting.

As the actors explore the spaces, I do too. Some of them have changed quite dramatically, thanks to the efforts of the art department, since I last reccied them. It’s an unprecented opportunity for me to check many potential camera angles. Before we move on from a scene, I run around frantically with Artemis, trying to take enough shots to make a storyboard. A large part of today (it’s Saturday as I write this) has been taken up with selecting the best shots, scribbling annotations on them and outputting them as PDFs into a Google Drive folder where the director, 1st AD, 1st AC, production designer and others can see them.

During quieter moments, I’ve slipped off to discuss things with the production designer or the stage lighting designer, or just to sit in one of the spaces by myself and think through shots and lighting.

On Friday afternoon a tech recce took place, which I led because the director was still busy rehearsing. This was followed by a Zoom meeting to discuss issues arising.

Less fun but equally important things last week were completing a camera department risk assessment, and taking Covid tests, which leave you feeling like you jumped into a swimming pool without pinching your nose.

Undisclosed Project: Observation

Undisclosed Project: Organisation

By the time you read this I will have entered the Covid bubble for the still-as-yet-unannounced Shakespearian film, the beginning of two weeks of full time prep before cameras finally roll.

The week just gone has been something of a calm before the storm. It started with two important Zoom meetings: one about practicals, the other about the schedule.

The first meeting involved going through all the locations with the production designer explaining what practical lamps he planned to put in each, and me sometimes asking for additional ones. Practicals are going to be a big part of our lighting, and this sort of collaboration with the art department can make a real difference between a smoothly-running shoot and a world of pain wherever you’re trying to hide film lights because you don’t have enough practical sources.

The second meeting, coming shortly after I saw the shooting schedule for the first time, was an in-depth discussion of it with the director, producer, line producer and 1st AD. Most of my concerns – other than some days which felt uncomfortably heavy, and even one or two that seemed wastefully light – were around times of day and equipment. For example, one daylight interior scene was scheduled for the end of day, when we might be losing the light. (The next day I went through it all again by myself and made sure that any night scenes scheduled for daytime could be reasonably done with blacked-out windows.)

We also talked a lot about how things could be rejigged to get as much value as possible out of the two days that we have the crane. It’s expensive, and no-one wants it sitting around while we shoot little dialogue scenes in tiny rooms. Nor do I want one or two scenes in the film to have lots of crane shots and the rest to have none; a sprinkling of them throughout the film would be preferable, though it would mean lots of costume and make-up changes.

Another draft of the script was issued , with pretty minor changes, though one extra room has been introduced, so that will need a proper recce next time I’m there. Reading through a new draft and updating my notes takes the best part of a day, and though it can sometimes feel like a chore, every reading helps me understand the story and characters better.

I did a little more shot-listing later in the week, but it will be much better and easier to do this at the rehearsals over the next fortnight, when I can see how the actors are approaching their characters and how they’re going to use the spaces. I can even take Artemis photos if it doesn’t interrupt their process too much. Roll on rehearsals!

Undisclosed Project: Organisation

Undisclosed Project: Experimentation

The main event of last week’s prep was a test at Panavision of the Arri Alexa XT, Red Gemini and Sony F55, along with Cooke Panchro, Cooke Varotal, Zeiss Superspeed and Angenieux glass. More on that below, along with footage.

The week started with Zoom meetings with the costume designer, the make-up artist, potential fight choeographers and a theatrical lighting designer. The latter is handling a number of scenes which take place on a stage, which is a new and exciting collaboration for me. I met with her at the location the next day, along with the gaffer and best boy. After discussing the stage scenes and what extra sources we might need – even as some of them were starting to be rigged – I left the lighting designer to it. The rest of us then toured the various rooms of the location, with the best boy making notes and lighting plans on his tablet as the gaffer and I discussed them. They also took measurements and worked out what distro they would need, delivering a lighting kit list to production the next day.

Meanwhile, at the request of the producer, I began a shot list, beginning with two logistically complex scenes. Despite all the recces so far, I’ve not thought about shots as much as you might think, except where they are specified in the script or where they jumped out at me when viewing the location. I expect that much of the shot planning will be done during the rehearsals, using Artemis Pro. That’s much better and easier than sitting at home trying to imagine things, but it’s useful for other departments to be able to see a shot list as early as possible.

So, the camera tests. I knew all along that I wanted to test multiple cameras and lenses to find the right ones for this project, a practice that is common on features but which, for one reason and another, I’ve never had a proper chance to do before. So I was very excited to spend Wednesday at Panavision, not far from my old stomping ground in Perivale, playing around with expensive equipment.

Specifically we had: an Arri Alexa – a camera I’m very familiar with, and my gut instinct for shooting this project on; a Sony F55 – which I was curious to test because it was used to shoot the beautiful Outlander series; and a Red Gemini – because I haven’t used a Red in years and I wanted to check I wasn’t missing out on something awesome.

For lenses we had: a set of Cooke Panchros – again a gut instinct (I’ve never used them, but from what I’ve read they seemed to fit); a set of Zeiss Superspeeds – selected after reviewing my 2017 test footage from Arri Rental; a couple of Cooke Varotal zooms, and the equivalents by the ever-reliable Angenieux. Other than the Angenieux we used on the B-camera for The Little Mermaid (which I don’t think we ever zoomed during a take), I’ve not used cinema zooms before, but I want the old-fashioned look for this project.

Here are the edited highlights from the tests…

You’ll notice that the Sony F55 disappears from the video quite early on. This is because, although I quite liked the camera on the day, as soon as I looked at the images side by side I could see that the Sony was significantly softer than the other two.

So it was down to the Alexa vs. the Gemini, and the Cookes vs. the Superspeeds. I spent most of Thursday and all of Friday morning playing with the footage in DaVinci Resolve, trying to decide between these two pairs of very close contenders. I tried various LUTs, did some rough grading (very badly, because I’m not a colourist), tested how far I could brighten the footage before it broke down, and examined flares and bokeh obsessively.

Ultimately I chose the Cooke Panchros because (a) they have a beautiful and very natural-looking flare pattern, (b) the bokeh has a slight glow to it which I like, (c) the bokeh remains a nice shape when stopped down, unlike the Superspeeds’, which goes a bit geometric, (d) they seem sharper than the Superspeeds at the edges of frame when wide open, and (e) more lengths are available.

As for the zoom lenses (not included in the video), the Cooke and the Angenieux were very similar indeed. I chose the former because it focuses a little closer and the bokeh again has that nice glow.

I came very close to picking the Gemini as my camera. I think you’d have to say, objectively, it produces a better image than the Alexa, heretical as that may sound. The colours seem more realistic (although we didn’t shoot a colour chart, which was a major oversight) and it grades extremely well. But…

I’m not making a documentary. I want a cinematic look, and while the Gemini is by no means un-cinematic, the Alexa was clearly engineered by people who loved the look of film and strove to recreate it. When comparing the footage with the Godfather and Fanny and Alexander screen-grabs that are the touchstone of the look I want to create, the Alexa was just a little bit closer. My familiarity and comfort level with the Alexa was a factor too, and the ACs felt the same way.

I’m very glad to have tested the Gemini though, and next time I’m called upon to shoot something great and deliver in 4K (not a requirement on this project) I will know exactly where to turn. A couple of interesting things I learnt about it are: (1) whichever resolution (and concomitant crop factor) you select, you can record a down-scaled 2K ProRes file, and this goes for the Helium too; (2) 4K gives the Super-35 field of view, whereas 5K shows more, resulting in some lenses vignetting at this resolution.

Undisclosed Project: Experimentation