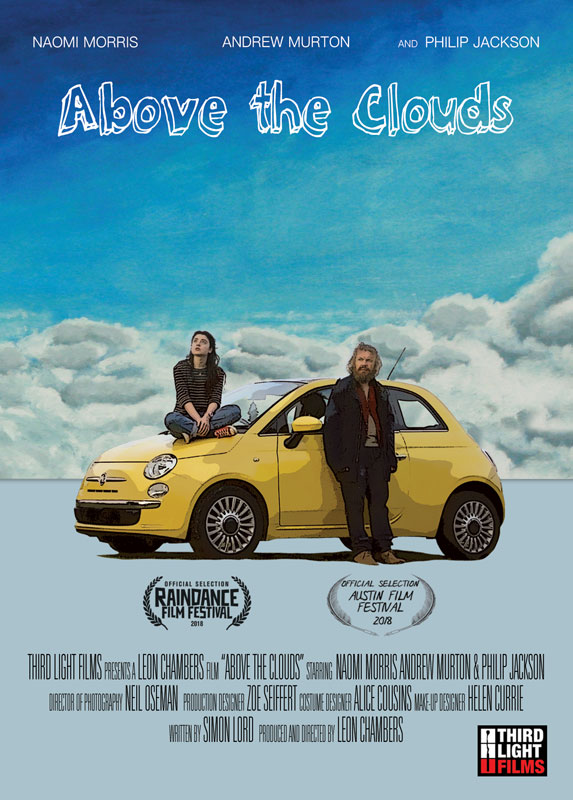
During 2016-2017 I blogged about the production of Above the Clouds, a comedy road movie which I shot for director Leon Chambers. It premiered at Raindance in 2018, closely followed by Austin Film Festival, where it won the audience award for Best Narrative Feature, the first of four gongs it would collect.
In two decades of filmmaking, Above the Clouds is easily in the top five productions I’m most proud of. Since this January it has been available on Amazon, iTunes, Google Play and other platforms, and I highly recommend you give it a watch. DO NOT continue reading this blog unless you have, because what follows are two blog entries that I held back due to spoilers.
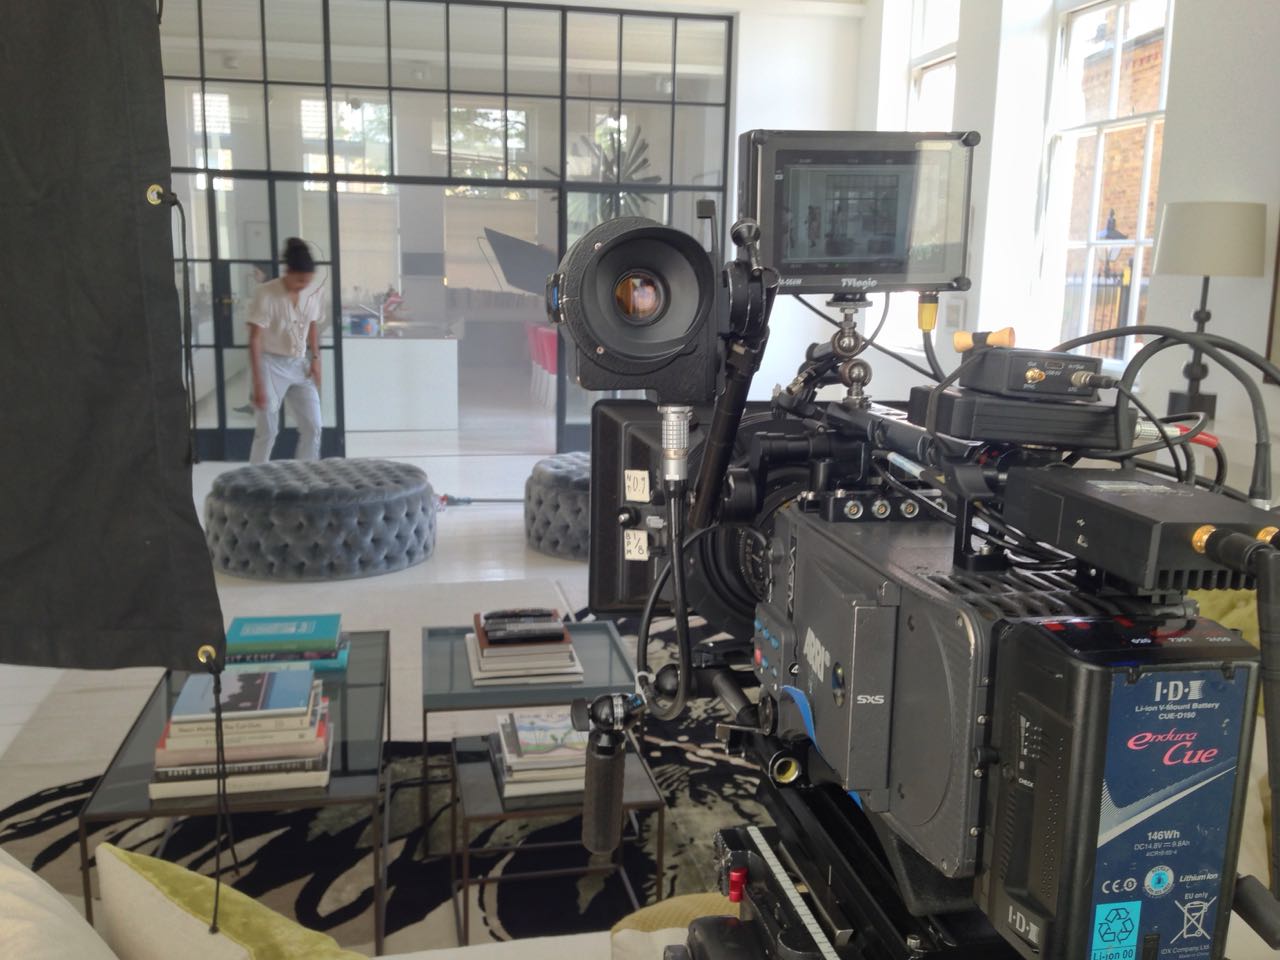
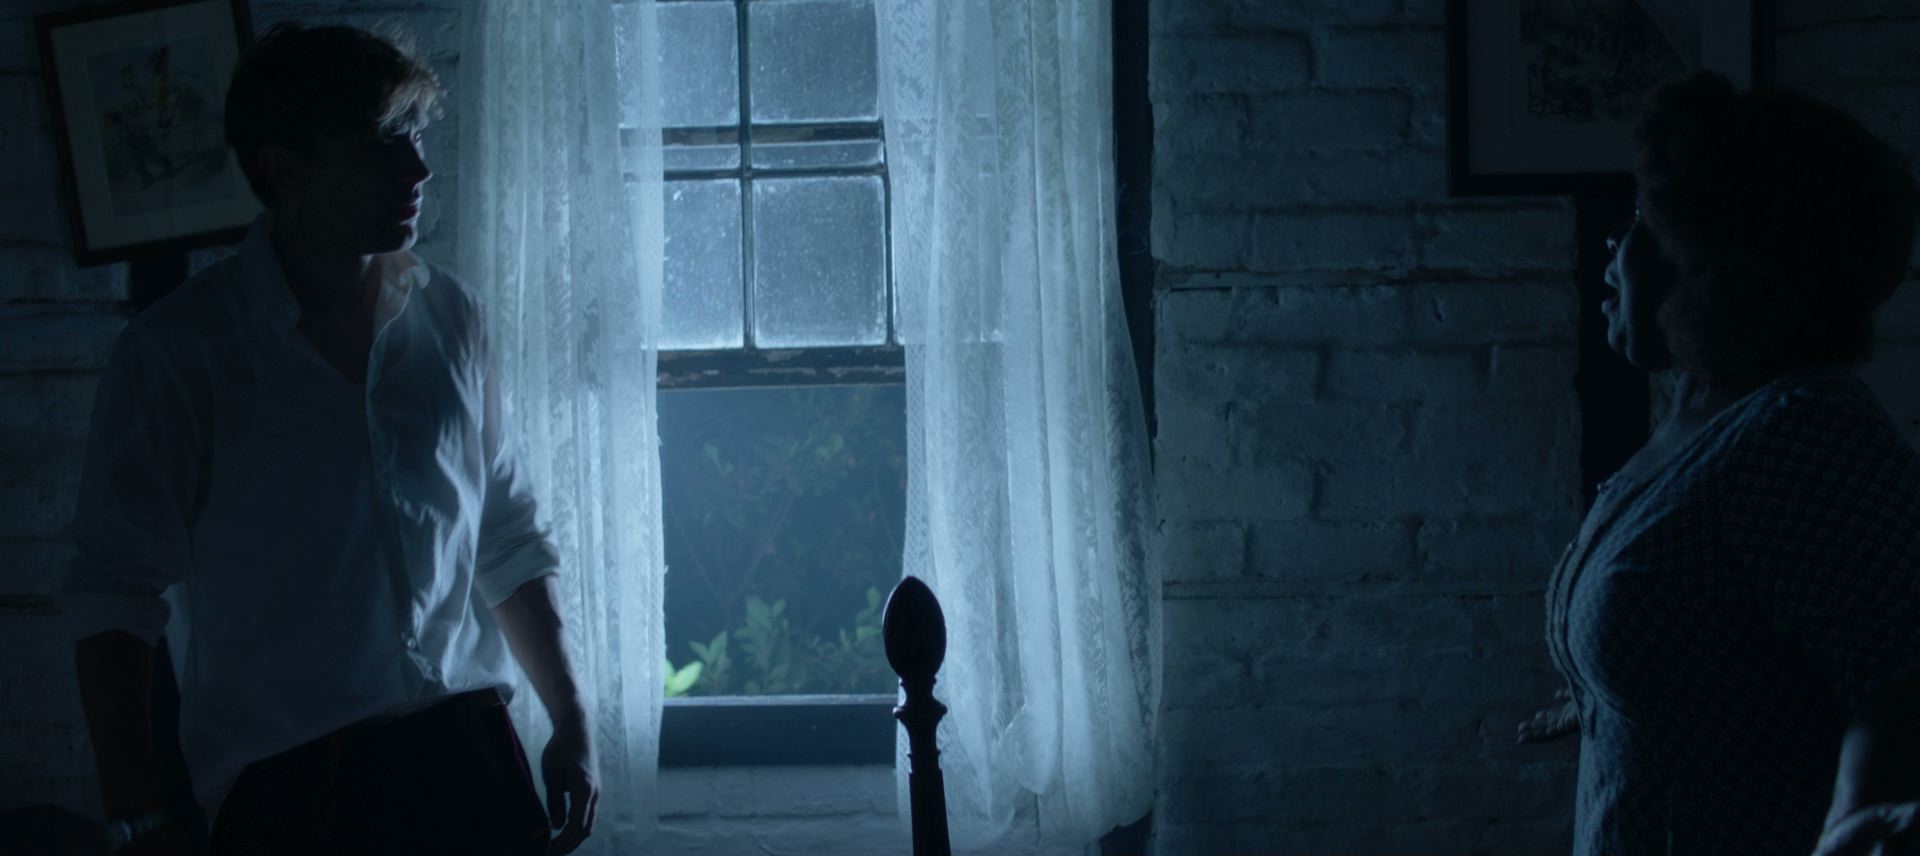
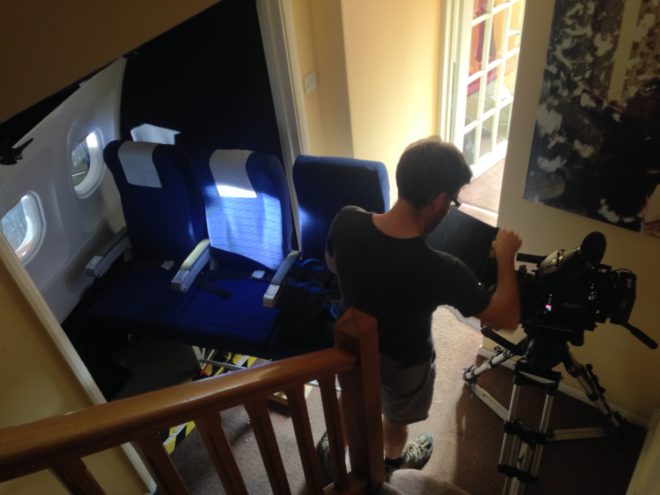
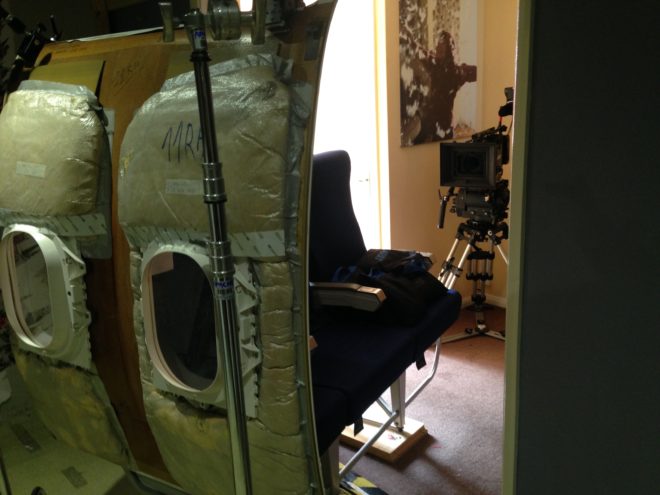
The script calls for Charlie to be seen sitting in the window seat of a plane as it rises quite literally above the clouds. This is another micro-set filmed in Leon’s living room, in fact half in the living room and half in the hall, to leave enough room for the lights beyond.
Although the view out of the window will be added in post, I need to simulate the lighting effect of bursting through the clouds. My plan involves a 1.2K HMI, and a 4×4 poly board held horizontally with a triple layer of 4×4 Opal sheets hanging from one edge.
We start with the HMI pointed straight into the window and the poly board held high up so that the Opal hangs in front of the lamp. As the plane supposedly rises through the cloud layer, Colin lowers the poly until it is below the level of the lamp, while Gary tilts the HMI down so its light skips off the poly (like sun skipping off the top of clouds) and bounces back up into the window. Gary then tilts the HMI back up to point straight into the window, to suggest further banking or climbing of the aircraft. This direct light is so hot that it bounces off the armrest of Charlie’s seat and gives a glow to her cheek which syncs perfectly with a smile she’s doing.
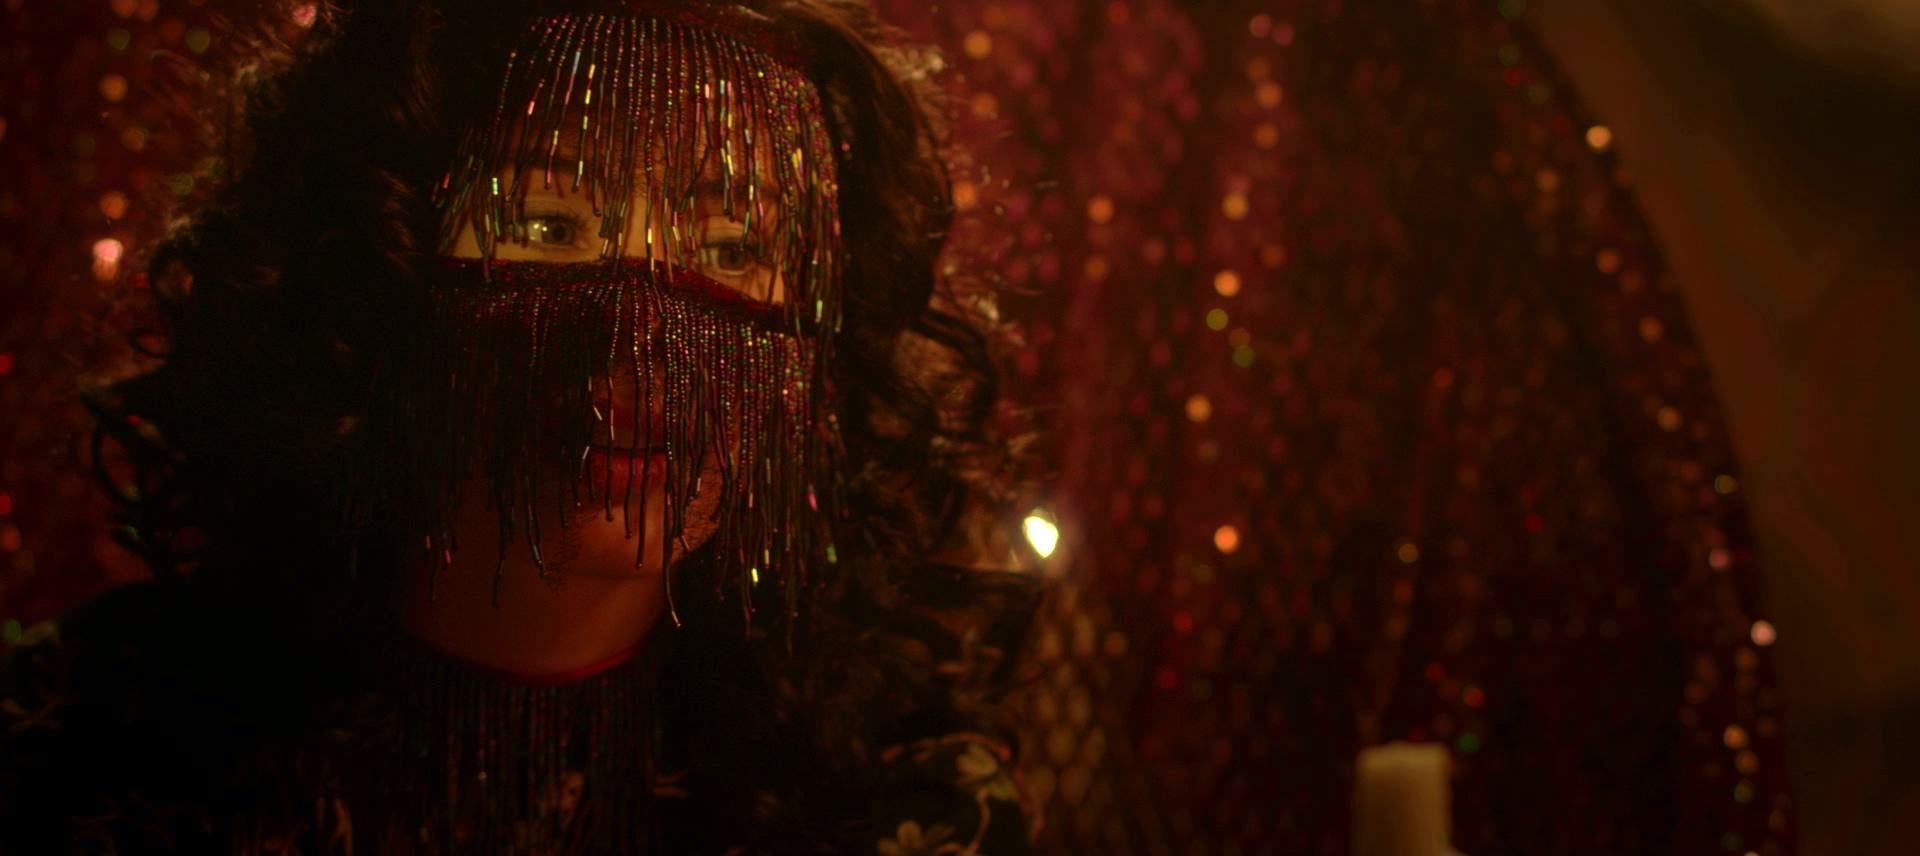
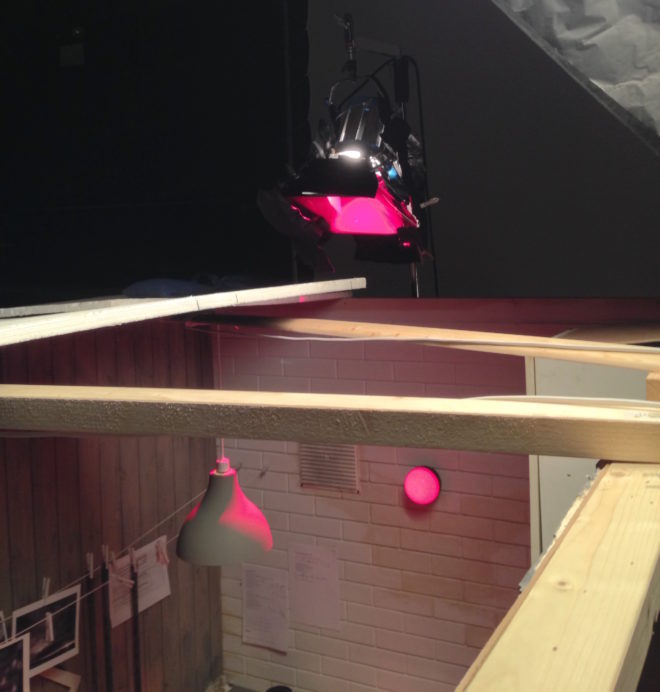
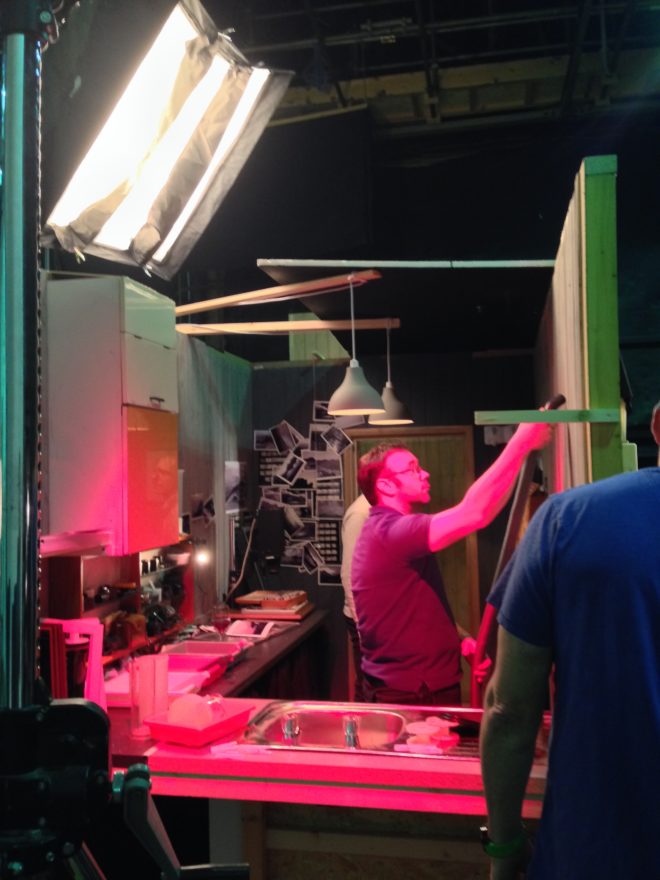
Today’s set is a dark room. A photographer’s dark room, that is. Not just a random dimly-lit room.
We begin with only the red safe-light in play. The wall-mounted practical has a 15W bulb, so it needs some serious help to illuminate the room. Micky rigs a 1K pup with Medium Red gel and fires it over the top of the set, above the practical. The effect is very convincing. Pure red light can make everything look out of focus on camera, which is why I chose the slightly magenta Medium Red gel, rather than the more realistic Primary Red. The colourist will be able to add some green/yellow to correct this.
During the scene, Naomi pulls a cord and the normal lights come on. These are two hanging practicals, fitted with dimmed 100W tungsten globes. In a very similar set-up to yesterday, we use a 2K with a chimera, poking over the set wall on the camera’s down-side, to enhance and soften the practicals’ light.
To read all the Above the Clouds blogs from the start, click here.
I’m using my time in Covid-19 lockdown for a few different things, some more worthy than others. Lying-in is a big one. Watching all of Lost again. Exercising more. But also I’ve got a big editing project to complete, a project of my own, the perfect task to get me through the long days at home.
Last November I shot Cinematic Lighting, a four-hour online course. It’s something I’d been thinking about for a while, especially over the last year or so as my Instagram following has sky-rocketed (about 33,000 at the time of writing). DPs and cinematography students follow my feed for the lighting diagrams I post every Friday, showing exactly how a lighting set-up was achieved, but some commenters had started to ask why I made certain creative decisions. So the idea for the course was born.
Lighting diagram for the Night Exterior module’s master shot
Cinematic Lighting consists of four modules: day exterior, day interior, night interior and night exterior. In each module I light and shoot a half-page scene with two actors, Kate Madison and Ivan Moy, with behind-the-scenes cameras following my every move. As I do it – with the assistance of gaffer Jeremy Dawson and spark Gareth Neal – I explain how and why I’m doing it. Sometimes I demonstrate alternative options I could have chosen. I talk about characterisation and how to match it with lighting. I quote John Alton and Christopher Nolan. I show clips from other productions I’ve shot and tell the stories behind them. I explain how to use a light meter and get your head around f-stops, T-stops and ND filters. I demonstrate the power of smoke. But most importantly I lay my creative process bare as I work.
Setting up a single in the Night Interior module. Photo: Ashram Maharaj
The original intention was for the course to be a reward on the Kickstarter campaign for Ren: The Girl with the Mark‘s second season, but sadly that campaign was unsuccessful. Over the next couple of months I’ll be investigating my options for releasing this course, and rest assured that I’ll let you know as soon as it’s available.
Meanwhile, postproduction work continues on it. The main thing left to do is the grading of the finished dramatic scenes; each module concludes with a polished edit of the scene which I’ve shot. Rather than hire a colourist, I’ve decided it’s time to finally learn a few things about grading myself. To that end, I’ve purchased a Udemy course and am currently learning how to do fancy secondaries in Davinci Resolve – another good use of my lockdown time, I feel. More on this in a future post.
Meanwhile, stay safe and REMAIN INDOORS.
Filming the introduction to the Day Exterior module. Photo: Colin Ramsay
Ren: The Girl with the Mark, the fantasy web series with over 8 million views and 14 international awards which I’m the DP on, is crowdfunding new episodes right now. Of all the projects I’ve ever worked on, there are few that I’m as proud of as I am of Ren.
https://www.kickstarter.com/projects/mythica/ren2
Please head on over to the Kickstarter page and contribute if you can. You can back for as little as £1 (or the equivalent in your local currency – Kickstarter automatically converts it). If you’re not able to back it, please tell others about it, share the social media posts, like and comment. You can find the Ren Facebook page here, the Twitter feed here and the Instagram feed here.
There are many awesome rewards on offer, including DVDs, downloads, collectables and unique on-set experiences.
One of the rewards is getting access to a new Cinematic Lighting course which I’ve made. Across four one-hour modules, I set up, light and shoot little scenes inspired by Ren on real locations with real actors, along the way explaining every decision I make.
Another reward is the Cinematographer Experience, where you get to spend a day on set with me, picking my brains, learning from everyone in the camera and lighting departments, and you get access to the lighting plans and shot lists, and you can take part in a group chat with me after we’ve wrapped.
Other filmmaking-related rewards are the Director Experience and the Downloads & Vlogs package which includes access to exclusive behind-the-scenes video blogs from every day of the shoot.
In August 2016 I was recommended to a production manager who was crewing up a small pick-ups shoot in London. The pick-ups were for Rory’s Way, or The Etruscan Smile as it was then known, a $12 million feature based on the best-selling novel of the latter name, starring Brian Cox and Thora Birch. Apparently test screenings had shown that the film’s ending wasn’t quite satisfying enough, and parts of it were to be remounted.
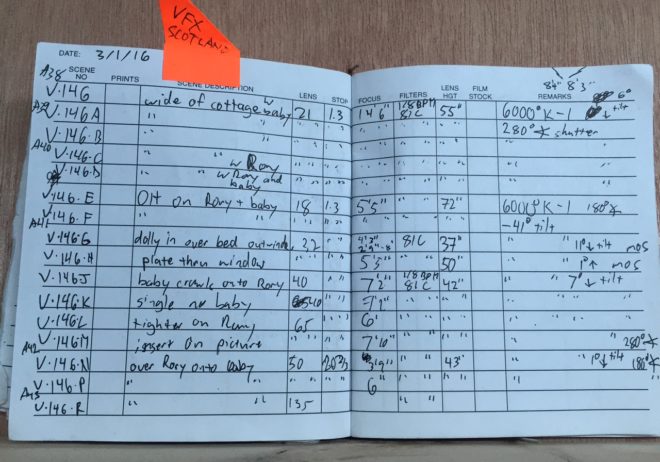
I was given a storyboard consisting of actual frame-grabs from the original version of the scene, alongside notes explaining how the action would be different. Not to give too much away, but the scene involves Brian’s character in bed, and a baby in a cot next to him. The changes simply involved Brian giving a different reaction to what the baby is doing. The bed was to be set up on stage against a blue screen, and composited into backgrounds extracted from the principal photography footage. The baby’s performance was not to be changed, so he was to be rotoscoped out of the original footage too.
I was sent the camera report, 2nd AC’s notebook and script notes from principal photography. The crew had known that the view out of the bedroom window would be added in post, and that separate takes of the baby and Brian would be digitally combined, so they recorded plenty of information for the VFX team. Between the three documents, I had the focal length, focal distance, aperture, white balance, shutter angle, filters, lens height and tilt of every set-up in the scene.
My next step was to email the main unit DP, who was none other than Javier Aguirresarobe, ASC, AE – the man behind the lens on Thor: Ragnarok, Nicole Kidman vehicle The Others, two of the Twilight films, and Woody Allen’s Vicky Cristina Barcelona. Needless to say, I was honoured to be recreating the work of such an experienced cinematographer.
Unit still of Javier Aguirresarobe, ASC, AE on location in Scotland for “Rory’s Way”/”The Etruscan Smile”
Javier told me that he had shot with Arri/Zeiss Master Primes, and explained the feel and colour of lighting he had been going for. He had used an 81C (coral) filter to warm up the image a little, and a 1/8th Black Promist for diffusion.
After that, I sat down over coffee with Ben Millar, my gaffer. We analysed the footage from principal photography and reverse-engineered the lighting. I say “we”; it was mostly Ben. This is why a DP hires a good gaffer!
The pick-ups shoot was a single day. The afternoon before, the director and the camera department convened at the studio. The plan was to go through each of the set-ups using a stand-in in the bed. For each set-up, we first used the camera logs and script notes to put on the correct lens and filters, and set the sticks to the right height and tilt. Then, with a print-out of the original shot taped underneath the monitor, we nudged the camera around until we had the closest possible match in framing. This done, ACs Max Quinton and Bex Clives marked the tripod position on the floor with tape, writing the lens length, height, filters etc. on the tape itself to make things super-efficient the next day.
The pick-ups set was nothing more than a bed surrounded by blue screens. The bright gap between the screens represents the window from the original location.
On the morning of the shoot, the lighting department had two or three hours to set up before Brian was called. We used mostly Kinoflos, with a lot of flags to represent window frames through which light sources had been shining on the original set. The VFX supervisor Stephen Coren and I checked the histograms on the monitor to ensure the blue screen was lit evenly and to the level he required.
We were ready to roll in plenty of time, and things went more or less to plan, with the addition of an extra shot or two. The editorial team were in the next room, checking our shots against the original material, and they reported that all was well.
We finished up with a single wide night interior shot for an earlier scene in the movie. This was an interesting one, because we had to extrapolate the lighting for the whole room from a single close-up that had been shot in principal photography. Our wide shot, recorded entirely against blue, would be dropped into a wide shot from principal – a daylight wide shot, that would be digitally painted and retimed for night.
At the time of writing, Rory’s Way has just hit UK cinemas, but I have yet to see it. For all I know it might have been re-edited again, but hopefully my shots are still in there! Either way, it was a fascinating exercise to analyse and reproduce the work of a top cinematographer.
This summer I shot Exit Eve, a short film from director Charlie Parham dealing with the exhausting and demeaning life of an au pair. We took the unusual decision to shoot it in 4:3, a ratio all but obsolete, but one which felt right for this particular story. Before I look at some of the ratio’s strengths and challenges, let’s remind ourselves of the history behind it.
History
William Kennedy Dickson
The 4:3 motion picture aspect ratio, a.k.a. 1.33:1, was created about 120 years ago by William Kennedy Dickson. This Thomas Edison employee was developing a forerunner to the movie projector, and decided that an image height of four perforations on 35mm film gave the ideal shape. In 1909 the ratio was declared the official standard for all US films by the Motion Picture Patent Company.
When the talkies arrived two decades later, room needed to be made on the film prints for the optical soundtrack. The Academy of Motion Pictures Arts and Sciences responded by determining a new, very slightly wider ratio of 1.37:1, known fittingly enough as the Academy Ratio. It’s so similar to 4:3 that I’m going to lump them together from hereon in.
When television was invented it naturally adopted the same 4:3 ratio as the big screen. The popularity of TV led to falling cinema attendance in the 1950s, to which the Hollywood studios responded with a range of enticing gimmicks including widescreen aspect ratios. Widescreen stuck, and for the next generation 1.85:1 and 2.39:1 were the ratios of cinema, while the narrower 4:3 was the ratio of TV.
By the time I entered the industry in the late 1990s, 4:3 was much maligned by filmmakers. It seemed boxy and restrictive compared with widescreen, and reminded those of us in the guerrilla world that we didn’t have the budgets and equipment of the Hollywood studios. Meanwhile, the wide compositions of big movies were butchered by pan-and-scan, the practice of cropping during the telecine process to fit the image onto a 4:3 TV without letterboxing. 4:3 was ruining our favourite movies, we felt.
Then, in the 21st century, 16:9 television became the norm, and the 4:3 aspect ratio quietly disappeared, unmourned…. Or did it?
Contemporary Cinema
Although they are firmly in a minority, a number of filmmakers have experimented with 4:3 or Academy Ratio in recent years. Some, like Andrea Arnold and the late Éric Rohmer, rarely shot anything else.
Arnold wanted a combination of intimacy and claustrophobia for her Bafta-winning 2009 drama Fish Tank. She carried the ratio over to her next film, an adaptation of Wuthering Heights, despite the prevalence of big landscapes which would have prompted most directors to choose 2.39:1. The Academy Ratio focuses the viewer’s attention much more on the characters and their inner worlds.
“Fish Tank” – DP: Robbie Ryan, BSC
Mark Kermode has this to say about the 1.37:1 work of Arnold and her DP Robbie Ryan: “What’s wonderful about it is the way [Ryan] uses that squarer format not to make the picture seem compressed but to make it seem taller, to make it seem larger, to make it seem oddly more expansive.”
Meek’s Cutoff (2010), a modern western by Kelly Reichardt, recalls the early Academy classics of the genre. As with Wuthering Heights, characters are placed in the landscape without being dominated by it, while the height of the frame produces bigger skies and an airier feel.
“Meek’s Cutoff” – DP: Chris Blauvelt
Pawel Pawlikowski’s 2013 Oscar-winner Ida deliberately goes against the grain, shooting not only in 4:3 but in black and white as well. It’s the perfect format to convey the timeless, spartan existence of the titular Ida and her fellow nuns. The tall frame allows for copious headroom, inspiring thoughts of Heaven and God, beneath which the mortal characters seem small.
The 2017 animated feature Loving Vincent, meanwhile, adopted 4:3 because it was closer to the shape of Van Gogh’s paintings.
David Lowery, director of last year’s A Ghost Story, wanted to trap his deceased title character in the boxy ratio. “It gave me a good opportunity to really hammer home the circumstances this ghost finds himself trapped in, and to dig into and break down the claustrophobia of his life within these four walls… And it was also a way to tap into some degree of nostalgia, because it feels old-fashioned when you see a movie in a square aspect ratio.”
4:3’s nostalgia factor has allowed it to be used very effectively for flashbacks, such as those in the recent Channel 4/Netflix series The End of the F***ing World. Wes Anderson delineated the three time periods of The Grand Budapest Hotel (2014) with different aspect ratios, using 1.37:1 for scenes set in 1932, the very same year in which that ratio was standardised by the Academy.
“Exit Eve”
Nostalgia, intimacy, claustrophobia, isolation – these are just some of the feelings which cinema’s original aspect ratio can evoke. For Charlie and I on Exit Eve, it was the sense of being trapped which made the ratio really fit our story.
I’m also a great believer in choosing a ratio that fits the shape of your primary location, and the converted schoolhouse which we were shooting in had very high ceilings. 4:3 allowed us to show the oppressive scale of these rooms, while giving the eponymous Eve little horizontal freedom to move around it. One additional practical consideration was that, when lensing a party scene, the narrower ratio made it easier to fill the frame with supporting artists!
It wasn’t hard to get used to framing in 4:3 again. A lot of Exit Eve was handheld, making for fluid compositions. There were a couple of tripod set-ups where I couldn’t help thinking that the extra width of 1.85:1 would be useful, but for the most part 4:3 worked well.
We were shooting on an Alexa Plus with a 16:9 sensor, meaning we were cropping the image at the sides, whereas ideally we would have hired a 4:3 model to use the full width of the sensor and a larger proportion of our lenses’ image circles. This would have allowed us to get slightly wider frames in some of the location’s smaller rooms.
Our sound department had to adapt a little. The boom op was used to being able to get in just above the actors’ heads, but with the generous headroom I was often giving, she had to re-learn her instincts.
Classic 4:3 overs in “Star Trek: The Next Generation”
I had forgotten how well dialogue scenes are suited to 4:3. With wider ratios, over-the-shoulder shots can sometimes be tricky; you can end up with a lot of space between the foreground shoulder and the other actor, and the eye-line ends up way off camera. 4:3 perfectly fits a face, along with that ideal L-shape of the foreground shoulder and side of head, while keeping the eye-line tight to camera.
Not every project is right for 4:3, far from it. But I believe that the ratio has served its sentence in the wilderness for its pan-and-scan crimes against cinema, and should now be returned to the fold as a valid and expressive option for filmmakers.
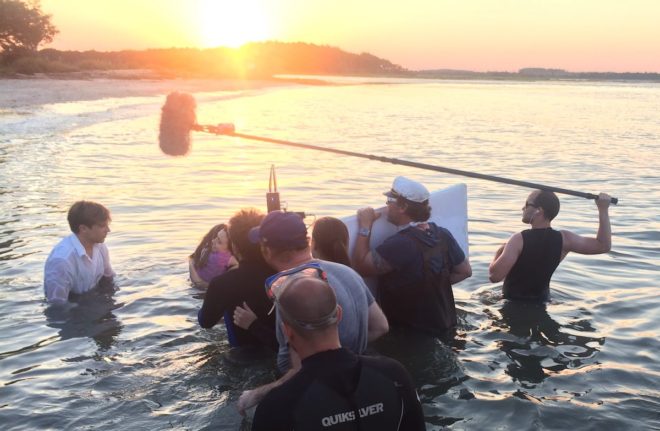
(Spoiler alert!) The denouement of The Little Mermaid takes place in the waves on a picturesque beach, where Cam (William Moseley) has carried Elizabeth (Poppy Drayton). In true fairytale style, our hero and heroine finally share their first kiss, parting to reveal the flaring orange sun behind them, just above the horizon. By the time we got to this sequence, we had already shot some water scenes, but those were in controlled, studio-like conditions. Working with natural light and real waves was going to be a whole different ball-game.
Here are some extracts from my diary, revealing how this magical moment was ultimately captured.
Day 22
Scenes at the beach today, with actors in the ocean. We’ve been worried about this sequence since the earliest stages of preproduction. Will the cast get too cold? Will it be too dangerous with waves and jellyfish and razor-sharp oyster beds? Will we get the magical dawn lighting the script requires? Building a partial beach set against green-screen was considered for a long time, but eventually shooting on a real beach, and this one particular beach, turned out to be our only option. (We’re back on Tybee Island, the same island we did the Shirley Shoot on so very long ago, and Baywatch seems to have all the other beaches tied up.)
The weather is good, with a cloudless sky. We’re cheating sunset for sunrise, and I know exactly where the sun will go down, thanks to the Helios and Sun Tracker apps.
We get ready to go into the water shortly after 6pm. The ACs put the camera in the splash bag and we bring it into the ocean. It starts to leak. Which is pretty much the last thing you want to happen. We pull it out before the camera gets damaged, but now we’re wondering how to shoot the scene. Someone suggests I just put the camera on my shoulder (I’m only going in up to my waist) and a couple of the crew spot me to make sure I don’t drop it. Sounds risky, doesn’t it? But it works. Meanwhile Captain Dan joins us in his waders to hand-bash a polyboard bounce, and the ‘B’ camera team are on a pontoon trying to get alternate angles.
Perhaps the most important thing I do today is ask Will to pick Poppy up the other way around. You see, when we’re about to turn over, Will picks up Poppy with her head to his right and her tail to his left. But I can see that if they play the scene with Poppy this way around, I will end up framing the two-shot with my back to the sun, losing that magical image of the low sun in the background, and probably casting camera shadows on them to boot. So I ask Will to pick Poppy up the other way around.
As the sun races towards the horizon, we get two magical takes. I’m constantly reframing to keep the setting sun in the background, and as the hero and heroine kiss, it flares out perfectly between them. Everyone is ecstatic.
Day 23
‘B’ cam 1st AC Geran Daniels on the pontoon with the Alexa XR Studio and the hefty Angenieux 19.5-94mm Optimo
It’s another beautiful day, and the first task is to go out on the pontoon and shoot Poppy’s double swimming about in the mermaid tail. I use the Angenieux zoom for only the second time (it normally lives on the ‘B’ camera), and for the first time on my shoulder. Damn, that thing’s heavy. But my shoulder has worse to come today.
As sunset approaches, we must shoot pick-ups for Saturday’s water scene with the principal cast. Today the tide is much lower at sunset, and getting out to a deep enough spot (up to around waist or chest level) means walking over very squelchy mud which you sometimes sink in up to your knees, and sharp oyster beds. So instead we get into the water via the pontoon. This boat has a limited capacity, so I’m dropped off on the first trip, before it returns to the dock twice more to get the rest of the cast and crew who are needed. It’s extremely pleasant to swim about in the ocean (more of an estuary really) while we wait.
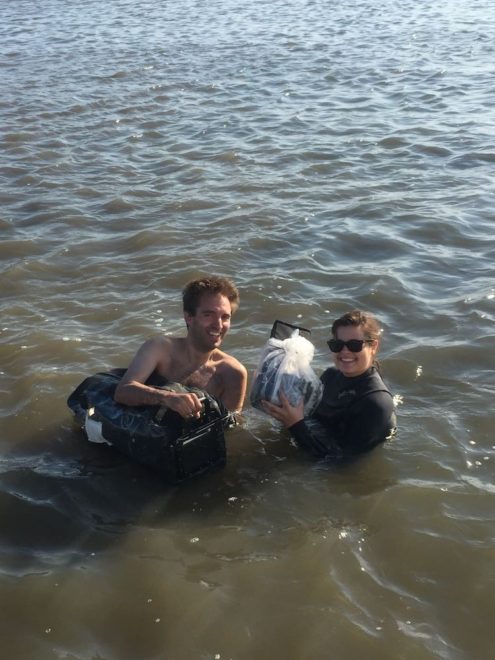
In the water with 2nd AC Kane Pearson and some expensive electronics. The white patch on the splash bag is the $5 of tape!
Line producer Fabio has proudly repaired the leaky splash bag with a $2 bicycle inner tube patch. 2nd AC Kane, a big spender, added $5 of tape, and we successfully tested it before we set sail.
Because the splash-bag doesn’t fit our Alexa’s viewfinder, Kane has to hand-bash a 5.6” monitor in a ziplock bag (along with a Teradek receiver and battery) so that I can see what I’m shooting. This works pretty well though. The hardest thing is the mud; it’s impossible to find a firm spot, so during the takes I’m always sinking and trying to keep my balance and follow the action at the same time. Kane has to prop me up on a couple of occasions.
For all the material in the ocean I stick to a (Cooke S4i) 32mm lens; the zoom won’t fit in the splash housing, and lens changes take too long. (The cast can only be in the water for 30 minutes at a time, according to Screen Actors Guild rules.) Although we mostly shoot at water level, where the splash bag floats and is easy to control, one set-up requires me to put it on my shoulder. The weight is quite something, but with help I get the shot.
With the water scenes wrapped, and the tide now higher, we swim back to shore. We’ve been in the water at least three hours, and it was exhausting but a lot of fun too.
That concludes my blog series on The Little Mermaid. If you missed any of the earlier instalments, here are the links:
“Shooting Shirley” – the pre-shoot with Hollywood legend Shirley MacLaine
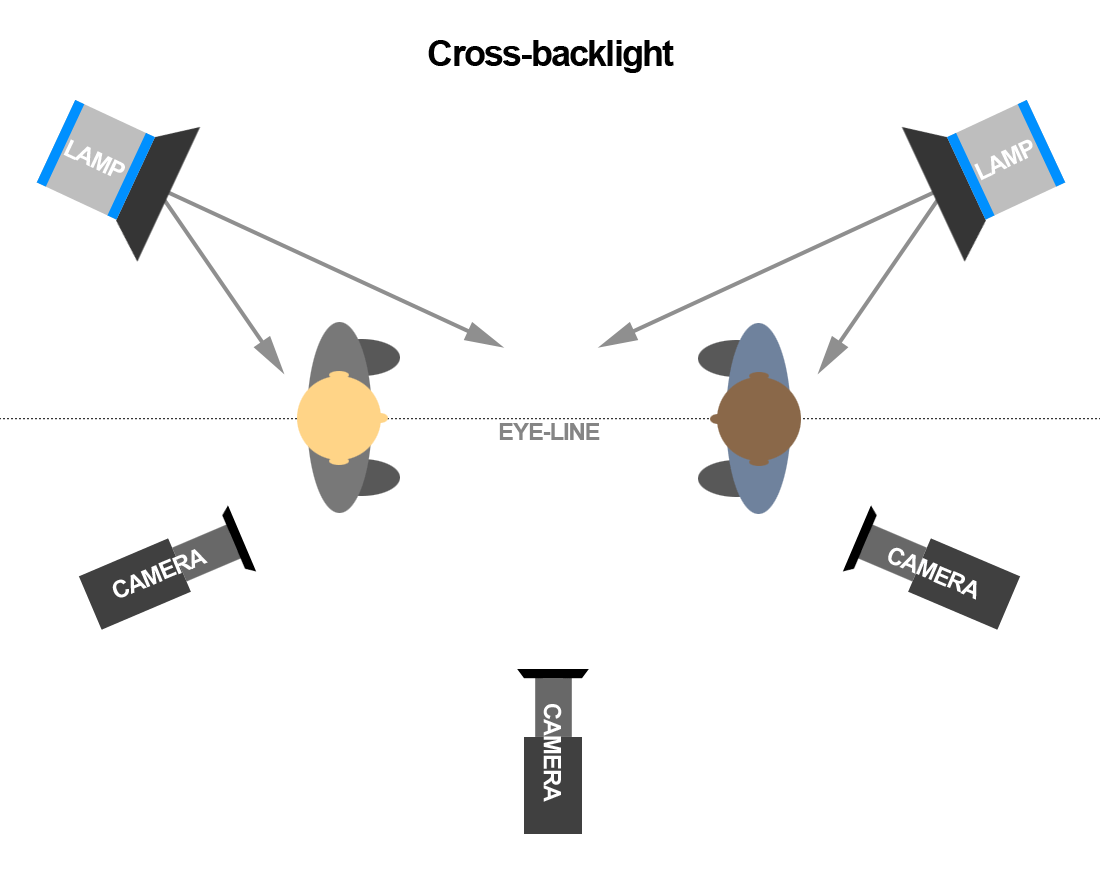
So far, this blog series about my cinematography of The Little Mermaid has covered the biggest and most complex scenes in the movie. Today I’m going to look at some smaller scenes, and how I employed the cinematography tenet of lighting from the back to quickly build a look for these which has depth, mood and drama.
Many of these examples are specifically cross-backlighting, something I covered in my Lighting Techniques series, but I’ll quickly recap since it has so much relevance here. It involves lighting two characters facing each other with two sources, on the far side of the eye-line (short key), crossed so that each source keys one character and often backlights the other too.
So with that in mind, let’s proceed to the examples from my shooting diary.
Day 1
The first week is pretty much all in houses with just a few principals, so an easy start. Day 1’s schedule is tight though. We start in a third floor bedroom – no way lamps are getting up to those windows from outside, so I’m relying on natural light augmented with a bit of cross-backlight cheated inside the room. (There’s a Kino Flo shining at Elle over Cam’s right shoulder, for example.) Once the haze is in it looks great. After we get the main coverage, we head out to the garden for the next scene, while the ‘B’ camera team steps in to pick up a couple of inserts…
Day 3
…It’s a night scene and the grips have tented the window. To get a nice blue glow coming in, I have two 4×4 Kino Flos set either side of the window (outside), and they give a great wrapping backlight to the actors and the set dressing. Smoke and a cool white balance of 3,200K (the Kinos are tubed for 5,600K) complete the look. It owes a lot to a scene from Hook, one of Blake’s (director Blake Harris) reference movies which I watched during preprod. This stuff definitely filters in and inspires things!
Day 13
Our first day on stage. It’s weird to be back at the former supermarket I spent five weeks of preproduction in. The first set, Locke’s chamber, is very confined and the walls don’t wild, so it’s quite slow-going to work in there. We fire a 5K fresnel through the stained glass window at the back of the set. Then I fall back on the tried and tested method of cross-backlighting even though I know that it will be hard to hide the lamps (a 650W fresnel in both of the upper rear corners of the set) from camera. In the end I have the art department dress drapes in front of them. For the villain’s single I leave the light hard, but for the hero’s single we use bounce boards to wrap the light around his face more…
Day 28
We start with the fortune-teller’s tent, another small set constructed on stage. In fact, it’s just an Easy-Up artfully draped with fabrics. Initially there’s nowhere to get light in from except the front, but I know that this will leave the scene looking flat and fake, so I work with the art department again to make holes in the top rear corners. Through those we shine tungsten-bubbled “Fat Boy” Kino Flos. (These 2ft 4-bank units are giving the dual kickers on Cam in the centre, and the beautiful down-light on the background fabrics, bringing out the ruching. Each one also provides a little key-light on the two ladies.) The other sources are “moonlight” coming in through the entrance, linking us to the circus exteriors, and a stylised slash of light across Thora’s eyes from a Source Four, suggested by Jason (key grip Jason Batey). Adding foreground practicals is an important final touch to expand the depth and scale of the set…
Day 31
It’s the last day of principal photography. Our big scene of the day is the newspaper office where Cam works, which is a set in the front of the studio, using the building’s real windows. We fire the 12K in and gel it with half CTS for a nice morning sunlight effect. We’re shooting towards the windows, which have blinds, so we get some nice shafts of light, though sometimes it’s a little too smokey. Running haze is a pretty skilled and tricky job, and involves considering the lens length and backlight, which both affect how much the smoke shows up on camera. When we get it right, combined with the dark wood period furniture, it totally sells the 1937 setting. Apparently people at video village are loving it, saying it looks like Mad Men….
Next week, in the final part of my blog series on The Little Mermaid, I’ll share my experiences of shooting the sunset denouement while up to my waist in the Atlantic Ocean.
One of the biggest challenges on The Little Mermaid was the amount of material set in moving vehicles at night. Over the course of the story, the heroes travel in two different trains, a pick-up truck and a riverboat, and I knew that lighting large stretches of railway, road or river wasn’t going to be practical on our budget. Ultimately much of it ended up being done against green screen, with the notable exception of the riverboat, the first mode of transport to go before the cameras. Here are the relevant extracts from my diary.
Day 14
Today’s a big day because we’re shooting on a riverboat which has been hired at great expense. We have a huge amount of material to cover and there’s no way we can come back to the boat later if we don’t get it all. Chris and I make a game plan in the afternoon and arrive at the dock in good time.
It feels a lot like a micro-budget movie, shooting on a location that perhaps should have been a set (once we set sail you can’t see anything in the background because it’s night) with a tiny lighting package running off a little genny: some Kinos, two LED panels, and a 1K baby. Out there in the dark river, it is eery watching unfathomably huge container ships pass 50ft from us. We leave ‘B’ camera on the shore and try to co-ordinate with them by walkie as they shoot wide shots of the boat and we try to hide!
Day 16
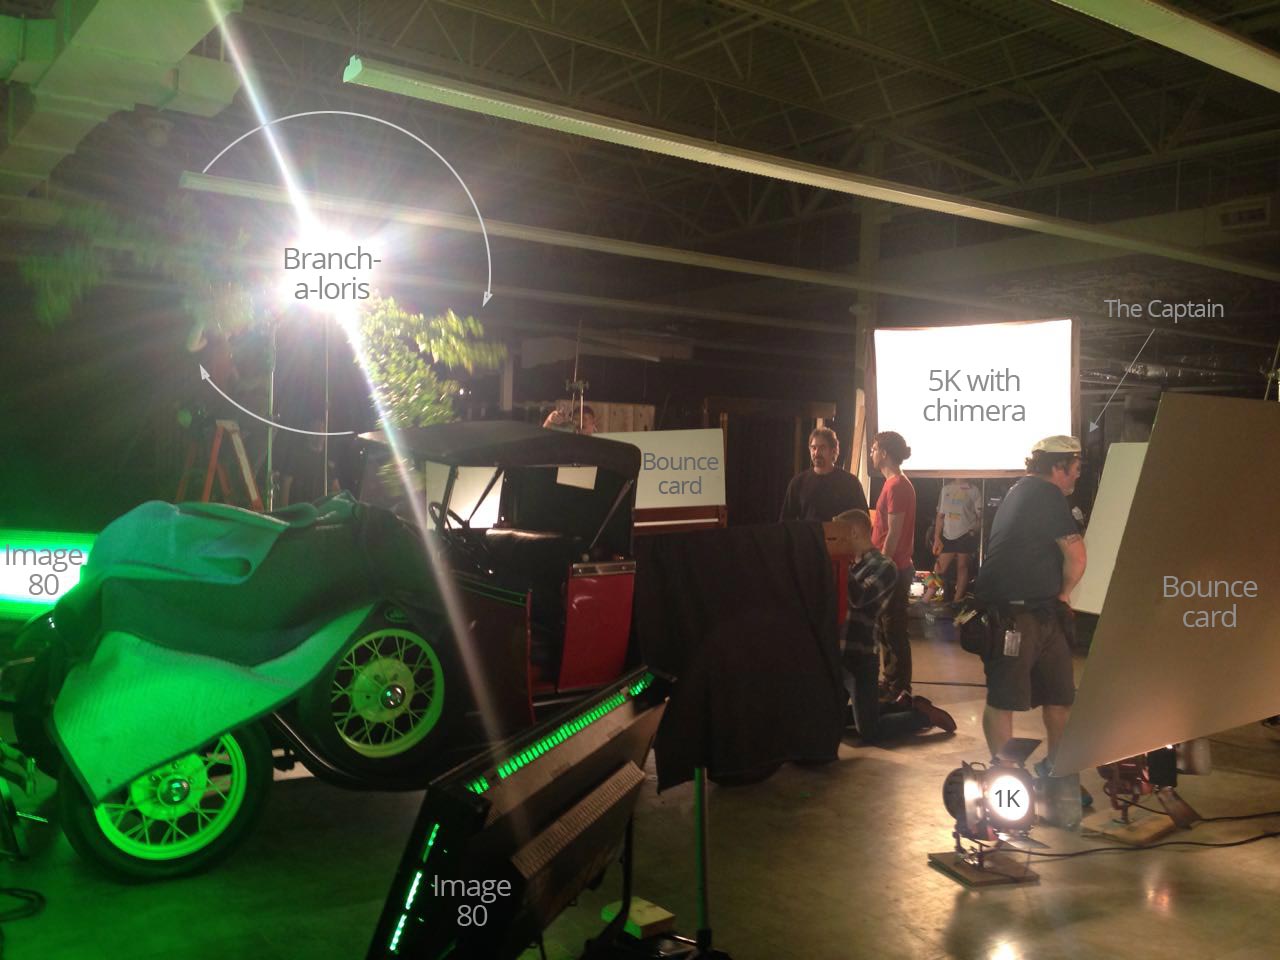
Night driving scenes in a pick-up truck today. Poor Man’s Process was considered for these, then doing it for real with a low loader (called a process trailer here in the States). But at last green screen was chosen as the way to go.
The period vehicle is wheeled into our studio and parked in front of two 12×12 green screens, which VFX supervisor Rich dots with red tape crosses for tracking markers. Throughout the night he moves them around to make sure there are always a couple in shot. We light the green screen with two Image 80s (4ft 8-bank Kino Flos with integral ballasts) fitted with special chroma green tubes. Rich tells me to expose the screen at key, which in this case is T4.
Captain Dan Xeller, best boy electric, has lit car stuff before, so I give him free reign to establish the ambient level. He does it with 1Ks fired into 8×4 bounce boards, so that any reflections in the car’s bodywork will be large and sky-like, not strips like Kino Flos or points like pars or fresnels.
For shape we add a 5K with a chimera at a three-quarter angle, and a side-on par can with a “branch-a-loris” in front of it. Key grip Jason Batey designs this rig, consisting of two branches on a pivot like a Catherine Wheel, which can be spun at any speed by one of the grips, to simulate movement of the car.
Finally I add a 2K poking over the top of the green screen with Steel Blue gel, as a gratuitous hair-light.
Most of the night’s work is handheld, often with two cameras, but we also get some dolly shots, moving towards or away from the car, again to simulate movement.
Day 17
More green screen work today. At the end of the night we recreate one of the scenes from the boat with a piece of railing against the green screen. I do exactly the same lighting as before – Steel Blue three-quarter backlight, and a tungsten key bounced off polyboard. I love the way the actors’ skin looks under this light. Tungsten bounced off polyboard may just be the best light source ever.
Day 18
Stage scenes on real sets today, one of which is meant to be on the riverboat. The grips come up with a gag where we shine moonlight through an off-camera window gobo, which they handbash back and forth to simulate the boat rocking. We end up dialling it down so it’s very subtle, but still adds a hint of movement.
We move to the caboose (guard’s van), one of the train carriage sets. A second branch-a-loris is constructed so that both windows on one side of the carriage can have the passing trees effect cutting up the hard fresnel “moonlight”. We light from the other side with Kinos, and add a 1K baby bounced off foamcore to represent light from a practical oil lamp. Later the dialogue transitions to a fight scene, and we replace the bounced baby with an LED panel so it’s a little easier to move around and keep out of shot. I get to do some energetic handheld camerawork following the action, which is always fun.
Interiors on stage, followed by night exteriors out the back of the studio. One of these is a shot of the heroes running, supposedly towards the train. It’s shot from the back of the 1st AD’s pick-up truck as we drive next to them. We have no condor today so the 12K backlight is just on a roadrunner stand, flooding out across the marsh between the lamp and the talent. With smoke it looks great, but lens flare keeps creeping in because the lamp’s not high enough.
We also shoot some Poor Man’s Process around a small set of the rear of a train car. Two lamps with branch-a-lorises in front of them, wind, smoke and shaky cameras help sell the movement.
Later we have a POV shot of a train screeching to a stop in front of the villain. The camera is on a dolly and the G&E team mount a 2K on there as well, to represent the train’s headlight.
Although The Little Mermaid takes place mostly on dry land, there were some key scenes involving tanks and pools. These include the moment which introduces the audience to the mermaid herself, played by Poppy Drayton. Here are some extracts from my diary covering the challenges of creating a magical, fairytale look while filming in and around water.
Day 10
Today we’re inside the big top all day – actually all NIGHT. We can’t shoot during the day because too much daylight bleeds through the canvas of the tent.
We are setting up when a storm hits. The tent starts to blow about in a slightly alarming fashion, rain lashes down outside (and inside, because the tent isn’t very waterproof) and lightning flashes. We are ordered out of the tent, and I run into a waiting mini-van with Joe from art and some of the camera crew. We sit watching the rain and telling stories for half an hour before we can press on.
Setting up with a stand-in next to the mermaid tank (centre, behind the monitors). In the top right you can see the 575W HMI backlight for the tank, and below that, grip Sawyer Oubre stands ready to fake watery rippling light with a par can and a blue gel frame.
Around the wall of the tent the art department have hung canvas posters; at the suggestion of gaffer Mike Horton, we uplight these with par cans and par 38s. The design of these fixtures hasn’t changed since the 30s, so we can get away with seeing them in shot. The art dept have sourced four period spotlights which we use as background interest (they’re not powerful enough to really illuminate anything), as well as string-lights.
Ambience comes from a Maxi Brute, with just a couple of bubbles on, firing into the tent roof. After seeing a video test of various diffusersduring preproduction, I asked for Moroccan Frost to be added to our consumables list, and we use it for the first time on this Maxi Brute. It gives a lovely muted orangey-pink look to the scene.
Steadicam operator Chris Lymberis. Photo: Kane Pearson
We’re shooting our mermaid for the very first time, in a tank in the circus ring. The initial plan is to fire a Source Four straight down into the water to create genuine watery rippling light, while bouncing a par can off a wobbling frame of blue gel to beef up the effect. In the end the Source Four isn’t really cutting it, so instead we rig a 575W HMI, gelled with Steel Blue, to a menace arm and fire it into the tank as toppy backlight. This Steel Blue gelled daylight source, blued up slightly further by the water itself, contrasts beautifully with the Moroccan Frost tungsten ambience which the Maxi Brutes are giving us.
In her mermaid tail and costume, Poppy Drayton looks stunning in the tank. We shoot steadicam angles and some slo-mo to get the most out of the set-up.
Day 15
The rocky pool set with two of the side-lighting Kino Flos and the 1.2K HMI backlight (centre) in place
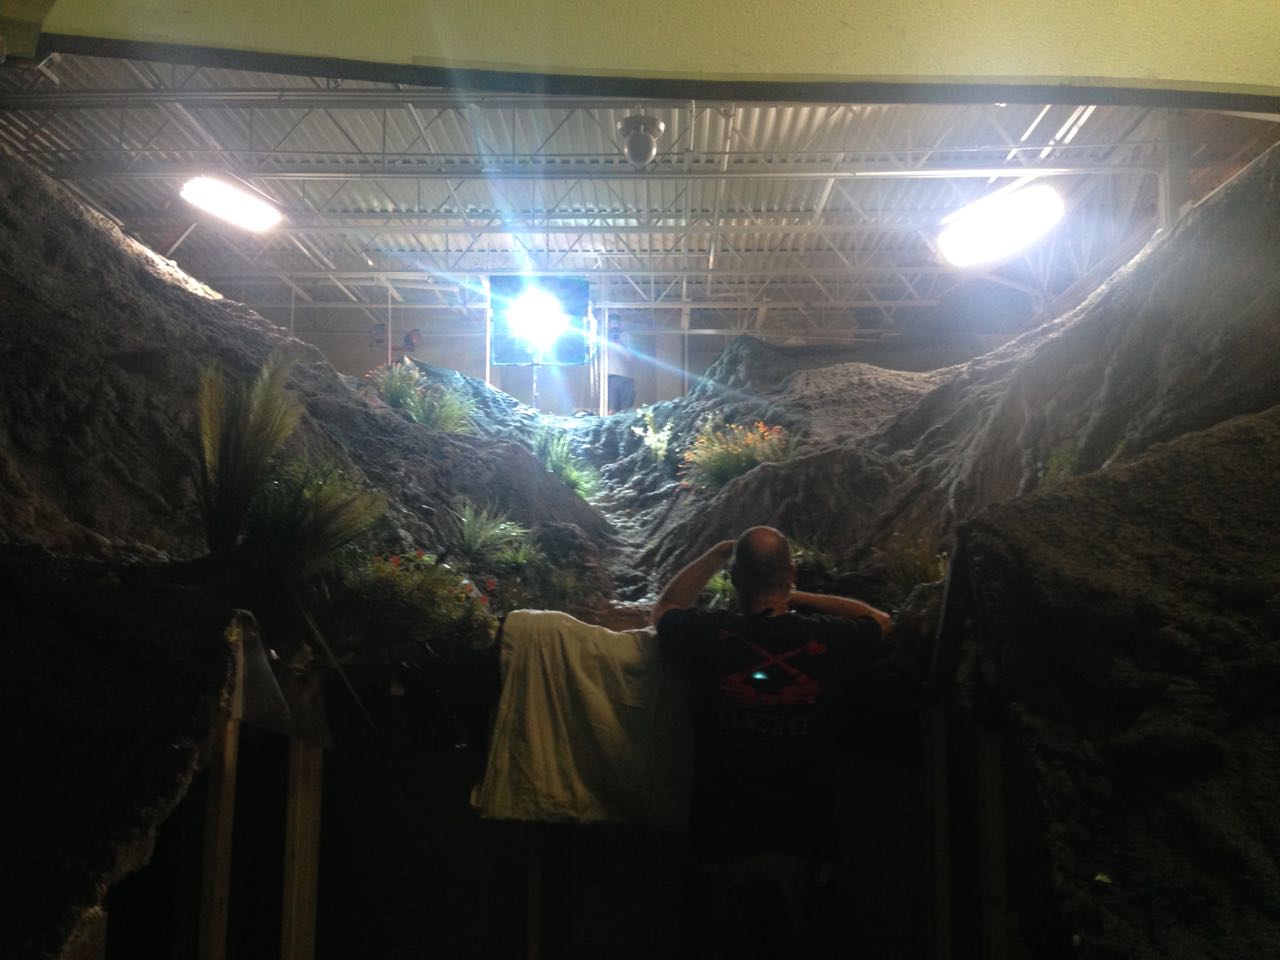
Back on stage, and we’re shooting the rocky pool. This set was built before I even arrived in Savannah, so I’ve been waiting a long time to shoot it. It’s built almost right up to the ceiling of the studio (a former supermarket) so it’s challenging to light. The grips build four menace arms and poke two 4×4 Kinos and two 575W HMIs over the sides to cross-light the set and bring out all the texture in it. Where the set ends they put up a 20×20′ greenscreen, which we light with two Kino Flo Image 80s fitted with special chroma green tubes.
After a wide (which didn’t make the final cut), the next set-up is a 2-shot of our leads in the pool itself. We consider arming the camera out over the pool using a jib, but ultimately decide that it’s better for me to join the cast in the pool, with the camera on my shoulder in a splash bag. 2nd AC Kane Pearson joins the pool party as well, and ends up hand-bashing a monitor for me since the splash bag’s designed for a Panaflex film camera and the viewfinder doesn’t line up. I’m reminded of my frustrating splash bag experience on See Saw back in 2007, but this time at least within a few minutes I’ve found a comfortable and effective way to operate the camera, under-slinging it and allowing it to partially float so I don’t have to support the whole weight.
For this shot we’ve added our par-can-bounced-off-a-wobbling-blue-gel gag for watery light ripples, and combined with the real light ripples and the reflections of a 1.2K HMI backlight, the image looks beautiful.
Day 19
After lunch we shoot the singles for the rocky pool scene. The pool itself has been removed, and the actors sit on stools in a paddling pool, with the set behind them. The paddling pool serves two functions: it catches the water that make-up pours over the actors to make them look wet, and it reflects rippling light onto their faces. This light originates from a par can. At first it flattens out the look, then we figure out that we need to lay black fabric on the bottom of the pool. This stops the par can’s light bouncing directly, while retaining the rippling highlights off the water’s surface. (Check out my article on shooting water for more tips like this.)
The low-tech solution for the pool pick-ups
In the final edit this was all intercut with some beautiful footage by underwater DP Jordan Klein, shot both at a local diving pool in Savannah and at Weeki Wachee Springs State Park in Florida. The main unit shot another scene in the actual ocean, but I’ll cover that later in this series. In the meantime, next week I’ll reveal some of the tricks and techniques used in shooting The Little Mermaid‘s many sequences in moving vehicles.
‘B’ cam 2nd AC Matt Dixon preps the camera on the crane’s Scorpio remote head. Photo: Tim Gill
The biggest set on The Little Mermaid was the circus, an area the size of a football pitch which was transformed into a period spectacle. The big top and many other pieces were driven across the country from LA, and during our first week of principal photography the art department were hard at work setting it all up and dressing it.
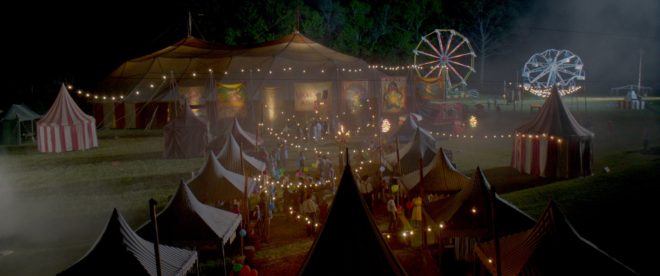
Today’s post is about how I lit the night exterior scenes on this huge set. To that end I’m going to focus on the two biggest shots in the sequence: a tracking shot outside the big top, and the crane-up which first reveals the circus to the audience. Below, as well as my diary entries from the shoot, you’ll find a little behind-the-scenes video I grabbed on my phone for the tracking shot, and a lighting plan for the crane shot.
Day 7
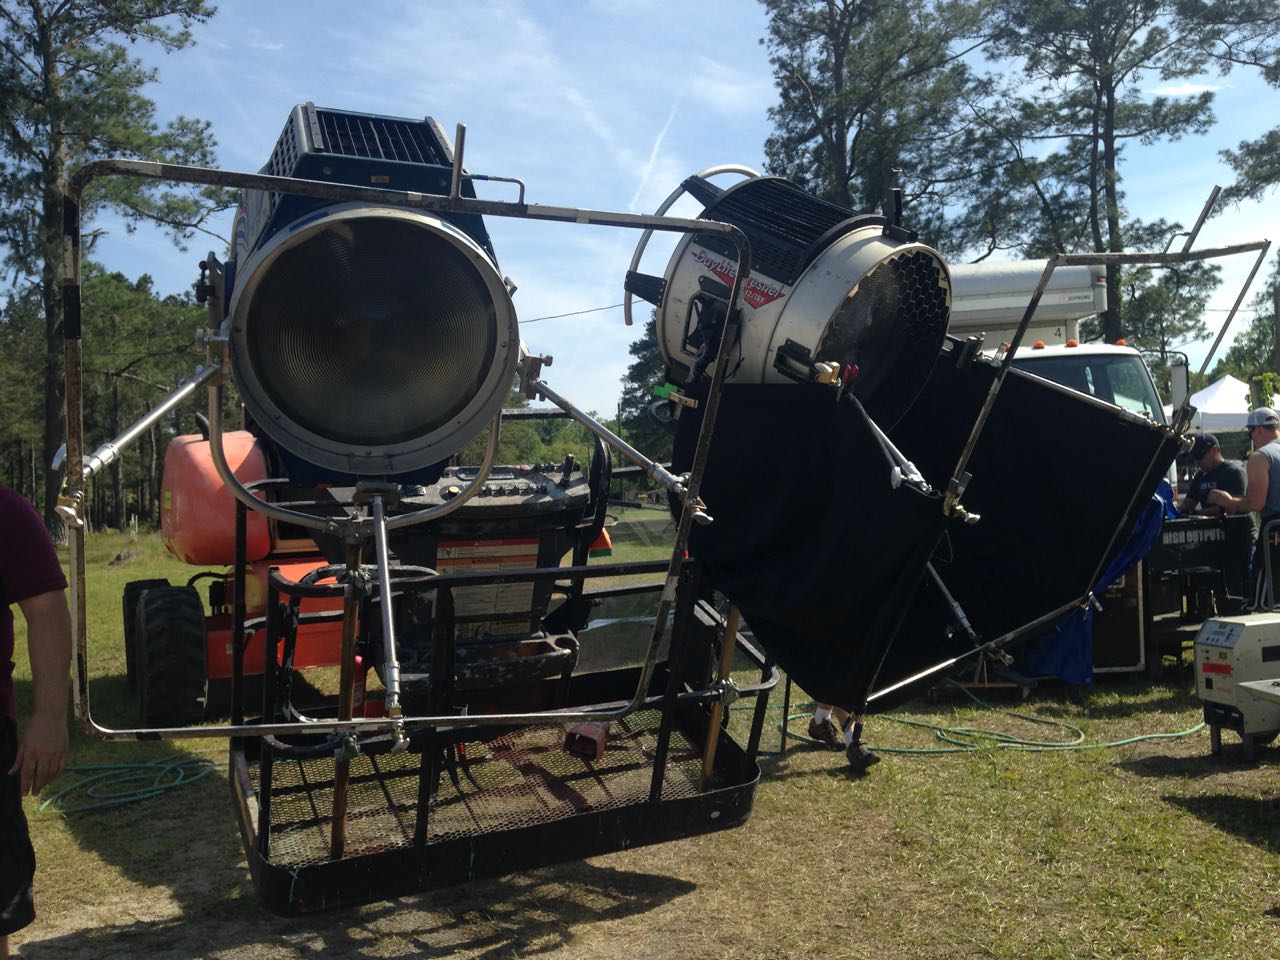
The two 18K HMI fresnels rigged on the condor
A couple of daylight pick-ups today, then we start setting up for a big night scene. The camera will dolly with Cam and Elle from the exit of the big top, past candy floss and ‘healing water’ stalls where bits of dialogue will happen, and finally reveal a ferris wheel in the distance. We block while the sun’s still up, and paint in the light as night sets in. We are trying to light most of it in a way that will also work for our big crane shot reveal of the circus later in the week, because repositioning large HMIs – especially the two 18Ks we’re flying on a condor (cherry-picker) – is very time-consuming. Inevitably it doesn’t quite work out that way, and one of the 18Ks has to die for now at least.
The ferris wheel is backlit by a 12K, with a little front-light from a 5K tungsten fresnel. Cross-light on the talent comes from the working 18K and a 6K on the opposite side of frame. Nine-light Maxi Brutes illuminate the tent from inside, some of that light spilling out onto the talent, while par cans uplight a row of banners outside. A 1K baby provides edge-light to the talent in their final position. A 300W fresnel inside the healing water wagon spills out, and a bare 40W globe inside the umbrella of the candy floss stall gives us a little glow there.
The final lamp to go up is another 300W fresnel, because the directors are concerned that the ’sold out’ sign on the healing water wagon isn’t clear enough. We end up firing it in from the front because there’s no time for anything else, but as always with front-light, I deeply regret it. Ideally we would have armed it out from the roof of the wagon to rake down the side of it.
Once the supporting artists are choreographed, the shot looks great.
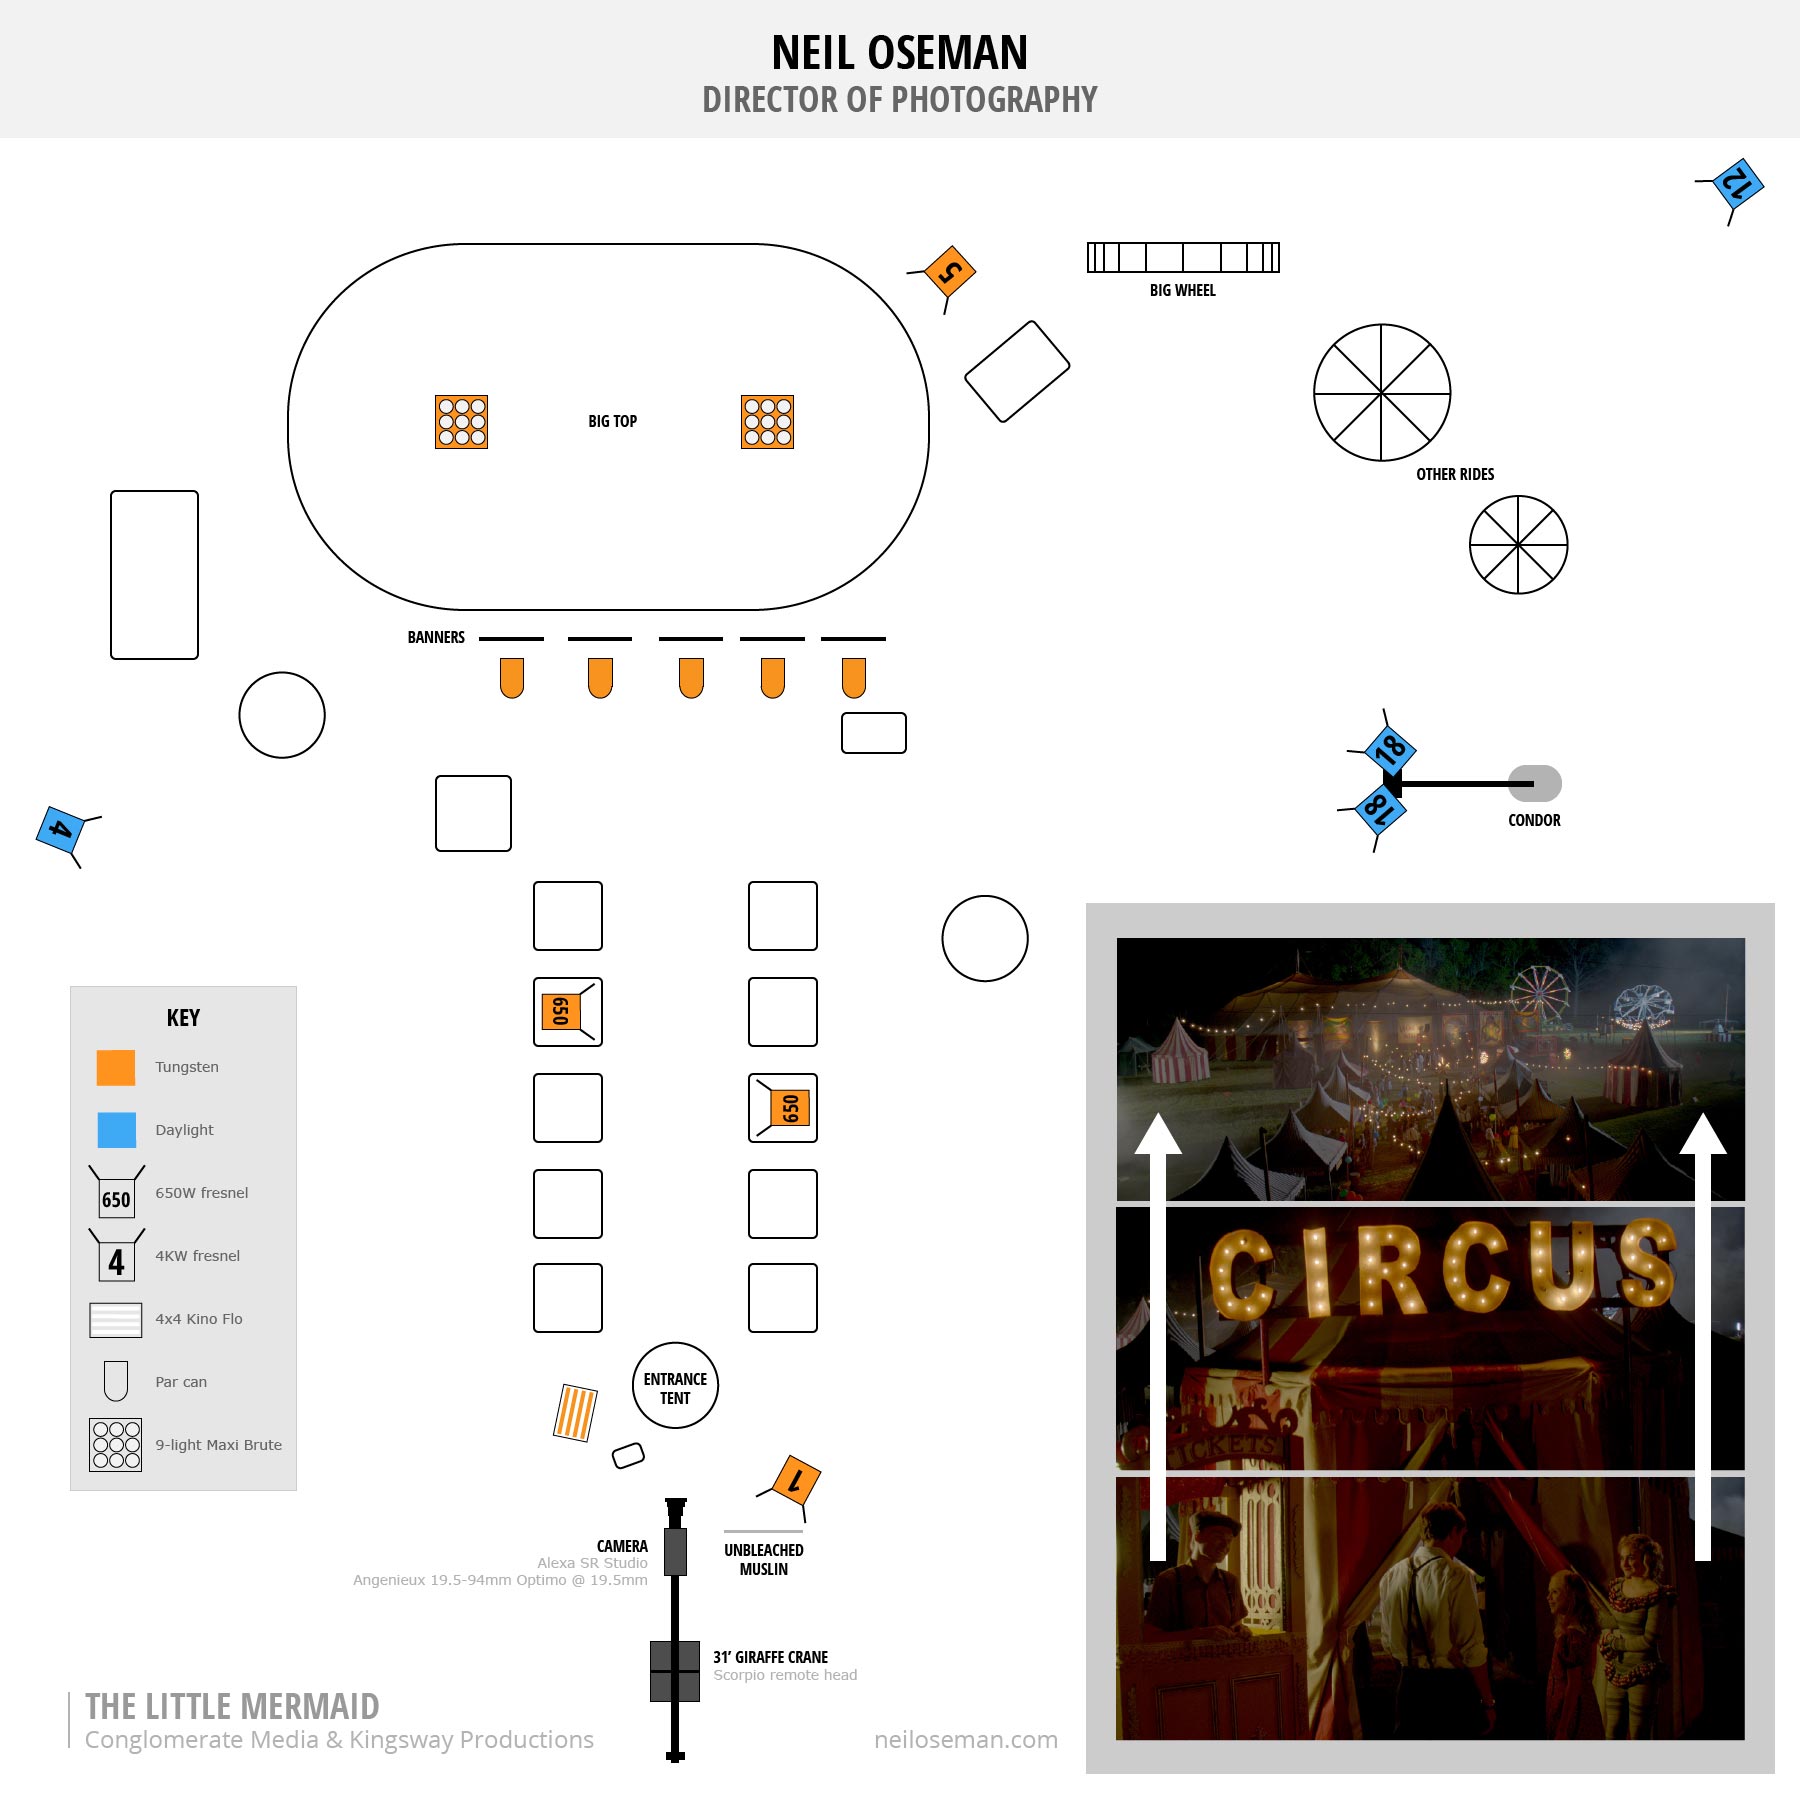
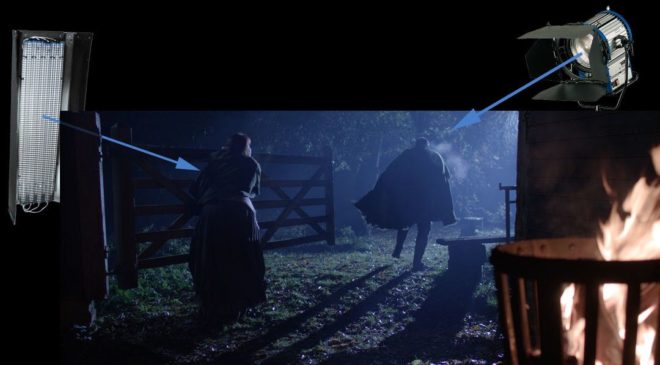
We start with a big crane shot revealing the whole circus at night. For this shot we have the following lamps burning: 2 x 18Ks (on a condor), 1 x 12K, 1 x 4K – all those are providing moonlight or starlight, with varying degrees of blue gel on them; 2 x Nine-light Maxi Brutes making the big top glow from inside; a 5K spilling some orange glow on the background; 2 or 3 smaller tungsten units spilling out light from inside the smaller tents; and lighting the foreground, a 4×4 Kino and a 1K baby bounced off unbleached muslin. There are also numerous practicals on, including the lights on the ferris wheel, the illuminated ‘circus’ sign, several par can up-lighters, and about 7KW of fairy lights. Totalling over 80KW, it is easily the biggest lighting set-up of my career. Although the grip and electrical crew is relatively small given the scale of the set-up, they handle it with aplomb.
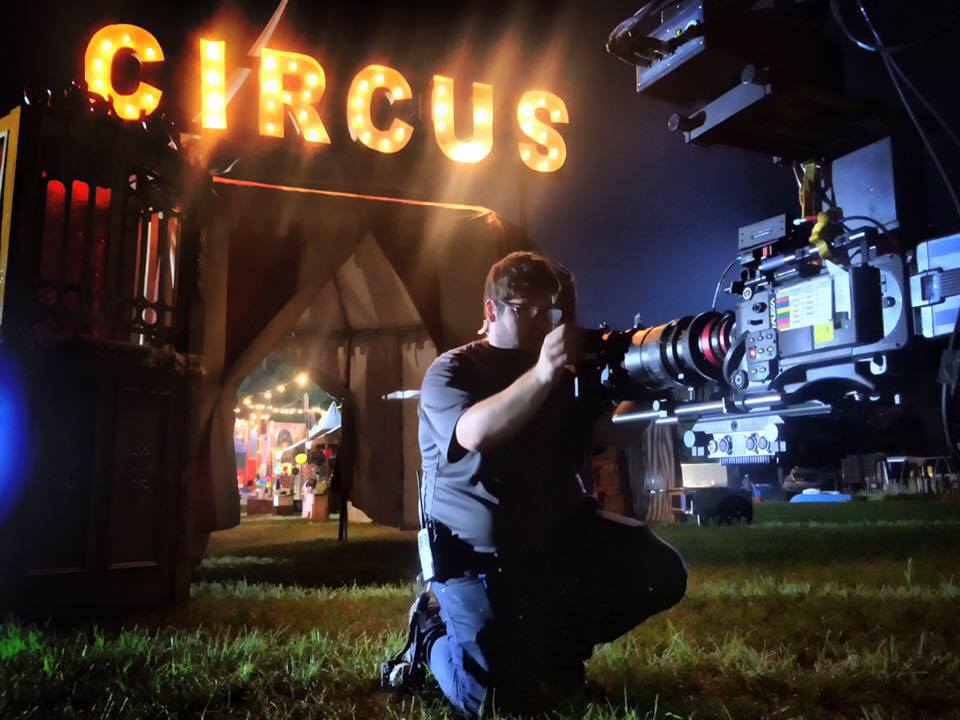
We have rebuilt our Giraffe crane to its maximum 31ft configuration, so we can swoop up over the entrance tent, past the ’circus’ sign, and reveal the twinkling string-lights of the midway leading to the big top, and the rides beyond.
Here’s a retrospective lighting plan for this crane shot (not to scale); click to enlarge it. Note that additional tents were added in postproduction, as you can see in the trailer.
Ideally we would have had two condors, with an 18K on each, and put one of them way back behind the trees, to maintain a consistent direction of moonlight, but budget and the practicalities of the location made this impossible.
The ‘A’ camera on the dolly, with the two 18Ks on the condor in the background
One thing that was a little different to my original plan was the hard 4K edging the roofs of the midway tents on the lefthand side. This was meant to be a pair of 6Ks firing through a diffusion frame, to get a much softer, less “sourcey” look than the hard “moonlight” from the 18Ks. But unfortunately both our 6Ks were malfunctioning.
Another change was the lighting of the midway itself. We had a tungsten helium balloon on the truck, which I had planned to float above the midway to provide warm ambience. As it turned out, the practical string lights, although only 40W each, were so numerous that they provided ample illumination in the centre of the frame.
Later on in production, I was chatting to one of the ADs about this scene and he expressed surprise at how well I had handled it, given that it was so much bigger than any lighting set-up I’d previously done. Honestly it never fazed me. Lighting is entirely scaleable; the principles are identical, whether your set is a small bathroom or a football pitch. I’d done so much night exterior in my career, I’d just never had the big toys I wanted before. I’ll let you in on a secret though: the only reason I knew to ask for 18Ks and a condor was from reading American Cinematographer!
In my next post I’ll discuss shooting some of Poppy Drayton’s key scenes as the eponymous mermaid, including her introduction inside the big top. Don’t forget that The Little Mermaid is currently showing in movie theatres across the US and on Amazon in the UK.


 After that, I sat down over coffee with Ben Millar, my gaffer. We analysed the footage from principal photography and reverse-engineered the lighting. I say “we”; it was mostly Ben. This is why a DP hires a good gaffer!