“The Little Mermaid”: Boats, Trains and Automobiles

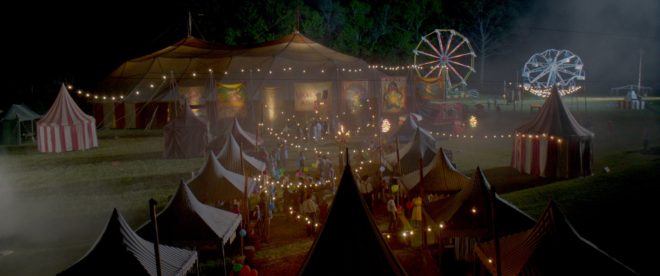
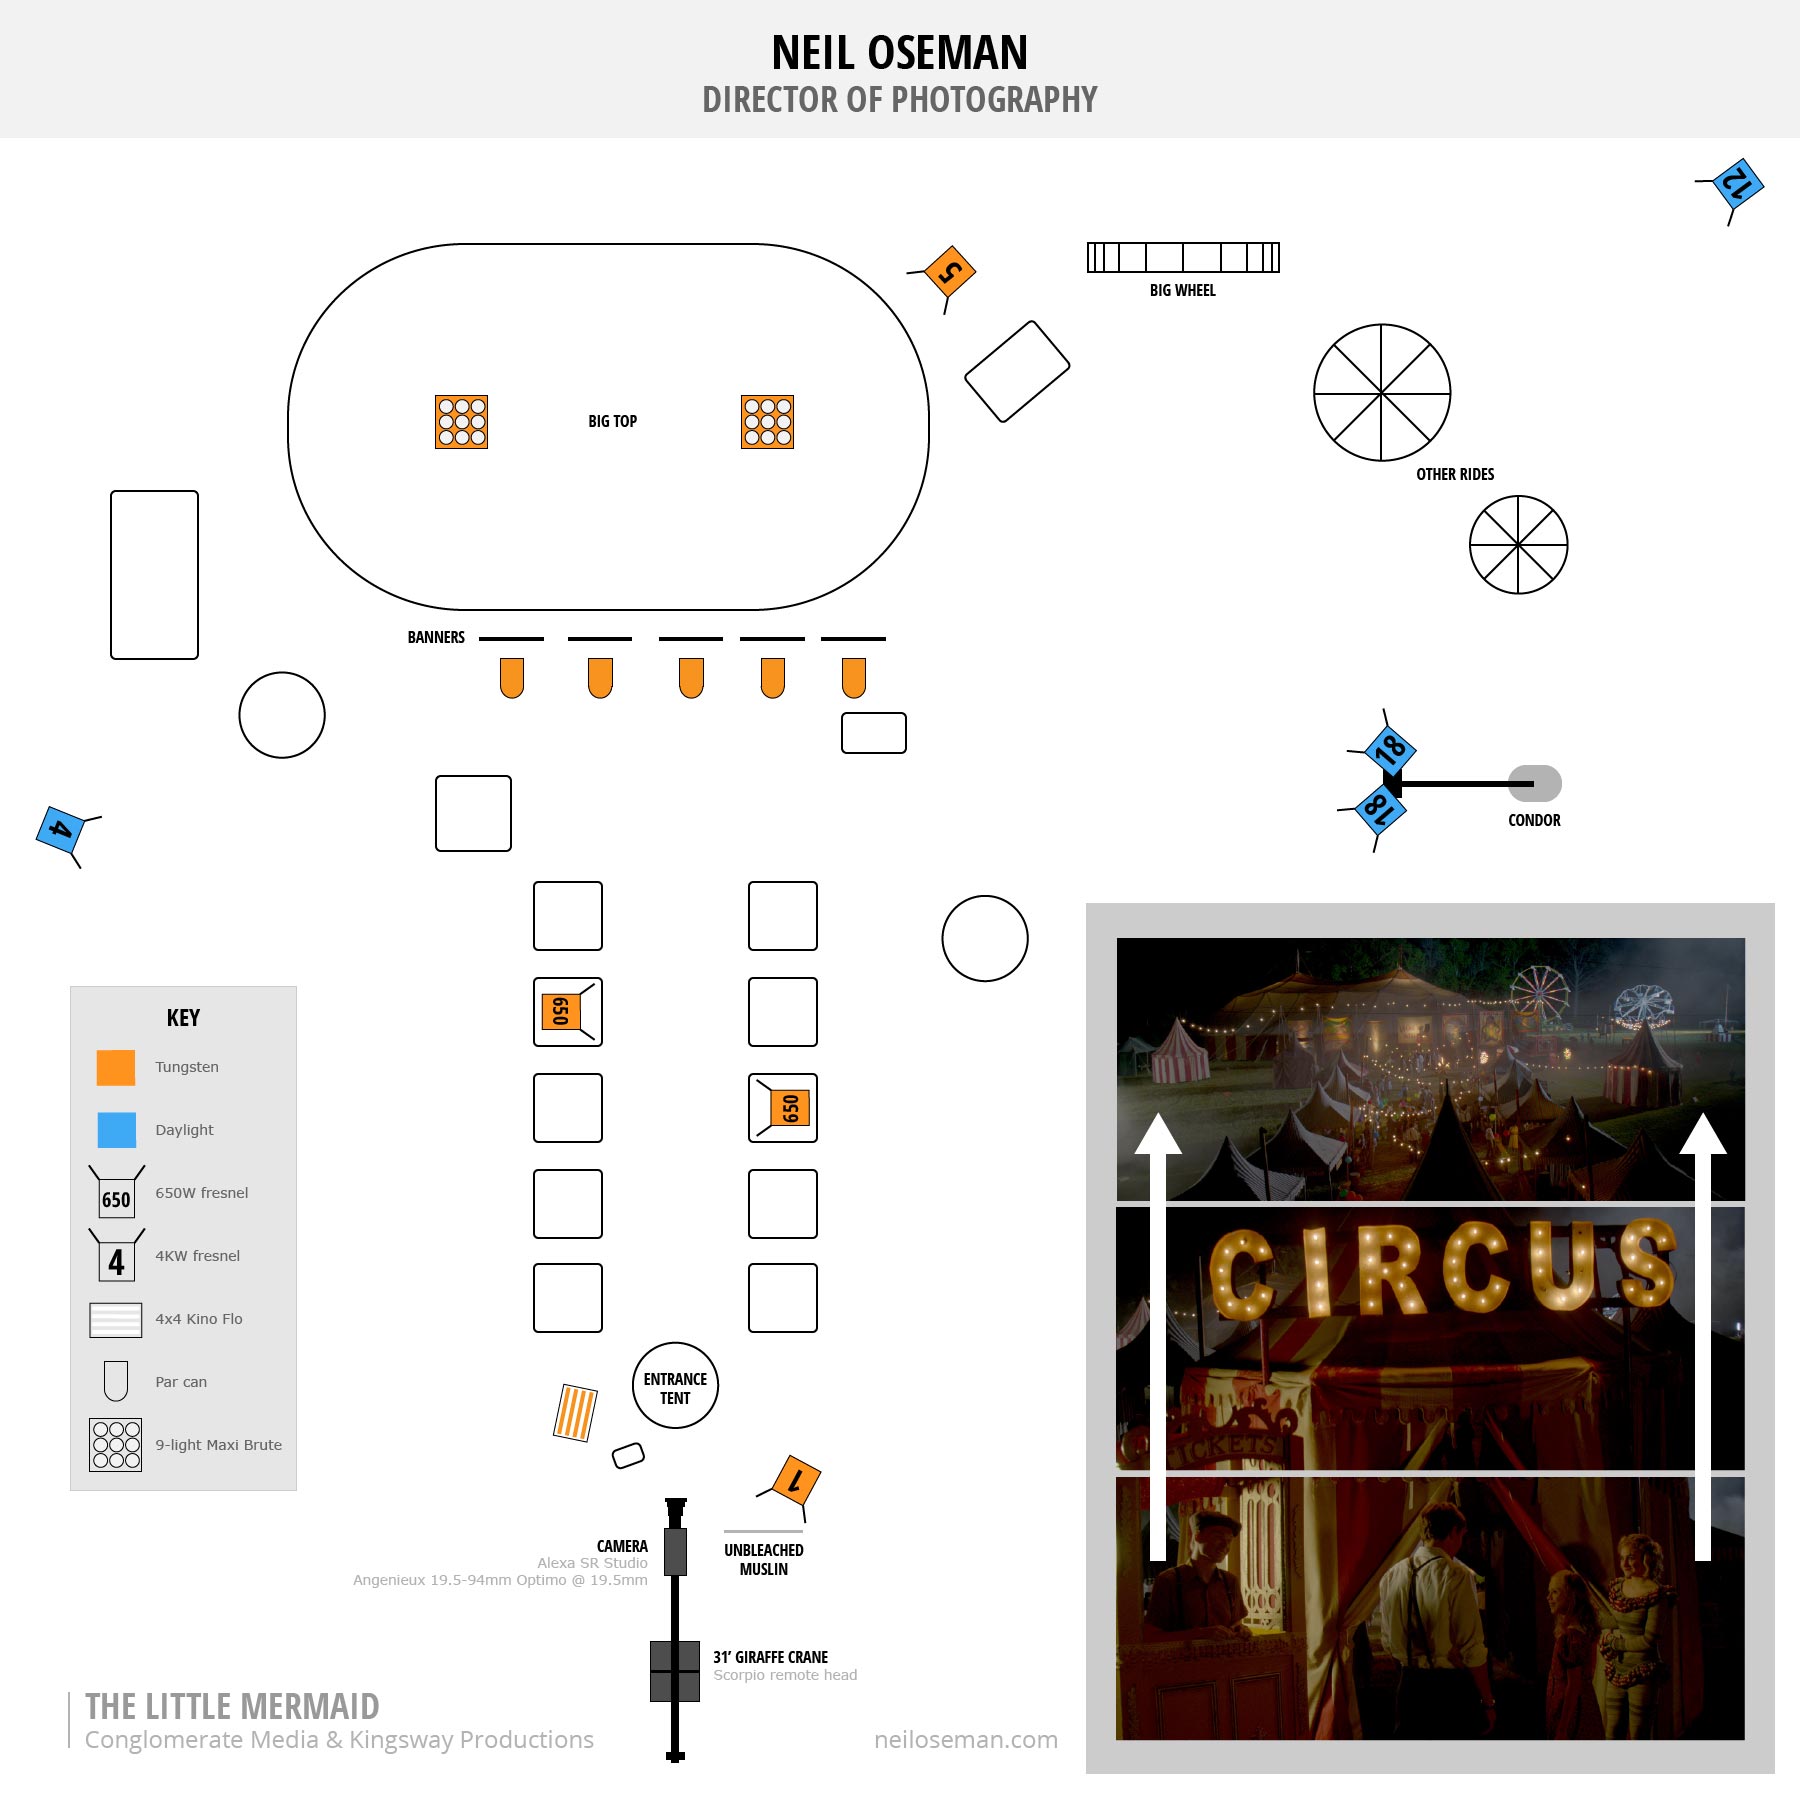
One of the biggest challenges on The Little Mermaid was the amount of material set in moving vehicles at night. Over the course of the story, the heroes travel in two different trains, a pick-up truck and a riverboat, and I knew that lighting large stretches of railway, road or river wasn’t going to be practical on our budget. Ultimately much of it ended up being done against green screen, with the notable exception of the riverboat, the first mode of transport to go before the cameras. Here are the relevant extracts from my diary.


Day 14

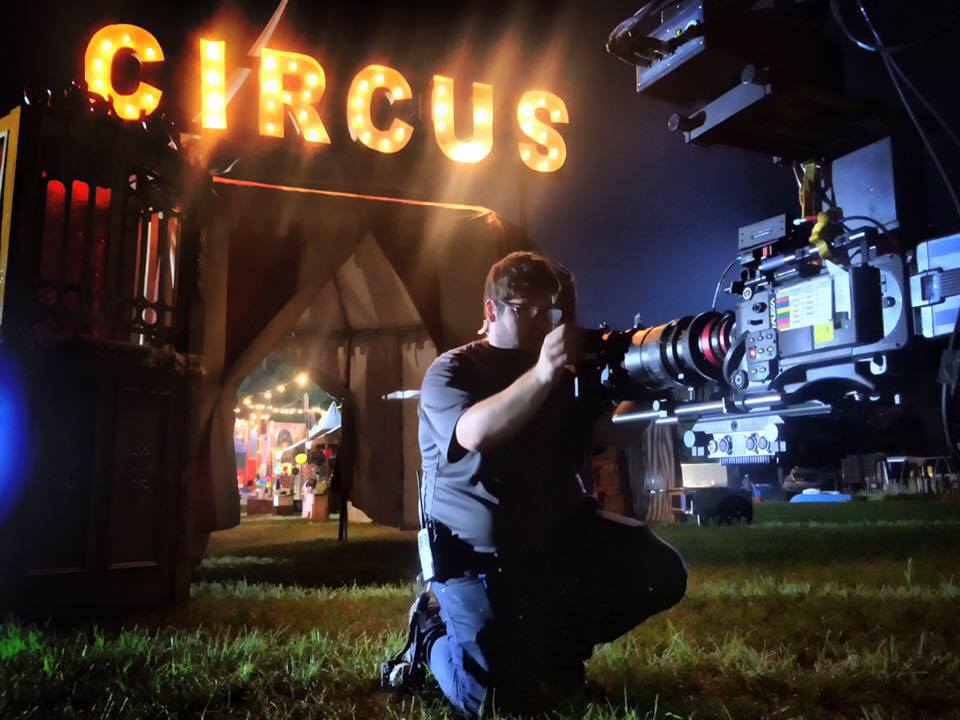
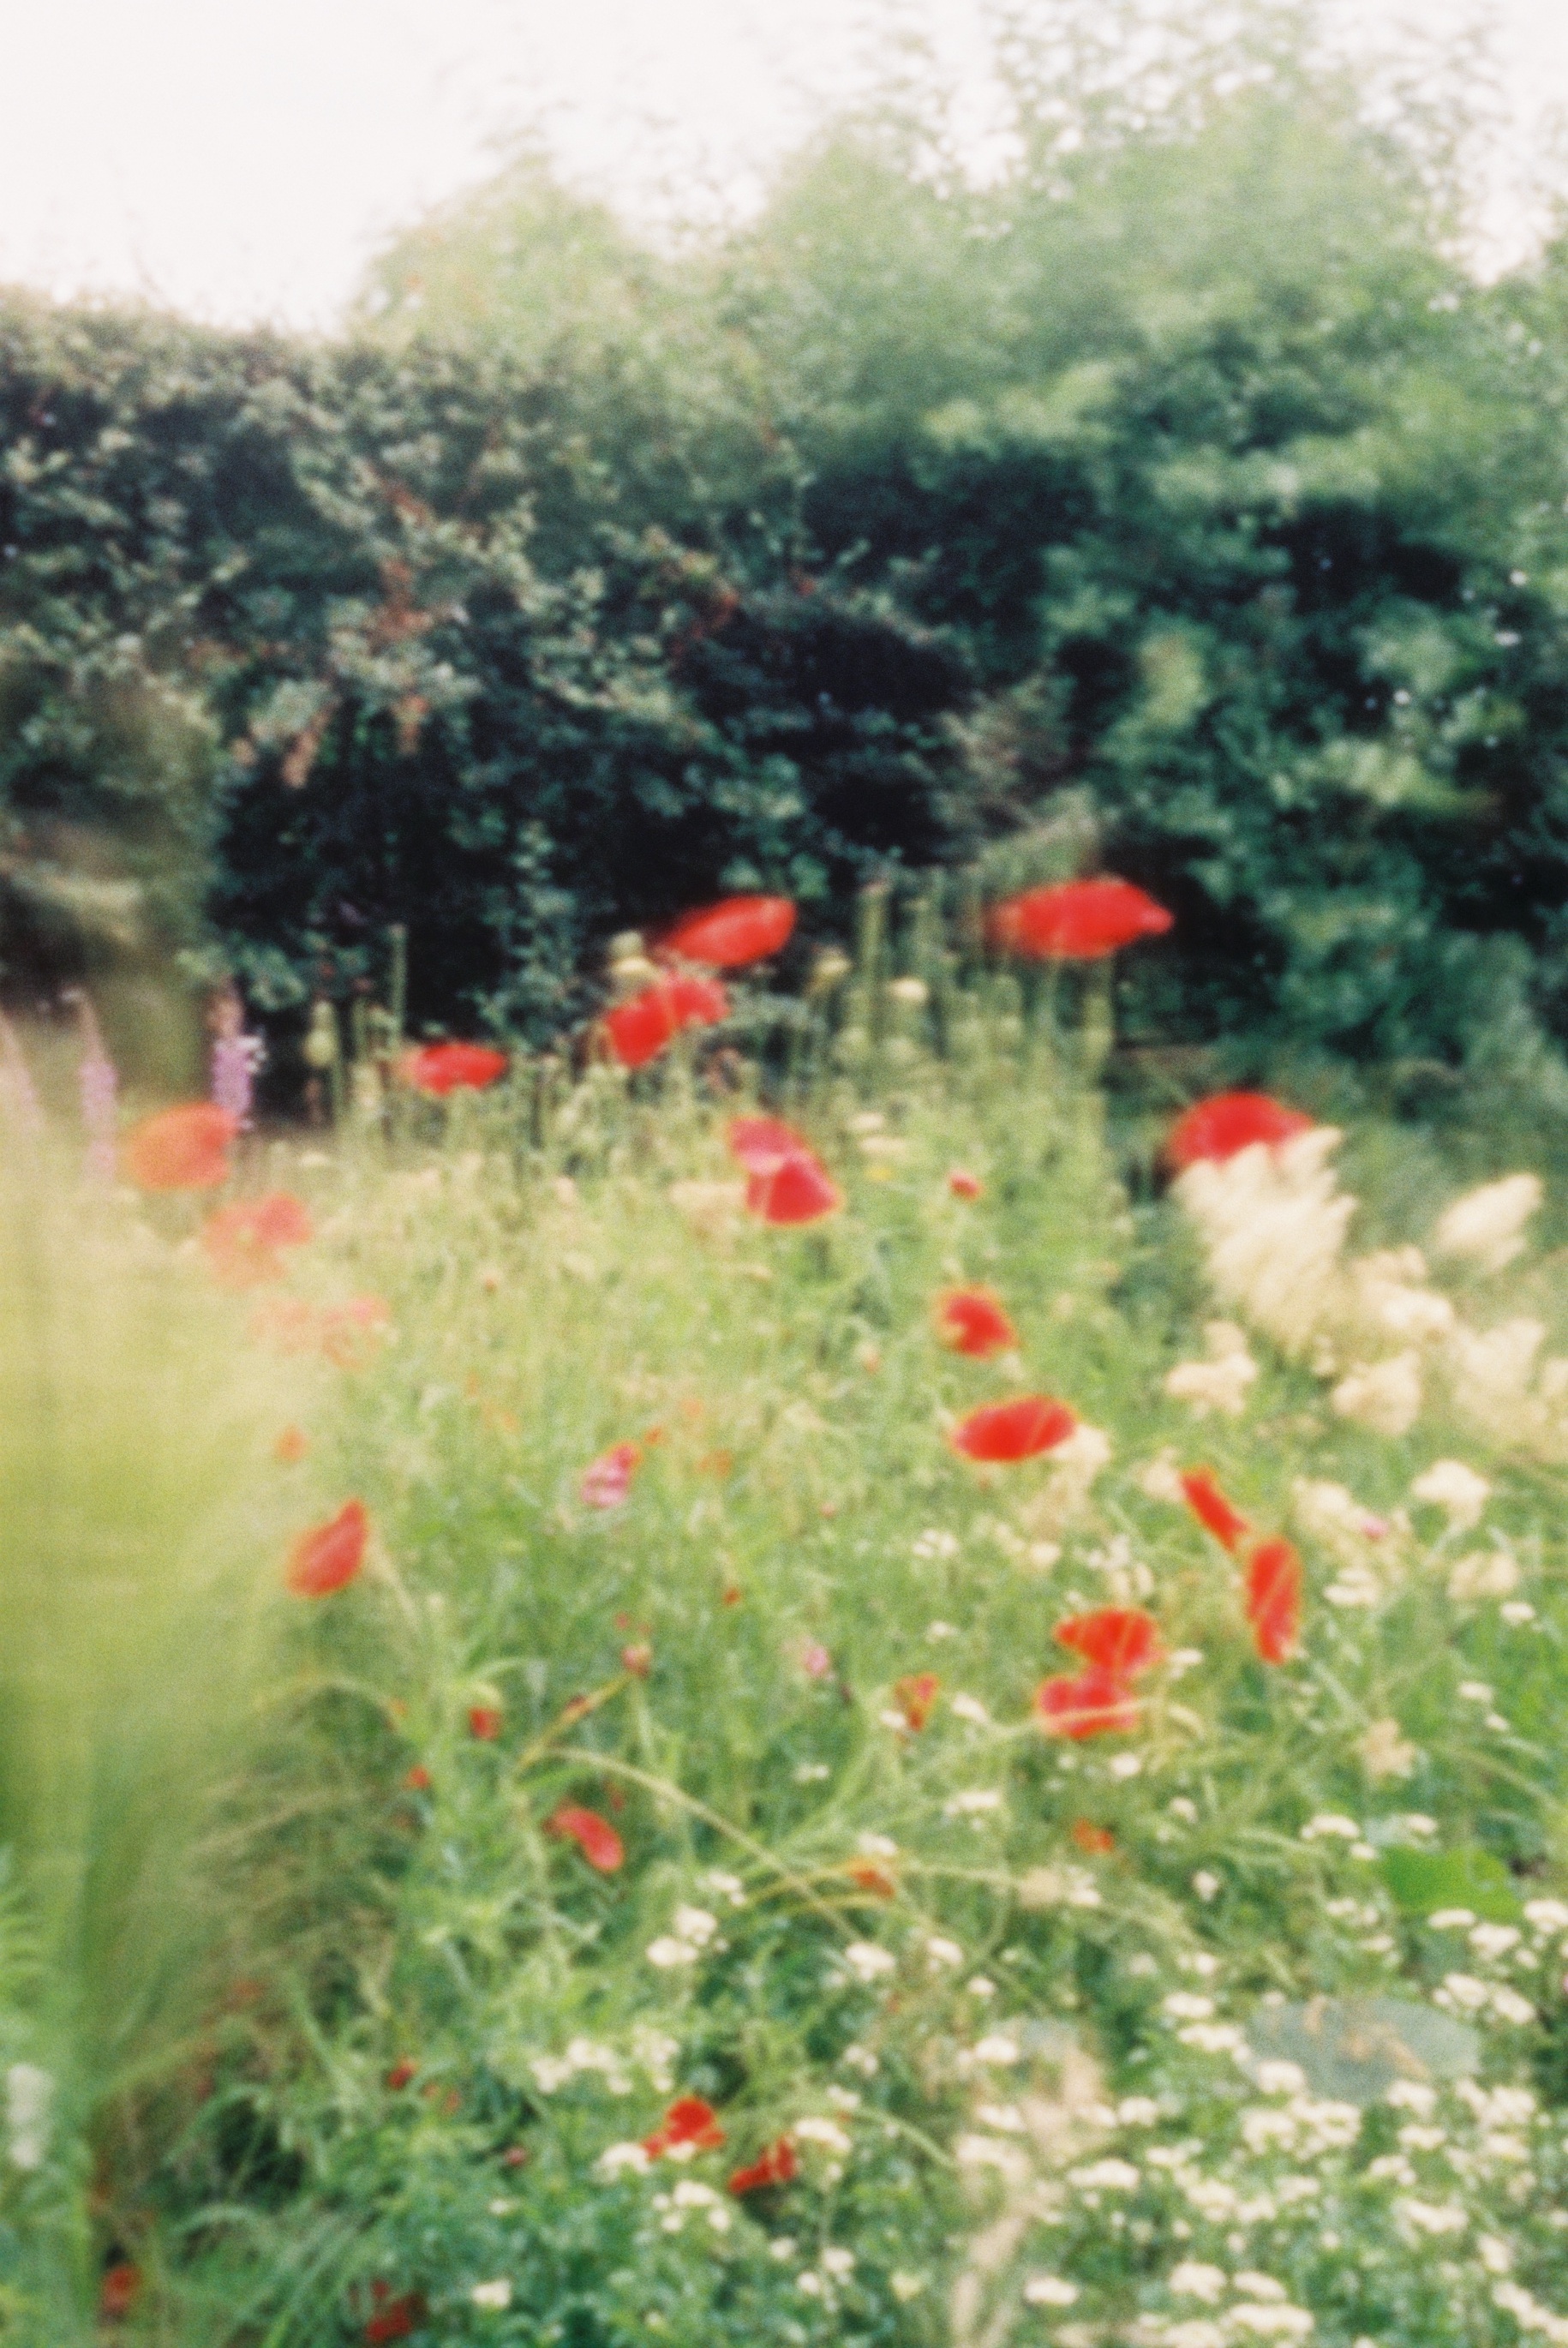
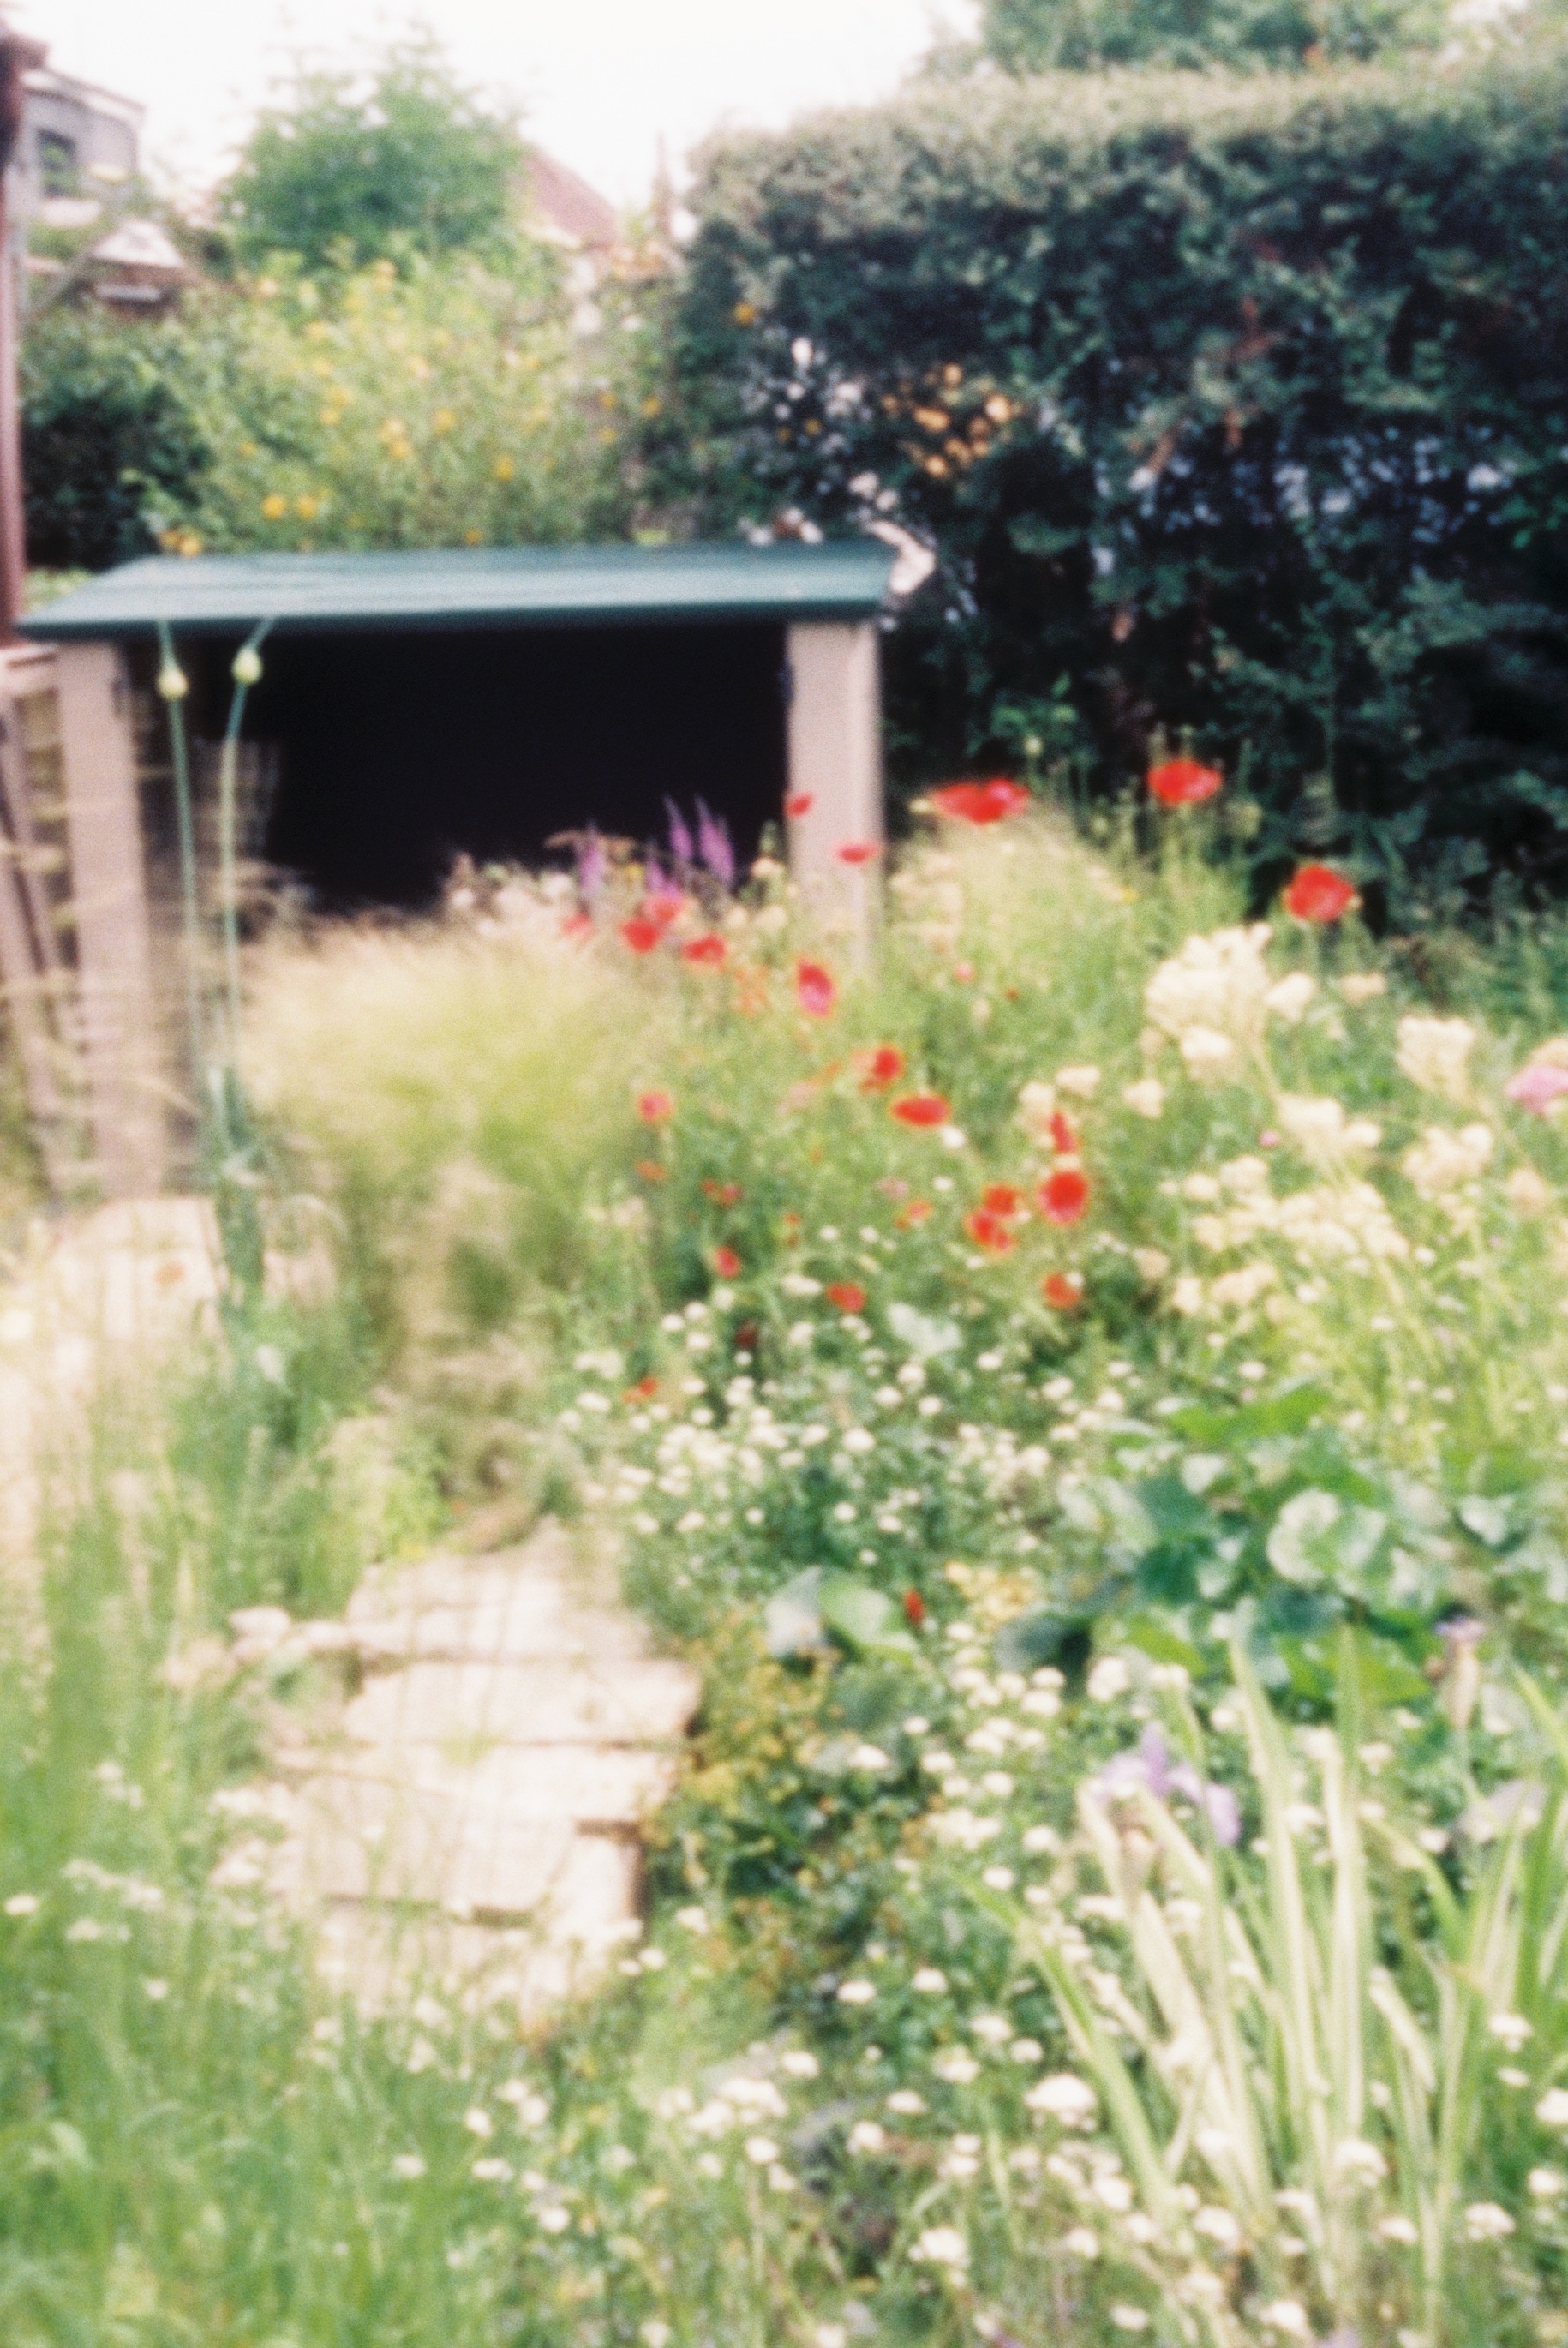
Today’s a big day because we’re shooting on a riverboat which has been hired at great expense. We have a huge amount of material to cover and there’s no way we can come back to the boat later if we don’t get it all. Chris and I make a game plan in the afternoon and arrive at the dock in good time.

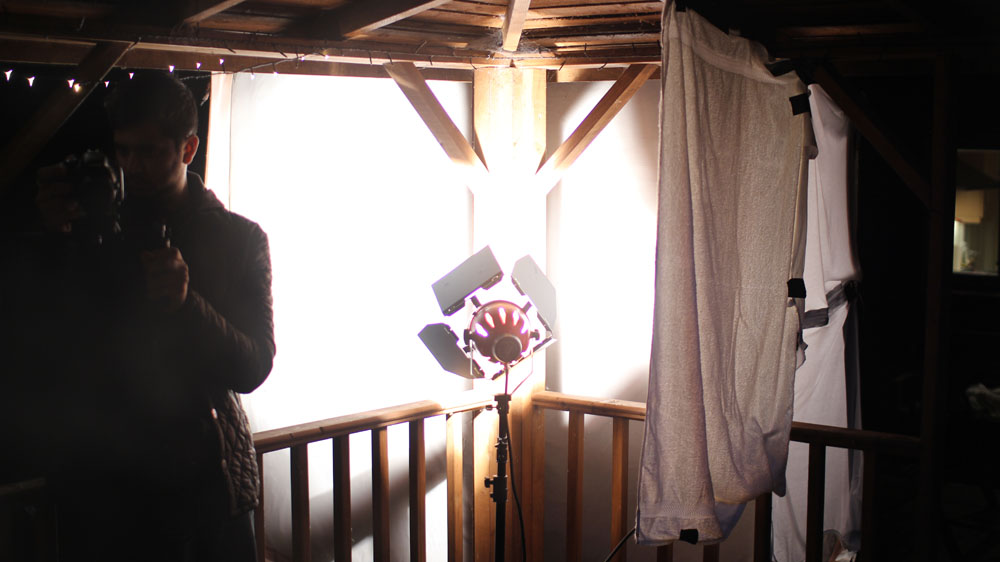
It feels a lot like a micro-budget movie, shooting on a location that perhaps should have been a set (once we set sail you can’t see anything in the background because it’s night) with a tiny lighting package running off a little genny: some Kinos, two LED panels, and a 1K baby. Out there in the dark river, it is eery watching unfathomably huge container ships pass 50ft from us. We leave ‘B’ camera on the shore and try to co-ordinate with them by walkie as they shoot wide shots of the boat and we try to hide!


Day 16

Night driving scenes in a pick-up truck today. Poor Man’s Process was considered for these, then doing it for real with a low loader (called a process trailer here in the States). But at last green screen was chosen as the way to go.

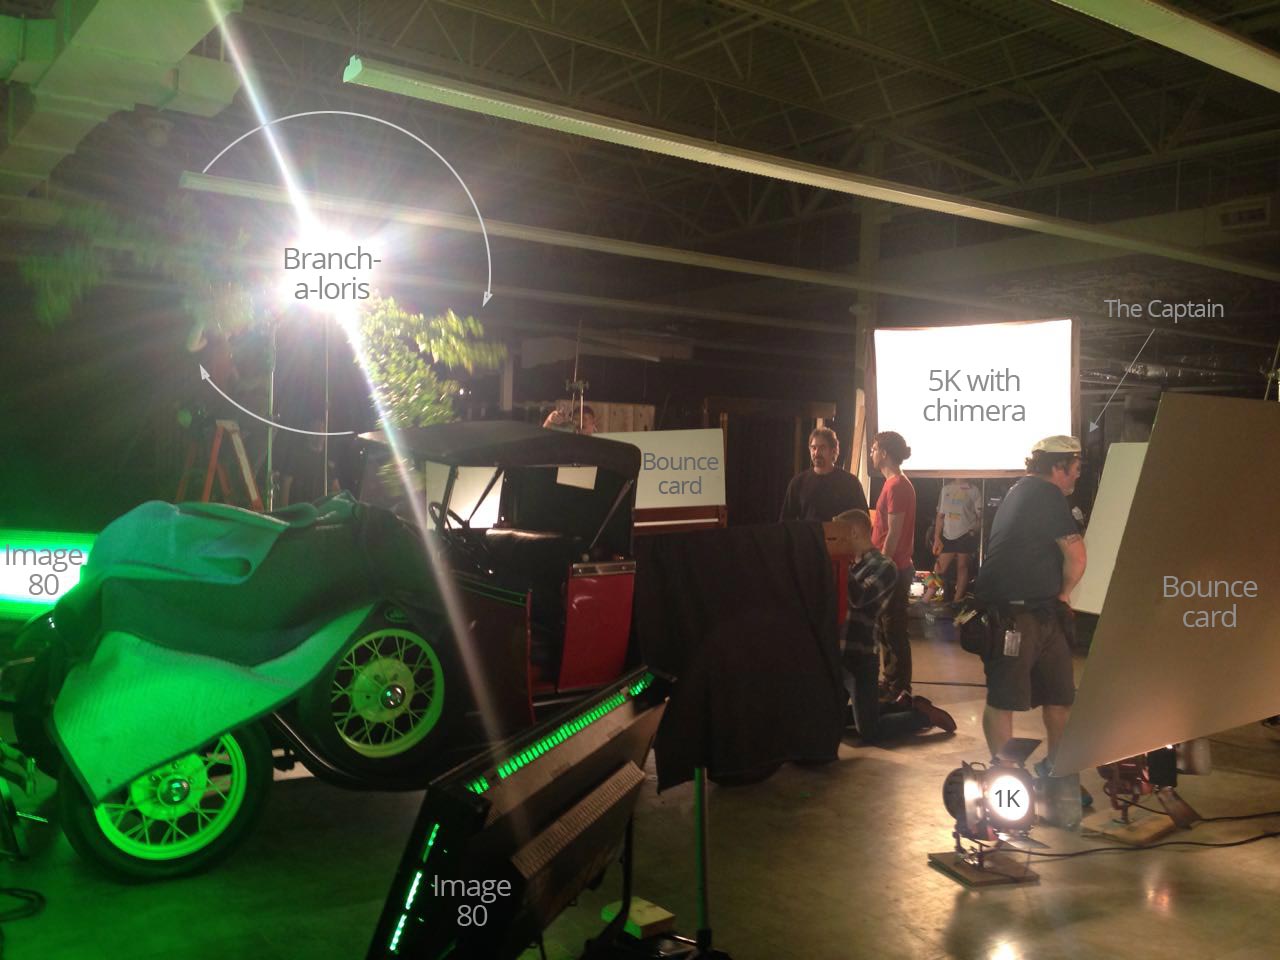
The period vehicle is wheeled into our studio and parked in front of two 12×12 green screens, which VFX supervisor Rich dots with red tape crosses for tracking markers. Throughout the night he moves them around to make sure there are always a couple in shot. We light the green screen with two Image 80s (4ft 8-bank Kino Flos with integral ballasts) fitted with special chroma green tubes. Rich tells me to expose the screen at key, which in this case is T4.

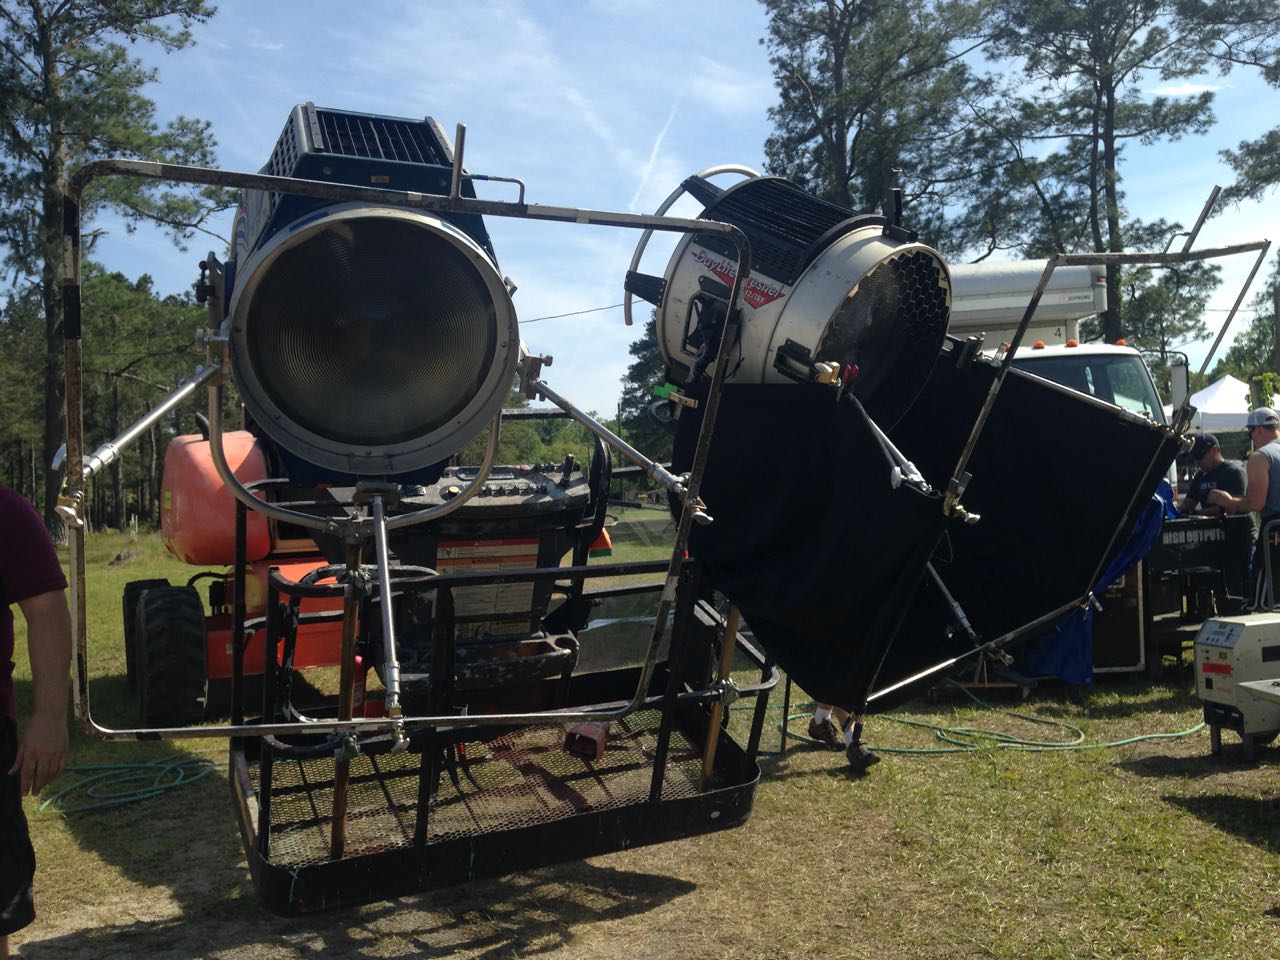
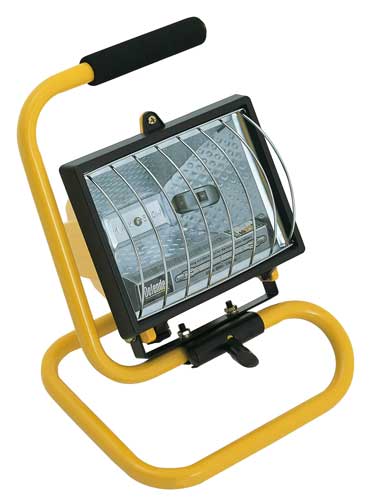
Captain Dan Xeller, best boy electric, has lit car stuff before, so I give him free reign to establish the ambient level. He does it with 1Ks fired into 8×4 bounce boards, so that any reflections in the car’s bodywork will be large and sky-like, not strips like Kino Flos or points like pars or fresnels.

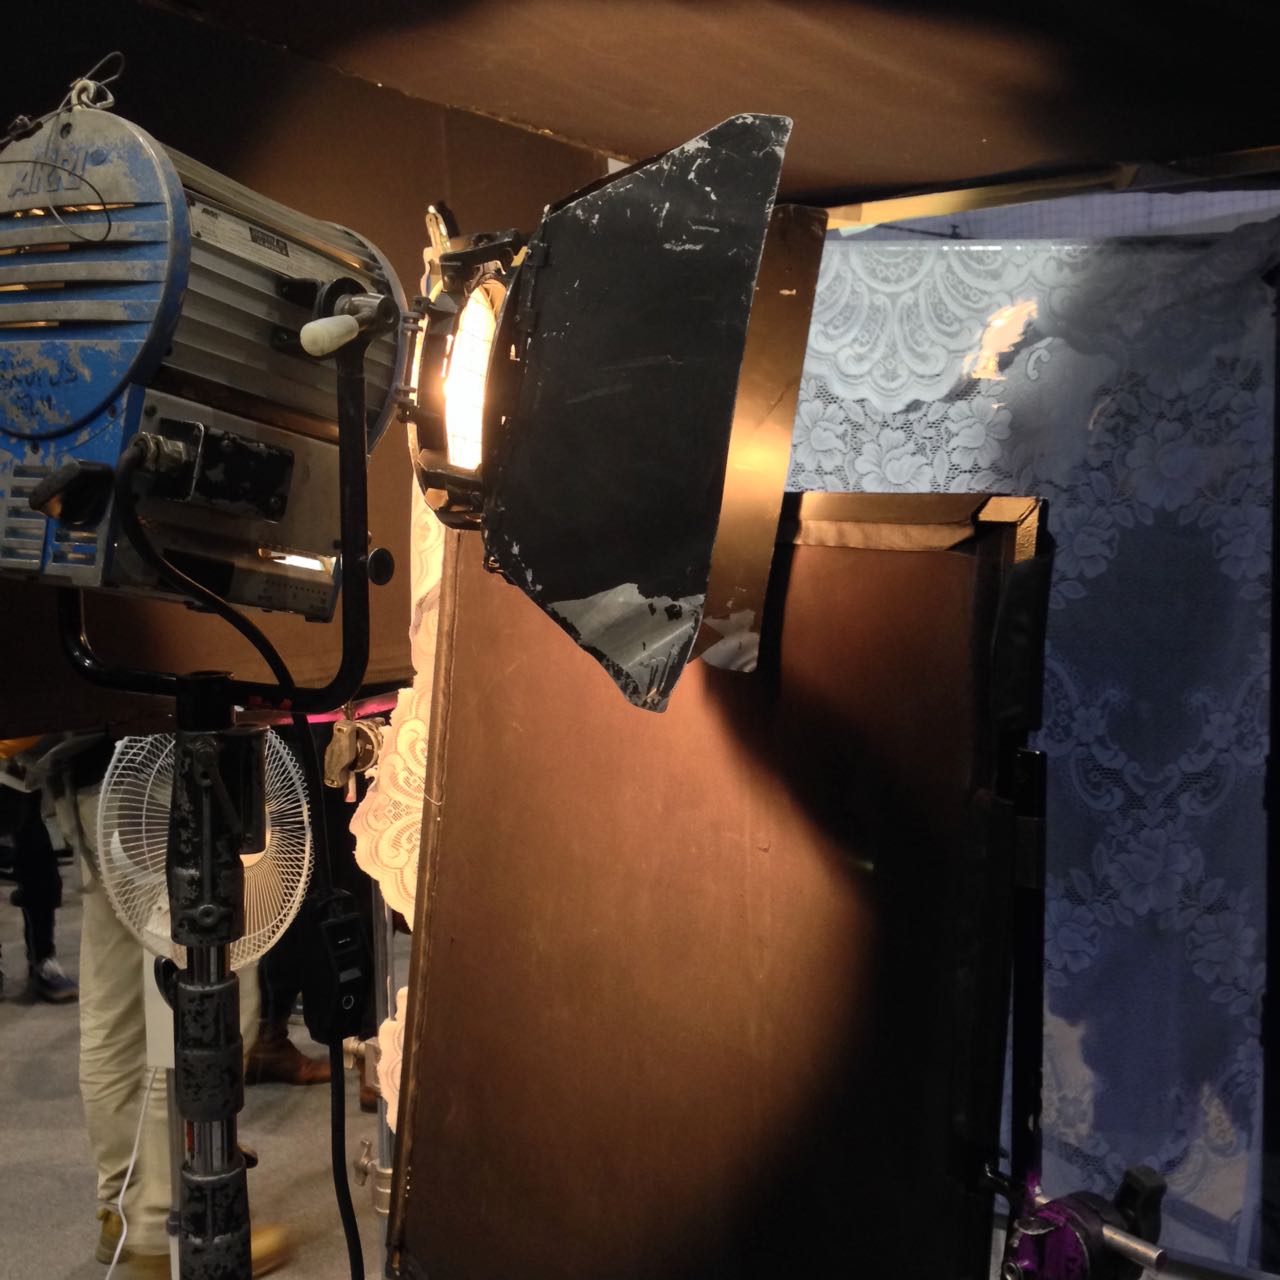
For shape we add a 5K with a chimera at a three-quarter angle, and a side-on par can with a “branch-a-loris” in front of it. Key grip Jason Batey designs this rig, consisting of two branches on a pivot like a Catherine Wheel, which can be spun at any speed by one of the grips, to simulate movement of the car.

Finally I add a 2K poking over the top of the green screen with Steel Blue gel, as a gratuitous hair-light.

Most of the night’s work is handheld, often with two cameras, but we also get some dolly shots, moving towards or away from the car, again to simulate movement.


Day 17

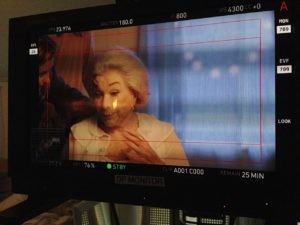
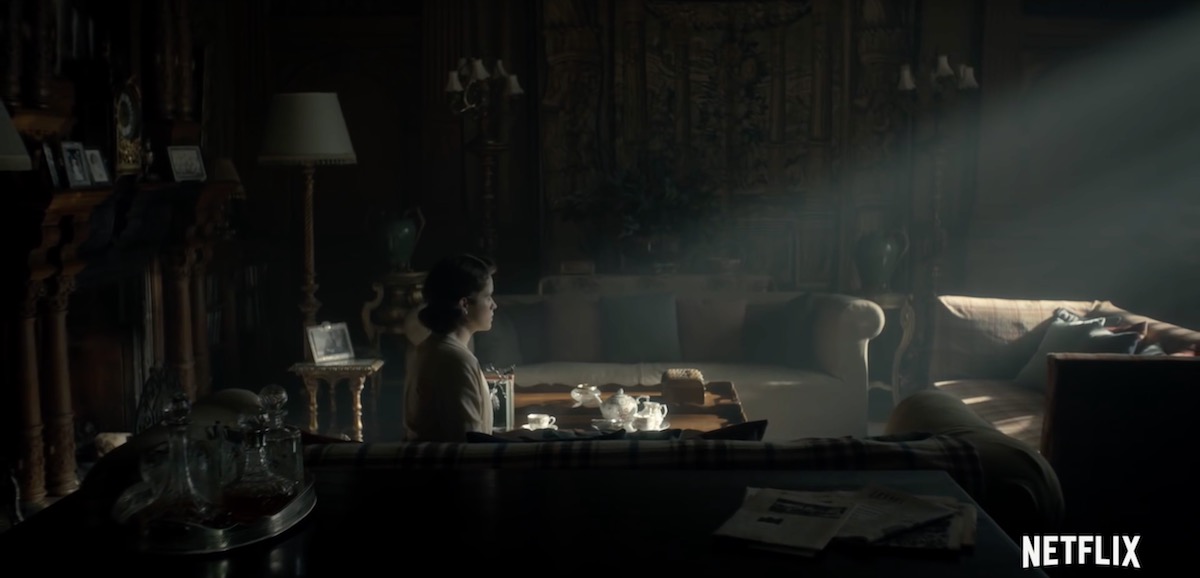
More green screen work today. At the end of the night we recreate one of the scenes from the boat with a piece of railing against the green screen. I do exactly the same lighting as before – Steel Blue three-quarter backlight, and a tungsten key bounced off polyboard. I love the way the actors’ skin looks under this light. Tungsten bounced off polyboard may just be the best light source ever.


Day 18

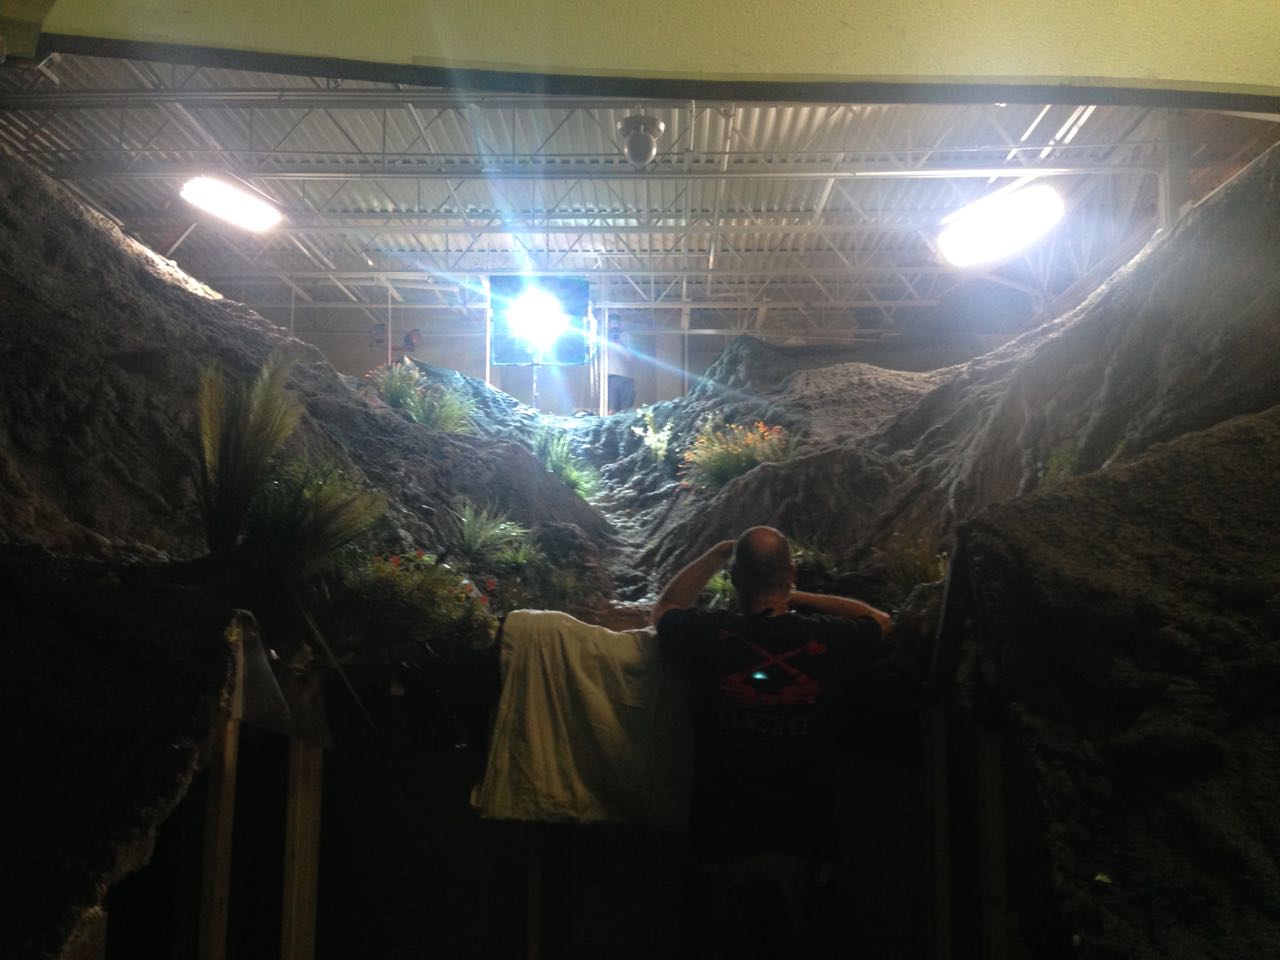
Stage scenes on real sets today, one of which is meant to be on the riverboat. The grips come up with a gag where we shine moonlight through an off-camera window gobo, which they handbash back and forth to simulate the boat rocking. We end up dialling it down so it’s very subtle, but still adds a hint of movement.

We move to the caboose (guard’s van), one of the train carriage sets. A second branch-a-loris is constructed so that both windows on one side of the carriage can have the passing trees effect cutting up the hard fresnel “moonlight”. We light from the other side with Kinos, and add a 1K baby bounced off foamcore to represent light from a practical oil lamp. Later the dialogue transitions to a fight scene, and we replace the bounced baby with an LED panel so it’s a little easier to move around and keep out of shot. I get to do some energetic handheld camerawork following the action, which is always fun.


View this post on Instagram


A post shared by Neil Oseman (@neiloseman) on


Day 27

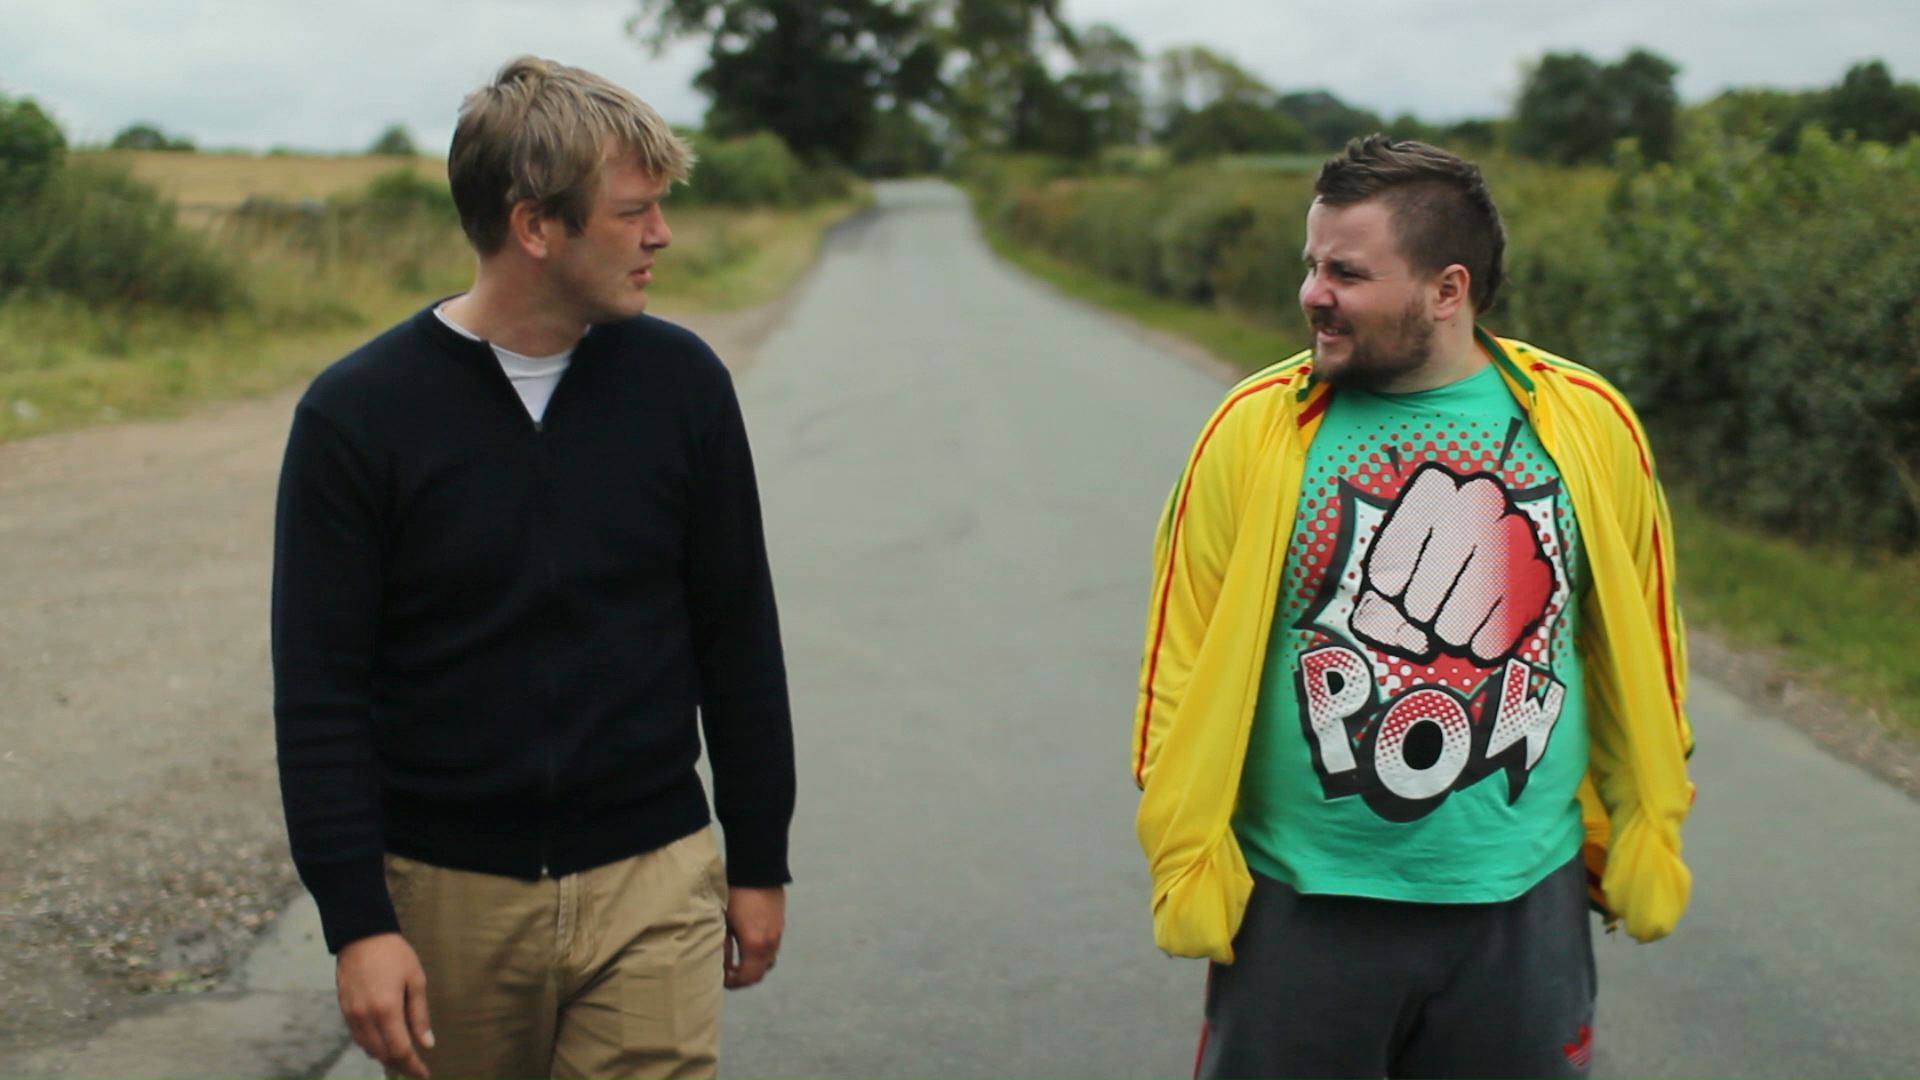
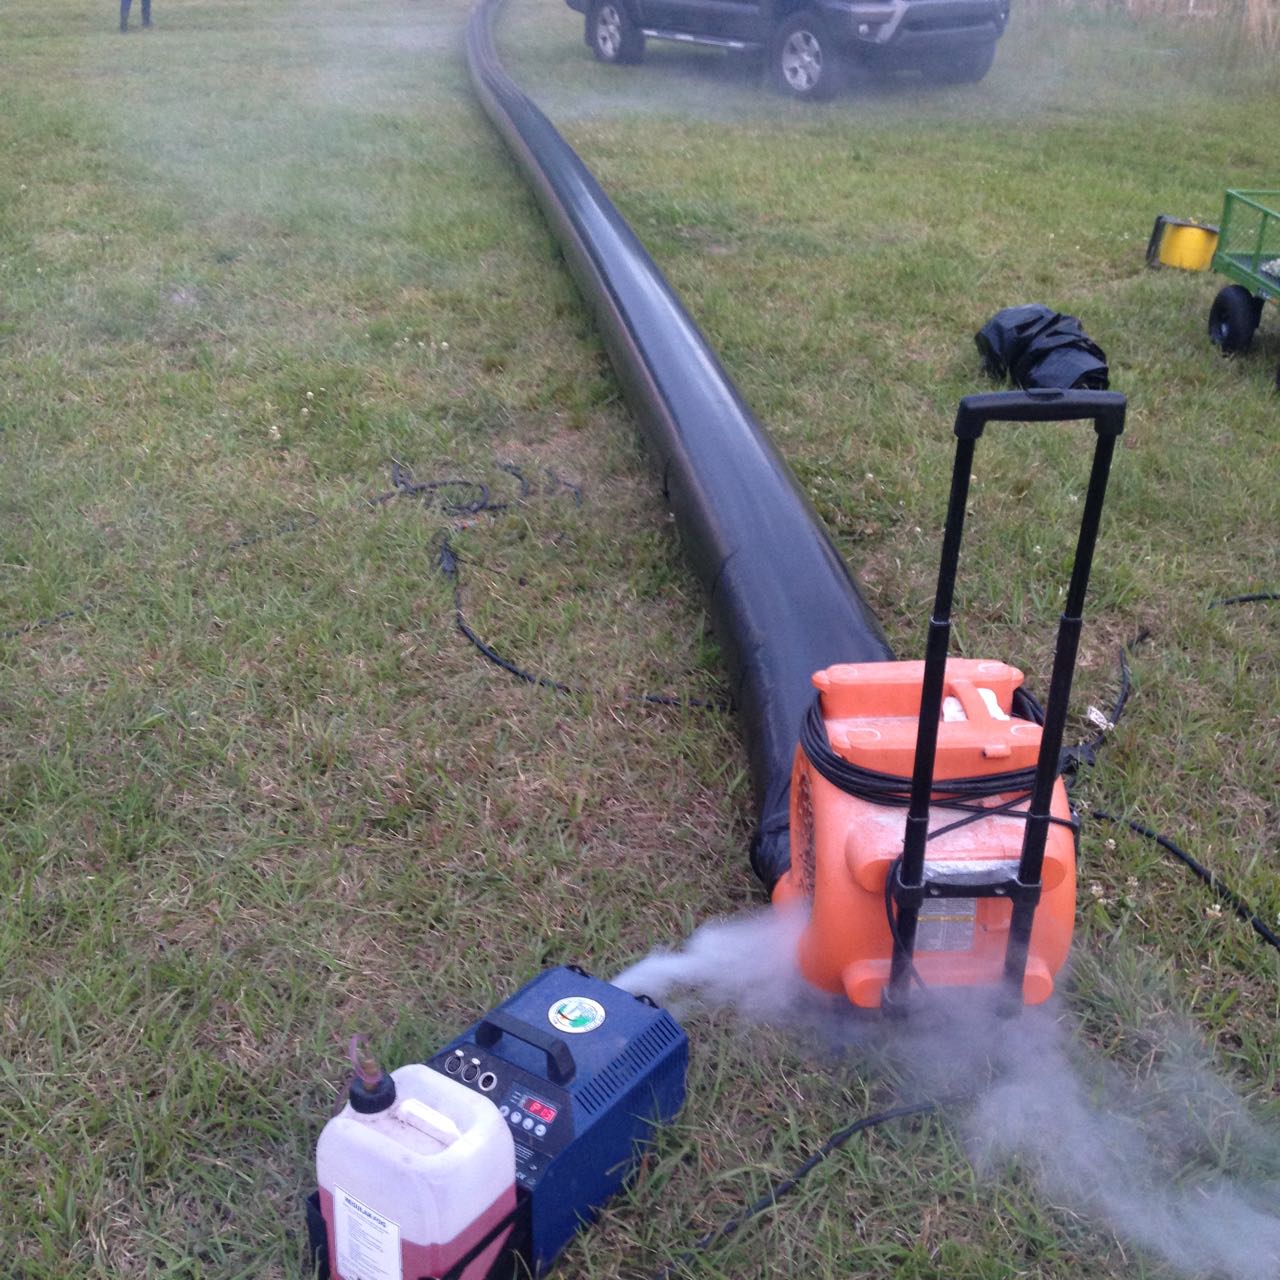
Interiors on stage, followed by night exteriors out the back of the studio. One of these is a shot of the heroes running, supposedly towards the train. It’s shot from the back of the 1st AD’s pick-up truck as we drive next to them. We have no condor today so the 12K backlight is just on a roadrunner stand, flooding out across the marsh between the lamp and the talent. With smoke it looks great, but lens flare keeps creeping in because the lamp’s not high enough.

We also shoot some Poor Man’s Process around a small set of the rear of a train car. Two lamps with branch-a-lorises in front of them, wind, smoke and shaky cameras help sell the movement.

A post shared by Neil Oseman (@neiloseman) on

Later we have a POV shot of a train screeching to a stop in front of the villain. The camera is on a dolly and the G&E team mount a 2K on there as well, to represent the train’s headlight.

Next week I’ll turn my attention to The Little Mermaid‘s smaller scenes, and discuss how the principle of lighting from the back was applied to them. Meanwhile, if you’re interested in some techniques for shooting in genuinely-moving vehicles, check out my blog from week three of Above the Clouds where we shot on Longcross Studios’ test track, and my article “Int. Car – Moving”.

“The Little Mermaid”: Boats, Trains and Automobiles

“The Little Mermaid”: Pools of Light

Although The Little Mermaid takes place mostly on dry land, there were some key scenes involving tanks and pools. These include the moment which introduces the audience to the mermaid herself, played by Poppy Drayton. Here are some extracts from my diary covering the challenges of creating a magical, fairytale look while filming in and around water.


Day 10

Today we’re inside the big top all day – actually all NIGHT. We can’t shoot during the day because too much daylight bleeds through the canvas of the tent.

We are setting up when a storm hits. The tent starts to blow about in a slightly alarming fashion, rain lashes down outside (and inside, because the tent isn’t very waterproof) and lightning flashes. We are ordered out of the tent, and I run into a waiting mini-van with Joe from art and some of the camera crew. We sit watching the rain and telling stories for half an hour before we can press on.

Setting up with a stand-in next to the mermaid tank (centre, behind the monitors). In the top right you can see the 575W HMI backlight for the tank, and below that, grip Sawyer Oubre stands ready to fake watery rippling light with a par can and a blue gel frame.

Around the wall of the tent the art department have hung canvas posters; at the suggestion of gaffer Mike Horton, we uplight these with par cans and par 38s. The design of these fixtures hasn’t changed since the 30s, so we can get away with seeing them in shot. The art dept have sourced four period spotlights which we use as background interest (they’re not powerful enough to really illuminate anything), as well as string-lights.

Ambience comes from a Maxi Brute, with just a couple of bubbles on, firing into the tent roof. After seeing a video test of various diffusers during preproduction, I asked for Moroccan Frost to be added to our consumables list, and we use it for the first time on this Maxi Brute. It gives a lovely muted orangey-pink look to the scene.

Steadicam operator Chris Lymberis. Photo: Kane Pearson

We’re shooting our mermaid for the very first time, in a tank in the circus ring. The initial plan is to fire a Source Four straight down into the water to create genuine watery rippling light, while bouncing a par can off a wobbling frame of blue gel to beef up the effect. In the end the Source Four isn’t really cutting it, so instead we rig a 575W HMI, gelled with Steel Blue, to a menace arm and fire it into the tank as toppy backlight. This Steel Blue gelled daylight source, blued up slightly further by the water itself, contrasts beautifully with the Moroccan Frost tungsten ambience which the Maxi Brutes are giving us.

In her mermaid tail and costume, Poppy Drayton looks stunning in the tank. We shoot steadicam angles and some slo-mo to get the most out of the set-up.


Day 15

The rocky pool set with two of the side-lighting Kino Flos and the 1.2K HMI backlight (centre) in place

Back on stage, and we’re shooting the rocky pool. This set was built before I even arrived in Savannah, so I’ve been waiting a long time to shoot it. It’s built almost right up to the ceiling of the studio (a former supermarket) so it’s challenging to light. The grips build four menace arms and poke two 4×4 Kinos and two 575W HMIs over the sides to cross-light the set and bring out all the texture in it. Where the set ends they put up a 20×20′ greenscreen, which we light with two Kino Flo Image 80s fitted with special chroma green tubes.

After a wide (which didn’t make the final cut), the next set-up is a 2-shot of our leads in the pool itself. We consider arming the camera out over the pool using a jib, but ultimately decide that it’s better for me to join the cast in the pool, with the camera on my shoulder in a splash bag. 2nd AC Kane Pearson joins the pool party as well, and ends up hand-bashing a monitor for me since the splash bag’s designed for a Panaflex film camera and the viewfinder doesn’t line up. I’m reminded of my frustrating splash bag experience on See Saw back in 2007, but this time at least within a few minutes I’ve found a comfortable and effective way to operate the camera, under-slinging it and allowing it to partially float so I don’t have to support the whole weight.

For this shot we’ve added our par-can-bounced-off-a-wobbling-blue-gel gag for watery light ripples, and combined with the real light ripples and the reflections of a 1.2K HMI backlight, the image looks beautiful.


Day 19

After lunch we shoot the singles for the rocky pool scene. The pool itself has been removed, and the actors sit on stools in a paddling pool, with the set behind them. The paddling pool serves two functions: it catches the water that make-up pours over the actors to make them look wet, and it reflects rippling light onto their faces. This light originates from a par can. At first it flattens out the look, then we figure out that we need to lay black fabric on the bottom of the pool. This stops the par can’s light bouncing directly, while retaining the rippling highlights off the water’s surface. (Check out my article on shooting water for more tips like this.)

The low-tech solution for the pool pick-ups

In the final edit this was all intercut with some beautiful footage by underwater DP Jordan Klein, shot both at a local diving pool in Savannah and at Weeki Wachee Springs State Park in Florida. The main unit shot another scene in the actual ocean, but I’ll cover that later in this series. In the meantime, next week I’ll reveal some of the tricks and techniques used in shooting The Little Mermaid‘s many sequences in moving vehicles.

“The Little Mermaid”: Pools of Light

“The Little Mermaid”: Circus Cinematography

‘B’ cam 2nd AC Matt Dixon preps the camera on the crane’s Scorpio remote head. Photo: Tim Gill

The biggest set on The Little Mermaid was the circus, an area the size of a football pitch which was transformed into a period spectacle. The big top and many other pieces were driven across the country from LA, and during our first week of principal photography the art department were hard at work setting it all up and dressing it.

Today’s post is about how I lit the night exterior scenes on this huge set. To that end I’m going to focus on the two biggest shots in the sequence: a tracking shot outside the big top, and the crane-up which first reveals the circus to the audience. Below, as well as my diary entries from the shoot, you’ll find a little behind-the-scenes video I grabbed on my phone for the tracking shot, and a lighting plan for the crane shot.


Day 7

The two 18K HMI fresnels rigged on the condor

A couple of daylight pick-ups today, then we start setting up for a big night scene. The camera will dolly with Cam and Elle from the exit of the big top, past candy floss and ‘healing water’ stalls where bits of dialogue will happen, and finally reveal a ferris wheel in the distance. We block while the sun’s still up, and paint in the light as night sets in. We are trying to light most of it in a way that will also work for our big crane shot reveal of the circus later in the week, because repositioning large HMIs – especially the two 18Ks we’re flying on a condor (cherry-picker) – is very time-consuming. Inevitably it doesn’t quite work out that way, and one of the 18Ks has to die for now at least.

The ferris wheel is backlit by a 12K, with a little front-light from a 5K tungsten fresnel. Cross-light on the talent comes from the working 18K and a 6K on the opposite side of frame. Nine-light Maxi Brutes illuminate the tent from inside, some of that light spilling out onto the talent, while par cans uplight a row of banners outside. A 1K baby provides edge-light to the talent in their final position. A 300W fresnel inside the healing water wagon spills out, and a bare 40W globe inside the umbrella of the candy floss stall gives us a little glow there.

The final lamp to go up is another 300W fresnel, because the directors are concerned that the ’sold out’ sign on the healing water wagon isn’t clear enough. We end up firing it in from the front because there’s no time for anything else, but as always with front-light, I deeply regret it. Ideally we would have armed it out from the roof of the wagon to rake down the side of it.

Once the supporting artists are choreographed, the shot looks great.

A post shared by Neil Oseman (@neiloseman) on


Day 9

A Nine-light Maxi Brute inside the big top

We start with a big crane shot revealing the whole circus at night. For this shot we have the following lamps burning: 2 x 18Ks (on a condor), 1 x 12K, 1 x 4K – all those are providing moonlight or starlight, with varying degrees of blue gel on them; 2 x Nine-light Maxi Brutes making the big top glow from inside; a 5K spilling some orange glow on the background; 2 or 3 smaller tungsten units spilling out light from inside the smaller tents; and lighting the foreground, a 4×4 Kino and a 1K baby bounced off unbleached muslin. There are also numerous practicals on, including the lights on the ferris wheel, the illuminated ‘circus’ sign, several par can up-lighters, and about 7KW of fairy lights. Totalling over 80KW, it is easily the biggest lighting set-up of my career. Although the grip and electrical crew is relatively small given the scale of the set-up, they handle it with aplomb.

We have rebuilt our Giraffe crane to its maximum 31ft configuration, so we can swoop up over the entrance tent, past the ’circus’ sign, and reveal the twinkling string-lights of the midway leading to the big top, and the rides beyond.

Here’s a retrospective lighting plan for this crane shot (not to scale); click to enlarge it. Note that additional tents were added in postproduction, as you can see in the trailer.

Ideally we would have had two condors, with an 18K on each, and put one of them way back behind the trees, to maintain a consistent direction of moonlight, but budget and the practicalities of the location made this impossible.

The ‘A’ camera on the dolly, with the two 18Ks on the condor in the background

One thing that was a little different to my original plan was the hard 4K edging the roofs of the midway tents on the lefthand side. This was meant to be a pair of 6Ks firing through a diffusion frame, to get a much softer, less “sourcey” look than the hard “moonlight” from the 18Ks. But unfortunately both our 6Ks were malfunctioning.

Another change was the lighting of the midway itself. We had a tungsten helium balloon on the truck, which I had planned to float above the midway to provide warm ambience. As it turned out, the practical string lights, although only 40W each, were so numerous that they provided ample illumination in the centre of the frame.

Later on in production, I was chatting to one of the ADs about this scene and he expressed surprise at how well I had handled it, given that it was so much bigger than any lighting set-up I’d previously done. Honestly it never fazed me. Lighting is entirely scaleable; the principles are identical, whether your set is a small bathroom or a football pitch. I’d done so much night exterior in my career, I’d just never had the big toys I wanted before. I’ll let you in on a secret though: the only reason I knew to ask for 18Ks and a condor was from reading American Cinematographer!

In my next post I’ll discuss shooting some of Poppy Drayton’s key scenes as the eponymous mermaid, including her introduction inside the big top. Don’t forget that The Little Mermaid is currently showing in movie theatres across the US and on Amazon in the UK.

“The Little Mermaid”: Circus Cinematography

“The Little Mermaid”: Shooting Shirley

The Little Mermaid, an independent live-action take on the Hans Christian Andersen fairytale, is now showing in cinemas across the USA. To mark the release, over the next few weeks I’ll be posting a series of articles about my cinematography of the film, using extracts from the diary I kept during production.

In this first instalment I’ll focus on the “pre-shoot”, two days of capturing the present-day scenes, undertaken a few weeks before principal photography began. For these scenes, we were all very excited to be working with bona fide Hollywood royalty in the form of Shirley MacLaine. Since debuting in the 1955 Hitchcock comedy The Trouble with Harry (and winning a Golden Globe), Shirley’s career has taken in six Oscar nominations as well as a win for Terms of Endearment, plus an AFI Life Achievement Award, two Baftas, an Emmy and several more Golden Globes.

No pressure then….


Saturday

Shirley is installed at a five-star hotel in downtown Savannah for hair, make-up and wardrobe tests. Taking it easy at the studio, I get a call from the UPM telling me that Shirley wants to meet me. Nervously I transfer my lighting reference images (including screen grabs I gathered last week from her previous movies) to my iPad and await my car.

When I get to the hotel I bump into her and the rest of the crew in the hall. Plunging straight in, I shake her hand and introduce myself as “Neil Oseman, the DP”. Evidently not hearing that last bit, and presuming I’m a PA or possibly a fan, she looks me up and down and asks me who I am. I repeat that I am the director of photography. “You’re so young!” she exclaims, laughing at her mistake.

“Well, I’ve been doing this for fifteen years,” I reply, all too aware of how short my career is compared with hers.

“Which pictures? Tell me,” she says.

Again acutely aware that my credits list isn’t going to sound very impressive to her, I mention Heretiks, and Ren: The Girl with the Mark and mutter something about doing lots of features.

To my great relief she doesn’t press the point, instead asking what I think of the wig and make-up she’s wearing. I ask her to step into the daylight, and assure her that it looks good, but that I’d like to warm up her skin tone a little with the lighting, an idea she responds well to.

Satisfied, Shirley moves on to other things, and I hang out in a meeting room at the hotel drawing storyboards, until it’s time for a production meeting.


SUNDAY

The present-day scenes were shot on Arri Alexas using Zeiss Super Speed Mark I primes and an Angenieux Optimo zoom, diffused with Tiffen Soft FX filters.

I arrive on location before even the early crew call of 8am, with my gaffer Mike Horton. His and key grip Jason Batey’s teams have rigged a dark box around the beach house’s deck/balcony so we can shoot day-for-night interiors.

At 10am Shirley arrives, blocks the scene, then goes off to hair and makeup. We’re starting with close-ups of her, so the grip and electric teams come in and build a book light. (This is a V-shaped arrangement of bounce and diffusion material, resembling an open book, which greatly softens the light fired into it.) When we start to turn over and Shirley watches playback, I’m gratified to find she is very happy with how she looks on camera. We shoot out all her close-ups, then bring in the little girls playing opposite her and block the wide shots.

In the lefthand foreground here is the 2K source for the book light. In the top right you can see the diffusion frame it’s firing through, and you can just make out the poly or rag we attached to the wall to bounce the light back onto Shirley (in the white nightgown). The net in the upper centre is cutting some light off the background. The camera can just be seen on the right of the photo.

As time begins to crunch, I fall back on cross-backlighting as a quick no-brainer solution to get the wide shot looking good. It’s so important to have these lighting templates up your sleeve when the pressure’s on. (Later on in this blog series I’ll discuss the use of cross-backlighting in several other scenes in the movie.)

For a little while it looks like we might not make the day, but I suggest a way to maximise the beautiful beach view at twilight and get the story beats covered in one two-camera set-up. The shot feels like something out of a classic old movie. Shirley MacLaine walking off into the sunset! Everyone loves how it looks, including Shirley. The praise of an actor as experienced as her is high praise indeed, and it makes my day!


Monday

At the monitors with producer Rob Molloy. Photo: Brooks Patrick Allen

We start lighting for our “sunset” scene, which involves firing a pink-gelled 6K through the window and netting the background to get some highlight detail into it. Rather than a book light, this time I use a diffused 4×4 Kino Flo as Shirley’s key. I take a risk and place it further off to the side to get a bit more shape into the light.

Shirley enters, takes one glance at the lighting and remarks, “So, you like this cross-light, huh?”

Busted!

We compromise by adding a little fill from a reflector which Shirley positions herself before each take. Her awareness of how she’s being photographed is astounding. She knows more about lighting than some DPs I’ve met!

Looking at the scenes now, I realise that a large white horizontal reflector in front of Shirley would have been perfect to simulate bounce off the bed, which we moved out when we were shooting the close-ups. Hindsight is 20/20, but I’m still pleased with how it turned out.

Next week I’ll break down the huge lighting set-up required for the night exterior circus scenes.

“The Little Mermaid”: Shooting Shirley

6 Tips for Making DIY Lighting Look Pro

Good lighting can boost the production values of a film tremendously, making the difference between an amateur and a professional-looking piece. For filmmakers early in their careers, however, the equipment typically used to achieve these results can be prohibitively expensive. Far from the Hollywood productions attended by trucks full of lights, a micro-budget film may be unable to rent even a single HMI. Do not despair though, as there are ways to light scenes well without breaking the bank. Here are my top six tips for lighting on the cheap.


1. Make the most of natural light

Checking my compass at the stone circle
Guesstimating the sun path on location

The hardest shots to light without the proper equipment are wide shots. Where a fully-budgeted production would rig Maxi Brutes on cherry-pickers, or pound HMIs through windows, a filmmaker of limited means simply won’t have access to the raw power of such fixtures. Instead, plan your day carefully to capture the wide shots at the time when natural light gives you the most assistance. For a day interior, this means shooting when the sun is on the correct side of the building.

See also: “Sun Paths”


2. Keep L.E.D.s to the background

£2 LED camping light

There are a plethora of LED fixtures on the market, designed for all kinds of applications, some of them very reasonably priced. It might be tempting to purchase some of these to provide your primary illumination, but I advise against it. Cheap LED units (and fluorescents) have a terrible Colour Rendering Index (CRI), making for unnatural and unappealing skintones. Such units are therefore best restricted to backgrounds, accent lighting and “specials”. For example, I purchased a little LED camping light from a charity shop for about £2, and I often use it to create the blue glow from computer screens or hang it from the ceiling to produce a hint of hair-light.

See also my article on LEDs from my “Know Your Lights” series.


3. Key with tungsten or halogen

Worklight
Halogen floodlight

By far the best solution for a high output, high CRI, low cost key is a halogen floodlight; 500W models are available for as little as £5. Their chief disadvantage is the lack of barn doors, making the light hard to control, though if you can stretch to a roll of black wrap you can fashion a kind of snoot. Alternatively, consider investing in a secondhand tungsten movie fixture. With many people switching to LEDs, there are plenty of old tungsten units out there. Try to get a reputable brand like Arri or Ianiro, as some of the unbranded units available on Ebay are poorly wired and can be unsafe.

See also: “DIY Interview Lighting for the ‘Ren’ EPK”


4. Control the light

Lace curtains used to break up light in a Camerimage workshop last year

Flooding a halogen light onto a scene is never going to look good, but then the same is often true of dedicated movie fixtures. Instead it’s more how you modify the light that creates the nuanced, professional look. Improvise flags from pieces of cardboard to stop the light spilling into unwanted places – but be VERY careful how close you put them to a tungsten or halogen source, as these get extremely hot. For example, when shooting indoors, flag light off the background wall (especially if it’s white or cream) to help your subject stand out.

See also “Lighting Micro-sets” for an example of this.


5. Soften the light

Almost all cinematographers today prefer the subtlety of soft light to the harshness of hard light. You can achieve this by bouncing your fixture off a wall or ceiling, or a sheet of polystyrene or card. Or you could hang a white bedsheet or a shower curtain in front of the light as diffusion, but again be sure to leave a safe distance between them. Professional collapsible reflectors are available very cheaply online, and can be used in multiple ways to diffuse or reflect light.

Hot tub cover = bounce board
Hot tub cover = bounce board. Towel = flag

See also: “How to Soften Harsh Sunlight with Tinfoil and a Bedsheet”; and to read more about the pictured example: “Always Know Where Your Towel Is”


6. Make use of practicals

Black-wrapped ceiling light

Finally, don’t be afraid to use existing practical lighting in your scene. Turning on the main overhead light usually kills the mood, but sometimes it can be useful. You can generate more contrast and shape by covering up the top of the lampshade, thus preventing ceiling bounce, or conversely use the ceiling bounce to give some ambient top-light and cover the bottom of the lampshade to prevent a harsh hotspot underneath it. Table lamps and under-cupboard kitchen lights can add a lot of interest and production value to your backgrounds. If possible, swap out LED or fluorescent bulbs for conventional tungsten ones for a more attractive colour and to eliminate potential flickering on camera.

See also: “5 Tips for Working with Practicals”, and for an example of the above techniques, my blog from day two of the Forever Alone shoot.

6 Tips for Making DIY Lighting Look Pro

What Does “Cinematic” Mean?

Earlier this year I undertook a personal photography project called Stasis. I deliberately set out to do something different to my cinematography work, shooting in portrait, taking the paintings of Dutch seventeenth century masters as my inspiration, and eschewing traditional lighting fixtures in favour of practical sources. I was therefore a little disappointed when I began showing the images to people and they described them as “cinematic”.

An image from “Stasis”

This experience made me wonder just what people mean by that word, “cinematic”. It’s a term I’ve heard – and used myself – many times during my career. We all seem to have some vague idea of what it means, but few of us are able to define it. 

Dictionaries are not much help either, with the Oxford English Dictionary defining it simply as “relating to the cinema” or “having qualities characteristic of films”. But what exactly are those qualities?

Shallow depth of field is certainly a quality that has been widely described as cinematic. Until the late noughties, shallow focus was the preserve of “proper” movies. The size of a 35mm frame (or of the digital cinema sensors which were then emerging) meant that backgrounds could be thrown way out of focus while the subject remained crisp and sharp. The formats which lower-budget productions had thereto been shot on – 2/3” CCDs and Super-16 film – could not achieve such an effect. 

Then the DSLR revolution happened, putting sensors as big as – or bigger than – those of Hollywood movies into the hands of anyone with a few hundred pounds to spare. Suddenly everyone could get that “cinematic” depth of field. 

My first time utilising the shallow depth of field of a DSLR, on a never-completed feature back in 2011.

Before long, of course, ultra-shallow depth of field became more indicative of a low-budget production trying desperately to look bigger than of something truly cinematic. Gradually young cinematographers started to realise that their idols chose depth of field for storytelling reasons, rather than simply using it because they could. Douglas Slocombe, OBE, BSC, ASC, cinematographer of the original Indiana Jones trilogy, was renowned for his deep depth of field, typically shooting at around T5.6, while Janusz Kaminski, ASC, when shooting Kingdom of the Crystal Skull, stopped down as far as T11.

There was also a time when progressive scan – the recording of discrete frames rather than alternately odd and even horizontal lines to make an interlaced image – was considered cinematic. Now it is standard in most types of production, although deviations from the norm of 24 or 25 frames per second, such as the high frame rate of The Hobbit, still make audiences think of reality TV or news, rejecting it as “uncinematic”.

Other distinctions in shooting style between TV/low-budget film and big-budget film have slipped away too. The grip equipment that enables “cinematic” camera movement – cranes, Steadicams and other stabilisers – is accessible now in some form to most productions. Meanwhile the multi-camera shooting which was once the preserve of TV, looked down upon by filmmakers, has spread into movie production.

A direct comparison may help us drill to the core of what is “cinematic”. Star Trek: Generations, the seventh instalment in the sci-fi film franchise, went into production in spring 1994, immediately after the final TV season of Star Trek: The Next Generation wrapped. The movie shot on the same sets, with the same cast and even the same acquisition format (35mm film) as the TV series. It was directed by David Carson, who had helmed several episodes of the TV series, and whose CV contained no features at that point.

Yet despite all these constants, Star Trek: Generations is more cinematic than the TV series which spawned it. The difference lies with the cinematographer, John A. Alonzo, ASC, one of the few major crew members who had not worked on the TV show, and whose experience was predominantly in features. I suspect he was hired specifically to ensure that Generations looked like a movie, not like TV.

The main thing that stands out to me when comparing the film and the series is the level of contrast in the images. The movie is clearly darker and moodier than the TV show. In fact I can remember my schoolfriend Chris remarking on this at the time – something along the lines of, “Now it’s a movie, they’re in space but they can only afford one 40W bulb to light the ship.” 

The bridge of the Enterprise D as seen on TV (top) and in the “Generations” movie (bottom).

It was a distinction borne of technical limitations. Cathode ray tube TVs could only handle a dynamic range of a few stops, requiring lighting with low contrast ratios, while a projected 35mm print could reproduce much more subtlety. 

Today, film and TV is shot on the same equipment, and both are viewed on a range of devices which are all good at dealing with contrast (at least compared with CRTs). The result is that, with contrast as with depth of field, camera movement and progressive scan, the distinction between the cinematic and the uncinematic has reduced. 

The cinematography of “Better Call Saul” owes much to film noir.

In fact, I’d argue that it’s flipped around. To my eye, many of today’s TV series – and admittedly I’m thinking of high-end ones like The Crown, Better Call Saul or The Man in the High Castle, not Eastenders – look more cinematic than modern movies. 

As my friend Chris had realised, the flat, high-key look of Star Trek: The Next Generation was actually far more realistic than that of its cinema counterpart. And now movies seem to have moved towards realism in the lighting, which is less showy and not so much moody for the sake of being moody, while TV has become more daring and stylised.

A typically moody and contrasty shot from “The Crown”

The Crown, for examples, blasts a 50KW Soft Sun through the window in almost every scene, bathing the monarchy in divine light to match its supposed divine right, while Better Call Saul paints huge swathes of rich, impenetrable black across the screen to represent the rotten soul of its antihero. 

Film lighting today seems to strive for naturalism in the most part. Top DPs like recent Oscar-winner Roger Deakins, CBE, ASC, BSC,  talk about relying heavily on practicals and using fewer movie fixtures, and fellow nominee Rachel Morrison, ASC, despite using a lot of movie fixtures, goes to great lengths to make the result look unlit. Could it be that film DPs feel they can be more subtle in the controlled darkness of a cinema, while TV DPs choose extremes to make their vision clear no matter what device it’s viewed on or how much ambient light contaminates it?

“Mudbound”, shot by Rachel Morrison, ASC

Whatever the reason, contrast does seem to be the key to a cinematic look. Even though that look may no longer be exclusive to movies released in cinemas, the perception of high contrast being linked to production value persists. The high contrast of the practically-lit scenes in my Stasis project is – as best I can tell – what makes people describe it as cinematic.

What does all of this mean for a filmmaker? Simply pumping up the contrast in the grade is not the answer. Contrast should be built into the lighting, and used to reveal and enhance form and depth. The importance of good production design, or at least good locations, should not be overlooked; shooting in a friend’s white-walled flat will kill your contrast and your cinematic look stone dead. 

A shot of mine from “Forever Alone”, a short film where I was struggling to get a cinematic look out of the white-walled location.

Above all, remember that story – and telling that story in the most visually appropriate way – is the essence of cinema. In the end, that is what makes a film truly cinematic.

SaveSave

What Does “Cinematic” Mean?

The Science of Smoke

Smoke, haze, atmos, whatever you want to call it, anyone who knows me knows that I’m a big fan. But how does it work and what is the purpose of smoking up a set?


Aerial perspective

At the most basic level, smoke simulates a natural phenomenon called aerial perspective. If you look at – for example – a range of mountains receding into the distance, the further mountains will appear bluer, lighter, less contrasty and less colour-saturated than the nearer mountains.

An example of aerial perspective

This effect is due to light being scattered by particles naturally suspended in the air, and by molecules of the air itself. It is described by the scary-looking Rayleigh Equation:

We don’t need to get into what all the variables stand for, but there are a couple of things worth noting:

  • The symbol on the far right represents the angle between the incident light and the scattered light. In practice this means that the more you shoot into the sun – the more the air you’re photographing is backlit – the more scattering there will be. Place the sun behind your camera and scattering will be minimal.
  • Lamda (the sort of upside-down y next to the x) is the wavelength of the light, so the shorter the wavelength, the more scattering. This is why things look bluer with distance: blue light has a shorter wavelength and so is scattered more. It’s also why shooting through an ultraviolet filter reduces the appearance of aerial perspective/atmospheric haze.


How smoke works

An Artem smoke gun

Foggers, hazers and smoke machines simulate aerial perspective by adding suspended particles to the air. These particles start off as smoke fluid (a.k.a. “fog juice”) which is made of mineral oil, or of a combination of water and glycol/glycerin.

In a smoke machine or gas-powered smoke gun (like the Artem), smoke fluid is pushed into a heat exchanger which vaporises it. When the vapour makes contact with the colder air, it condenses to form fog.

A hazer uses compression rather than heat to vaporise the fluid, meaning you don’t have to wait for the machine to heat up. The particles are smaller, making for a more subtle and longer-lasting effect.

As a general rule, you should use only hazers for interior cinematography, unless there is a story reason for smoke to be present in the scene. Outdoors, however, hazers are ineffective. An Artem or two will work well for smaller exterior scenes; for larger ones, a Tube of Death is the best solution. This is a long, plastic inflatable tube with regularly-spaced holes, with a fan and a smoke machine (usually electric) at the end. It ensures that smoke is distributed fairly evenly over a large area.

A Tube of Death in action on the set of “The Little Mermaid”


The effects of smoke

Just like aerial perspective, smoke/haze separates the background from the foreground, as the background has more smoke between it and the camera. The background becomes brighter, less contrasty, less saturated and (depending on the type of smoke) bluer, making the foreground stand out against it.

Since smoke also obeys the Rayleigh Equation, it shows up best when it’s backlit, a bit when it’s side-lit and barely at all when front-lit.

Here are some of the other things that smoke achieves:

  • It diffuses the image, particularly things further away from camera.
  • It lowers contrast.
  • It brightens the image.
  • It lifts the shadows by scattering light into them.
  • If it’s sufficiently thick, and particularly if it’s smoke rather than haze, it adds movement and texture to the image, which helps to make sets look less fake.
  • It volumises the light, showing up clear shafts of hard light and diffuse pools of soft light. (For more on this, read 5 Tips for Perfect Shafts of Light.)
  • Backlit smoke in front of a person or an object will obscure them, concealing identity.
Heavy smoke (from an Artem) pops Lyanna (Dita Tantang) out of the background in “Ren: The Girl with the Mark” (dir. Kate Madison).
Backlit smoke through a roof of branches creates magical shafts of light in “Ren: The Girl with the Mark”.
The final day/sunset look. From each side an orange-gelled and a pink-gelled par can light the backdrop. A 2K tungsten fresnel provides backlight, while a 650W fresnel with a cucoloris provides dappled light on the tree and tarsier. An LED panel off right supplies fill, and a second panel is inside the cave with a turquoise gel.
The colour-washed infinity cove in the background of this music promo for Lewis Watson’s “Droplets” (dir. Tom Walsh) is softened and disguised by smoke.
Haze gives the LED panels their glowing appearance in this video for “X, Y & Z Rays” (dir. Tom Walsh) by Revenge of Calculon.
This torch beam in “Above the Clouds” (dir. Leon Chambers) shows up so well because the set is heavily fogged.
Smoke backlit by an HMI creates the blue background glow against which the heroes of “The First Musketeer” (dir. Harriet Sams) stand out.
Haze creates the shafts of light from HMIs outside the windows, and adds to the gothic feel of “Heretiks” (dir. Paul Hyett).
The Science of Smoke

Pinhole Results

In my last couple of posts I described making and shooting with a pinhole attachment for my 35mm Pentax P30t SLR. Well, the scans are now back from the lab and I’m very pleased with them. They were shot on Fujifilm Superia Xtra 400.

As suspected, the 0.7mm pinhole was far too big, and the results are super-blurry:

See how contemptuous Spike is of this image. Or maybe that’s just Resting Cat Face.

The 0.125mm hole produced much better results, as you can see below. My f/stop calculations (f/365) seem to have been pretty close to the mark, although, as is often the case with film, the occasions where I gave it an extra stop of exposure produced even richer images. Exposure times for these varied between 2 and 16 seconds. Click to see them at higher resolution.

I love the ethereal, haunting quality of all these pictures, which recalls the fragility of Victorian photographs. It’s given me several ideas for new photography projects…

SaveSave

Pinhole Results

Adventures with a Pinhole

Last week I discussed making a pinhole for my Pentax 35mm SLR. Since then I’ve made a second pinhole and shot a roll of Fujifilm Superia X-tra 400 with them. Although I haven’t had the film processed yet, so the quality of the images is still a mystery, I’ve found shooting with a pinhole to be a really useful exercise.

My Pentax P30T fitted with a 0.125mm pinhole attachment


A Smaller Pinhole

Soon after my previous post, I went out into the back garden and took ten exposures of the pond and the neighbour’s cat with the 0.7mm pinhole. By that point I had decided that the hole was almost certainly too big. As I noted last week, Mr Pinhole gives an optimal diameter of 0.284mm for my camera. Besides that, the (incredibly dark) images in my viewfinder were very blurry, a sign that the hole needed to be smaller.

Scans of my two pinholes

So I peeled the piece of black wrap with the 0.7mm pinhole off my drilled body cap and replaced it with another hole measuring about 0.125mm. I had actually made this smaller hole first but rejected it because absolutely nothing was visible through the viewfinder, except for a bit of a blur in the centre. But now I came to accept that I would have to shoot blind if I wanted my images to be anything approaching sharp.

The 0.125mm(ish) pinhole magnified in Photoshop

I had made the 0.125mm hole by tapping the black wrap with only the very tip of the needle, rather than pushing it fully through. Prior to taping it into the body cap, I scanned it at high resolution and measured it using Photoshop. This revealed that it’s a very irregular shape, which probably means the images will still be pretty soft. Unfortunately I couldn’t see a way of getting it any more circular; sanding didn’t seem to help.

Again I found the f-stop of the pinhole by dividing the flange focal distance (45.65mm) by the hole diameter, the result being about f/365. My incident-light meter only goes up to f/90, so I needed to figure out how many stops away from f/365 that is. I’m used to working in the f/1.4-f/22 range, so I wasn’t familiar with how the stop series progresses above f/90. Turns out that you can just multiply by 1.4 to roughly find the next stop up, so after f/90 it’s 128, then 180, then 256, then 358, pretty close to my f/365 pinhole. So whatever reading my meter gave me for f/90, I knew that I would need to add 4 stops of exposure, i.e. multiply the shutter interval by 16. (Stops are a base 2 logarithmic scale. See my article on f-stops, T-stops and ND filters for more info.)


The Freedom of Pinhole Shooting

I’ve just spent a pleasant hour or so in the garden shooting the remaining 26 exposures on my roll with the new 0.125mm pinhole. Regardless of how the photos come out, I found it a fun and fascinating exercise.

Knowing that the images would be soft made me concentrate on colour and form far more than I normally would. Not being able to frame using the viewfinder forced me to visualise the composition mentally. And as someone who finds traditional SLRs very tricky to focus, it was incredibly freeing not to have to worry about that, not to have to squint through the viewfinder at all, but just plonk the camera down where it looked right and squeeze the shutter.

Of course, before squeezing the shutter I needed to take incident-light readings, because the TTL (through the lens) meter was doing nothing but flash “underexposed” at me. Being able to rely solely on an incident meter to judge exposure is a very useful skill for a DP, so this was great practice. I’ve been reading a lot about Ansel Adams and the Zone System lately, and although this requires a spot reflectance meter to be implemented properly, I tried to follow Adams’ philosophy, visualising how I wanted the subject’s tones to correspond to the eventual print tones. (Expect an article about the Zone System in the not-too-distant future!)


D.I.Y. pinhole Camera

On Tuesday night I went along to a meeting of Cambridge Darkroom, the local camera club. By coincidence, this month’s subject was pinhole cameras. Using online plans, Rich Etteridge had made up kits for us to construct our own complete pinhole cameras in groups. I teamed up with a philosophy student called Tim, and we glued a contraption together in the finest Blue Peter style. The actual pinholes were made in metal squares cut from Foster’s cans, which are apparently something Rich has in abundance.

DIY pinhole camera

I have to be honest though: I’m quite scared of trying to use it. Look at those dowels. Can I really see any outcome of attempting to load this camera other than a heap of fogged film on the floor? No. I think I’ll stick with my actual professionally-made camera body for now. If the pinhole photos I took with that come out alright, then maaaaaaybe I’ll consider lowering the tech level further and trying out my Blue Peter camera. Either way, big thanks to Rich for taking all that time to produce the kits and talk us through the construction.

Watch this space to find out how my pinhole images come out.

SaveSave

Adventures with a Pinhole

Making a Pinhole Attachment for an SLR

Last autumn, after a few years away from it, I got back into 35mm stills photography. I’ve been reading a lot of books about photography: the art of it, the science and the history too. I’ve even taken a darkroom course to learn how to process and print my own black and white photos.

Shooting stills in my spare time gives me more opportunities to develop my eye for composition, my exposure-judging skills and my appreciation of natural light. Beyond that, I’ve discovered interesting parallels between electronic and photochemical imaging which enhance my understanding of both.

For example, I used to think of changing the ISO on a digital camera as analogous to loading a different film stock into a traditional camera. However, I’ve come to realise it’s more like changing the development time – it’s an after-the-fact adjustment to an already-captured (latent) image. There’s more detail on this analogy in my ISO article at Red Shark News.

The importance of rating an entire roll of film at the same exposure index, as it must all be developed for the same length of time, also has resonance in the digital world. Maintaining a consistency of exposure (or the same LUT) throughout a scene or sequence is important in digital filmmaking because it makes the dailies more watchable and reduces the amount of micro-correction which the colourist has to do down the line.

Anyway, this is all a roundabout way of explaining why I decided to make a pinhole attachment for my SLR this week. It’s partly curiosity, partly to increase my understanding of image-making from first principles.

The pinhole camera is the simplest image-making device possible. Because light rays travel in straight lines, when they pass through a very small hole they emerge from the opposite side in exactly the same arrangement, only upside-down, and thus form an image on a flat surface on the other side. Make that flat surface a sheet of film or a digital sensor and you can capture this image.


How to make a pinhole attachment

I used Experimental Filmmaking: Break the Machine by Kathryn Ramey as my guide, but it’s really pretty straightforward.

You will need:

  • an extra body cap for your camera,
  • a drill,
  • a small piece of smooth, non-crumpled black wrap, or kitchen foil painted black,
  • scissors,
  • gaffer tape (of course), and
  • a needle or pin.

Instructions:

  1. Drill a hole in the centre of the body cap. The size of the hole is unimportant.
  2. Use the pin or needle to pierce a hole in the black wrap, at least a couple of centimetres from the edge.
  3. Cut out a rough circle of the black wrap, with the pinhole in the middle. This circle needs to fit on the inside of the body cap, with the pinhole in the centre of the drilled hole.
  4. Use the gaffer tape to fix the black wrap tightly to the inside of the body cap.
  5. Fit the body cap to your camera.

The smaller the pinhole is, the sharper the image will be, but the darker too. The first pinhole I made was about 0.1-0.2mm in diameter, but when I fitted it to my camera and looked through the viewfinder I could hardly make anything out at all. So I made a second one, this time pushing the pin properly through the black wrap, rather than just pricking it with the tip. (Minds out of the gutter, please.) The new hole was about 0.7mm but still produced an incredibly dark image in the viewfinder.


Exposing a pinhole image

If you’re using a digital camera, you can of course judge your exposure off the live-view screen. Things are a little more complicated if, like me, you’re shooting on film.

In theory the TTL (through the lens) light meter should give me just as reliable a reading as it would with a lens. The problem is that, even with the shutter set to 1 second, and ISO 400 Fujifilm Super X-tra loaded, the meter tells me I’m underexposed. Admittedly the weather has been overcast since I made the pinhole yesterday, so I may get a useful reading when the sun decides to come out again.

Failing that, I can use my handheld incident-light meter to determine the exposure…. once I’ve worked out what the f-stop of my pinhole is.

As I described in my article on aperture settings, the definition of an f-stop is: the ratio of the focal length to the aperture diameter. We’re all used to using lenses that have a clearly defined and marked focal length, but what is the focal length in a pinhole system?

The definition of focal length is the distance between the point where the light rays focus (i.e. converge to a point) and the image plane. So the focal length of a pinhole camera is very simply the distance from the pinhole itself to the film or digital sensor. Since my pinhole is more or less level with the top of the lens mount, the focal length is going to be approximately equal to the camera’s flange focal distance (defined as the distance between the lens mount and the image plane). According to Wikipedia, the flange focal distance for a Pentax K-mount camera is 45.46mm.

So the f-stop of my 0.7mm pinhole is f/64, because 45.64 ÷ 0.7 ≈ 64. Conveniently, f/64 is the highest stop my light meter will handle.

The website Mr Pinhole has a calculator to help you figure this sort of stuff out, and it even tells you the optimal pinhole diameter for your focal length. Apparently this is 0.284mm in my case, so my images are likely to be quite soft.

Anyway, when the sun comes out I’ll take some pictures and let you know how I get on!

Making a Pinhole Attachment for an SLR